
Apache Tomcat software is a Java-based HTTP server that can run Java technologies like Java Servlet, JavaServer Pages (JSP), and Java Expression Language. The advanced built-in customization options, high flexibility, and impressive stability make the software highly in-demand and a popular pick among developers globally. Let’s see what makes Apache Tomcat stand out among competitors:
-
Open-Source
Apache Tomcat is an open-source application. That means anyone can download, install and use the app free of cost.
-
Lightweight
The lightweight feature counts as an added advantage when loading and redeployments as compared to competitors.
-
Flexibility
The built-in customization option allows the user to customize the app to their liking based on their needs and project requirements.
-
Advanced Security
Tomcat applications also offer an advanced level of security.
Since its first release in 1998, the Apache Software Foundation has made incredible changes. As a result, the recent release is more stable than ever before. In this tutorial, you will learn how to install Apache Tomcat 9 on Ubuntu 20.04.
Prerequisites
Before we go ahead with installing Apache Tomcat on your Ubuntu system, make sure you have the following:
- An Ubuntu server- you can follow the steps to set up your server from our tutorial.
- A non-root user with sudo privileges set up on your server.
You are all set now. Next, keep following the steps below to install Apache Tomcat on Ubuntu 20.04
Step 1 — Install Java
First, verify if Java is already installed in your system using the command:
|
1 |
java -version |

If Java is not installed in your system, then you need to install it in order to execute Java-based applications. You can install the Java Development Kit using the following command:
|
1 |
sudo apt install default-jre |

Once the installation is complete, verify using the command:
|
1 |
java -version |

Once the installation is complete, it’s time to create a tomcat user account. For security purposes, it is advisable to run Tomcat with non-root privileges. Remember, if any of the page scripts have root privileges, you can easily modify the hard disk file completely with the page scripts. Next, we will create a new user and group that will run the Tomcat services.
Step 2 – Create & Set-Up Tomcat User
We will create a new user and group that will use all the Tomcat services. We will name the new group tomcat using the following command:
|
1 |
sudo groupadd tomcat |
After creating a group name, we will create a new tomcat user and then add the user to the group tomcat:
- Create a new tomcat user.
- Add the user membership to the tomcat group.
When adding the user to the tomcat group, make sure to keep it confidential, so that no one can access your tomcat account. For security concerns, keep the user in the home directory where we are going to install tomcat ( /opt/tomcat) and add a shell /bin/false:
|
1 |
sudo useradd -s /bin/false -g tomcat -d /opt/tomcat tomcat |
Once our account setup is complete, let’s move forward and install Tomcat:

Step 3 – Install Tomcat
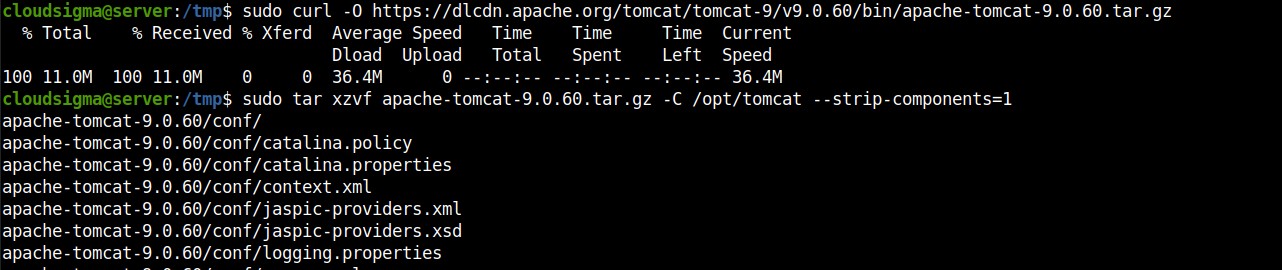
We are going to install Tomcat from Tomcat’s official website. To harness its full potential, download the latest version. To upgrade to the most stable version available, go to the Binary Distributions section, scroll over to the Core list, and then copy the link to the “tar.gz”. Once done, change the directory to /tmp:
|
1 |
cd /tmp |
Next, using the curl command, download Tomcat from the official website as stated above:
|
1 |
sudo curl -O https://dlcdn.apache.org/tomcat/tomcat-9/v9.0.60/bin/apache-tomcat-9.0.60.tar.gz |
Let’s install Tomcat under the /opt/tomcat directory. After creating the directory, extract the archive using the following command:
|
1 2 |
sudo mkdir /opt/tomcat sudo tar xzvf apache-tomcat-9.0.60.tar.gz -C /opt/tomcat --strip-components=1 |
Step 4 – Update Permissions
After installing Tomcat in your system, you need to set permissions for the newly created tomcat user. Use the following command to change to the directory where we unpacked the Tomcat installation:
|
1 |
cd /opt/tomcat |
Next, permit the tomcat group ownership over the entire installation directory:
|
1 2 3 |
sudo chgrp -R tomcat /opt/tomcat sudo chmod -R g+r conf sudo chmod g+x conf |
Once done, make the tomcat user the owner of the webapps, work, temp, and logs directories:
|
1 |
sudo chown -R tomcat webapps/ work/ temp/ logs |

After setting up all the required permissions, the next step is to create a systemd service file to manage the Tomcat process and to run Tomcat as a service.
Step 5 – Create a systemd Unit File
Although we are done with installing Java, Tomcat needs to know where Java is installed. To know the Java installation location run the following command:
|
1 |
sudo update-java-alternatives -l |
The output should look like this:
![]()
The highlighted part is JAVA_Home as shown below:
|
1 |
/usr/lib/jvm/java-1.11.0-openjdk-amd64 |
Next, we will create a systemd service file. Open a file named tomcat.service from the directory /etc/systemd/system using the following command:
|
1 |
sudo nano /etc/systemd/system/tomcat.service |
Use VI editor to edit the file and modify the JAVA_Home by your JAVA_Home location:
|
1 2 3 4 5 6 7 8 9 10 11 12 13 14 15 16 17 18 19 20 |
[Unit] Description=Apache Tomcat Web Application Container After=network.target [Service] Type=forking Environment=JAVA_HOME=/usr/lib/jvm/java-1.11.0-openjdk-amd6 Environment=CATALINA_PID=/opt/tomcat/temp/tomcat.pid Environment=CATALINA_HOME=/opt/tomcat Environment=CATALINA_BASE=/opt/tomcat Environment='CATALINA_OPTS=-Xms512M -Xmx1024M -server -XX:+UseParallelGC' Environment='JAVA_OPTS=-Djava.awt.headless=true -Djava.security.egd=file:/dev/./urandom' ExecStart=/opt/tomcat/bin/startup.sh ExecStop=/opt/tomcat/bin/shutdown.sh User=tomcat Group=tomcat UMask=0007 RestartSec=10 Restart=always [Install] WantedBy=multi-user.target |
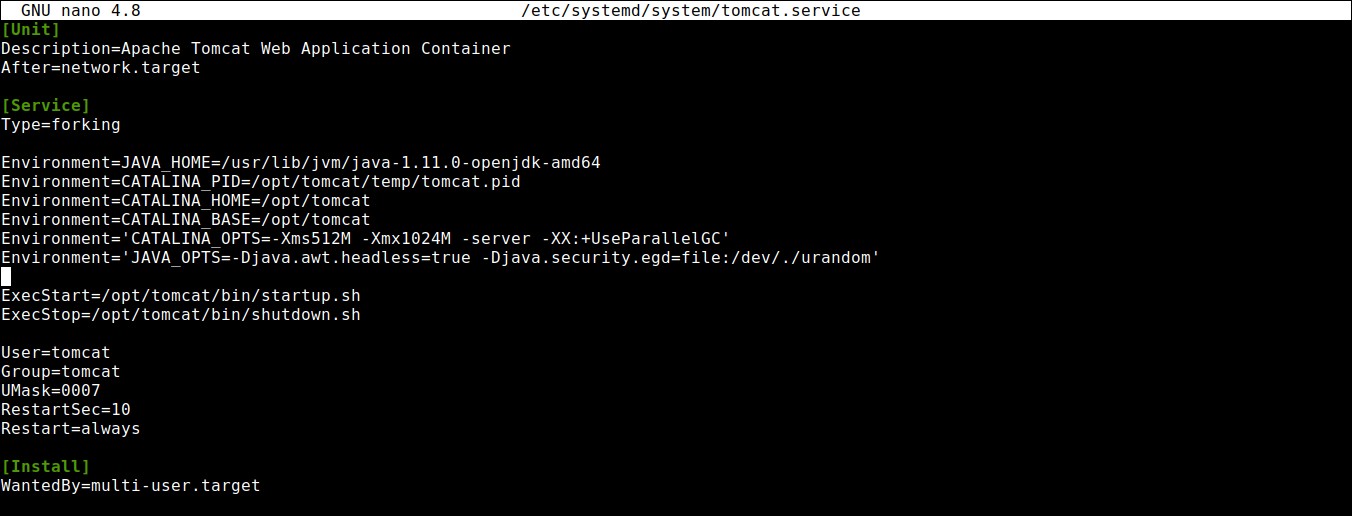
After adding JAVA_Home, save and close the file. Next, reload the systemd daemon so that it knows about our service file:
|
1 |
sudo systemctl daemon-reload |
Next, start the Tomcat service using the following command:
|
1 |
sudo systemctl start tomcat |
Step 6 – Firewall Configuration
After creating the systemd unit file, it’s time to configure the firewalls. Firewall configurations are essential in enabling our requests and access to the Tomcat service. If you have correctly followed the guide, then it’s certain that you already have a ufw firewall enabled.
Tomcat uses the port 8080 to accept conventional requests. Allow traffic to that port using the command:
|
1 |
sudo ufw allow 8080 |

The modified firewall enables you to access the default splash page in the IP address followed by :8080. You can open in a web browser by going to the IP as shown below:
|
1 |
http://server_domain_or_IP:8080 |
|
1 |
sudo ufw allow 8080 |
Step 7 — Tomcat Web Management Interface Configuration
To use the manager web app that comes with Tomcat, we have to add a login to our Tomcat server. We can do that by editing the tomcat-users.xml file as shown below:
|
1 |
sudo nano /opt/tomcat/conf/tomcat-users.xml |
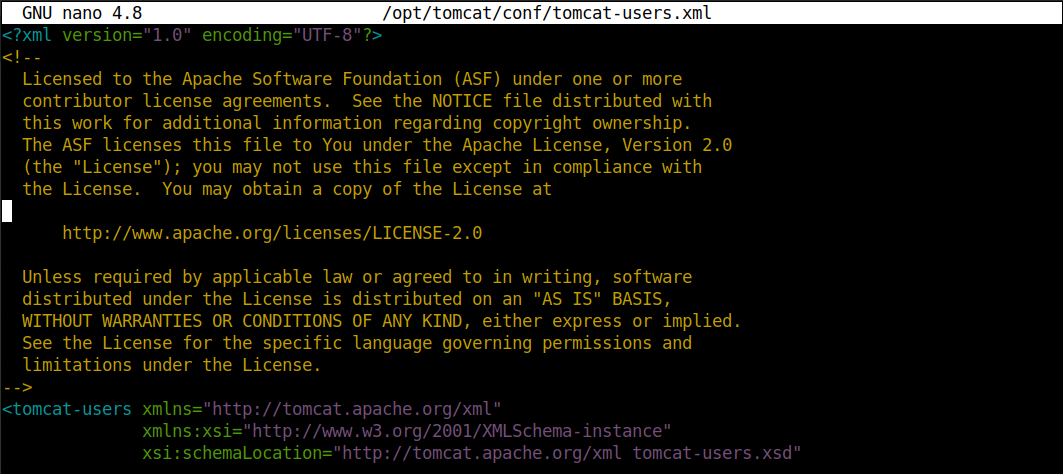
Tomcat comes up with web apps that enable the user to access the manager-gui and admin-gui. You can define a user between the tomcat-users tags as shown below:
|
1 2 3 |
<tomcat-users . . .> <user username="admin" password="password" roles="manager-gui,admin-gui"/> </tomcat-users> |
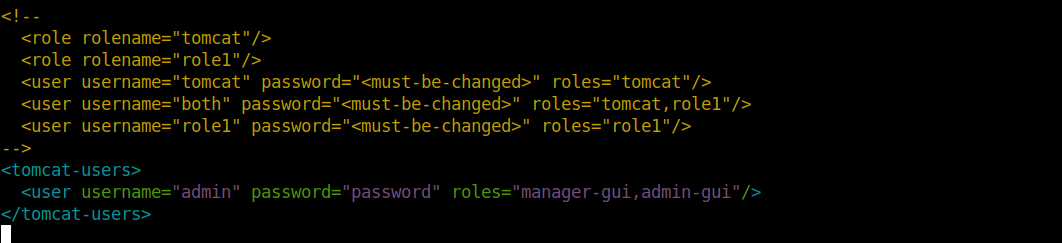
Save and close the file once done.
All the recent versions of Tomcat restrict access to the Manager and Host Manager apps to connections coming from the server itself. To change the IP address restrictions on these, open the appropriate context.xml files. To access the Manager app, use the command:
|
1 |
sudo nano /opt/tomcat/webapps/manager/META-INF/context.xml |
Next, to access the Host Manager app, use the command:
|
1 |
sudo nano /opt/tomcat/webapps/host-manager/META-INF/context.xml |
Based on your needs, you can choose to accept or deny connections. You can comment on the IP address restrictions to allow connections from anywhere. Otherwise, you can add the public IP address to the list to access connections coming from your IP address:
|
1 2 3 4 |
<Context antiResourceLocking="false" privileged="true" > <!--<Valve className="org.apache.catalina.valves.RemoteAddrValve" allow="127\.\d+\.\d+\.\d+|::1|0:0:0:0:0:0:0:1" />--> </Context> |

Save and close the files when you are finished. To reflect the changes you have made, restart the Tomcat service using the following command:
|
1 |
sudo systemctl restart tomcat |
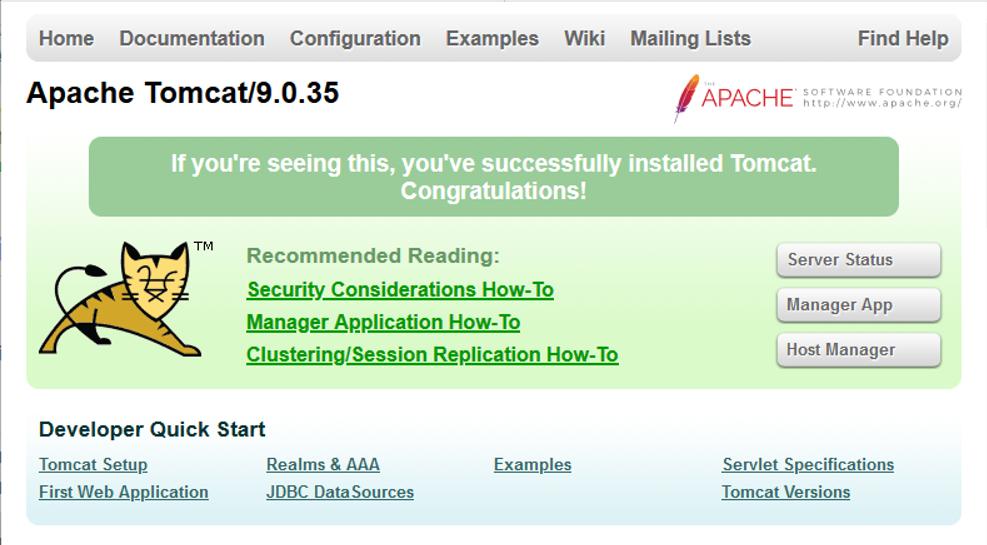
Step 8—Web Interface Access
After creating the Tomcat user, we can now access the web management interface. Once again, you can access the interface by going to the server’s domain name or IP address followed by port 8080:
|
1 |
http://server_domain_or_IP:8080 |
When you click on this url, you will see a page as shown below:
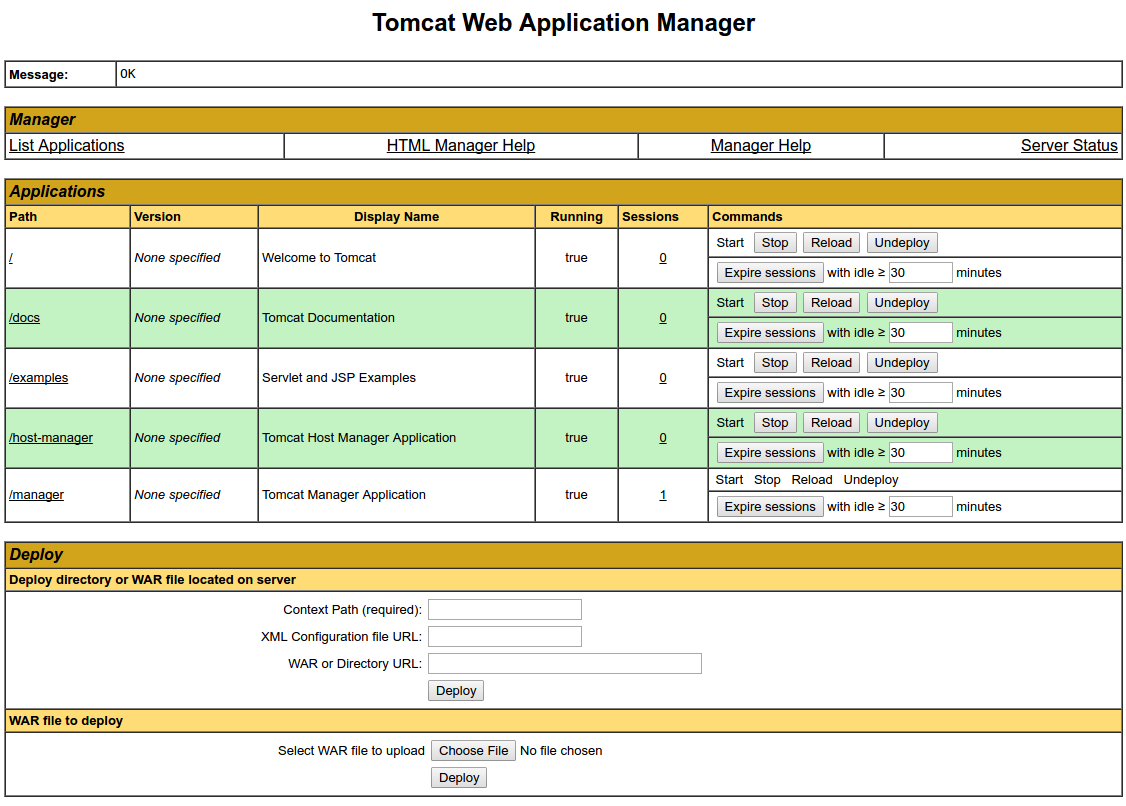
You can access the Tomcat web apps by adding the account credentials that you added to the tomcat-users.xml. To access the Manager app, use the link:
|
1 |
http://server_domain_or_IP:8080/manager/html |
When you click on this URL, you will see a page as shown below:
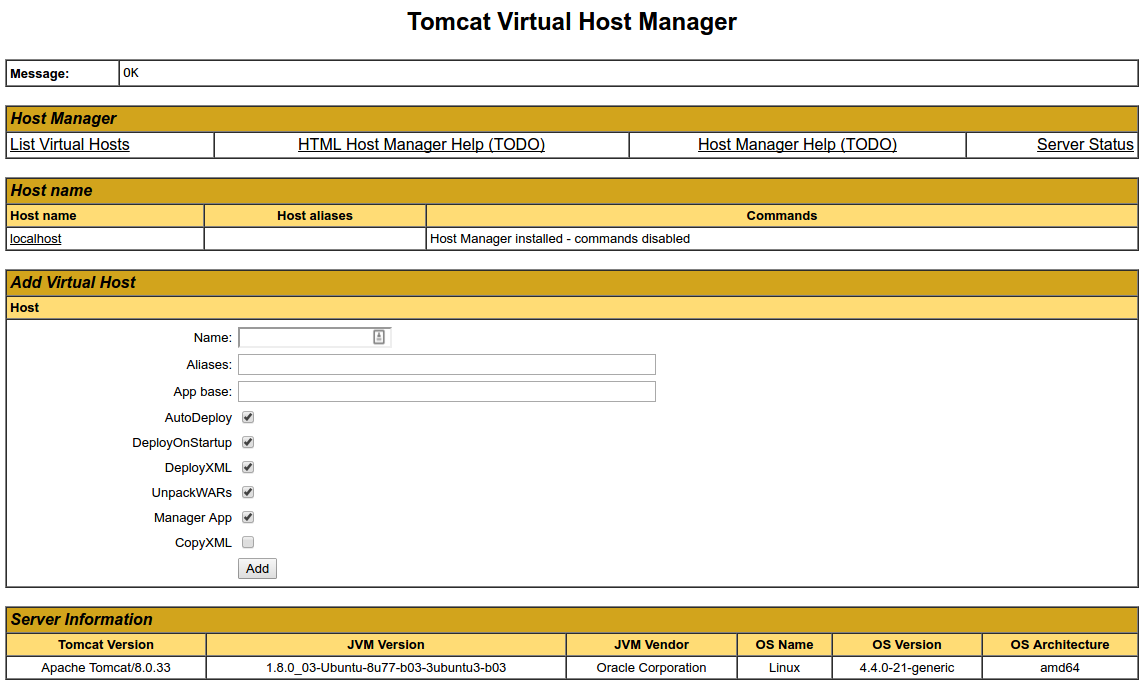
To access the Host Manager app, use the link:
|
1 |
http://server_domain_or_IP:8080/host-manager/html |
When you click on this URL, you will see a page as shown below:
Conclusion
Your installation of Tomcat is now complete. You can freely deploy your own Java web applications and enhance your digital experience. You will find out that working on Apache Tomcat is much faster while loading and redeploying when compared to its alternatives. However, it is unsuitable when working with static pages.
For more resources on applying Apache-based servers check out our blog:
- A Guide on the mod_proxy Extension: Using Apache as a Reverse Proxy
- The World of Web Servers: Apache vs. Nginx
- Setting Up Apache Virtual Hosts on Ubuntu 20.04
- Installing the Apache Web Server on CentOS 7
Happy Computing!
- How To Enable, Create and Use the .htaccess File: A Tutorial - March 8, 2023
- An Overview of Queries in MySQL - October 28, 2022
- Introduction to Cookies: Understanding and Working with JavaScript Cookies - October 25, 2022
- An Overview of Data Types in Ruby - October 24, 2022
- The Architecture of Iptables and Netfilter - October 10, 2022