

Introduction
WordPress is one of the most popular Content Management Systems (CMSs) out there. Statistically, it powers over 39% of all websites you see around the world wide web. It’s a popular choice because of its extensibility through plugins and its flexible templating system. It allows you to change its appearance in seconds. Moreover, its administration can be done through the web interface without requiring a lot of technical know-how.
In addition, WordPress is free and open-source and is built on a MySQL database with PHP processing. You can deploy WordPress on a LAMP stack (Linux, Apache, MySQL, and PHP) or a LEMP stack (Linux, Nginx, MySQL, and PHP). However, it proves to be time-consuming to set up the stack every time you want to deploy.
Luckily, modern software delivery methods such as cloud computing, Docker, and Docker Compose have smoothened the overall developer experience. These tools simplify the process of setting any stack by avoiding the overhead of installing and configuring individual components every time you want to deploy an application. Instead, you write configuration files that will be used to pull and create images and run them in Docker containers, allowing you to deploy your application with just one command.
Containers are lightweight, virtualized, portable, software-defined standardized environments that allow the software to run in isolation from other software running on the physical host machine. Docker Compose allows you to manage multiple containers and ensure they communicate. For example, an application source code and a database must communicate.
In this tutorial, we will be building a multiple containerized WordPress application. A complete WordPress app requires three containers: MySQL database, Nginx server, and WordPress source code. Security being a priority in modern websites, we will obtain an SSL certificate from Let’s Encrypt to secure your installation. Then, we will set up a cron job to periodically check and renew certificates so that your website’s security is maintained continuously.
Prerequisites
- As this is a hands-on tutorial, you should have an installation of Ubuntu 20.04 as your initial operating environment. You should also have a non-root user with sudo privileges. Here is a step-by-step tutorial to help you set up your Ubuntu server.
- You also need to install Docker. You can refer to this tutorial on how to install and operate Docker on Ubuntu 18.04.
- An installation of Docker Compose. You may follow Step 1 of the tutorial How to Install and Configure Docker Compose on Ubuntu 20.04.
- A registered domain name is required to obtain a TLS/SSL certificate from Let’s Encrypt. For the sake of this tutorial, we will use
example.com. - Set up DNS records to point traffic to your VPS. You need two DNS records:
- An A record with
example.compointing to the public IP address of your server. - An A record with
www.example.compointing to the public IP address of your server.
- An A record with
Step 1: Define the Configurations for the Web Server
The web server holds your website files and lets users access your web application. Thus, it’s only appropriate that in the first step we define the configuration for the webserver. We will be defining an Nginx server configuration file which will include WordPress-specific location blocks. We will also include location blocks to direct Let’s Encrypt verification requests to the Certbot client for automated renewals of the certificate.
Let’s start by making a directory for the project. You can choose a directory name you prefer. We will use wordpress_docker for this tutorial. Enter the following command to create the directory and navigate into it:
|
1 |
mkdir wordpress_docker && cd wordpress_docker |
Next, create a directory to hold the Nginx configuration files with the command:
|
1 |
mkdir nginx-conf |
Use nano to open the file with the following command:
|
1 |
nano nginx-conf/nginx.conf |
In this file, we will define basic directives for an Nginx server block configuration. These include directives for the server name, document root, and location blocks to direct Certbot plugin requests for certificates, static files, and PHP processing. You may read our tutorial on How to Secure Nginx with Let’s Encrypt to learn more. Add the following code to the file, replacing example.com with your registered domain name:
|
1 2 3 4 5 6 7 8 9 10 11 12 13 14 15 16 17 18 19 20 21 22 23 24 25 26 27 28 29 30 31 32 33 34 35 36 37 38 39 40 41 42 43 44 45 |
server { listen 80; listen [::]:80; server_name example.com www.example.com; index index.php index.html index.htm; root /var/www/html; location ~ /.well-known/acme-challenge { allow all; root /var/www/html; } location / { try_files $uri $uri/ /index.php$is_args$args; } location ~ \.php$ { try_files $uri =404; fastcgi_split_path_info ^(.+\.php)(/.+)$; fastcgi_pass app:9000; fastcgi_index index.php; include fastcgi_params; fastcgi_param SCRIPT_FILENAME $document_root$fastcgi_script_name; fastcgi_param PATH_INFO $fastcgi_path_info; } location ~ /\.ht { deny all; } location = /favicon.ico { log_not_found off; access_log off; } location = /robots.txt { log_not_found off; access_log off; allow all; } location ~* \.(css|gif|ico|jpeg|jpg|js|png)$ { expires max; log_not_found off; } } |
Let’s define the sections you have added:
-
Directives:
listen: it tells Nginx to listen on port80. This allows the use of Certbot’s webroot plugin to make certificate requests. Once we have obtained an SSL certificate, we will update this configuration to use port443.server_name: this defines the domain name for which this configuration should handle. The traffic to the domain name defined here will be directed to this particular server block, and hence to the documentroot.root: it defines the root directory for requests to the domain name above. It’s usually the directory holding our actual website files. We have set the directory to this/var/www/html. It will be created as a Docker mount point during the container building time. We will define the instructions for this process inside the WordPress Dockerfile.index: this defines files that will be used as indexes or the entry point to your web server when processing requests. We have moved index.php before index.html so that Nginx prioritizesindex.php.
-
Location Blocks:
location ~ /.well-known/acme-challenge: handles requests to the well-known directory where Certbot adds a temporary file to validate that the DNS for the specified domain directs to the particular server we are requesting SSL certificates from. This is why you should add a valid domain for this step to work instead of theexample.comwe are using in this tutorial.location /: picks URI requests and gives control to WordPressindex.phpto request arguments for processing.location ~ \.php$: handles PHP processing and passes the request to the WordPress container (we will define a configuration file for this in a later step). We have defined configurations specific to FastCGI protocol here because the WordPress Docker image will be based on the php:fpm image. Nginx uses an independent PHP processor for PHP-specific requests. We will use thephp-fpmprocessor that comes with thephp:fpmDocker image.location ~ /\.ht: handles.htaccessfiles that Nginx does not use. Thedeny alldirective ensures these files are never served to website visitors.location = /favicon.ico, location = /robots.txt: as seen in the definition, this prevents logging of requests to/favicon.icoand/robots.txtfiles.location ~* \.(css|gif|ico|jpeg|jpg|js|png)$: turns off logging of requests to static files and ensures they are cached to lessen the load on the server.
You may now save and close the file by pressing CTRL+X, Y, then ENTER. That completes the first step.
Step 2: Define Environment Variables
Environment variables are necessary to facilitate communication between the WordPress application and the Database. They also ensure the application data is persisted. The environment variables include sensitive information such as database credentials and non-sensitive information such as database name and host.
For security purposes, it’s always a good idea not to add sensitive information to project repositories. Hence, instead of setting the sensitive values in the Docker Compose file, we will be defining the MySQL credentials inside the .env files that will not be committed to the project repository and risk public exposure. Inside the project root ~/wordpress_docker open the .env file:
|
1 |
nano .env |
|
1 2 3 |
MYSQL_ROOT_PASSWORD=your_strong_root_password MYSQL_USER=your_wordpress_database_user MYSQL_PASSWORD=strong_wordpress_database_password |
The next thing you must do is to add the .env file to .gitignore and .dockerignore files to ensure that it does not get added to your repositories or Docker images respectively.
This is not necessary for this tutorial, but if you want to work with Git for version control, enter the following command to initialize the current directory as a git repository:
|
1 |
git init |
Open the .gitignore with nano:
|
1 |
nano .gitignore |
Add the following line:
|
1 |
.env |
Save and close the file. Next, open the .dockerignore with nano:
|
1 |
nano .dockerignore |
Add the following line:
|
1 |
.env |
While at it, you may optionally add other files and directories associated with your application’s development:
|
1 2 3 |
.env .git docker-compose.yml |
Save and close the file when done. That is all for this step. Let’s move on to the Docker Compose definition.
Step 3: Configure Services with Docker Compose
Docker Compose uses a docker-compose.yml file to build images. This file contains service definitions for the complete setup of an application. Service definitions are basically instructions for how a container will run. A service is an actual running container.
Docker Compose makes it possible to define different services for multi-container applications by linking the various services together with shared networks and volumes. You will see this in action as we will be defining three containers for our application: web server, WordPress installation, and database. We will add a fourth container to run the Certbot client for certificate renewals.
Enter the following command to create the docker-compose.yml file:
|
1 |
nano docker-compose.yml |
The first line in a docker-compose.yml file is the version definition line. We have set 3 for ours. Then, you can start defining your services. Add the following code snippet in the file to define the db service:
|
1 2 3 4 5 6 7 8 9 10 11 12 13 14 15 16 |
version: '3' services: #MySQL Service db: image: mysql:8.0 container_name: db restart: unless-stopped env_file: .env environment: - MYSQL_DATABASE=wordpress volumes: - dbdata:/var/lib/mysql command: '--default-authentication-plugin=mysql_native_password' networks: - app-network |
Let’s discuss what we have in the db service definitions below:
image: determines the image the container will be based on. It’s always better to specify a specific version (mysql:8.0) than using the latest tag (mysql:latest) as future versions of MySQL images may conflict with our application if we happen to rebuild this image. You may find more information about Dockerfiles Best practices on the official Dockerfile Docs.container_name: we specify the container name here.restart: this directive determines the restart behavior of the container. The default isnobut we have set it to alwaysrestartunless it is manually stopped.env_file: this directive is used to specify the location of the file with the environment variables (.env) used by our application.environment: used to specify additional environment variables. In this tutorial, we have specified theMYSQL_DATABASEvariable to hold the database name for our application. The database name can be included in thedocker-compose.yml.volumes: used for specifying mount locations. In our example, we have mounted a named volume called dbdata to the/var/lib/mysqldirectory on the container, which is usually the standard data directory for MySQL.command: this directive specifies a command that will override the default CMD instruction for the image. We have added an option to the Docker image’s standardmysqldcommand that starts the MySQL server inside the container. The option we have added is--default-authentication-plugin=mysql_native_password, which updates the default authentication plugin for MySQL to use password authentication (mysql_native_password). This is necessary for your PHP (WordPress application to work) because they use a username and password to access the database. In newer MySQL versions, the default authentication plugin has changed. However, most applications use password authentication. Thus, you must change this setting for the application to work.networks: this directive is used to specify that thedbservice should join theapp-network, which we will define as we go along with the tutorial.
Next, let’s define the service configuration for our WordPress application. We will call the service and container_name app. Add the following code snippet below the db service definition, keeping in mind proper indentation:
|
1 2 3 4 5 6 7 8 9 10 11 12 13 14 15 16 17 |
#WordPress application code Service app: depends_on: - db image: wordpress:5.1.1-fpm-alpine container_name: app restart: unless-stopped env_file: .env environment: - WORDPRESS_DB_HOST=db:3306 - WORDPRESS_DB_USER=$MYSQL_USER - WORDPRESS_DB_PASSWORD=$MYSQL_PASSWORD - WORDPRESS_DB_NAME=wordpress volumes: - app:/var/www/html networks: - app-network |
Just like we did with the db service, we have named our container and defined the restart policy. Some more options we added are defined below:
depends_on: this directive ensures that containers are started in order of dependency. In our case, theappcontainer depends on thedbcontainer. Hence, it will start after thedbcontainer has started. This needs to happen in this order because the WordPress app depends on the availability of a MySQL database for it to function.image: as seen in the code snippet, we will be using WordPress version 5.1.1 fpm alpine image. We had explained about thephp-fpmprocessor that Nginx requires for PHP processing. This image takes care of that. The alpine image based on the Alpine Linux project helps keep the image size smaller. If you need more information about image variations, you may follow this link for Docker Hub Wordpress images.env_file: specifies the location of the.envfile that contains the database credentials.environment: this directive defines additional environment variables. For our case, we are defining the variables that WordPress expects and assigning them with the values of the variables from our.envfile. These areWORDPRESS_DB_USER,WORDPRESS_DB_PASSWORD, andWORDPRESS_DB_HOSTwhich refers to the MySQL server running on thedbcontainer, accessible from MySQL’s default port3306. Finally, you see theWORDPRESS_DB_NAMEwhich we have set to WordPress. The same value is specified in the MySQL service definition in the db container:MYSQL_DATABASE=wordpress.volumes: this directive mounts a volume called app to the/var/www/htmlmount point, created by the WordPress image. The naming of volumes allows sharing of application code with other containers.networks: finally, we add the app container to theapp-networkto ensure it communicates with other containers on the network.
That will be all for the app service container for the WordPress image. Let’s now define the webserver service for the Nginx image. First, add the following code snippet below the app service definition in your docker-compose.yml file:
|
1 2 3 4 5 6 7 8 9 10 11 12 13 14 15 |
#Webserver Nginx service webserver: depends_on: - app image: nginx:1.15.12-alpine container_name: webserver restart: unless-stopped ports: - "80:80" volumes: - app:/var/www/html - ./nginx-conf:/etc/nginx/conf.d - certbot-etc:/etc/letsencrypt networks: - app-network |
We have already explained the depends_on option. In the case of this webserver service, the container will start after the app container has started. The web server container is based on the alpine Nginx image. It has a similar restart policy as the previous service definitions. The other options in the webserver service definition include:
ports: binds the ports between the host machine and the container. In Step 1, we had defined port80in thenginx.conffile. This port is mapped to port80on the container.volumes: we have a combination of bind mounts and named volumes under this option:app:/var/www/html: this volume definition mounts the WordPress application to the/var/www/htmldirectory that earlier on, we had set as root in the Nginx server block../nginx-conf:/etc/nginx/conf.d: this definition bind mounts the Nginx configuration directory on the host machine to the Nginx configuration directory we defined for the container. Hence, any changes on the host machine are automatically reflected in the container.certbot-etc:/etc/letsencrypt: this definition mounts the Let’s Encrypt certificates and keys for the domain to the appropriate directory on the container.
networks: like in the previous service definitions, thenetworksdirective adds the webserver service to theapp-networks.
Since we are done with the webserver definition, let’s add instructions for the Certbot service. This will handle getting your TLS/SSL certificates from Let’s Encrypt. If you would like to know more about securing an Nginx server, this tutorial on how to secure Nginx with Let’s Encrypt is a good source.
Next, add the following code snippet below the webserver service. Remember to set your correct domain name and email address:
|
1 2 3 4 5 6 7 8 9 10 |
#certbot service certbot: depends_on: - webserver image: certbot/certbot container_name: certbot volumes: - certbot-etc:/etc/letsencrypt - app:/var/www/html command: certonly --webroot --webroot-path=/var/www/html --email hackins@cloudsigma.com --agree-tos --no-eff-email --staging -d example.com -d www.example.com |
The certbot image will only start after the webserver has started, because of the depends_on directive. Docker Compose will pull the Certbot image from Docker Hub as defined.
Under the volumes definition, the Certbot container will share the domain certificates and key in certbot-etc with the Nginx webserver container and the application code with the app container.
Under the command definition, we have specified a subcommand to run the container’s default Certbot certonly command with additional options as listed below:
-
--webroot: specifies the use of the webroot plugin which places files in the webroot folder for authentication.--webroot-path: specifies the path of the webroot directory.--agree-tos: specifies that you agree to ACME’s Terms of service.--no-eff-email: specifies that you do not want to share your email with EFF. You can omit this if you want to share.--staging: tells Certbot that you want to first get test certificates from the Let’s Encrypt staging environment for testing your configuration before obtaining the actual certificate. Let’s Encrypt has domain request rate limiting. Hence, first testing your configuration will help you avoid your domain getting limited.-d: this option takes the domain names for the certificate request. In this tutorial, we have includedexample.comandwww.example.com. Please specify your actual registered domain.
Our docker-compose.yml file is almost complete. However, you must also add the network and volume definitions below the Certbot service:
|
1 2 3 4 5 6 7 8 9 10 |
#Volumes volumes: certbot-etc: app: dbdata: #Networks networks: app-network: driver: bridge |
The volumes key defines the volumes to be shared with all the services (containers) defined in this compose file: certbot-etc, app, and dbdata. The contents of the volumes that Docker creates are stored in a directory managed by Docker on the host file system: /var/lib/docker/volumes/. The contents of each volume are then mounted to any container that uses the volume. This makes it possible to share data and code between containers.
The networks key defines the bridge network that allows communication between containers. Containers on the same bridge network such as webserver and db can communicate securely through ports without exposing the traffic to the outside network. We only expose port 80 to allow access to the front-end website pages.
The complete docker-compose.yml file will look like this:
|
1 2 3 4 5 6 7 8 9 10 11 12 13 14 15 16 17 18 19 20 21 22 23 24 25 26 27 28 29 30 31 32 33 34 35 36 37 38 39 40 41 42 43 44 45 46 47 48 49 50 51 52 53 54 55 56 57 58 59 60 61 62 63 64 65 66 67 68 69 70 71 72 |
version: '3' services: #MySQL Service db: image: mysql:8.0 container_name: db restart: unless-stopped env_file: .env environment: - MYSQL_DATABASE=wordpress volumes: - dbdata:/var/lib/mysql command: '--default-authentication-plugin=mysql_native_password' networks: - app-network #WordPress application code Service app: depends_on: - db image: wordpress:5.1.1-fpm-alpine container_name: app restart: unless-stopped env_file: .env environment: - WORDPRESS_DB_HOST=db:3306 - WORDPRESS_DB_USER=$MYSQL_USER - WORDPRESS_DB_PASSWORD=$MYSQL_PASSWORD - WORDPRESS_DB_NAME=wordpress volumes: - app:/var/www/html networks: - app-network #Webserver Nginx service webserver: depends_on: - app image: nginx:1.15.12-alpine container_name: webserver restart: unless-stopped ports: - "80:80" volumes: - app:/var/www/html - ./nginx-conf:/etc/nginx/conf.d - certbot-etc:/etc/letsencrypt networks: - app-network #certbot service certbot: depends_on: - webserver image: certbot/certbot container_name: certbot volumes: - certbot-etc:/etc/letsencrypt - app:/var/www/html command: certonly --webroot --webroot-path=/var/www/html --email hackins@cloudsigma.com --agree-tos --no-eff-email --staging -d example.com -d www.example.com #Volumes volumes: certbot-etc: app: dbdata: #Networks networks: app-network: driver: bridge |
You can save and close the file. In the next step, we will be starting and testing the container and certificate requests.
Step 4: Running the Containers and Obtaining SSL Certificates
The greatest advantage of Docker Compose is that, once you have defined all your services in the docker-compose.yml file, you can start all the containers with just one command: docker-compose up. The command runs every instruction specified. If the domain requests are successful, you should be able to see the correct exit status in your terminal. Enter the following command to create the containers. The -d flag is for running the containers in the background:
|
1 |
docker-compose up -d |
If you see the output like in the screenshot below, then the services were created successfully:

To confirm the status of the services, run the docker-compose ps command:
|
1 |
docker-compose ps |
The output of the command is as shown below if everything was successful. The app, db, and webserver containers’ state should be up, and the certbot container should have Exit0 status:

If you see anything other than Up in the state column for app, db or webserver, or an Exit status that is not 0 for the certbot container, then something went wrong. You can check the logs of each container using the command docker-compose logs, and specify the service_name:
|
1 |
docker-compose logs service_name |
For example, you can check the logs of the certbot container by entering the following command:
|
1 |
docker-compose logs certbot |
To check if the certificates were mounted to the webserver container, use the docker-compose exec command:
|
1 |
docker-compose exec webserver ls -la /etc/letsencrypt/live |
If you used an actual registered domain name other than the example.com and the certificate requests were successful, you should see an output similar to this:

Once you have confirmed that the certificate request was successful, you can edit the docker-compose.yml file and remove the --staging flag. Open the file with nano:
|
1 |
nano docker-compose.yml |
Scroll down to the Certbot service definition section, in the command option and replace the --staging flag with --force-renewal flag. This tells Certbot that you are requesting a certificate renewal for a certificate of the same domain. Your Certbot service definition should now look like this:
|
1 2 3 4 5 6 7 8 9 10 |
#certbot service certbot: depends_on: - webserver image: certbot/certbot container_name: certbot volumes: - certbot-etc:/etc/letsencrypt - app:/var/www/html command: certonly --webroot --webroot-path=/var/www/html --email hackins@cloudsigma.com --agree-tos --no-eff-email --force-renewal -d example.com -d www.example.com |
Save the file when you are done editing.
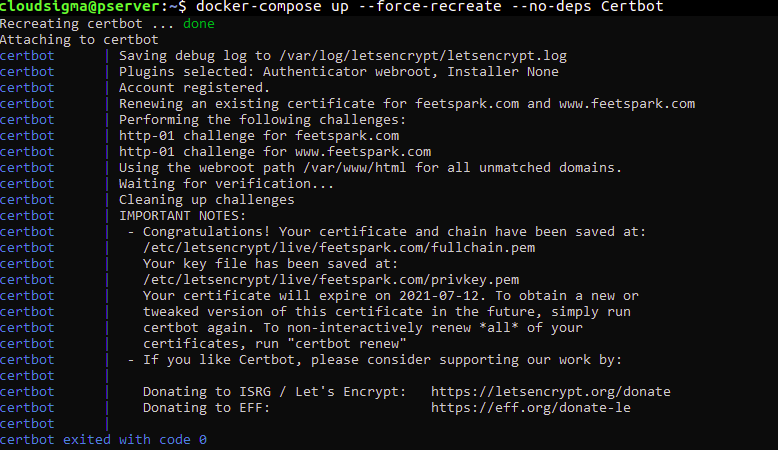
Enter the following command to recreate the certbot container. The included --no-deps flag tells Compose to skip restarting the web server service since it’s already running:
|
1 |
docker-compose up --force-recreate --no-deps Certbot |
The command outputs the following screenshot, showing that the certificate request was successful:
That is all for this step. In the next step, you will modify the Nginx configuration file to include the SSL certificate.
Step 5: Enabling SSL in Nginx Configuration and Service Definition
To make Nginx serve traffic over secure SSL, you will first modify the Nginx configuration file to add an HTTP redirection to HTTPS. Then, you need to specify the certificate and key locations, and finally add security parameters and headers.
Before modifying the configuration file, you should get the recommended Nginx security parameters from Certbot’s GitHub repository using curl with the following command:
|
1 |
curl -sSLo nginx-conf/options-ssl-nginx.conf |
The command runs and saves the parameters it pulls into a file called options-ssl-nginx.conf, inside the nginx-conf directory. Remove the Nginx configuration file so that we can create a new one with the following commands:
|
1 2 |
rm nginx-conf/nginx.conf nano nginx-conf/nginx.conf |
In the now empty nginx.conf file, add the following code that includes a redirection from HTTP to HTTPS, SSL credential protocols, and security headers. As you have done earlier, replace the example.com domain with your own registered domain:
|
1 2 3 4 5 6 7 8 9 10 11 12 13 14 15 16 17 18 19 20 21 22 23 24 25 26 27 28 29 30 31 32 33 34 35 36 37 38 39 40 41 42 43 44 45 46 47 48 49 50 51 52 53 54 55 56 57 58 59 60 61 62 63 64 65 66 67 68 69 |
server { listen 80; listen [::]:80; server_name example.com www.example.com; location ~ /.well-known/acme-challenge { allow all; root /var/www/html; } location / { rewrite ^ https://$host$request_uri? permanent; } } server { listen 443 ssl http2; listen [::]:443 ssl http2; server_name example.com www.example.com; index index.php index.html index.htm; root /var/www/html; server_tokens off; ssl_certificate /etc/letsencrypt/live/example.com/fullchain.pem; ssl_certificate_key /etc/letsencrypt/live/example.com/privkey.pem; include /etc/nginx/conf.d/options-ssl-nginx.conf; add_header X-Frame-Options "SAMEORIGIN" always; add_header X-XSS-Protection "1; mode=block" always; add_header X-Content-Type-Options "nosniff" always; add_header Referrer-Policy "no-referrer-when-downgrade" always; add_header Content-Security-Policy "default-src * data: 'unsafe-eval' 'unsafe-inline'" always; # add_header Strict-Transport-Security "max-age=31536000; includeSubDomains; preload" always; # enable strict transport security only if you understand the implications location / { try_files $uri $uri/ /index.php$is_args$args; } location ~ \.php$ { try_files $uri =404; fastcgi_split_path_info ^(.+\.php)(/.+)$; fastcgi_pass app:9000; fastcgi_index index.php; include fastcgi_params; fastcgi_param SCRIPT_FILENAME $document_root$fastcgi_script_name; fastcgi_param PATH_INFO $fastcgi_path_info; } location ~ /\.ht { deny all; } location = /favicon.ico { log_not_found off; access_log off; } location = /robots.txt { log_not_found off; access_log off; allow all; } location ~* \.(css|gif|ico|jpeg|jpg|js|png)$ { expires max; log_not_found off; } } |
In the first server block that handles unsecured requests using port 80, we specify the webroot for Certbot renewal requests. We also include a redirect directive that redirects HTTP requests to HTTPS.
The second server block handles secure HTTPS traffic coming on port 443. As you can see, we also enable SSL and HTTP2. HTTP/2 improves the performance of your server. You can read more about it from the official Nginx docs on HTTP/2.
In this block, we have also specified that Nginx includes the SSL certificate and key locations, as well as the recommended Certbot security parameters that curl saved to nginx-conf/options-ssl-nginx.conf directory.
The additional security headers serve to improve the ratings of your website on security test sites such as Security Headers and SSL Labs. You can follow the links on these headers to learn more: X-Frame-Options, Referrer Policy, X-Content-Type-Options, X-XSS-Protection, Content-Security-Policy. We have commented out the HTTP Strict Transport Security (HSTS) header. You are free to read about its preload functionality and decide if you want to enable it.
The rest of the directives such as root, index, WordPress-specific location blocks remain as discussed in Step 1. You may now save and close the file when you have finished editing.
Now that we have enabled HTTPS traffic that uses port 443, we must also enable the port on the service definition of the web server. Enter the following command to open the docker-compose.yml file with nano:
|
1 |
nano docker-compose.yml |
In the web server section under the ports option, add a mapping for port 443 as highlighted below:
|
1 2 3 4 5 6 7 8 9 10 11 12 13 14 15 |
webserver: depends_on: - app image: nginx:1.15.12-alpine container_name: webserver restart: unless-stopped ports: - "80:80" - "443:443" volumes: - app:/var/www/html - ./nginx-conf:/etc/nginx/conf.d - certbot-etc:/etc/letsencrypt networks: - app-network |
The complete docker-compose.yml file should now look like this:
|
1 2 3 4 5 6 7 8 9 10 11 12 13 14 15 16 17 18 19 20 21 22 23 24 25 26 27 28 29 30 31 32 33 34 35 36 37 38 39 40 41 42 43 44 45 46 47 48 49 50 51 52 53 54 55 56 57 58 59 60 61 62 63 64 65 66 67 68 69 70 71 72 73 |
version: '3' services: #MySQL Service db: image: mysql:8.0 container_name: db restart: unless-stopped env_file: .env environment: - MYSQL_DATABASE=wordpress volumes: - dbdata:/var/lib/mysql command: '--default-authentication-plugin=mysql_native_password' networks: - app-network #WordPress application code Service app: depends_on: - db image: wordpress:5.1.1-fpm-alpine container_name: app restart: unless-stopped env_file: .env environment: - WORDPRESS_DB_HOST=db:3306 - WORDPRESS_DB_USER=$MYSQL_USER - WORDPRESS_DB_PASSWORD=$MYSQL_PASSWORD - WORDPRESS_DB_NAME=wordpress volumes: - app:/var/www/html networks: - app-network #Webserver Nginx service webserver: depends_on: - app image: nginx:1.15.12-alpine container_name: webserver restart: unless-stopped ports: - "80:80" - "443:443" volumes: - app:/var/www/html - ./nginx-conf:/etc/nginx/conf.d - certbot-etc:/etc/letsencrypt networks: - app-network #certbot service certbot: depends_on: - webserver image: certbot/certbot container_name: certbot volumes: - certbot-etc:/etc/letsencrypt - app:/var/www/html command: certonly --webroot --webroot-path=/var/www/html --email hackins@cloudsigma.com --agree-tos --no-eff-email --force-renewal -d example.com -d www.example.com #Volumes volumes: certbot-etc: app: dbdata: #Networks networks: app-network: driver: bridge |
Once you have confirmed that everything looks correct, save and close the file. After that, run the following command to recreate the webserver service:
|
1 |
docker-compose up -d --force-recreate --no-deps webserver |
|
1 |
docker-compose ps |

Now that all your containers are running, it’s possible to proceed with WordPress configuration from the web interface.
Step 6: Complete Your WordPress Configuration from the Web Interface
Navigate to your server’s domain name to continue the installation. You should see the WordPress setup homepage. It welcomes you to choose your language before continuing:
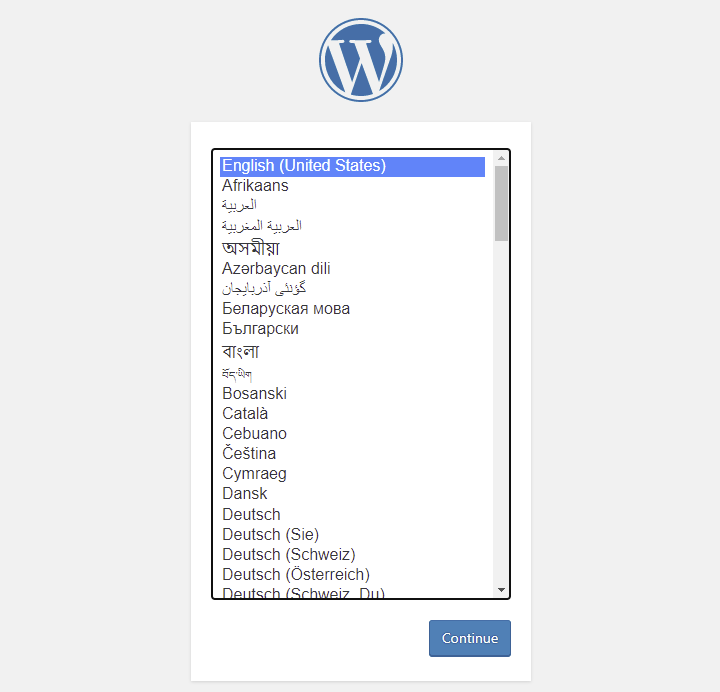
Choose your language and click Continue to move to the next page:
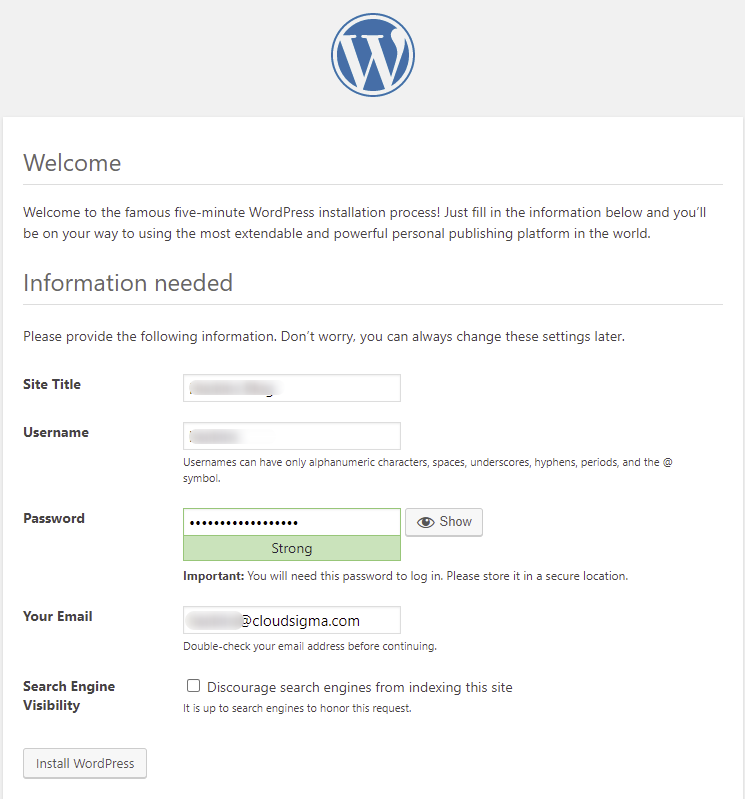
On this page, fill in your website title, choose a memorable username and a strong password. It’s recommended not to use Admin as your username for security reasons. Enter your email and click the Install WordPress button to begin installing WordPress.
Once the installation completes, you will be taken to the login screen where you will provide the username and the password you had set. When you enter the valid credentials, you should be able to see your WordPress dashboard:
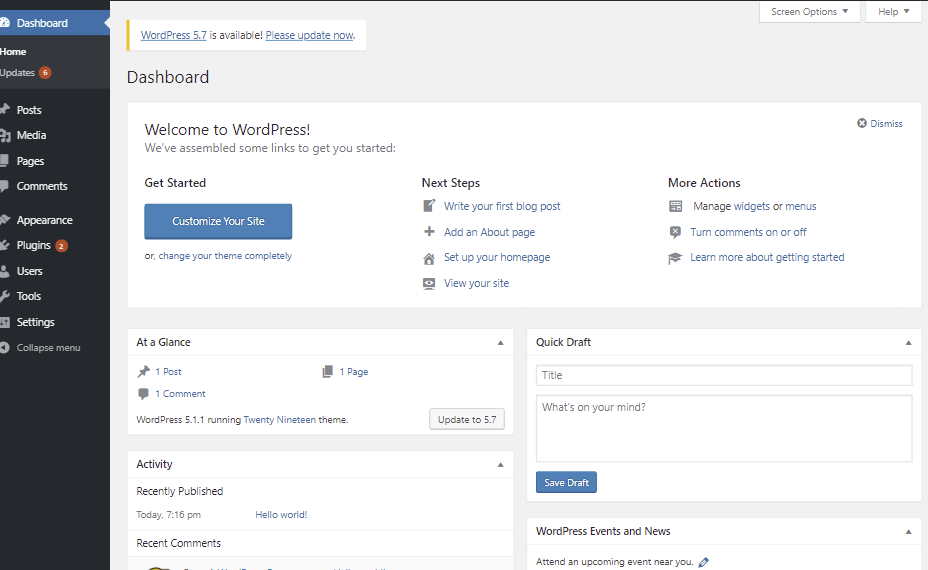
You have now successfully installed WordPress! Next, you need to take the steps to ensure that the SSL certificates will auto-renew.
Step 7: Configuring Automatic SSL Certificate Renewal
Let’s Encrypt TLS/SSL certificates are valid for 90 days only. It’s up to you to create an auto-renewal configuration to ensure they do not expire. You can achieve this by creating a script and scheduling it with the cron job utility. In this step, we will show you how to create a script that will renew the certificates. We will then schedule it with cron job utility to periodically run it and renew the certificates if they are approaching the expiry date.
Inside the wordpress_docker project directory, open a script called ssl_renewer.sh with nano:
|
1 |
nano ssl_renewer.sh |
Add the following code to the script to handle auto-renewal and Nginx configuration reloading. Remember to replace the highlighted username with your non-root username:
|
1 2 3 4 5 6 7 8 |
#!/bin/bash COMPOSE="/usr/local/bin/docker-compose –ansi never" DOCKER="/usr/bin/docker" cd /home/hackins/wordpress_docker/ $COMPOSE run certbot renew --dry-run && $COMPOSE kill -s SIGHUP webserver $DOCKER system prune -af |
In this script, we assign the docker-compose binary to a variable called COMPOSE. We also include the –ansi never option which tells the script to run docker-compose commands without ANSI control characters. We further assign the Docker binary to a variable called DOCKER.
The script then moves into our project directory wordpress_docker and executes the following commands:
docker-compose run: it starts the certbot container and overrides the command we had provided in the certbot service definition. Instead of running the certonly subcommand, it runs the renew subcommand which will renew the SSL/TLS certificates from Let’s Encrypt if they are about to expire.docker-compose kill: sends a SIGHUP signal to thewebservercontainer to reload the Nginx configurations. You may want to check out this tutorial from Docker on how to use the Official Nginx Docker image.docker system prune: this command removes all unused containers and images.
Save and close the file when you finish editing. Then, run the following command to make it executable:
|
1 |
chmod +x ssl_renewer.sh |
Once you have made it executable, open your root crontab file to run the script periodically at the intervals we will specify:
|
1 |
sudo crontab -e |
The crontab asks you to choose your preferred editor if it’s your first time using it:
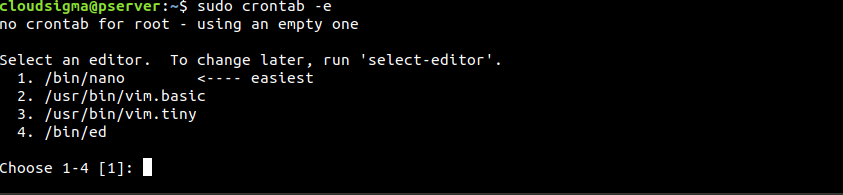
Choose your preferred editor and press Enter to open the file. At the bottom of the file, add the following line:
|
1 |
*/5 * * * * /home/hackins/wordpress_docker/ssl_renewer.sh >> /var/log/cron_docker.log 2>&1 |
This sets the interval for five minutes to allow us to test whether our renewal script will work or not. We have also specified a log file that will hold the output from the job: cron_docker.log.
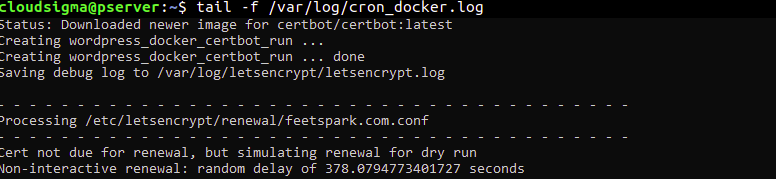
Wait for five minutes and check the cron.log to see if the script was successful with the renewal request:
|
1 |
tail -f /var/log/cron_docker.log |
You should see something similar to the screenshot below if the requests were successful:
Now that we have tested and confirmed it’s working, you can modify the crontab file to specify a daily renewal. For example, you may want to specify that the script runs every day at 6. PM. To do that, modify the last line of the crontab to look like this:
|
1 |
0 18 * * * /home/hackins/wordpress_docker/ssl_renewer.sh >> /var/log/cron_docker.log 2>&1 |
In addition, you need to remove the –dry-run flag from the ssl_renewer.sh script to ensure the actual renewal happens when it runs. It should look like this:
|
1 2 3 4 5 6 7 8 |
#!/bin/bash COMPOSE="/usr/local/bin/docker-compose --ansi never" DOCKER="/usr/bin/docker" cd /home/hackins/wordpress_docker/ $COMPOSE run certbot renew && $COMPOSE kill -s SIGHUP webserver $DOCKER system prune -af |
Next, save and close the file. Having done that, the cron job will keep your scripts valid, by renewing them before the 90 days’ end.
Conclusion
If you have reached this far in the tutorial, you may consider yourself a step closer to being a DevOps Engineer. You were able to create an Nginx configuration script, created a docker-compose.yml file, and defined several services necessary to run a WordPress application with Docker and Docker Compose. You obtained SSL/TLS certificates from Let’s Encrypt to ensure that your web server is secure. Finally, you created a cron job to ensure that the certificates do not expire. Good job!
If you are trying to get deeper into DevOps, take a look at more resources on containers from our blog:
- Getting to Know Kubernetes
- How to Deploy a Node.js (Express.js) App with Docker on Ubuntu 20.04
- Deploy a PHP Application on a Kubernetes Cluster with Ubuntu 18.04.
- Deploying Laravel, Nginx, and MySQL with Docker Compose
Happy Computing!
- How To Enable, Create and Use the .htaccess File: A Tutorial - March 8, 2023
- An Overview of Queries in MySQL - October 28, 2022
- Introduction to Cookies: Understanding and Working with JavaScript Cookies - October 25, 2022
- An Overview of Data Types in Ruby - October 24, 2022
- The Architecture of Iptables and Netfilter - October 10, 2022