
Docker is a free and open-source solution for developing, deploying, and managing apps in lightweight, OS-level virtualization. In this guide, we will demonstrate creating a Python app within a Docker container.
Prerequisites
To perform the steps demonstrated in this guide, you will need the following components:
-
A Linux system. Check out configuring your own Ubuntu VPS on CloudSigma.
-
The latest version of Docker is installed and configured. Learn more about installing Docker on Ubuntu.
Docker Containers
When running various programs within the same environment, things can (and will) break. The more programs you add, the more unstable it becomes. It may not be a big deal for average folks. However, when it comes to mission-critical applications, there can be serious consequences.
The more apps are introduced in the system, the bigger the attack surface. A single compromised app can easily lead to the downfall of the entire system.
To solve these issues, we can use Docker containers for software-level sandboxing:
-
Apps within the container will have limited access to files.
-
Containerized apps can’t see other processes running in the system.
-
The container can be allocated a specific amount of hardware resources.
-
Network ports of a container aren’t exposed outside.
-
Consistent packaging of almost anything across local/production environments.
To demonstrate, we are going to build a simple Python server within a Docker container, transform the container into an image, and deploy the image within a dummy production environment.
Step 1 – Filesystem Configuration
To host the project, first, we are going to create a dedicated directory:
|
1 |
mkdir -pv python-server-container/ |
|
1 |
cd !$ |
Within the directory, create a sub-directory src to store our code:
|
1 |
mkdir -pv src/ |

Step 2 – Building the Python Server
In this step, we are going to create a simple HTTP server in Python. Create the file server.py:
|
1 |
touch server.py |
Open it up in a text editor:
|
1 |
nano server.py |

Enter the following Python code:
|
1 2 3 4 5 6 7 8 9 10 11 |
from http.server import HTTPServer, SimpleHTTPRequestHandler def run(server_class=HTTPServer, handler_class=SimpleHTTPRequestHandler): """server entrypoint""" server_address = ("0.0.0.0", 8080) httpd = server_class(server_address, handler_class) print("starting server...") httpd.serve_forever() if __name__ == "__main__": run() |
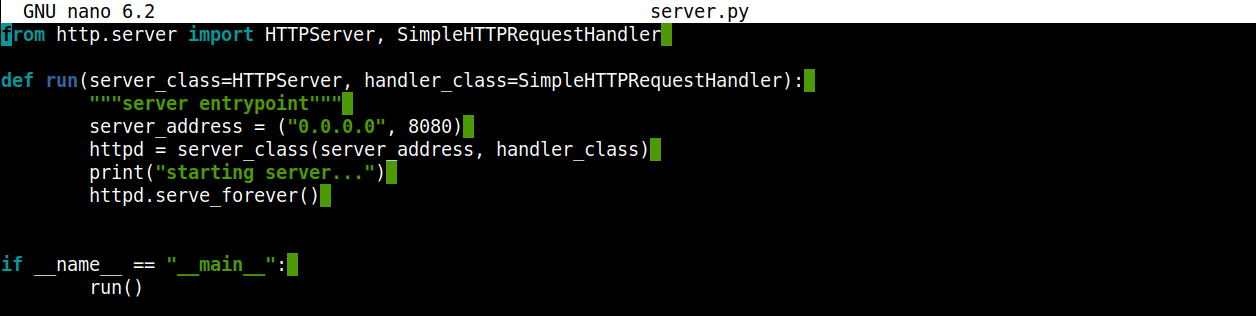
Here,
-
We are using the HTTPServer class and requesting a handler from the standard Python library, keeping the program simple.
-
The function run initiates an instance of the HTTPserver.
-
As the arguments of server_address suggest, the server will listen to any incoming connection on port 8080.
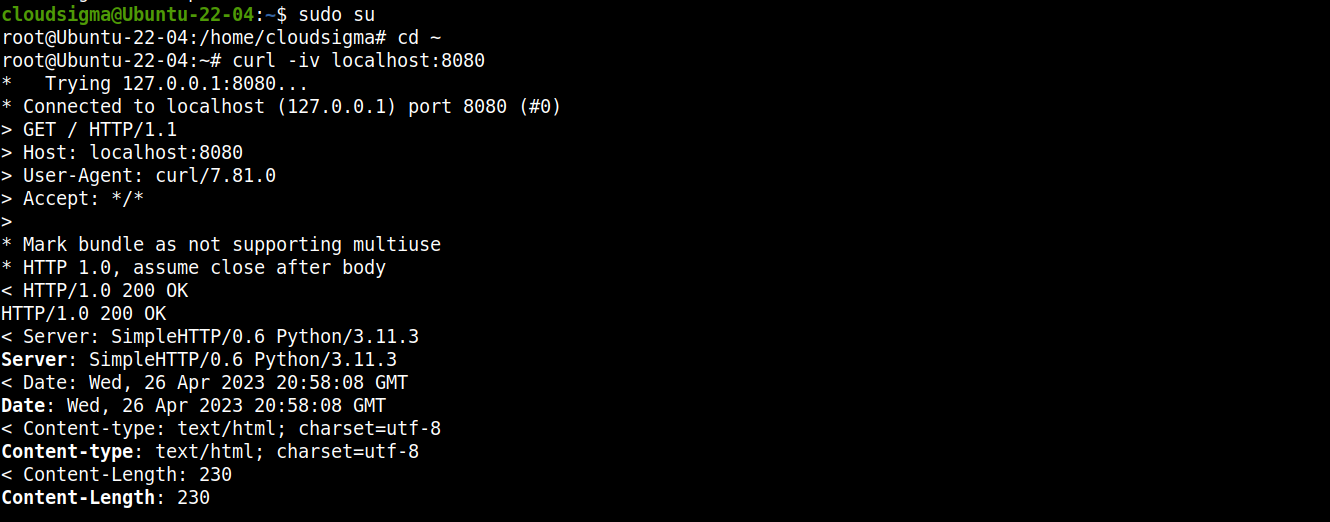
Now, we will verify if the server is working as expected. Launch the server:
|
1 |
python3 server.py |
![]()
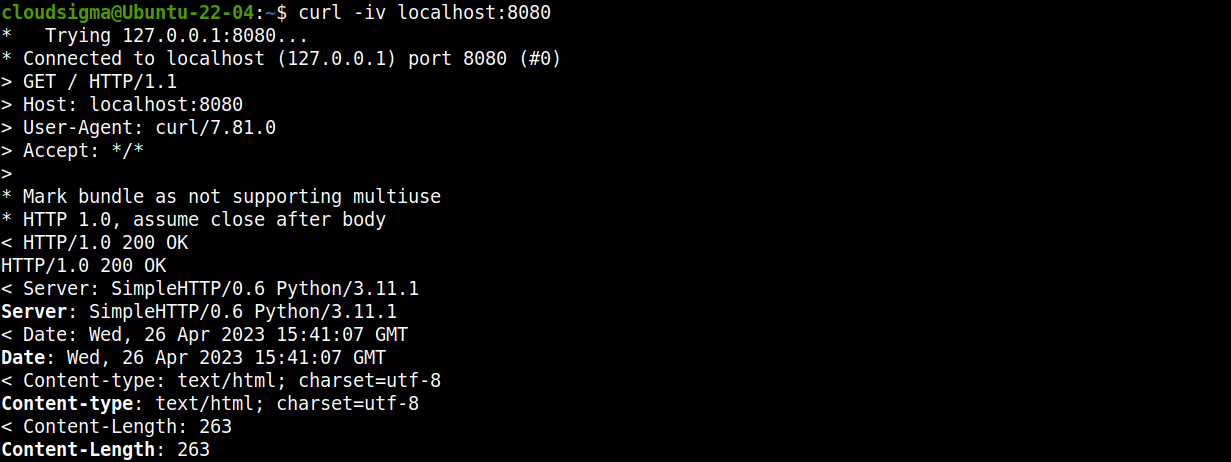
From a new terminal, we can use curl to send a request to the server:
|
1 |
curl -iv localhost:8080 |

Alternatively, you can access the link in a web browser:
|
1 |
http://localhost:8080 |
Step 3 – Creating a Dockerfile
A Dockerfile contains the necessary instructions to generate a Docker image. The instructions in the file are followed sequentially. Hakkında daha fazla bilgi edinin Dockerfile.
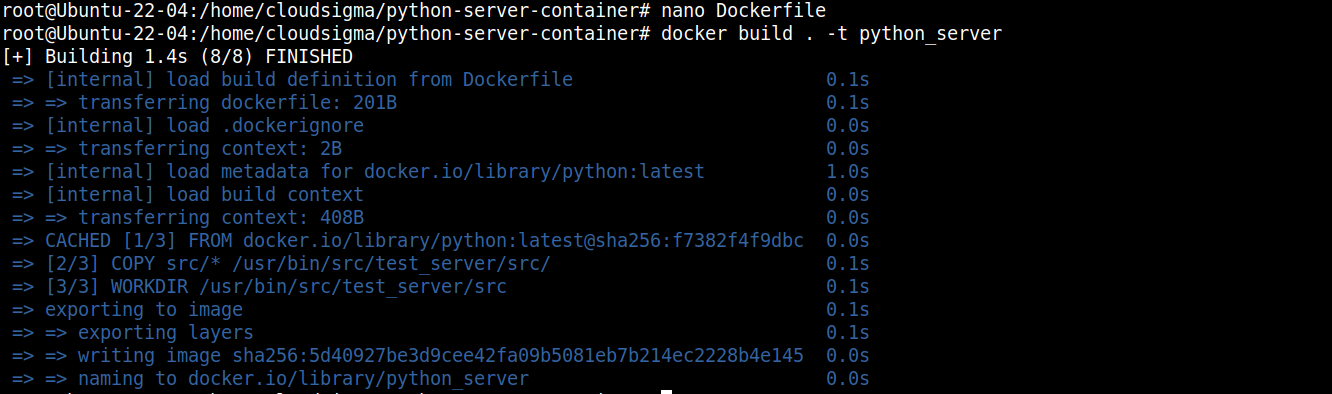
Create a new Dockerfile for our project:
|
1 |
touch Dockerfile |
Now, we will introduce the necessary codes in it. Open it in a text editor:
|
1 |
nano Dockerfile |
Enter the following code:
|
1 2 3 4 5 6 7 8 9 |
FROM python:latest ENV SRC_DIR /usr/bin/src/test_server/src COPY src/* ${SRC_DIR}/ WORKDIR ${SRC_DIR} ENV PYTHONUNBUFFERED=1 CMD ["python", "server.py"] |
Burada,
-
Herhangi bir Dockerfile must begin with the FROM yönergesi ile başlamalıdır. Bizim durumumuzda, Python'u Docker imajının temeli olarak tanımlıyoruz.
-
The ENV SRC_DIR yönergesi, konteyner dizininin konumunu belirtir.
-
The COPY yönergesi, dosyaları src dizininden kopyalar; bu dizin şu anda Python sunucusunu barındırmaktadır.
-
değişkeni, PYTHONBUFFERED=1 Python'un çıktıları doğrudan STDOUT ortamına yazdırmasını ve günlüğe kaydetmesini belirtir. Aksi takdirde, günlükler herhangi bir arabelleğe gönderilmezdi.
-
The CMD yönergesi, konteyner çalıştırılırken yürütülecek varsayılan bir komutu belirtir. Bu durumda, yönergeyi Python sunucumuzu başlatmak için kullanıyoruz.
Adım 4 – Docker İmajı Oluşturma
With the Dockerfile hazır olduğunda, artık bir imaj oluşturabiliriz. İşlemi başlatmak için aşağıdaki Docker komutunu çalıştırın:
|
1 |
docker build . -t python_server |
Burada,
-
The -t bayrağı, Docker imajımızı etiketlemek için kullanılır: python_server.
-
Docker gerekli tüm bileşenleri indirecek ve bunları bir imajda birleştirecektir.
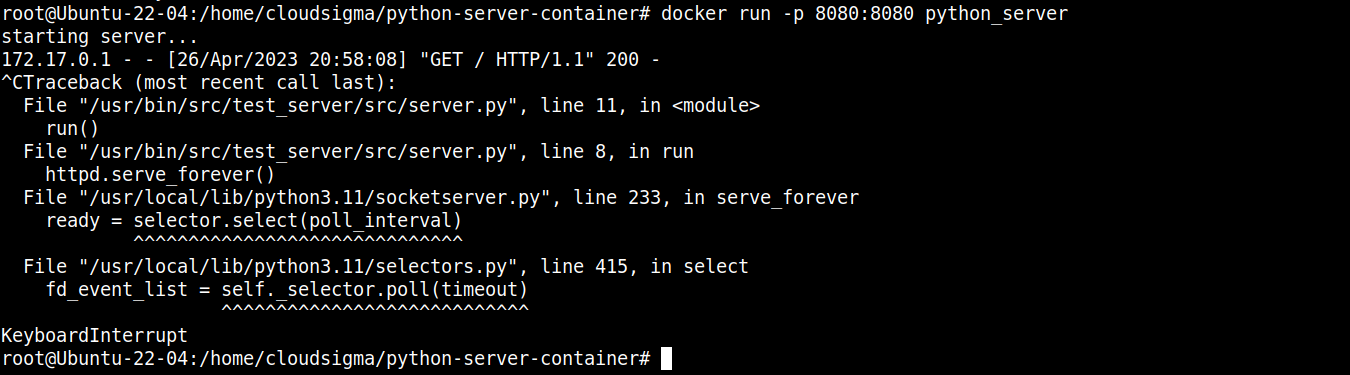
Adım 5 – İmajı Çalıştırma
İmaj dağıtıma hazır. Aşağıdaki komutu kullanarak çalıştırabiliriz:
|
1 |
docker run -p 8080:8080 python_server |

Burada, yerel makineden Docker imajına 8080 portunu -p bayrağını kullanarak yönlendiriyoruz.
Sunucunun çalışır durumda olup olmadığını curl:
|
1 |
curl -iv localhost:8080 |

Adım 6 – Sunucuyu Sonlandırma
Terminalden, Docker işlemini sonlandırmak için “Ctrl + C” tuşlarına basın:
Adım 7 – Docker İmajını Dışa Aktarma ve İçe Aktarma
Artık Python sunucumuzu barındıran işlevsel bir Docker imajımız var. Docker’ın dışa aktarma ve içe aktarma özelliklerinin yardımıyla bunu başka herhangi bir sisteme taşıyabiliriz.
İlk olarak, mevcut sistemdeki Docker imajlarının listesini kontrol edin:
|
1 |
docker images |

Hedefimiz, az önce oluşturduğumuz python_server Docker imajıdır. Aşağıdaki komut bunu bir TAR arşivi olarak dışa aktaracaktır:
|
1 |
docker save python_server:latest > python_server.tar |

After transferring the python_server.tar dosyasını hedef makineye aktardıktan sonra, Docker imajını içe aktarmak için aşağıdaki komutu kullanın:
|
1 |
docker load < python_server.tar |

Son Düşünceler
Bu kılavuzda, bir Python uygulamasından Docker imajı oluşturmayı gösterdik. Basit bir Python web sunucusu oluşturduk ve bundan bir Docker imajı elde ettik. Docker imajı artık herhangi bir ortamda dağıtılabilir ve tutarlı bir davranış sergilemesi beklenebilir.
Docker hakkında daha fazla bilgi edinmek ister misiniz? Aşağıdaki kılavuzlara göz atın:
-
Ubuntu 20.04 üzerinde Docker ile Flask Uygulaması Derleme ve Dağıtma
-
Docker, Nginx ve Let’s Encrypt ile bir Django Uygulamasını Güvenli Hale Getirme ve Ölçeklendirme
-
Ubuntu 20.04 üzerinde Docker Konteynerleri ile WordPress Dağıtımı
Keyifli Çalışmalar!
Yorumlar
Henüz yorum yapılmamış. İlk siz olun.