
これまでAngularJSを使ってアプリケーションを開発してきたなら、おそらくHTTPインターセプターについてはご存知でしょう。しかし、これらのHTTPインターセプターは、バージョン4.3になるまでAngularでは利用できませんでした。このチュートリアルでは、Angularでインターセプターを使用してHTTPリクエストとレスポンスを処理し、エラーを処理します。
前提条件
Angularアプリケーションは、Node.jsランタイムを使用します。このチュートリアルを完了するには、マシンにNode.jsがインストールされている必要があります。幸いなことに、Node.jsのインストールは非常に簡単です。こちらのUbuntu 18.04にNode.jsをインストールする方法.
に完全なガイドがあります。さらに、Angularを理解しており、Angularアプリケーションを構築するためにAngular CLIを使用することに慣れていると役立ちます。今回はNode v8.12.0とnpm v6.4.1を使用します。
ステップ1:Angularアプリの作成
まず、Angular CLIを使用して新しいAngularアプリを作成しましょう。アプリケーションの名前は Angular-Interceptorとします。アプリを作成するには、以下のコマンドを実行します:
|
1 |
npx @angular/cli@7.0.6 new Angular-Interceptor |
いくつかの選択肢を求められます。デフォルト値を入力して進めてください:

次に、アプリケーションのディレクトリに移動し、以下のコマンドを実行してアプリケーションを起動します:
|
1 |
npx ng serve --open |

その後、ブラウザで http://localhost:4200にアクセスしてアプリを確認します。これで基本的なAngularアプリが設定されました。
ステップ2:Angularアプリのスタイリング
ここでは、Angular Materialを使用してAngularアプリをスタイリングします。プロジェクトにAngular Materialをインストールするには、以下のコマンドを実行します:
|
1 |
npm install --save @angular/material@7.0.4 @angular/cdk@7.0.4 @angular/animations@7.0.4 |
これにより、プロジェクトに @angular/material, @angular/cdk、および @angular/animationがインストールされます。次に、プロジェクトでアニメーションを設定します。 BrowserAnimationsModuleを src/app/module.tsファイルに追加します:
|
1 2 3 4 5 6 7 8 9 10 11 12 13 |
... import { BrowserAnimationsModule } from '@angular/platform-browser/animations'; @NgModule({ ... imports: [ ... BrowserAnimationsModule ], ... }) export class AppModule { } |
Angular Material of Dialogコンポーネントを使用します。Dialogコンポーネントを使用するには、 MatDialogModuleを src/app/app.module.tsファイルにインポートする必要があります:
|
1 2 3 4 5 6 7 8 9 10 11 12 13 |
... import { MatDialogModule } from '@angular/material'; @NgModule({ ... imports: [ ... MatDialogModule ], ... }) export class AppModule { } |
UIをより魅力的にするために、 indigo-pink.cssを styles.scssファイルに追加しましょう:
|
1 |
@import "~@angular/material/prebuilt-themes/indigo-pink.css"; |
ステップ3:Angularインターセプターの構築
Under the appフォルダの下に、 interceptorという新しいフォルダを作成します。この新しく作成したフォルダの中に、新しい httpconfig.interceptor.tsファイルを作成します。
インターセプターを機能させるには、 httpconfig.interceptor.tsにいくつかの依存関係をインポートする必要があります。これらの依存関係は、 HttpInterceptor, HttpRequest, HttpResponse、および HttpHandler, HttpEvent, HttpErrorResponse.
インポート後の httpconfig.interceptor.tsファイルは以下のようになります:
|
1 2 3 4 5 6 7 8 9 10 11 12 13 |
import { Injectable } from '@angular/core'; import { HttpInterceptor, HttpRequest, HttpResponse, HttpHandler, HttpEvent, HttpErrorResponse } from '@angular/common/http'; import { Observable, throwError } from 'rxjs'; import { map, catchError } from 'rxjs/operators'; |
次に、クラス HttpConfigInterceptorを作成し、次のインターフェースを実装します: HttpInterceptor. これは例です:
|
1 2 3 4 5 6 7 |
@Injectable() export class HttpConfigInterceptor implements HttpInterceptor { intercept(request: HttpRequest<any>, next: HttpHandler): Observable<HttpEvent<any>> { // ... } } |
以下のコードを httpconfig.interceptor.ts ファイルに追加します:
|
1 2 3 4 5 6 7 8 9 10 11 12 13 14 15 16 17 18 19 20 21 22 23 24 25 26 27 |
... @Injectable() export class HttpConfigInterceptor implements HttpInterceptor { intercept(request: HttpRequest<any>, next: HttpHandler): Observable<HttpEvent<any>> { const token: string = localStorage.getItem('token'); if (token) { request = request.clone({ headers: request.headers.set('Authorization', 'Bearer ' + token) }); } if (!request.headers.has('Content-Type')) { request = request.clone({ headers: request.headers.set('Content-Type', 'application/json') }); } request = request.clone({ headers: request.headers.set('Accept', 'application/json') }); return next.handle(request).pipe( map((event: HttpEvent<any>) => { if (event instanceof HttpResponse) { console.log('event--->>>', event); } return event; })); } } |
動作させるには、 httpconfig.interceptor.tsを、 app.module.ts ファイルにインポートする必要があります:
|
1 2 3 4 5 6 7 8 9 10 11 12 13 |
... import { HttpClientModule, HTTP_INTERCEPTORS } from '@angular/common/http'; ... import { HttpConfigInterceptor } from './interceptor/httpconfig.interceptor'; @NgModule({ ... imports: [ ... HttpClientModule ], ... }) |
Add HttpConfigInterceptorを providersに追加します。複数のインターセプターを処理するために、 multi: をtrueに設定します:
|
1 2 3 4 5 6 7 8 9 10 |
... @NgModule({ ... providers: [ ... { provide: HTTP_INTERCEPTORS, useClass: HttpConfigInterceptor, multi: true } ], ... }) ... |
次のセクションでは、エラーを処理するためのサービスを作成します。
ステップ 4: エラー処理用のサービス
ここでは、エラーを処理するためのコードを記述します。エラーをキャプチャし、エンドユーザーに適切に表示する必要があります。簡単に言うと、以下の手順に従います。
- Create a folder called error-dialogという名前のフォルダを、 app フォルダ内に作成します。
- Create a service for errors called errorDialogServiceというエラー用サービスを、次のファイル内に作成します: errordialog.service.ts.
- 以下のコードを errordialog.service.tsに追加します: :
|
1 2 3 4 5 6 7 8 9 10 11 12 13 14 15 16 17 18 19 20 21 22 23 24 25 26 27 |
import { Injectable } from '@angular/core'; import { MatDialog, MatDialogRef, MAT_DIALOG_DATA } from '@angular/material'; import { ErrorDialogComponent } from './errordialog.component'; @Injectable() export class ErrorDialogService { public isDialogOpen: Boolean = false; constructor(public dialog: MatDialog) { } openDialog(data): any { if (this.isDialogOpen) { return false; } this.isDialogOpen = true; const dialogRef = this.dialog.open(ErrorDialogComponent, { width: '300px', data: data }); dialogRef.afterClosed().subscribe(result => { console.log('ダイアログが閉じられました'); this.isDialogOpen = false; let animal; animal = result; }); } } |
|
1 2 3 4 5 6 7 8 9 10 11 12 |
import { Component, Inject } from '@angular/core'; import { MAT_DIALOG_DATA } from '@angular/material'; @Component({ selector: 'app-root', templateUrl: './errordialog.component.html' }) export class ErrorDialogComponent { title = 'Angular-Interceptor'; constructor(@Inject(MAT_DIALOG_DATA) public data: string) {} } |
|
1 2 3 4 5 6 7 8 9 10 |
<div> <div> <p> 理由: {{data.reason}} </p> <p> ステータス: {{data.status}} </p> </div> </div> |
要約すると、手順は以下の通りです。
- まず、以下をインポートすることから始めます。 errordialog.service.
- 次に、以下のコンストラクタを追加します。 errorDialogService.
- また、以下を使用してエラーレスポンスを処理するコードも追加します。 catchError および throwError.
- 以下をインポートします。 errordialog.service および errordialog.component を以下にインポートします。 AppModule.
変更が完了すると、次の2つのファイルが修正されます。 app.module.ts および httpconfig.interceptor.ts:
|
1 2 3 4 5 6 7 8 9 10 11 12 13 14 15 16 17 18 |
... import { ErrorDialogComponent } from './error-dialog/errordialog.component'; ... import { ErrorDialogService } from './error-dialog/errordialog.service'; ... @NgModule({ ... declarations: [ ... ErrorDialogComponent ], ... providers: [ ... ErrorDialogService ], entryComponents: [ErrorDialogComponent], }) |
|
1 2 3 4 5 6 7 8 9 10 11 12 13 14 15 16 17 18 19 20 21 22 23 24 25 26 |
... import { ErrorDialogService } from '../error-dialog/errordialog.service'; ... @Injectable() export class HttpConfigInterceptor implements HttpInterceptor { constructor(public errorDialogService: ErrorDialogService) { } intercept(request: HttpRequest<any>, next: HttpHandler): Observable<HttpEvent<any>> { ... return next.handle(request).pipe( map((event: HttpEvent<any>) => { if (event instanceof HttpResponse) { console.log('event--->>>', event); } return event; }), catchError((error: HttpErrorResponse) => { let data = {}; data = { reason: error && error.error && error.error.reason ? error.error.reason : '', status: error.status }; this.errorDialogService.openDialog(data); return throwError(error); })); } } |
ステップ 5: サンプルサービスの作成
このステップでは、サンプルとして2つのサービスを作成します:
- ログインAPI
- 顧客詳細API
という名前の新しいフォルダーをservices ( src フォルダー内)に作成します。次に、この新しく作成したフォルダー内に、 という名前の新しいファイルを作成します。login.service.ts。そして、2つの関数を追加します:
|
1 2 3 4 5 6 7 8 9 10 11 12 13 14 15 16 |
import { Injectable } from '@angular/core'; import { HttpClient } from '@angular/common/http'; @Injectable() export class LoginService { constructor(private http: HttpClient) { } login(data) { data = { email: 'admin', password: 'admin' }; return this.http.post('http://localhost:3070/api/login', data); } getCustomerDetails() { return this.http.get('http://localhost:3070/customers/details'); } } |
ステップ 6: HTTPクライアントサービスの呼び出し
いよいよ、チュートリアルの最後の部分です。HTTPサービスを app.component.ts ファイルから呼び出します。2つの LoginService 関数を app.component.ts に追加します。onloadでログインAPIを呼び出し、customers/detailsを onclick で呼び出します。:
|
1 2 3 4 5 6 7 8 9 10 11 12 13 14 15 16 17 18 19 20 21 22 |
import { Component } from '@angular/core'; import { LoginService } from './services/login.service'; @Component({ selector: 'app-root', templateUrl: './app.component.html', styleUrls: ['./app.component.scss'] }) export class AppComponent { title = 'Angular-Interceptor'; constructor(public loginService: LoginService) { this.loginService.login({}).subscribe(data => { console.log(data); }); } getCustomerDetails() { this.loginService.getCustomerDetails().subscribe((data) => { console.log('----->>>', data); }); } } |
次に、UI要素を app.component.htmlに追加して、ユーザーがクリックできるようにする必要があります:
|
1 |
<h2 (click)="getCustomerDetails()">顧客詳細の取得</h2> |
完了するには、 LoginServiceを providers( AppModule内)に含める必要があります。:
|
1 2 3 4 5 6 7 8 9 10 11 12 |
... import { LoginService } from './services/login.service'; ... @NgModule({ ... providers: [ ... LoginService ] ... }) |
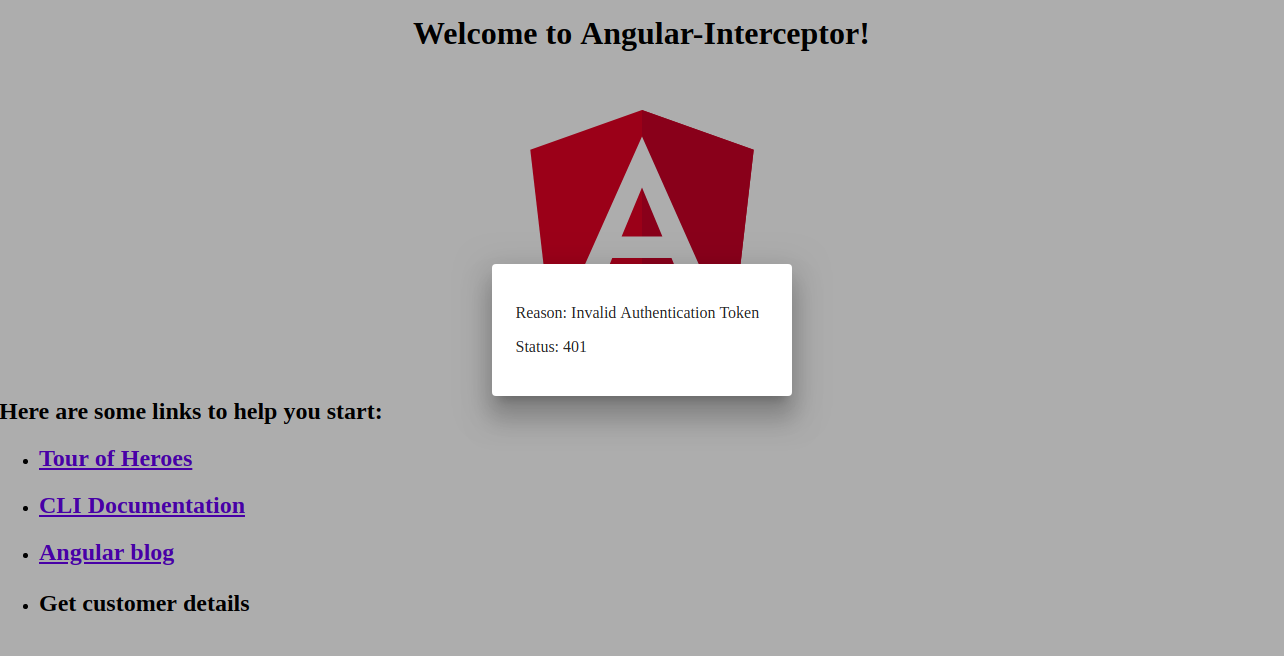
以下に、エラーハンドラーダイアログのスクリーンショットを示します。
結論
このチュートリアルでは、Angularのインターセプターを使用してHTTPリクエストとレスポンスを処理する方法を学びました。また、Angular Materialのダイアログを使用してエラーを処理する方法についても学びました。
AngularアプリはランタイムとしてNode.jsを使用します。Node.jsの詳細や、Docker上でNode.jsアプリケーションをデプロイする方法について詳しく知りたい場合は、こちらのUbuntu 20.04でDockerを使用してNode.js (Express.js) アプリをデプロイする方法 ガイドをご覧ください。また、Ubuntu 20.04でNode.jsを使用して本番タスクを実行する方法 や、CentOS 8へのNode.jsのインストール:完全ガイド.
ハッピーコンピューティング!
コメント
コメントはまだありません。最初のコメントを投稿しましょう。