
如果您一直使用 AngularJS 開發應用程式,您可能已經知道 HTTP 攔截器。然而,這些 HTTP 攔截器直到 4.3 版本才在 Angular 中提供。 在本教學中,我們將在 Angular 中使用攔截器來處理 HTTP 請求和回應,並處理錯誤。
先決條件
Angular 應用程式使用 Node.js 執行階段。要完成本教學,您需要在電腦上安裝 Node.js。幸運的是,Node.js 非常容易安裝。我們在這裡有一份完整的指南:如何在 Ubuntu 18.04 上安裝 Node.js.
此外,了解 Angular 並熟悉使用 Angular CLI 來建置 Angular 應用程式將會對您有所幫助。我們將使用 Node v8.12.0 和 npm v6.4.1。
步驟 1:建立 Angular 應用程式
首先,讓我們使用 Angular CLI 建立一個新的 Angular 應用程式。我們將應用程式命名為 Angular-Interceptor。執行以下命令來建立應用程式:
|
1 |
npx @angular/cli@7.0.6 new Angular-Interceptor |
系統會要求您進行一些選擇。輸入預設值並繼續:

接下來,導覽至應用程式目錄,並執行以下命令來啟動應用程式:
|
1 |
npx ng serve --open |

然後,在瀏覽器中查看 http://localhost:4200 以查看應用程式。您現在已經設定了一個基本的 Angular 應用程式。
步驟 2:美化 Angular 應用程式樣式
在這裡,我們將使用 Angular Material 來美化我們的 Angular 應用程式。要在您的專案中安裝 Angular Material,請執行以下命令:
|
1 |
npm install --save @angular/material@7.0.4 @angular/cdk@7.0.4 @angular/animations@7.0.4 |
這將在您的專案中安裝 @angular/material, @angular/cdk,以及 @angular/animation。接下來,我們將在專案中設定動畫。在您的 BrowserAnimationsModule 中新增 src/app/module.ts 檔案:
|
1 2 3 4 5 6 7 8 9 10 11 12 13 |
... import { BrowserAnimationsModule } from '@angular/platform-browser/animations'; @NgModule({ ... imports: [ ... BrowserAnimationsModule ], ... }) export class AppModule { } |
我們將使用 Angular Material 的 Dialog 元件。要使用 Dialog 元件,我們必須在 MatDialogModule 中匯入 src/app/app.module.ts 檔案:
|
1 2 3 4 5 6 7 8 9 10 11 12 13 |
... import { MatDialogModule } from '@angular/material'; @NgModule({ ... imports: [ ... MatDialogModule ], ... }) export class AppModule { } |
為了讓 UI 更美觀,讓我們將 indigo-pink.css 新增到您的 styles.scss 檔案:
|
1 |
@import "~@angular/material/prebuilt-themes/indigo-pink.css"; |
Step 3: Build Your Angular Interceptor
在 app 資料夾下,我們將建立一個名為 interceptor 的新資料夾。在這個新建立的資料夾中,建立一個新的 httpconfig.interceptor.ts 檔案。
我們需要在我們的 httpconfig.interceptor.ts 中匯入一些依賴項,以使我們的攔截器正常運作。這些依賴項是 HttpInterceptor, HttpRequest, HttpResponse,以及 HttpHandler, HttpEvent, HttpErrorResponse.
我們的 httpconfig.interceptor.ts 檔案在匯入後將如下所示:
|
1 2 3 4 5 6 7 8 9 10 11 12 13 |
import { Injectable } from '@angular/core'; import { HttpInterceptor, HttpRequest, HttpResponse, HttpHandler, HttpEvent, HttpErrorResponse } from '@angular/common/http'; import { Observable, throwError } from 'rxjs'; import { map, catchError } from 'rxjs/operators'; |
接下來,建立一個類別 HttpConfigInterceptor 並實作介面 HttpInterceptor. 這是一個範例:
|
1 2 3 4 5 6 7 |
@Injectable() export class HttpConfigInterceptor implements HttpInterceptor { intercept(request: HttpRequest<any>, next: HttpHandler): Observable<HttpEvent<any>> { // ... } } |
將以下程式碼新增至 httpconfig.interceptor.ts 檔案:
|
1 2 3 4 5 6 7 8 9 10 11 12 13 14 15 16 17 18 19 20 21 22 23 24 25 26 27 |
... @Injectable() export class HttpConfigInterceptor implements HttpInterceptor { intercept(request: HttpRequest<any>, next: HttpHandler): Observable<HttpEvent<any>> { const token: string = localStorage.getItem('token'); if (token) { request = request.clone({ headers: request.headers.set('Authorization', 'Bearer ' + token) }); } if (!request.headers.has('Content-Type')) { request = request.clone({ headers: request.headers.set('Content-Type', 'application/json') }); } request = request.clone({ headers: request.headers.set('Accept', 'application/json') }); return next.handle(request).pipe( map((event: HttpEvent<any>) => { if (event instanceof HttpResponse) { console.log('event--->>>', event); } return event; })); } } |
為了使其運作,我們需要匯入 httpconfig.interceptor.ts 於我們的 app.module.ts 檔案:
|
1 2 3 4 5 6 7 8 9 10 11 12 13 |
... import { HttpClientModule, HTTP_INTERCEPTORS } from '@angular/common/http'; ... import { HttpConfigInterceptor } from './interceptor/httpconfig.interceptor'; @NgModule({ ... imports: [ ... HttpClientModule ], ... }) |
新增 HttpConfigInterceptor 至 providers。我們將設定 multi: true 以處理多個攔截器:
|
1 2 3 4 5 6 7 8 9 10 |
... @NgModule({ ... providers: [ ... { provide: HTTP_INTERCEPTORS, useClass: HttpConfigInterceptor, multi: true } ], ... }) ... |
在下一節中,我們將建立用於處理錯誤的服務。
步驟 4:處理錯誤的服務
在這裡,我們將撰寫處理錯誤的程式碼。我們需要擷取錯誤並將其適當地顯示給終端使用者。簡而言之,以下是我們將遵循的步驟:
- 建立一個名為 error-dialog 的資料夾,位於 app 資料夾中。
- 建立一個名為 errorDialogService 的錯誤服務,位於名為 errordialog.service.ts.
- 將以下程式碼新增至 errordialog.service.ts :
|
1 2 3 4 5 6 7 8 9 10 11 12 13 14 15 16 17 18 19 20 21 22 23 24 25 26 27 |
import { Injectable } from '@angular/core'; import { MatDialog, MatDialogRef, MAT_DIALOG_DATA } from '@angular/material'; import { ErrorDialogComponent } from './errordialog.component'; @Injectable() export class ErrorDialogService { public isDialogOpen: Boolean = false; constructor(public dialog: MatDialog) { } openDialog(data): any { if (this.isDialogOpen) { return false; } this.isDialogOpen = true; const dialogRef = this.dialog.open(ErrorDialogComponent, { width: '300px', data: data }); dialogRef.afterClosed().subscribe(result => { console.log('對話框已關閉'); this.isDialogOpen = false; let animal; animal = result; }); } } |
|
1 2 3 4 5 6 7 8 9 10 11 12 |
import { Component, Inject } from '@angular/core'; import { MAT_DIALOG_DATA } from '@angular/material'; @Component({ selector: 'app-root', templateUrl: './errordialog.component.html' }) export class ErrorDialogComponent { title = 'Angular-Interceptor'; constructor(@Inject(MAT_DIALOG_DATA) public data: string) {} } |
|
1 2 3 4 5 6 7 8 9 10 |
<div> <div> <p> 原因: {{data.reason}} </p> <p> 狀態: {{data.status}} </p> </div> </div> |
總結來說,讓我們列出以下步驟:
- 首先匯入 errordialog.服務.
- 然後,我們將新增建構函式於 errorDialogService.
- 我們也將新增處理錯誤回應的程式碼,使用 catchError 與 throwError.
- 匯入 errordialog.服務 與 errordialog.元件 到 AppModule.
完成修改後,將會修改兩個檔案: app.module.ts 和 httpconfig.interceptor.ts:
|
1 2 3 4 5 6 7 8 9 10 11 12 13 14 15 16 17 18 |
... import { ErrorDialogComponent } from './error-dialog/errordialog.component'; ... import { ErrorDialogService } from './error-dialog/errordialog.service'; ... @NgModule({ ... declarations: [ ... ErrorDialogComponent ], ... providers: [ ... ErrorDialogService ], entryComponents: [ErrorDialogComponent], }) |
|
1 2 3 4 5 6 7 8 9 10 11 12 13 14 15 16 17 18 19 20 21 22 23 24 25 26 |
... import { ErrorDialogService } from '../error-dialog/errordialog.service'; ... @Injectable() export class HttpConfigInterceptor implements HttpInterceptor { constructor(public errorDialogService: ErrorDialogService) { } intercept(request: HttpRequest<any>, next: HttpHandler): Observable<HttpEvent<any>> { ... return next.handle(request).pipe( map((event: HttpEvent<any>) => { if (event instanceof HttpResponse) { console.log('event--->>>', event); } return event; }), catchError((error: HttpErrorResponse) => { let data = {}; data = { reason: error && error.error && error.error.reason ? error.error.reason : '', status: error.status }; this.errorDialogService.openDialog(data); return throwError(error); })); } } |
步驟 5:建立範例服務
在此步驟中,我們將建立兩個服務作為範例:
- 登入 API
- 客戶詳細資料 API
建立一個名為 services 的資料夾,位於 src 資料夾中。接下來,在此新建立的資料夾內,建立一個名為 login.service.ts 的檔案,並新增兩個函式:
|
1 2 3 4 5 6 7 8 9 10 11 12 13 14 15 16 |
import { Injectable } from '@angular/core'; import { HttpClient } from '@angular/common/http'; @Injectable() export class LoginService { constructor(private http: HttpClient) { } login(data) { data = { email: 'admin', password: 'admin' }; return this.http.post('http://localhost:3070/api/login', data); } getCustomerDetails() { return this.http.get('http://localhost:3070/customers/details'); } } |
步驟 6:呼叫 HTTP 用戶端服務
最後,我們來到了教學課程的最後一部分。我們將從 app.component.ts 檔案中呼叫我們的 HTTP 服務。將這兩個 LoginService 函式新增至 app.component.ts。在 onload 時呼叫登入 API,並針對 customers/details 使用 onclick:
|
1 2 3 4 5 6 7 8 9 10 11 12 13 14 15 16 17 18 19 20 21 22 |
import { Component } from '@angular/core'; import { LoginService } from './services/login.service'; @Component({ selector: 'app-root', templateUrl: './app.component.html', styleUrls: ['./app.component.scss'] }) export class AppComponent { title = 'Angular-Interceptor'; constructor(public loginService: LoginService) { this.loginService.login({}).subscribe(data => { console.log(data); }); } getCustomerDetails() { this.loginService.getCustomerDetails().subscribe((data) => { console.log('----->>>', data); }); } } |
現在我們必須在以下位置添加一個 UI 元素: app.component.html,以便用戶可以點擊它:
|
1 |
<h2 (click)="getCustomerDetails()">獲取客戶詳細資訊</h2> |
最後,您需要將 LoginService 包含到 providers 中,位於 AppModule:
|
1 2 3 4 5 6 7 8 9 10 11 12 |
... import { LoginService } from './services/login.service'; ... @NgModule({ ... providers: [ ... LoginService ] ... }) |
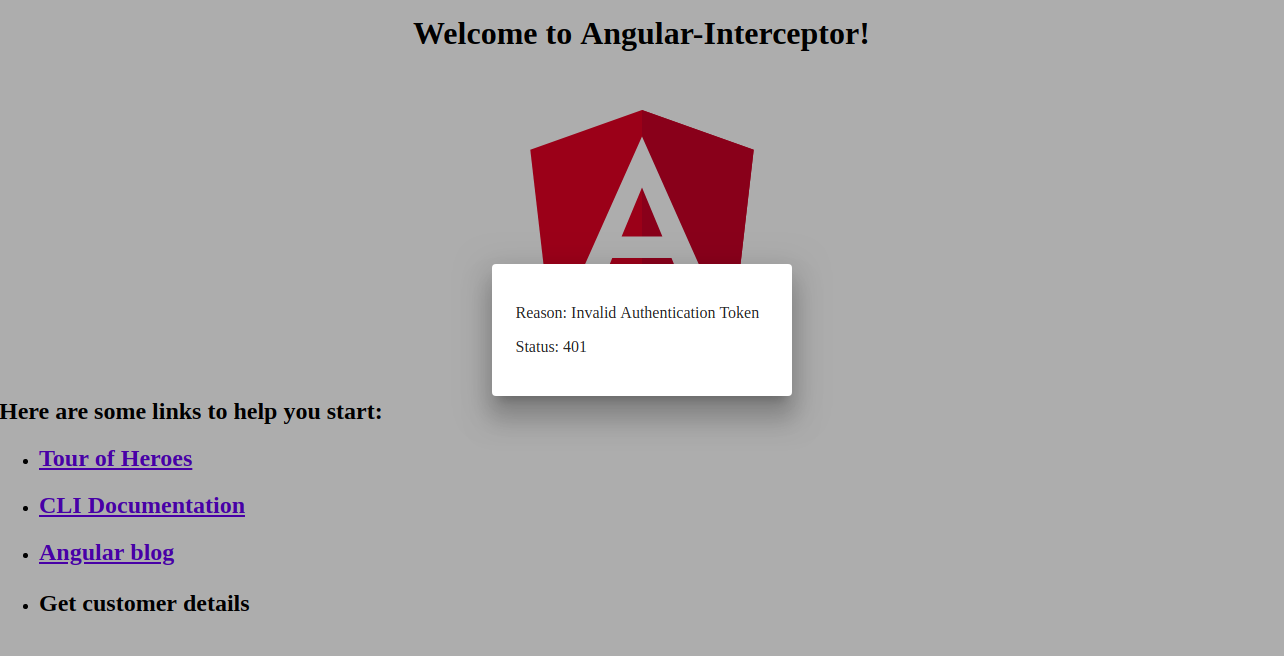
以下是錯誤處理器對話框的螢幕截圖:
結論
在本教學中,我們學習了如何使用 Angular 攔截器處理 HTTP 請求和回應。我們還學習了如何使用 Angular Material 中的對話框處理錯誤。
Angular 應用程式使用 Node.js 作為其執行環境。如果您想了解更多關於 Node.js 以及如何在 Docker 上部署 Node.js 應用程式的資訊,請參閱我們的 如何在 Ubuntu 20.04 上使用 Docker 部署 Node.js (Express.js) 應用程式 指南。您也可以參閱 如何在 Ubuntu 20.04 上使用 Node.js 執行生產任務 以及 在 CentOS 8 上安裝 Node.js:完整指南.
祝您使用愉快!
留言
目前尚無留言。成為第一個留言的人吧。