
소개
새로운 서버를 구성해야 하는 상황은 언제나 발생합니다. 이는 작업 부하를 분산하기 위해서일 수도 있고, 단순히 더 많은 서버가 필요해서일 수도 있습니다. 새로운 서버를 설정할 때, 사용자는 수동 개입을 최소화하기 위해 서버 자동화를 활용하여 서버를 구성해야 합니다. Ansible은 새 서버를 자동으로 구성하여 수동으로 서버를 설정할 때 발생할 수 있는 인적 오류의 가능성을 줄이는 데 사용할 수 있는 구성 관리 도구 중 하나입니다.
Ansible은 아키텍처가 단순하면서도 기능이 풍부한 도구입니다. 스크립트를 통해 서버 구성을 용이하게 합니다. 간결한 아키텍처 덕분에 Ansible은 노드 전체에 다른 소프트웨어를 설치할 필요가 없습니다.
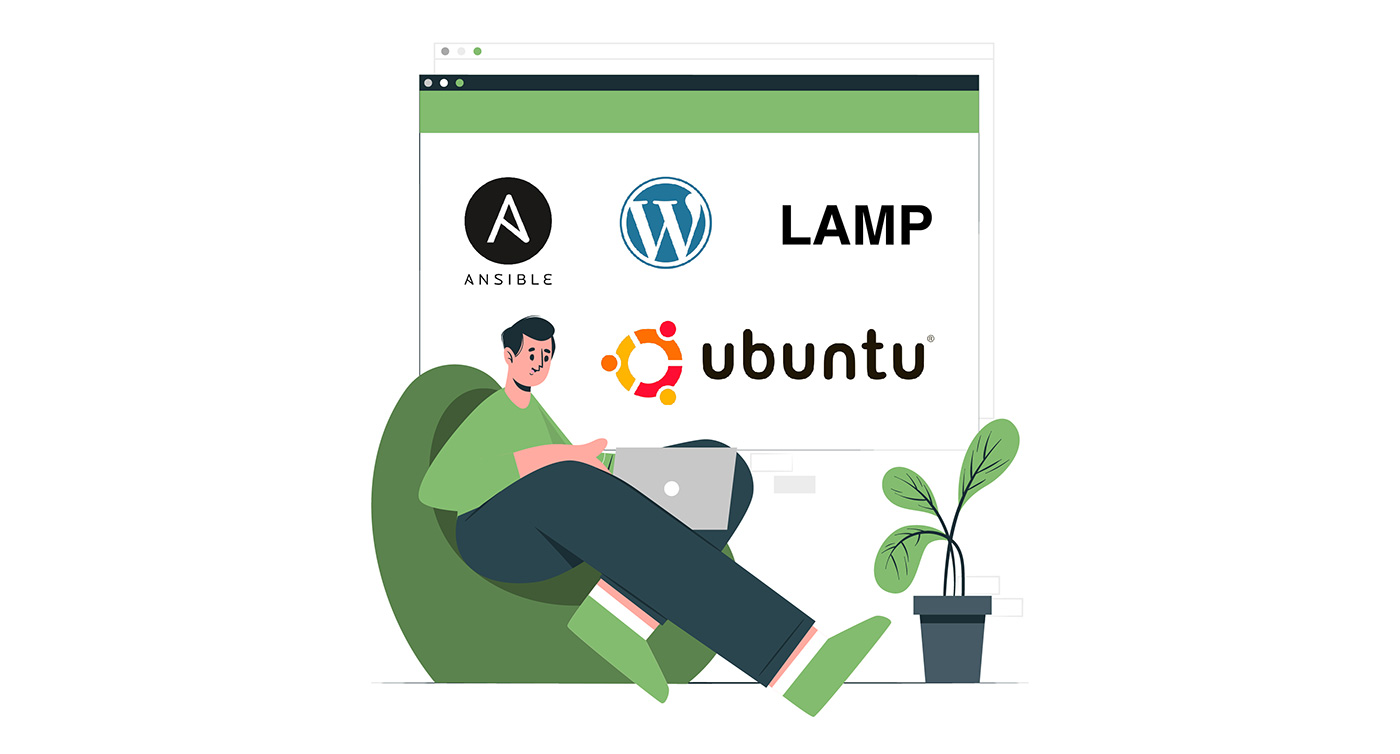
이 튜토리얼에서는, Ubuntu 서버에서 실행되는 LAMP 스택과 함께 WordPress 설치를 자동화하기 위해 Ansible을 사용하는 방법을 보여드리겠습니다. WordPress는 코딩 언어로 PHP를 사용하고 데이터를 저장하기 위해 MySQL 데이터베이스를 활용하여 블로그와 웹사이트를 만드는 데 사용되는 CMS입니다. WordPress가 설치되면 사용자는 웹 프론트엔드를 사용하여 사이트를 관리할 수 있습니다.
사전 요구 사항
- 이 튜토리얼은 Ubuntu를 기반으로 하므로, 최신 Ubuntu 버전이 설치되어 있어야 하며, sudo 권한이 필요합니다. Ubuntu가 설치되어 있지 않다면, 저희의 Ubuntu 서버 설정 방법.
- 또한 Ansible 제어 노드가 필요합니다. 이 제어 노드는 sudo 권한이 있고 방화벽이 활성화되어 있어야 합니다. Ubuntu 20.04에서 Ansible 설치 및 구성 에 Ansible을 구성하는 방법에 대한 자세한 가이드가 포함되어 있습니다.
- 또한 원격 Ansible 호스트 (최신 Ubuntu를 실행하는)가 필요합니다. 이 호스트들은 기본적으로 Ansible에서 관리되는 노드입니다.
Ansible Playbook 작업 요약
이 섹션에서는 Ansible Playbook을 실행할 때 수행되는 작업을 살펴봅니다. 이 절차는 여기에 제공된 수동 설정의 대안입니다: Ubuntu 20.04에서 LAMP를 사용하여 WordPress를 설치하는 방법.
Playbook을 실행하면 Ansible은 다음을 수행합니다:
- 설치 aptitude (선호되는 Ansible 패키지 관리자).
- PHP 확장 및 LAMP 패키지를 설치하고 구성합니다.
- 새로운 Apache VirtualHost (WordPress 웹사이트용)를 생성합니다.
- 활성화 mod_rewrite 모듈을 활성화하고 Apache에서 제공하는 기본 웹사이트를 비활성화합니다.
- MySQL root 사용자의 비밀번호를 설정합니다.
- 익명 MySQL 계정 및 테스트 데이터베이스를 제거합니다.
- 새로운 사용자와 새로운 데이터베이스를 생성합니다. 이들은 WordPress 웹사이트에서 사용됩니다.
- 설정 UFW (구성된 포트( 에서 HTTP 트래픽을 허용하도록)80 가 기본값).
- WordPress를 다운로드하고 압축을 풉니다.
- 디렉터리 권한 및 소유권을 설정합니다.
- 새로운 wp-config.php 파일을 템플릿을 사용하여 구성합니다.
LAMP 기반 WordPress Ansible Playbook 가이드
먼저, 다음에서 LAMP 기반 WordPress playbook 및 해당 종속성을 가져와야 합니다: do-community/ansible-playbooks 저장소. 이 저장소를 Ansible 제어 노드 내부에 복제합니다.
아래에 언급된 대로 git pull 명령어를 실행할 수 있습니다:
|
1 2 3 4 5 |
cd ~ git clone https://github.com/do-community/ansible-playbooks.git cd ansible-playbooks |
위에서 언급한 저장소의 최신 풀(pull)을 받았는지 확인하세요. 이전에 저장소를 복제(clone)한 적이 있는 경우에 해당합니다. 아래는 최신 상태로 업데이트하는 방법입니다:
|
1 2 3 |
cd ~/ansible-playbooks git pull |
이제 다음 폴더 내부의 파일을 찾아야 합니다. wordpress-lamp_ubuntu 폴더입니다. 이 폴더의 이름은 사용 중인 Ubuntu 버전에 따라 다를 수 있습니다. 한눈에 보면 이 디렉토리에서 다음과 같은 구조를 볼 수 있습니다:
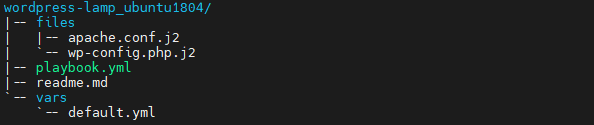
아래에서 이 파일들의 용도를 요약해 보겠습니다:
- files/apache.conf.j2: Apache는 다음을 사용합니다. VirtualHost. 이 파일은 다음에 대한 설정을 지정하는 데 사용됩니다. VirtualHost.
- files/wp-config.php.j2: 이 파일에는 WordPress를 구성하기 위한 설정이 포함되어 있습니다.
- vars/default.yml: 플레이북 설정을 구성합니다.
- playbook.yml: 원격 서버에서 실행해야 하는 작업이 있는 경우, 이 파일을 사용하여 구성합니다.
- readme.md: 플레이북 사용 가이드입니다.
설치를 사용자 정의하려면 플레이북의 변수 파일을 편집해야 합니다. 먼저 위에서 언급한 디렉토리 내에 있는 vars/default.yaml 파일을 엽니다:
|
1 2 3 |
cd wordpress-lamp_ubuntu1804 nano vars/default.yml |
이 파일은 꽤 깁니다. 설치에 도움이 되는 여러 구성이 포함되어 있습니다:
|
1 2 3 4 5 6 7 8 9 10 11 12 13 14 |
--- #System Settings php_modules: [ 'php-curl', 'php-gd', 'php-mbstring', 'php-xml', 'php-xmlrpc', 'php-soap', 'php-intl', 'php-zip' ] #MySQL Settings mysql_root_password: "mysql_root_password" mysql_db: "wordpress" mysql_user: "sammy" mysql_password: "password" #HTTP Settings http_host: "your_domain" http_conf: "your_domain.conf" http_port: "80" |
여기서는 다음과 같은 변수들과 관련이 있습니다:
- php_modules: WordPress 설정을 지원하기 위해 설치해야 하는 PHP 확장 기능이 포함된 배열입니다. 더 많은 모듈을 설치하려면 여기에 지정할 수 있습니다.
- mysql_root_password: 다음 계정의 비밀번호입니다. root MySQL 계정.
- mysql_db: WordPress가 사용할 MySQL 데이터베이스의 이름을 지정합니다.
- mysql_user: WordPress용으로 생성할 MySQL 사용자 이름입니다.
- mysql_password: 새 MySQL 사용자의 비밀번호입니다.
- http_host: 서버의 도메인 이름 또는 IP 주소입니다.
- http_conf: Apache 내에 생성될 구성 파일의 이름입니다.
- http_port: 이 가상 호스트의 HTTP 포트입니다. 이 포트는 웹사이트에 접속하는 데 사용됩니다. 기본값은 80입니다.
다음으로, 위의 파일에 값을 입력하고 저장한 후 닫습니다. nano 에디터를 사용하는 사용자는 CTRL+X, Y를 누르고, ENTER.
이제 이 플레이북을 실행할 준비가 되었습니다. 하나 이상의 서버에서 이 플레이북을 실행할 수 있습니다. 특정 서버에서 이 플레이북을 실행하려면 -l 플래그를 사용할 수 있습니다. 또한, 원격 서버에 연결할 사용자를 지정해야 하는 경우, -u 플래그를 사용하여 사용자를 지정합니다.
예를 들어, 하나의 서버 srvr1에서 사용자 u1을 사용하여 플레이북을 실행하려면 아래 명령을 실행하면 됩니다:
|
1 |
ansible-playbook playbook.yml -l server1 -u cloudsigma |
위 명령을 실행하면 아래와 같은 출력이 표시됩니다:
|
1 2 3 4 5 6 7 8 9 |
PLAY [all] ******************************************************************************** TASK [Gathering Facts] ******************************************************************************** ok: [server1] TASK [Install prerequisites] ******************************************************************************** ok: [server1] |
플레이북 실행이 완료될 때까지 기다립니다. 그런 다음 웹 브라우저에서 server_name 으로 이동합니다:
|
1 |
http://server_host_or_ip/ |
다음 화면이 표시됩니다:
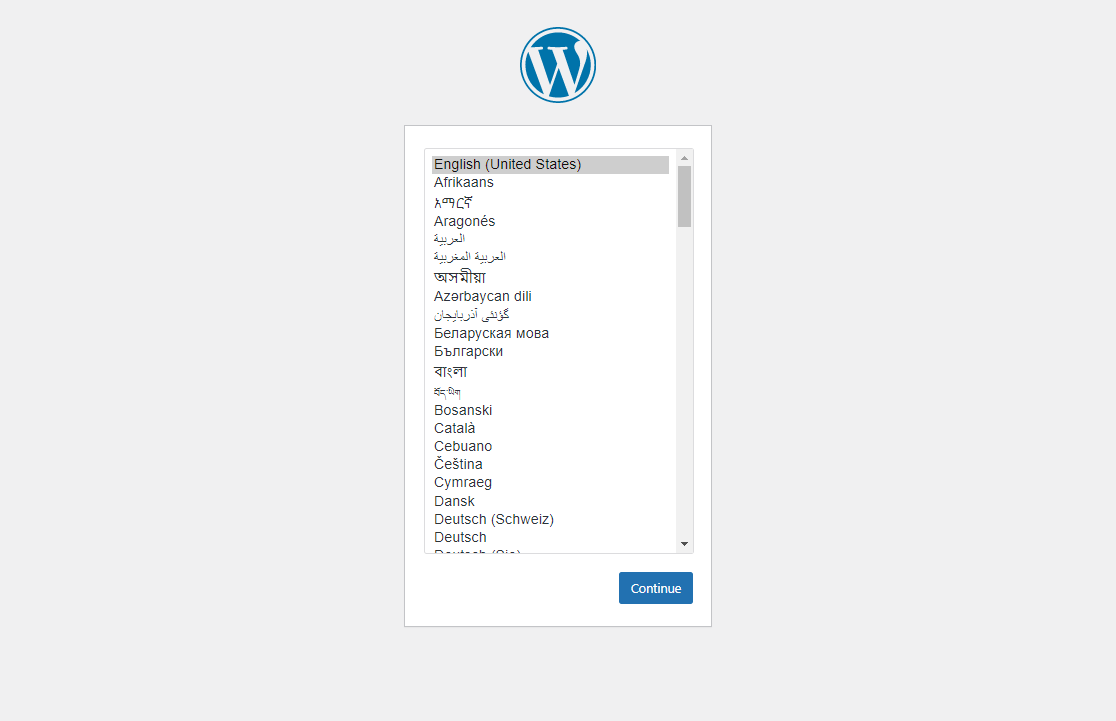
다음으로, 원하는 언어를 선택하고 Continue를 누릅니다. 설치를 완료하기 위해 몇 가지 세부 정보를 요청하는 다음 화면이 나타납니다:
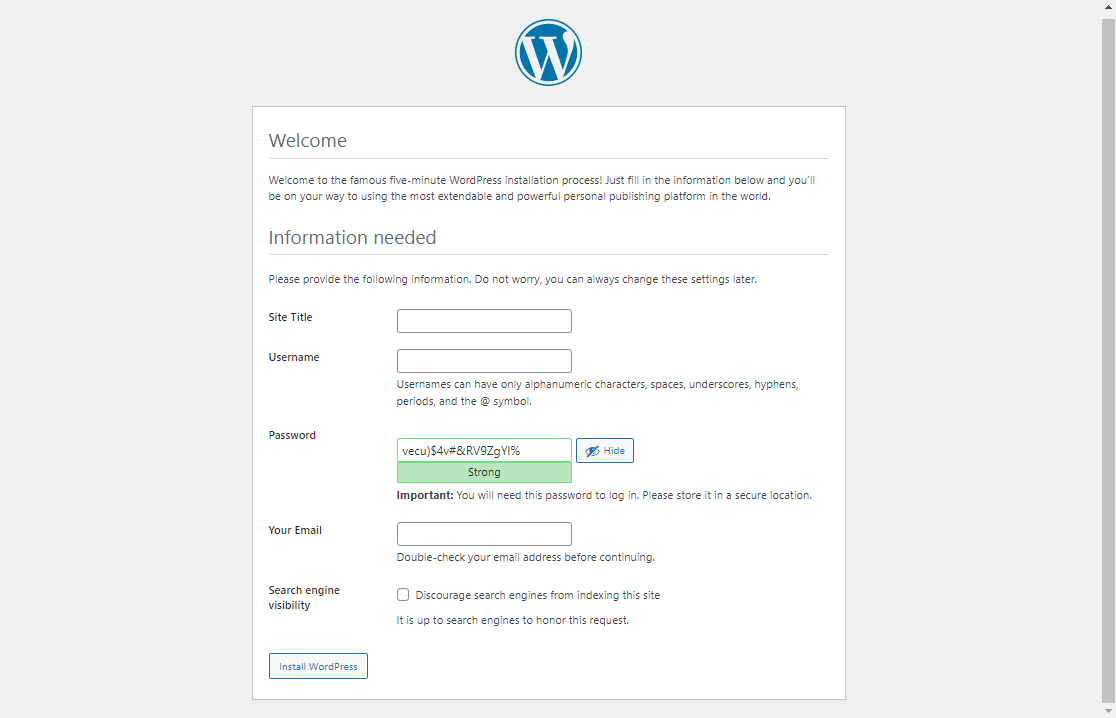
그 후, 정보를 입력하고 Install WordPress를 누릅니다. 시간이 조금 걸린 후 아래와 같은 화면이 표시됩니다:
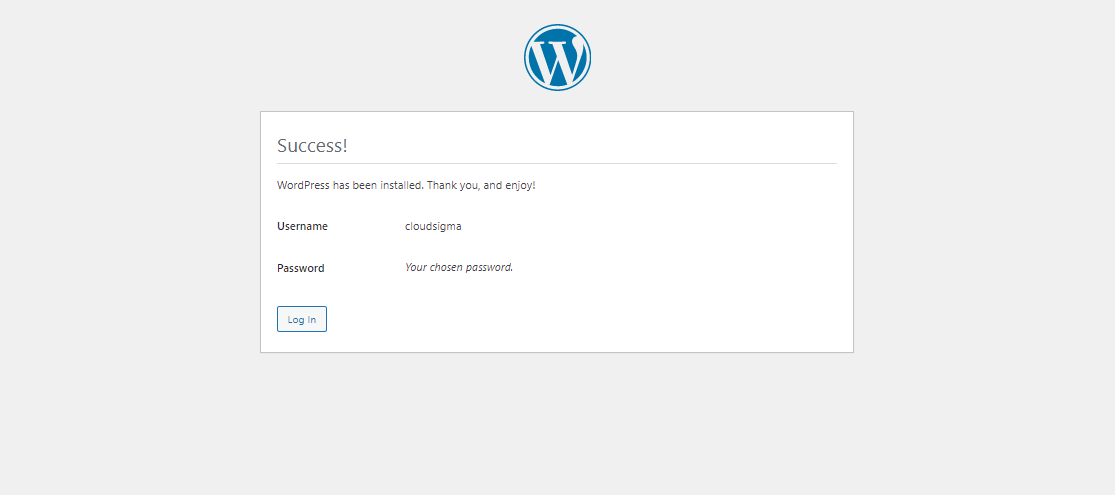
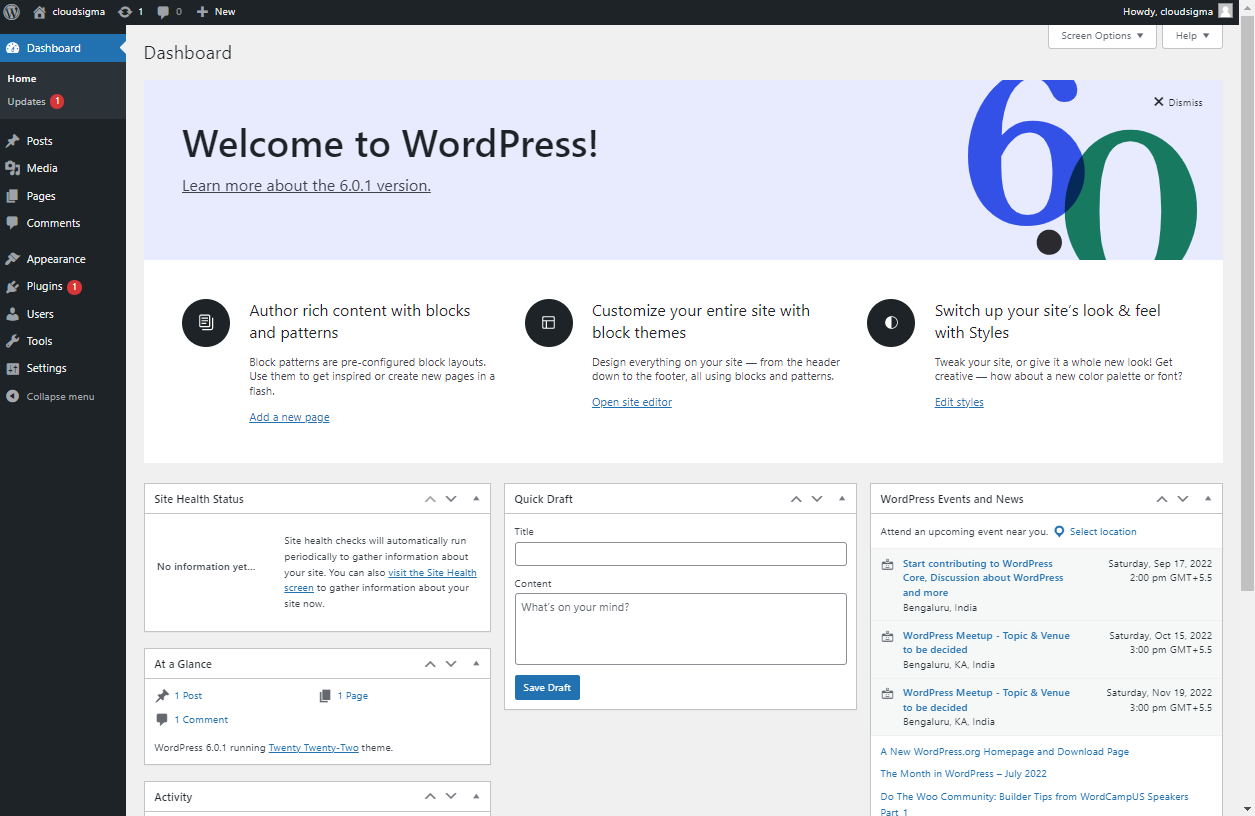
웹사이트에 로그인하고 설정을 구성하려면 Login을 선택합니다:
Ansible 플레이북 콘텐츠
다음 사항을 기억하세요. wordpress-lamp_ubuntu 폴더입니다. 그 안에는 몇 개의 파일이 들어 있습니다. 이제 하나씩 살펴보겠습니다:
● vars/default.yml
이 파일에는 WordPress 웹사이트 설정을 구성하는 데 사용되는 값들이 포함되어 있습니다:
|
1 2 3 4 5 6 7 8 9 10 11 12 13 |
#System Settings php_modules: [ 'php-curl', 'php-gd', 'php-mbstring', 'php-xml', 'php-xmlrpc', 'php-soap', 'php-intl', 'php-zip' ] #MySQL Settings mysql_root_password: "mysql_root_password" mysql_db: "wordpress" mysql_user: "sammy" mysql_password: "password" #HTTP Settings http_host: "your_domain" http_conf: "your_domain.conf" http_port: "80" |
● files/apache.conf.j2
이 파일은 Apache VirtualHost를 구성하는 데 사용됩니다:
|
1 2 3 4 5 6 7 8 9 10 11 12 13 14 15 16 17 |
<VirtualHost *:{{ http_port }}> ServerAdmin webmaster@localhost ServerName {{ http_host }} ServerAlias www.{{ http_host }} DocumentRoot /var/www/{{ http_host }} ErrorLog ${APACHE_LOG_DIR}/error.log CustomLog ${APACHE_LOG_DIR}/access.log combined <Directory /var/www/{{ http_host }}> Options -Indexes </Directory> <IfModule mod_dir.c> DirectoryIndex index.php index.html index.cgi index.pl index.xhtml index.htm </IfModule> </VirtualHost> |
● files/wp-config.php.j2
이 파일은 WordPress를 구성하는 데 사용됩니다. 해시 함수에 의해 생성된 고유 키와 솔트가 포함되어 있습니다:
|
1 2 3 4 5 6 7 8 9 10 11 12 13 14 15 16 17 18 19 20 21 22 23 24 25 26 27 28 29 30 31 32 33 34 35 36 37 38 39 40 41 42 43 44 45 46 47 48 49 50 51 52 53 54 55 56 57 58 59 60 61 62 63 64 65 66 67 68 69 70 71 72 73 74 75 76 77 78 79 80 81 82 83 84 85 86 87 88 89 90 |
<?php /** * The base configuration for WordPress * * The wp-config.php creation script uses this file during the * installation. You don't have to use the web site, you can * copy this file to "wp-config.php" and fill in the values. * * This file contains the following configurations: * * * MySQL settings * * Secret keys * * Database table prefix * * ABSPATH * * @link https://codex.wordpress.org/Editing_wp-config.php * * @package WordPress */ // ** MySQL settings - You can get this info from your web host ** // /** The name of the database for WordPress */ define( 'DB_NAME', '{{ mysql_db }}' ); /** MySQL database username */ define( 'DB_USER', '{{ mysql_user }}' ); /** MySQL database password */ define( 'DB_PASSWORD', '{{ mysql_password }}' ); /** MySQL hostname */ define( 'DB_HOST', 'localhost' ); /** Database Charset to use in creating database tables. */ define( 'DB_CHARSET', 'utf8' ); /** The Database Collate type. Don't change this if in doubt. */ define( 'DB_COLLATE', '' ); /** Filesystem access **/ define('FS_METHOD', 'direct'); /**#@+ * Authentication Unique Keys and Salts. * * Change these to different unique phrases! * You can generate these using the {@link https://api.wordpress.org/secret-key/1.1/salt/ WordPress.org secret-key service} * You can change these at any point in time to invalidate all existing cookies. This will force all users to have to log in again. * * @since 2.6.0 */ define( 'AUTH_KEY', '{{ lookup('password', '/dev/null chars=ascii_letters length=64') }}' ); define( 'SECURE_AUTH_KEY', '{{ lookup('password', '/dev/null chars=ascii_letters length=64') }}' ); define( 'LOGGED_IN_KEY', '{{ lookup('password', '/dev/null chars=ascii_letters length=64') }}' ); define( 'NONCE_KEY', '{{ lookup('password', '/dev/null chars=ascii_letters length=64') }}' ); define( 'AUTH_SALT', '{{ lookup('password', '/dev/null chars=ascii_letters length=64') }}' ); define( 'SECURE_AUTH_SALT', '{{ lookup('password', '/dev/null chars=ascii_letters length=64') }}' ); define( 'LOGGED_IN_SALT', '{{ lookup('password', '/dev/null chars=ascii_letters length=64') }}' ); define( 'NONCE_SALT', '{{ lookup('password', '/dev/null chars=ascii_letters length=64') }}' ); /**#@-*/ /** * WordPress Database Table prefix. * * You can have multiple installations in one database if you give each * a unique prefix. Only numbers, letters, and underscores please! */ $table_prefix = 'wp_'; /** * For developers: WordPress debugging mode. * * Change this to true to enable the display of notices during development. * It is strongly recommended that plugin and theme developers use WP_DEBUG * in their development environments. * * For information on other constants that can be used for debugging, * visit the Codex. * * @link https://codex.wordpress.org/Debugging_in_WordPress */ define( 'WP_DEBUG', false ); /* That's all, stop editing! Happy publishing. */ /** Absolute path to the WordPress directory. */ if ( ! defined( 'ABSPATH' ) ) { define( 'ABSPATH', dirname( __FILE__ ) . '/' ); } /** Sets up WordPress vars and included files. */ require_once( ABSPATH . 'wp-settings.php' ); |
● playbook.yml
이 파일에는 이 설정에서 정의된 모든 작업이 포함되어 있습니다. 이 설정의 대상이 되는 서버 그룹을 나열하는 것으로 시작합니다. 여기에는 다음이 포함됩니다. vars/default.yml 구성 옵션을 로드하기 위한 변수 파일:
|
1 2 3 4 5 6 7 8 9 10 11 12 13 14 15 16 17 18 19 20 21 22 23 24 25 26 27 28 29 30 31 32 33 34 35 36 37 38 39 40 41 42 43 44 45 46 47 48 49 50 51 52 53 54 55 56 57 58 59 60 61 62 63 64 65 66 67 68 69 70 71 72 73 74 75 76 77 78 79 80 81 82 83 84 85 86 87 88 89 90 91 92 93 94 95 96 97 98 99 100 101 102 103 104 105 106 107 108 109 110 111 112 113 114 115 116 117 118 119 120 121 122 123 124 125 126 127 128 129 130 131 132 133 134 135 136 137 138 139 140 141 142 143 144 145 146 147 148 149 150 151 |
--- - hosts: all become: true vars_files: - vars/default.yml tasks: - name: Install prerequisites apt: name=aptitude update_cache=yes state=latest force_apt_get=yes tags: [ system ] - name: Install LAMP Packages apt: name={{ item }} update_cache=yes state=latest loop: [ 'apache2', 'mysql-server', 'python3-pymysql', 'php', 'php-mysql', 'libapache2-mod-php' ] tags: [ system ] - name: Install PHP Extensions apt: name={{ item }} update_cache=yes state=latest loop: "{{ php_modules }}" tags: [ system ] # Apache Configuration - name: Create document root file: path: "/var/www/{{ http_host }}" state: directory owner: "www-data" group: "www-data" mode: '0755' tags: [ apache ] - name: Set up Apache VirtualHost template: src: "files/apache.conf.j2" dest: "/etc/apache2/sites-available/{{ http_conf }}" notify: Reload Apache tags: [ apache ] - name: Enable rewrite module shell: /usr/sbin/a2enmod rewrite notify: Reload Apache tags: [ apache ] - name: Enable new site shell: /usr/sbin/a2ensite {{ http_conf }} notify: Reload Apache tags: [ apache ] - name: Disable default Apache site shell: /usr/sbin/a2dissite 000-default.conf notify: Restart Apache tags: [ apache ] # MySQL Configuration - name: Set the root password mysql_user: name: root password: "{{ mysql_root_password }}" login_unix_socket: /var/run/mysqld/mysqld.sock tags: [ mysql, mysql-root ] - name: Remove all anonymous user accounts mysql_user: name: '' host_all: yes state: absent login_user: root login_password: "{{ mysql_root_password }}" tags: [ mysql ] - name: Remove the MySQL test database mysql_db: name: test state: absent login_user: root login_password: "{{ mysql_root_password }}" tags: [ mysql ] - name: Creates database for WordPress mysql_db: name: "{{ mysql_db }}" state: present login_user: root login_password: "{{ mysql_root_password }}" tags: [ mysql ] - name: Create MySQL user for WordPress mysql_user: name: "{{ mysql_user }}" password: "{{ mysql_password }}" priv: "{{ mysql_db }}.*:ALL" state: present login_user: root login_password: "{{ mysql_root_password }}" tags: [ mysql ] # UFW Configuration - name: "UFW - Allow HTTP on port {{ http_port }}" ufw: rule: allow port: "{{ http_port }}" proto: tcp tags: [ system ] # WordPress Configuration - name: Download and unpack latest WordPress unarchive: src: https://wordpress.org/latest.tar.gz dest: "/var/www/{{ http_host }}" remote_src: yes creates: "/var/www/{{ http_host }}/wordpress" tags: [ wordpress ] - name: Set ownership file: path: "/var/www/{{ http_host }}" state: directory recurse: yes owner: www-data group: www-data tags: [ wordpress ] - name: Set permissions for directories shell: "/usr/bin/find /var/www/{{ http_host }}/wordpress/ -type d -exec chmod 750 {} \\;" tags: [ wordpress ] - name: Set permissions for files shell: "/usr/bin/find /var/www/{{ http_host }}/wordpress/ -type f -exec chmod 640 {} \\;" tags: [ wordpress ] - name: Set up wp-config template: src: "files/wp-config.php.j2" dest: "/var/www/{{ http_host }}/wordpress/wp-config.php" tags: [ wordpress ] handlers: - name: Reload Apache service: name: apache2 state: reloaded - name: Restart Apache service: name: apache2 state: restarted |
구축 중인 웹사이트의 특정 요구 사항에 맞게 필요에 따라 이 파일들을 수정할 수 있습니다.
결론
이 튜토리얼에서는 Ansible을 사용하여 최신 Ubuntu 운영 체제의 LAMP 스택에서 실행되는 WordPress 웹사이트의 설치 및 설정을 자동화하는 방법을 설명했습니다.
Ansible 작업에 대한 자세한 가이드는 다음 튜토리얼을 참조하세요. 저희 블로그:
- CloudSigma와 함께 Ansible 사용하기
- Ansible 및 Ubuntu 20.04를 사용하여 서버 설정 자동화하기
- Ansible을 사용하여 Ubuntu 20.04에 LAMP 설치 및 구성하기
즐거운 컴퓨팅 되세요!
댓글
아직 댓글이 없습니다. 첫 번째로 작성해 보세요.