

Introduction
Do you ever wonder why you must type “sudo” while trying to execute certain commands in a Linux or Unix Operating System environment? Sudo is actually an abbreviation, standing for “super-user do”. When you use the sudo command, you can run programs and execute commands with the security privileges of another user.
By default, the sudo command allows system users to execute commands with the privileges of the super-user. A new installation of a Linux/Unix OS creates a root account that has super-user privileges. When doing the initial server setup of a Linux/Unix system, system administrators log in with the root account and allocate system rights to other system users. These settings are stored in a file called sudoers. A root privileged account can edit the sudoers file and alter the privileges of other users.
In this tutorial, we will discuss how you can obtain root privileges and make edits to the sudoers file.
Prerequisites
This is a hands-on tutorial and you will need to test out the commands to understand the tutorial fully. We will be using Ubuntu 20.04 server in this tutorial, however, you can follow the steps if you have any of the modern Linux distributions such as Debian and CentOS. You can follow this link to set up an Ubuntu cloud server of your own on CloudSigma.
Obtaining Root Privileges
You can obtain root privileges through three ways which we will discuss below:
Login as root
The simplest method most people use to obtain root privileges is by logging into a system using the root user credentials. If you are accessing your local machine, then you can simply provide a username and you will be prompted for a password.
Another method you can use to login as root is by using SSH – a command-line tool for logging into and performing tasks on a server. It requires a username and IP address of your server. The syntax to log in as root is as follows, replace your server’s IP address:
|
1 |
ssh root@your_server_ip_or_domain_name |
When you enter the above command in your terminal, you will either be prompted to provide your password if you haven’t set up the SSH keys, or you will be prompted to enter the passphrase for your SSH key if you had set them up. Once you provide the correct credentials, you will be logged in. Follow this guide for step-by-step instructions on how to use SSH to connect to a remote server in Ubuntu.
Using su to become root
You can log into a Linux system using any other account that is not root, which is usually the recommended way when doing non-administrative tasks. Whenever you want to obtain root privileges, you can simply type su on your terminal:
|
1 |
su |
The system prompts you for the root password, after which you will gain access to a root shell session. While in this shell session, you can perform all administrative tasks and whenever you want to return to the normal shell, simply press Ctrl + D. Optionally, you can type exit on the terminal and hit enter.
Using sudo to run root privileged commands
The sudo command, which was slightly introduced at the beginning of this tutorial allows you to execute single-line commands without the need of a root privileged shell. You simply type sudo followed by the command to be executed:
|
1 |
sudo execute_this_command |
For example, to update your system, you can enter the following:
|
1 |
sudo apt-get update |
It will prompt you for a password. The difference between the su and the sudo command is that su asks for the root password while sudo asks for the password of the current user. Sudo access is not granted to users by default because it carries great security implications for the system. We will discuss more on this in the following sections.
Using Visudo to edit the sudoers file
Sudo privileges are configured in the sudoers file located at /etc/sudoers. These privileges are necessary for any user to gain access to the Linux system. Any syntax error will prevent users from logging into the system hence leaving the system broken.
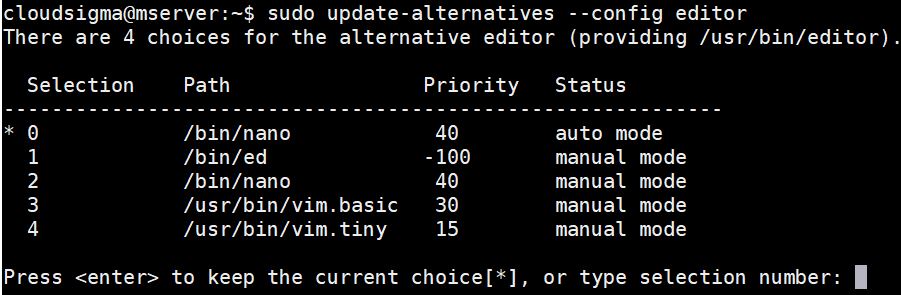
Visudo command opens the file with a special editor that checks the syntax of the file when saving. It’s thus important that you only use the visudo command to open the file to prevent you from rendering your server system unusable. By default, visudo was set to open the text editor with (vi) vim. However, Ubuntu has configured visudo to use the nano text editor. On Debian or Ubuntu, you may change to a different editor by entering the following command:
|
1 |
sudo update-alternatives --config editor |
It displays a list of editors that you can choose a default editor from, as shown in the screenshot. Select the number against the editor you prefer:
On a CentOS Linux distribution, edit /etc/sudoers and add below lines:
|
1 2 |
Defaults editor = /usr/bin/vim:/usr/bin/vi:/usr/bin/nano Defaults env_keep += "EDITOR" |
Enter the following command. Remember to replace the name of your_editor_of_choice:
|
1 |
export EDITOR=`which your_editor_of_choice` |
The command adds the line to the ~/.bashrc file. Enter the following in your terminal to implement the changes:
|
1 |
. ~/.bashrc |
With your visudo now configured, you may open the file at /etc/sudoers by entering the command:
|
1 |
sudo visudo |
Editing the Sudoers File
When you run the previous command, the file opens in your primary editor as you had configured. Below are the contents of the file:
|
1 2 3 4 5 6 7 8 9 10 11 12 13 14 15 16 17 18 19 20 21 22 23 24 25 26 27 28 29 30 31 32 |
# # This file MUST be edited with the 'visudo' command as root. # # Please consider adding local content in /etc/sudoers.d/ instead of # directly modifying this file. # # See the man page for details on how to write a sudoers file. # Defaults env_reset Defaults mail_badpass Defaults secure_path="/usr/local/sbin:/usr/local/bin:/usr/sbin:/usr/bin:/sbin:/bin:/snap/bin" # Host alias specification # User alias specification # Cmnd alias specification # User privilege specification root ALL=(ALL:ALL) ALL # Members of the admin group may gain root privileges %admin ALL=(ALL) NOPASSWD:ALL # Allow members of group sudo to execute any command %sudo ALL=(ALL) NOPASSWD:ALL # See sudoers(5) for more information on "#include" directives: #includedir /etc/sudoers.d |
The comments are pretty descriptive, but we will discuss what the lines indicate below.
Default Lines
- Defaults env_reset – Resets the terminal environment variables to remove any user variables. Hence, it clears potentially harmful variables from a sudo session.
- Defaults mail_badpass – Instructs the system to mail notices of failed sudo password attempts to the configured mailto user, usually the root account.
- Defaults secure_path – Contains the several paths in the file system that a sudo operation will look for applications to use when executing to prevent the use of other user-defined paths that may be dangerous to the system.
User Privilege Specification Lines
|
1 |
root ALL=(ALL:ALL) ALL |
- root ALL=(ALL:ALL) ALL – The first field specifies the user name the rule will apply to. In this case it is the root user.
- root ALL=(ALL:ALL) ALL –The first ALL specifies that the rule will apply to all hosts.
- root ALL=(ALL:ALL) ALL – The second ALL specifies that the user this rule applies to (i.e root) can run commands as all users.
- root ALL=(ALL:ALL) ALL – The third ALL specifies that the user this rule applies to (i.e root) can run commands as all groups.
- root ALL=(ALL:ALL) ALL – The last ALL specifies that these rules apply to all commands.
From what this rule indicates, a root user can run any command using sudo once they provide the correct password.
Group Privileges Specification Lines
These lines specify the sudo privilege rules that apply to groups. The fields indicate the same actions as the user privilege lines, with a small difference. They begin with a % to indicate group names.
As you can see, the admin group can execute any command as any user on any host. The sudo group has the same privilege with the additional privilege of executing commands as any group.
Include /etc/sudoers.d Line
The #includedir /etc/sudoers.d line might appear like it is a comment because of the # at the beginning of the line. However, this is an include directive to indicate that the files within the /etc/sudoers.d directory should be sourced and used as part of the sudoers file. Files within this directory follow the same rules as the sudoers file.
Any file within the directory that does not have a dot (.) in it and does not end in ~ is read and appended to the sudoers file configuration. The directory allows applications to alter sudo privileges upon installation by putting all their associated rules within a single dedicated file in the /etc/sudoers.d directory without altering the default sudoers file. Moreover, when you want to inspect or reverse the privileges for an application you can easily check or modify the files within the /etc/sudoers.d directory without modifying the /etc/sudoers file directly.
As a rule of thumb, all the files within the /etc/sudoers.d directory should always be edited using the visudo command. Below is the syntax, remember to replace the file name you want to edit in the command:
|
1 |
sudo visudo -f /etc/sudoers.d/file_name_to_edit |
Assigning Sudo Privileges to a User
When you grant a new user general sudo access, it means you have given the user account full administrative access to the system. This is a common task that the system admins perform when creating other non-root users with sudo privileges.
In systems like Ubuntu 20.04 which already have the general-purpose administration group, we can easily assign sudo privileges to a user by adding the user to that group. The sudo group as seen in the /etc/sudoers file has full administrative privileges, and we can add a username to the group by entering the following command:
|
1 |
sudo usermod -aG sudo username |
Optionally, you may use the gpasswd command to accomplish the same thing:
|
1 |
sudo gpasswd -a username sudo |
On CentOS, the default group with sudo privileges is named as wheel, so you can assign the privileges using the command:
|
1 |
sudo usermod -aG wheel username |
Optionally, using the gpasswd command, you can accomplish the same using the command:
|
1 |
sudo gpasswd -a username wheel |
In some cases, the wheel group on CentOS may be commented out in the /etc/sudoers file. To enable it, open the file with visudo and uncomment the line with the group name. You can do this by removing the # at the beginning of the line: %wheel ALL=(ALL) ALL.
Creating Custom Rules
With the knowledge of the general syntax of the sudoers that you have up to this point, it’s time for you to set up some rules.
Create Aliases
Aliases allow you to organize your sudoers file by grouping items under various “aliases”. We have three directives which we will discuss in this section: User_Alias for creating user/group aliases, Cmnd_Alias for creating command aliases, and Runas_Alias for allowing another user to run as another user.
For example, using the User_Alias, inside your /etc/sudoers file, you may add the following snippet to create three different groups of users. Some users may belong to more than one group:
|
1 2 3 |
User_Alias GROUPONE = adelle, nikita, ellie User_Alias GROUPTWO = nikita, brenden, natalia User_Alias GROUPTHREE = brenden, walter, james |
Note that all group names start with a capital letter. With the above group aliases added in the /etc/sudoers file, you can assign a privilege for updating the apt database to GROUPTWO by adding the following rule in the /etc/sudoers file:
|
1 |
GROUPTWO ALL = /usr/bin/apt-get update |
Note that without specifying the user/group to run as, the sudo command will always default to the root user.
Here is an example of the Cmnd_Alias where we create a command alias for shutting down and rebooting the system. The rule is then assigned to GROUPTHREE. Adding the following lines inside the /etc/sudoers file achieves this:
|
1 2 |
Cmnd_Alias POWER = /sbin/shutdown, /sbin/halt, /sbin/reboot, /sbin/restart GROUPTHREE ALL = POWER |
In the snippet above, the first line creates a command alias called POWER that includes commands to power off and reboot. The second line allows members of GROUPTHREE to run this command.
Here is an example of the Runas_Alias, where we create an alias that will allow a group of users to run as another user:
|
1 2 |
Runas_Alias WEB = www-data, apache GROUPONE ALL = (WEB) ALL |
In the snippet above, the first line creates an alias called WEB, specifying that the Alias will run as apache user or the www-data user. The second line assigns the alias to GROUPONE. Now, members of group one can execute commands as either the apache or www-data users.
Lock Down Rules
In this section, you will learn the various ways in which you can control how sudo reacts to a call. Some commands are relatively harmless on single-user systems. In such cases, you may allow users to execute them with root privileges without having to type the root password. For example, you can create a rule to allow users in GROUPONE to run the updatedb command without entering a password by adding the following to the /etc/sudoers file:
|
1 |
GROUPONE ALL = NOPASSWD: /usr/bin/updatedb |
The tag NOPASSWD implies that no password will be requested. The companion tag for the NOPASSWD tag is PASSWD, which is the default behavior. This implies that a password must be provided at the prompt.
A tag applies to a rule unless it is overruled by its companion tag, for example:
|
1 |
GROUPTWO ALL = NOPASSWD: /usr/bin/updatedb, PASSWD: /bin/kill |
In this rule, users in GROUPTWO can execute the updatedb command without entering a password. However, they must provide a password before executing the kill command.
In some instances, you may want to restrict users from executing certain commands to prevent some dangerous executions. Here is where the NOEXEC tag comes into play. Some programs can run other commands from within their interface. An example of such a program is less. If you type a command with the following syntax within the less interface, it will run, causing some unexpected behavior.
|
1 |
!name_of_command_to_run |
To prevent such behavior, you can add the following rule to the /etc/sudoers file to restrict a given user identified with username:
|
1 |
username ALL = NOEXEC: /usr/bin/less |
Additional Information
In this section, we include some additional information, directives, and commands you may find necessary when working with sudo.
If you used the Runas_Alias in the configuration, specifying that a user or group can run as another user, you can execute commands as those users by using the -u flag on the user and the -g flag on groups. Here is the syntax:
|
1 2 |
sudo -u run_as_user command sudo -g run_as_group command |
Each of the commands will prompt you to enter the associated password. For convenience purposes, sudo saves the password for some time, so that you don’t have to keep entering it every time you run a command with sudo. You may want to clear the time once you finish with sudo privileged commands by entering the following command:
|
1 |
sudo -k |
In case you have more tasks to perform with sudo privileges, and you want to extend the time before password request, or you want to avoid the sudo command from prompting a password later, you can renew the time by typing the following command:
|
1 |
sudo -v |
The command prompts you for a password and caches it for later sudo uses.
To list the sudo privileges defined for your name, you can enter the following command:
|
1 |
sudo -l |
The command lists all the rules configured in the /etc/sudoers file that apply to your username. From the rules, you can have an idea of what tasks your username can do on the system. Here is an example screenshot:

In some cases, you may execute commands and they fail because you forgot to precede it with sudo. In search scenarios, you may have to retype the command starting with sudo. To avoid having to retype the command, you can utilize the bash functionality for “repeating last command”. The syntax is double exclamation marks. You can execute the last command you ran on your terminal by entering the following:
|
1 |
sudo !! |
Finally, it is important to know that sudo simply elevates the command to be executed with sudo privileges. For additional information, you may follow the instructions on this link to have some fun with your users.
Conclusion
When working with multiple users, understanding your way around the sudo command and the sudoers file is crucial. In this tutorial, we introduced the basics of reading and modifying the sudoers file as well as the various methods you can use to obtain root privileges.
Always keep in mind that privilege separation is what makes Linux systems secure. Hence, super-user privileges should not be given to regular users. Assign only privileges that are absolutely necessary for a particular user to perform their specific tasks in the system and not all privileges.
Happy Computing!
- How To Create a Kubernetes Cluster Using Kubeadm on Ubuntu 18.04 - June 24, 2021
- Nginx Server and Location Block Selection Algorithms: Overview - May 14, 2021
- Configuring an Iptables Firewall: Basic Rules and Commands - April 5, 2021
- How to Configure a Linux Service to Auto-Start After a Reboot or System Crash: Part 2 (Theoretical Explanations) - March 25, 2021
- How to Configure a Linux Service to Auto-Start After a Reboot or System Crash: Part 1 (Practical Examples) - March 24, 2021