
如果您一直在使用 AngularJS, 您可能已经知道 HTTP 拦截器。然而,这些 HTTP 拦截器直到 Angular 4.3 版本才可用。在本教程中,我们将使用 Angular 中的拦截器来处理 HTTP 请求和响应,并处理错误。
前提条件
Angular 应用程序使用 Node.js 运行时。要完成本教程,您需要在您的机器上安装 Node.js。幸运的是,Node.js 非常容易安装。我们在这里有一个关于 How to Install Node.js on Ubuntu 18.04 here.
此外,了解 Angular 并熟悉使用 Angular CLI 来构建 Angular 应用程序对您会很有帮助。我们将使用 Node v8.12.0 和 npm v6.4.1。
Step 1: Create Angular App
首先,让我们使用 Angular CLI 创建一个新的 Angular 应用。我们将应用命名为 Angular-Interceptor。运行以下命令来创建应用:
|
1 |
npx @angular/cli@7.0.6 new Angular-Interceptor |
系统会提示您进行一些选择。输入默认值并继续:

接下来,导航到应用目录,并运行以下命令启动应用:
|
1 |
npx ng serve --open |

然后,在浏览器中查看 http://localhost:4200 以在浏览器中查看该应用。您现在已经配置了一个基本的 Angular 应用。
Step 2: Style Angular App
在这里,我们将使用 Angular Material 来美化我们的 Angular 应用。要在您的项目中安装 Angular Material,请运行以下命令:
|
1 |
npm install --save @angular/material@7.0.4 @angular/cdk@7.0.4 @angular/animations@7.0.4 |
这将安装 @angular/material, @angular/cdk,以及 @angular/animation 到您的项目中。接下来,我们将在项目中设置动画。添加 BrowserAnimationsModule 到您的 src/app/module.ts 文件中:
|
1 2 3 4 5 6 7 8 9 10 11 12 13 |
... import { BrowserAnimationsModule } from '@angular/platform-browser/animations'; @NgModule({ ... imports: [ ... BrowserAnimationsModule ], ... }) export class AppModule { } |
我们将使用 Angular Material 中的 Dialog 组件。要使用 Dialog 组件,我们必须导入 MatDialogModule 到 src/app/app.module.ts 文件中:
|
1 2 3 4 5 6 7 8 9 10 11 12 13 |
... import { MatDialogModule } from '@angular/material'; @NgModule({ ... imports: [ ... MatDialogModule ], ... }) export class AppModule { } |
为了让 UI 更美观,让我们添加 indigo-pink.css 到您的 styles.scss 文件中:
|
1 |
@import "~@angular/material/prebuilt-themes/indigo-pink.css"; |
Step 3: Build Your Angular Interceptor
在 app 文件夹下,我们将创建一个名为 interceptor 的新文件夹。在这个新创建的文件夹中,创建一个新的 httpconfig.interceptor.ts 文件。
我们需要在我们的 httpconfig.interceptor.ts 中导入一些依赖项,以使我们的拦截器正常工作。这些依赖项是 HttpInterceptor, HttpRequest, HttpResponse,以及 HttpHandler, HttpEvent, HttpErrorResponse.
我们的 httpconfig.interceptor.ts 文件在导入后将如下所示:
|
1 2 3 4 5 6 7 8 9 10 11 12 13 |
import { Injectable } from '@angular/core'; import { HttpInterceptor, HttpRequest, HttpResponse, HttpHandler, HttpEvent, HttpErrorResponse } from '@angular/common/http'; import { Observable, throwError } from 'rxjs'; import { map, catchError } from 'rxjs/operators'; |
接下来,创建一个类 HttpConfigInterceptor 并实现接口 HttpInterceptor. 这是一个例子:
|
1 2 3 4 5 6 7 |
@Injectable() export class HttpConfigInterceptor implements HttpInterceptor { intercept(request: HttpRequest<any>, next: HttpHandler): Observable<HttpEvent<any>> { // ... } } |
将以下代码添加到 httpconfig.interceptor.ts 文件中:
|
1 2 3 4 5 6 7 8 9 10 11 12 13 14 15 16 17 18 19 20 21 22 23 24 25 26 27 |
... @Injectable() export class HttpConfigInterceptor implements HttpInterceptor { intercept(request: HttpRequest<any>, next: HttpHandler): Observable<HttpEvent<any>> { const token: string = localStorage.getItem('token'); if (token) { request = request.clone({ headers: request.headers.set('Authorization', 'Bearer ' + token) }); } if (!request.headers.has('Content-Type')) { request = request.clone({ headers: request.headers.set('Content-Type', 'application/json') }); } request = request.clone({ headers: request.headers.set('Accept', 'application/json') }); return next.handle(request).pipe( map((event: HttpEvent<any>) => { if (event instanceof HttpResponse) { console.log('event--->>>', event); } return event; })); } } |
为了使其工作,我们需要导入 httpconfig.interceptor.ts 到我们的 app.module.ts 文件中:
|
1 2 3 4 5 6 7 8 9 10 11 12 13 |
... import { HttpClientModule, HTTP_INTERCEPTORS } from '@angular/common/http'; ... import { HttpConfigInterceptor } from './interceptor/httpconfig.interceptor'; @NgModule({ ... imports: [ ... HttpClientModule ], ... }) |
将 HttpConfigInterceptor 添加到 providers。我们将设置 multi: true 以处理多个拦截器:
|
1 2 3 4 5 6 7 8 9 10 |
... @NgModule({ ... providers: [ ... { provide: HTTP_INTERCEPTORS, useClass: HttpConfigInterceptor, multi: true } ], ... }) ... |
在下一节中,我们将创建用于处理错误的服务。
步骤 4:处理错误的服务
在这里,我们将编写代码来处理错误。我们需要捕获错误并将其适当地显示给最终用户。简而言之,以下是我们将要遵循的步骤:
- 创建一个名为 error-dialog 的文件夹,在 app 文件夹中。
- 创建一个名为 errorDialogService 的错误服务,文件名为 errordialog.service.ts.
- 将以下代码添加到 errordialog.service.ts :
|
1 2 3 4 5 6 7 8 9 10 11 12 13 14 15 16 17 18 19 20 21 22 23 24 25 26 27 |
import { Injectable } from '@angular/core'; import { MatDialog, MatDialogRef, MAT_DIALOG_DATA } from '@angular/material'; import { ErrorDialogComponent } from './errordialog.component'; @Injectable() export class ErrorDialogService { public isDialogOpen: Boolean = false; constructor(public dialog: MatDialog) { } openDialog(data): any { if (this.isDialogOpen) { return false; } this.isDialogOpen = true; const dialogRef = this.dialog.open(ErrorDialogComponent, { width: '300px', data: data }); dialogRef.afterClosed().subscribe(result => { console.log('对话框已关闭'); this.isDialogOpen = false; let animal; animal = result; }); } } |
|
1 2 3 4 5 6 7 8 9 10 11 12 |
import { Component, Inject } from '@angular/core'; import { MAT_DIALOG_DATA } from '@angular/material'; @Component({ selector: 'app-root', templateUrl: './errordialog.component.html' }) export class ErrorDialogComponent { title = 'Angular-Interceptor'; constructor(@Inject(MAT_DIALOG_DATA) public data: string) {} } |
|
1 2 3 4 5 6 7 8 9 10 |
<div> <div> <p> 原因: {{data.reason}} </p> <p> 状态: {{data.status}} </p> </div> </div> |
总而言之,让我们列出以下步骤:
- 首先导入 errordialog.service.
- 然后,我们将添加构造函数,用于 errorDialogService.
- 我们还将添加用于处理错误响应的代码,使用 catchError 和 throwError.
- 导入 errordialog.service 和 errordialog.component 到 AppModule.
完成更改后,将修改两个文件: app.module.ts 和 httpconfig.interceptor.ts:
|
1 2 3 4 5 6 7 8 9 10 11 12 13 14 15 16 17 18 |
... import { ErrorDialogComponent } from './error-dialog/errordialog.component'; ... import { ErrorDialogService } from './error-dialog/errordialog.service'; ... @NgModule({ ... declarations: [ ... ErrorDialogComponent ], ... providers: [ ... ErrorDialogService ], entryComponents: [ErrorDialogComponent], }) |
|
1 2 3 4 5 6 7 8 9 10 11 12 13 14 15 16 17 18 19 20 21 22 23 24 25 26 |
... import { ErrorDialogService } from '../error-dialog/errordialog.service'; ... @Injectable() export class HttpConfigInterceptor implements HttpInterceptor { constructor(public errorDialogService: ErrorDialogService) { } intercept(request: HttpRequest<any>, next: HttpHandler): Observable<HttpEvent<any>> { ... return next.handle(request).pipe( map((event: HttpEvent<any>) => { if (event instanceof HttpResponse) { console.log('event--->>>', event); } return event; }), catchError((error: HttpErrorResponse) => { let data = {}; data = { reason: error && error.error && error.error.reason ? error.error.reason : '', status: error.status }; this.errorDialogService.openDialog(data); return throwError(error); })); } } |
步骤 5:创建示例服务
在此步骤中,我们将创建两个服务作为示例:
- 登录 API
- 客户详情 API
创建一个名为 services 的新文件夹,位于 src 文件夹中。接下来,在这个新创建的文件夹内,创建一个名为 login.service.ts 的新文件,并添加两个函数:
|
1 2 3 4 5 6 7 8 9 10 11 12 13 14 15 16 |
import { Injectable } from '@angular/core'; import { HttpClient } from '@angular/common/http'; @Injectable() export class LoginService { constructor(private http: HttpClient) { } login(data) { data = { email: 'admin', password: 'admin' }; return this.http.post('http://localhost:3070/api/login', data); } getCustomerDetails() { return this.http.get('http://localhost:3070/customers/details'); } } |
步骤 6:调用 HTTP 客户端服务
最后,我们来到了教程的最后一部分。我们将从 app.component.ts 文件中调用我们的 HTTP 服务。将这两个 LoginService 函数添加到 app.component.ts。在 onload 时调用登录 API,并在 onclick 时调用 customers/details:
|
1 2 3 4 5 6 7 8 9 10 11 12 13 14 15 16 17 18 19 20 21 22 |
import { Component } from '@angular/core'; import { LoginService } from './services/login.service'; @Component({ selector: 'app-root', templateUrl: './app.component.html', styleUrls: ['./app.component.scss'] }) export class AppComponent { title = 'Angular-Interceptor'; constructor(public loginService: LoginService) { this.loginService.login({}).subscribe(data => { console.log(data); }); } getCustomerDetails() { this.loginService.getCustomerDetails().subscribe((data) => { console.log('----->>>', data); }); } } |
现在我们必须在以下位置添加一个 UI 元素: app.component.html,以便用户可以点击它:
|
1 |
<h2 (click)="getCustomerDetails()">获取客户详情</h2> |
最后,您需要将 LoginService 包含到 providers 中,位于 AppModule:
|
1 2 3 4 5 6 7 8 9 10 11 12 |
... import { LoginService } from './services/login.service'; ... @NgModule({ ... providers: [ ... LoginService ] ... }) |
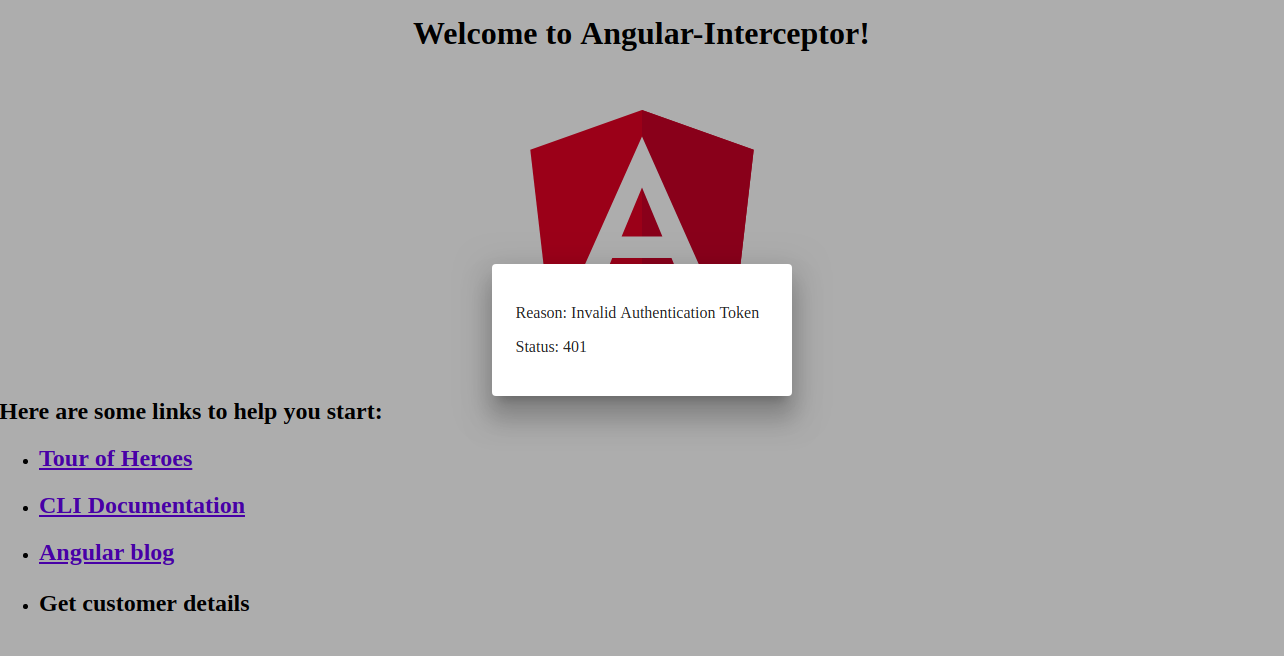
下面是错误处理程序对话框的截图:
结论
在本教程中,我们学习了如何使用 Angular 拦截器处理 HTTP 请求和响应。我们还学习了如何使用 Angular Material 中的对话框来处理错误。
Angular 应用使用 Node.js 作为其运行时。如果您想了解更多关于 Node.js 以及如何在 Docker 上部署 Node.js 应用的信息,请查看我们的 如何在 Ubuntu 20.04 上使用 Docker 部署 Node.js (Express.js) 应用 指南。您还可以查看 如何在 Ubuntu 20.04 上使用 Node.js 执行生产任务 以及 在 CentOS 8 上安装 Node.js:完整指南.
祝您编程愉快!
评论
暂无评论。发表第一条评论吧。