
Introduction
Drupal is one of the most preferred Content Management Systems(CMS) for running blogs and managing enterprise content. Developers and businesses prefer it because of its robustness and usability. It is very customizable and it can be extended to implement a wide variety of use cases.
In this tutorial, we will demonstrate how to install Drupal on Ubuntu 20.04 with Apache.
Prerequisites
Since we are going to install Drupal on Ubuntu, we will need to have the latest version of Ubuntu installed. You can follow our guide to install Ubuntu if you don’t have it already. We will also need PHP, MySQL, and Apache installed and ready. If you do not have these installed, you can check out our guide LAMP Stack setup – Linux Apache MySQL PHP.
Before we start downloading and setting up Drupal on our machine, we have to perform some tweaks in our system. With PHP, MySQL, and Apache installed, let’s start configuring our system for Drupal installation.
Making MySQL User and Database Ready
Drupal relies on a MySQL database for storing data and configuration. We will set up a dedicated user and database so that our Drupal environment is isolated. It will also help us secure our application. We will create a new user and database. First, login into MySQL server by running the below command in the terminal:
|
1 |
mysql -u root -p |
Enter the username and password of MySQL. Once you are authenticated, run the below command to create a new database. Let’s call it drupal:
|
1 |
CREATE DATABASE drupal; |
Next, you will need to create a new user to connect to this database. We will call it drupaluser. For the password, make sure you enter a strong password. Run the below command to create a new user:
|
1 |
CREATE USER drupaluser@localhost IDENTIFIED BY 'password'; |
Our user needs privileges for performing operations on this database. However, providing all the privileges will expose our application to security breaches. Thus, here we will provide the necessary privileges by running the below command:
|
1 |
GRANT SELECT,INSERT,UPDATE,DELETE,CREATE,DROP,INDEX,ALTER,CREATE TEMPORARY TABLES,LOCK TABLES ON drupal.* TO drupaluser@localhost; |
Once you have granted the privileges we are ready to move ahead. Run the below command to flush the privileges so that they become effective straight away:
|
1 |
FLUSH PRIVILEGES; |
After that, exit the MySQL by running the below command:
|
1 |
exit |
Install and Configure PHP Modules
Drupal needs PHP modules to work. We will be downloading them from the Ubuntu official repository. Update your local package cache by running the command below:
|
1 2 |
sudo apt-get update sudo apt-get install php5-gd php5-curl libssh2-php |
Next, we will make some tweaks to the PHP modules as per the recommendation of Drupal. Open the PHP configuration file using the below command:
|
1 |
sudo nano /etc/php5/apache2/php.ini |
Switch off both expose_php and allow_url_fopen variables:
|
1 2 3 4 5 |
. . . expose_php = Off . . . allow_url_fopen = Off . . . |
Save and close the file. You are now ready to move forward.
Modifying Htaccess Files in Apache
Drupal needs to modify URLs so that they make more sense to users. For this, it needs access to rewrite URLs. Fortunately, the module mod_rewrite to rewrite is present in Apache by default. We just need to enable it. Run the below command to enable this module:
|
1 |
sudo a2enmod rewrite |
Next, we need to update the virtual host settings. We have to do this, so that Drupal can access the .htaccess file. Open the virtualhost file by running the command below:
|
1 |
sudo nano /etc/apache2/sites-enabled/000-default.conf |
Within the virtualhost setting, add the folder that points to our web root. Here, AllowOverride to All. If you have a domain name, you can add ServerName directive, and change the ServerAdmin directive to reflect a valid email address:
|
1 2 3 4 5 6 7 8 9 10 11 |
<VirtualHost *:80> . . . ServerName example.com ServerAdmin webmaster@example.com DocumentRoot /var/www/html <Directory /var/www/html> AllowOverride All </Directory> . . . </VirtualHost> |
Save and close the file. We are all set now. We just need to restart the Apache and PHP for the changes to become effective:
|
1 |
sudo service apache2 restart |
Installing Drupal
Here we will be installing Drupal on the web root. We would be unzipping the Drupal files and making a copy. After that, we will copy these copied files to the intended directory. This will give us a backup of files, should anything go wrong.
To download Drupal, open https://www.drupal.org/project/drupal. Under the Recommended releases section you should locate your desired release.Then, copy the address of the tar.gz file. On your server, you can download this file using the wget utility. Run the below command in the terminal to fetch the copied link address:
|
1 2 |
cd ~ wget <your link> |
Once the file has been downloaded, extract the application directory by typing:
|
1 |
tar xzvf drupal* |
Now move to the newly created directory using the below command:
|
1 |
cd drupal* |
Copy all the files in this directory to the web root by running the command below:
|
1 |
sudo rsync -avz . /var/www/html |
Once the files have been copied, move into web root by running the below command:
|
1 |
cd /var/www/html |
Making Drupal Files Easy to Install and Secure
If we install Drupal via a web-based installation script, we will need modifications in the Drupal directory. It will compel us to switch between the browser and command line. While we can also install it this way, a better option is to make tweaks to our files and eliminate this hassle.
Create a new directory under the sub-tree sites/default called files:
|
1 |
mkdir /var/www/html/sites/default/files |
Copy the default settings file to the filename that Drupal uses for the active configuration:
|
1 |
cp /var/www/html/sites/default/default.settings.php /var/www/html/sites/default/settings.php |
To complete the installation, we need to give the active settings file some more privileges. We will revert this later on. Run the below command to give the write permission to the group owner:
|
1 |
chmod 664 /var/www/html/sites/default/settings.php |
Give group ownership of our files to the web user, which in Ubuntu is www-data. Our whole Drupal installation requires these ownership properties:
|
1 |
sudo chown -R :www-data /var/www/html/* |
We can now move forward.
Finishing the Web-based Installation
From now on we will be using the browser. The steps are going to be easy and quick. In your browser enter the server’s domain/IP:
|
1 |
http://server_domain_or_ip/ |
You will see the Drupal welcome page:
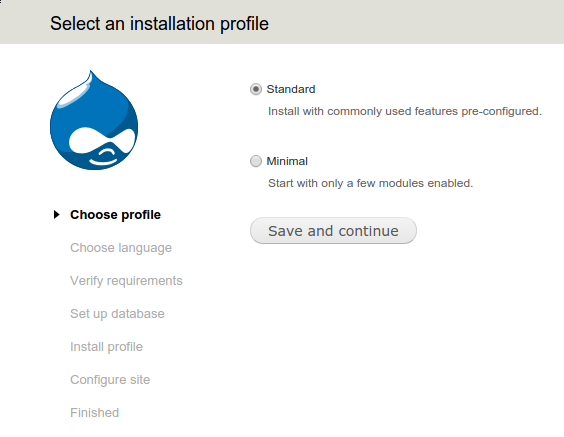
For most cases, Standard is the default option. Choose Manual if your use case demands it specifically. After selecting Standard, click Save and Continue. You will get some more prompts. Keep clicking Next and accepting the default options, until you reach the database configuration page. In this page, you will be asked for database information. Enter the user and password and database on this page that we had used above:
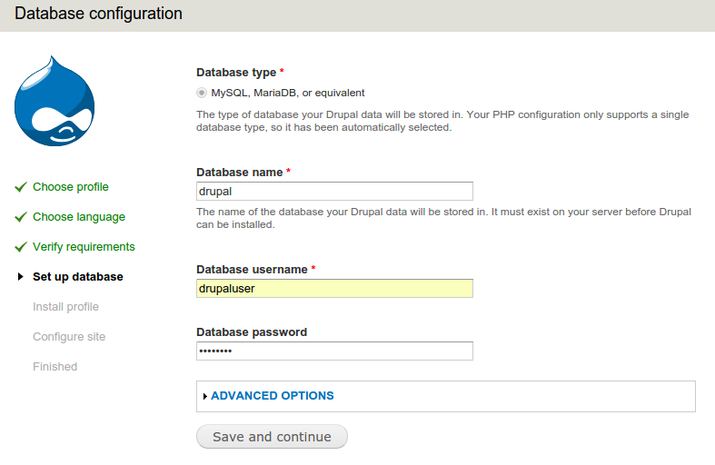
Click Save and Continue. If you are redirected to the same database configuration page, just refresh the page. The database settings will be configured and the profile will be installed.
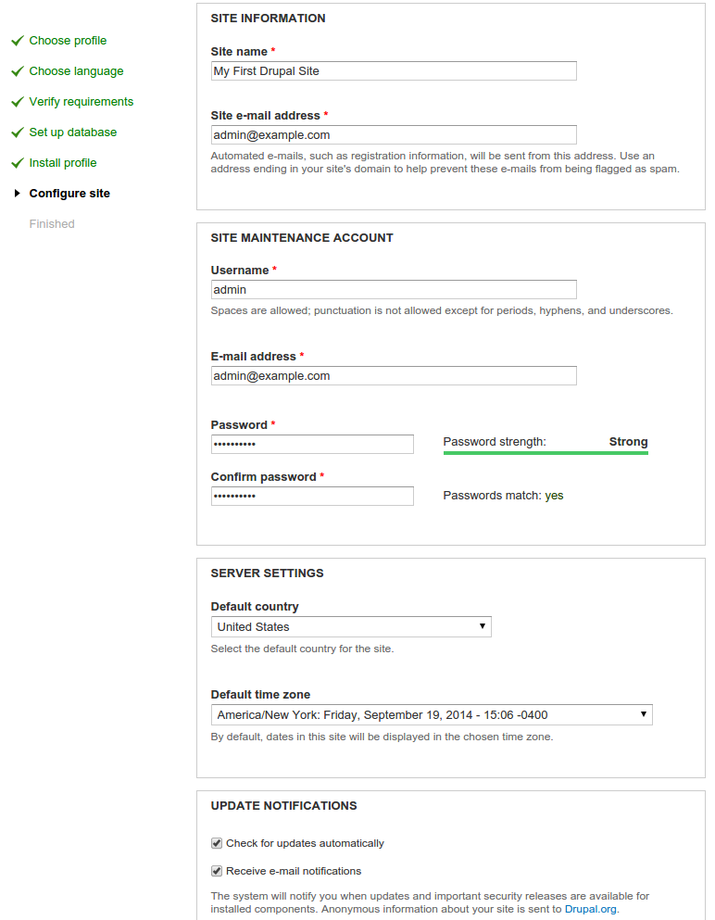
You will be asked for some more information about the website. A prompt will also appear at the top telling that it is okay to change the permissions of the settings file. We will only do this for a brief period of time and then we will revert the changes. We don’t want to compromise our website. Enter the required information for the website:
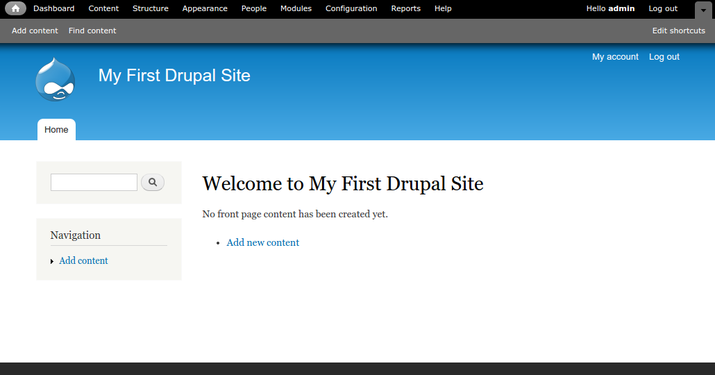
We have to click Save and Continue one more time to complete the installation. Open your site by typing your IP/domain. You will see the welcome page:
Here concludes the Drupal installation. Now we will revert the permissions for our settings to avoid unauthorized use. Restrict this by running the command below in the terminal:
|
1 |
chmod 644 /var/www/html/sites/default/settings.php |
Troubleshooting
We need to ensure that the Drupal installation is complete. If the last step is not complete, run the below command:
|
1 |
sudo tail /var/log/apache2/error.log |
This will open the log file. Next check if you can locate the below log in the file:
|
1 2 |
PHP Fatal error: Call to undefined function field_attach_load() in /var/www/html/includes/entity.inc on line 316, referer: http://12.34.56.78/install.php?profile=standard&locale=en sh: 1: /usr/sbin/sendmail: not found |
If the above lines are present, it shows that our installation is not successful. To remove this error, Drupal has provided a lead in their document here: https://www.drupal.org/node/481758
A common reason for the above mentioned error is max_execution_time. To increase this, open the php.ini file using the below command:
|
1 |
sudo nano /etc/php5/apache2/php.ini |
Next, locate the max_execution_time and change it as below:
|
1 |
max_execution_time = 300 |
Since we are using our own database, we will have to delete the default database pf Drupal and existing PHP setting file /var/www/html/default/settings.php. After this, replace them with default copies, and start the installation over again. Don’t forget to create backups as a precaution.
To drop the existing Drupal database, login into the MySQL database and run the below command:
|
1 |
DROP DATABASE drupal; |
Then, create the database and grant privileges as described above. Another option is to run cp /var/www/html/sites/default/default.settings.php /var/www/html/sites/default/settings.php again to replace the settings file. Make sure you run the chmod 664 /var/www/html/sites/default/settings.php command to set the correct permissions again as well. Now access your IP and attempt to install again.
Conclusion
In this tutorial, we learned how to set up Drupal on your machine running Ubuntu. This would give you a solid foundation to get started with Drupal CMS. Having a Drupal setup can help you run your website which is highly customizable without having to code everything from scratch.
To learn more about another useful CMS, WordPress, you can check out the following tutorials:
- How to Deploy WordPress with Docker Containers on Ubuntu 20.04
- How to Install WordPress with LAMP on Ubuntu 20.04
- Why Should You Turn to WordPress Cloud Hosting for Your Website?
- How to Migrate a Website from WordPress to CloudSigma PaaS
Happy Computing!
- How To Set Up GitHub Continuous Integration Pipelines With Self-Hosted Runners on Ubuntu 22.04. - March 20, 2023
- Managing CSV in Node.js using Node-CSV - March 15, 2023
- Containerize A Python App using Docker - March 7, 2023
- Using GitLab for Managing Projects - September 15, 2022
- Creating Drag and Drop Elements with Pure, Vanilla JavaScript - August 4, 2022