
Introduction
If you are familiar with the world of programming, you know just how important programming languages are. Some of the most critical and frequently used ones include HTML, CSS, and JavaScript. Where HTML and CSS help you design and structure your website, JavaScript enables you to make it interactive. There are a number of JavaScript libraries you can use to add unique features to your web project. Among these is the jQuery library.
jQuery by itself is not a programming language. It is a tool that you can use to facilitate web development in JavaScript. This helps make the tasks simpler and straightforward. It is famously based on the concept of ‘Write Less, Do More.’ Apart from making web development easier, jQuery also gives you the added benefit of cross-browser compatibility. This means the code can render appropriately regardless of which browser is used for the output.
To better visualize how jQuery makes things more concise, consider an example. Say we are writing the “Hello, World!” program. Here is how it would appear in JavaScript and jQuery respectively:
|
1 2 |
JavaScript document.getElementById("demo").innerHTML = "Hello, World!"; |
|
1 2 |
jQuery $("#demo").html("Hello, World!"); |
Both of these lines of code will yield the same result. However, as you can see, jQuery makes the writing more concise and to the point.
In this tutorial, you will learn all about the basics of jQuery. You can download the tool for yourself from this website. We will proceed as if you are a complete beginner with no knowledge regarding jQuery. This tutorial will teach you how to install jQuery and some of the fundamental concepts associated with it. We will explore some of the common selectors, events, and effects in jQuery. Then, you will learn how to test development concepts like API, DOM, and CDN through helpful examples. Read ahead to familiarize yourself with the world of jQuery.
Before We Begin
There are certain things that will work in your favor if you know them beforehand. For example, having some basic understanding of how HTML and CSS work will help you greatly. We will not cover that in this tutorial. We will be working under the assumption that you know how to set up a simple website at the very least. You should also have a basic understanding of how programming works in general. That does not necessarily mean that you have to be an expert in JavaScript to proceed. Simply having some familiarity with things like logic, variables, and data types in programming is sufficient.
How to Set up jQuery on Your System
First of all, let’s see how you can set up jQuery on your system. jQuery is available as a JavaScript file since it is a JavaScript library. You have to link this file in the HTML code for our website. There are two ways to do this. As I mentioned before, one way to do it is to download it from here. Apart from the official website, you can also find jQuery in Google Hosted Libraries right here.
Another way is for you to use the Content Delivery Network or CDN to link the file. A CDN comprises a set of servers that helps deliver web content locally. Hosting a jQuery file via CDN allows the content to arrive much faster to the user. That is why we will be using the Content Delivery Network from this point onwards in this tutorial.
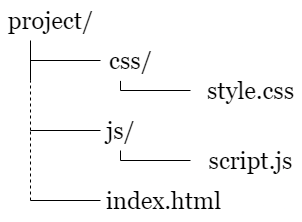
In our first example, we will be making a web project. This small project contains style.css in the css/ directory. script.js is located in the js/ directory. Lastly, an index.html is present at the root of the web project:
As per this project, we shall create an HTML skeleton. Subsequently, we will save it as index.html:
|
1 2 3 4 5 6 7 8 9 10 11 12 13 |
<!doctype html> <html lang="en"> <head> <title>jQuery Demo</title> <link rel="stylesheet" href="css/style.css"> </head> <body> </body> </html> |
This is where we will link the jQuery file. As I said before, we will be linking it via CDN. You will enter the jQuery link before the </body> tag. After that, you can add your custom JavaScript file which was script.js in our example. Remember to always put the JavaScript file below the jQuery library, like this:
|
1 2 3 4 5 6 7 8 9 10 11 12 13 14 15 |
<!doctype html> <html lang="en"> <head> <title>jQuery Demo</title> <link rel="stylesheet" href="css/style.css"> </head> <body> <script src="https://ajax.googleapis.com/ajax/libs/jquery/3.1.0/jquery.min.js"></script> <script src="js/script.js"></script> </body> </html> |
What would you do if you downloaded a local copy of the jQuery library instead? In that case, you have to save the jQuery file in the js/ folder. Then you can link it as js/jquery.min.js.
jQuery: The Fundamentals
Before we dive into the details, let’s go over some of the fundamentals of jQuery. The main job of jQuery is to use DOM to connect HTML elements in the browser. DOM stands for Document Object Model. It is the method that enables JavaScript to interact with HTML in a browser. You can visualize the DOM by right-clicking on your web page and selecting Inspect. The HTML that appears in the Developer Tools is the DOM.
A node is an individual HTML element in the DOM. JavaScript can modify all of these objects or elements. You can imagine the arrangement of these objects as a tree-like structure. <html> lies at the root while the elements further branch out.
Right clicking and selecting View Page Source will show you the raw HTML of the website. Remember that this is not the same as the DOM. Where the DOM can be changed, the HTML source is completely static. Any changes you make in JavaScript will not impact this HTML file. The whole <html> node is wrapped in an outer layer called the document object.
Next, we will see how you can manipulate your webpage and its features using jQuery. Before doing that, however, you have to ensure that the page is ready.
Type in the following after making the script.js file in the js/ directory:
|
1 2 3 4 5 |
$(document).ready(function() { // all custom jQuery will go here }); |
Now any code you write will be wrapped within this code. jQuery will detect the readiness of the code. The code within this function will be run only when the DOM is prepared.
We shall revisit the “Hello, World!” script that we talked about at the beginning of the tutorial. Consider that we want to initiate this script. To use jQuery to print this text to the browser, we have to apply the ID demo to an empty block-level paragraph like this:
|
1 2 3 4 5 6 |
... <body> <p id="demo"></p> ... |
To call jQuery, we have to use the $ symbol. You can apply CSS syntax and methods to access DOM with jQuery. A simple example is as follows:
|
1 |
$("selector").method(); |
This is the format you will use with jQuery. We already know that the # symbol represents ID in CSS. Therefore, you can access the demo ID using the #demo.html() selector. This method will allow you to change the HTML present in an element.
The following code shows us putting the “Hello, World” program in the script.js file’s jQuery ready() wrapper:
|
1 2 3 |
$(document).ready(function() { $("#demo").html("Hello, World!"); }); |
You have to add this line of code to the script.js file. Save this file. After that, you can open the index.html file in the browser. You should be able to see the output Hello, World!. This is also a good point to check the DOM for your understanding’s sake. Right-click on the “Hello, World!” text. Select Inspect Element. The DOM will show <p id="demo">Hello, World!</p>. Clicking on View Page Source, on the other hand, will only show you the raw html. In this case, that would be <p id="demo"></p>.
What are Selectors?
Now we shall move on to some of the critical features in jQuery. Among these are selectors. jQuery selectors tell the program which elements you want to work with or ‘select.’ They are very similar to the selectors that you may use on CSS. Here is the basic format of how to access a selector in jQuery:
|
1 |
$("selector") |
You can use single or double-quoted strings, although the jQuery style guide prefers the latter. If you would like to, you can view the full list of jQuery selectors on this official page. For your information, here are some of the most frequently used selectors:
-
$("*")
This is the Wildcard selector. It will select every element on your page.
-
$(this)
This is the Current selector. It selects the element that you are currently operating on with a function.
-
$("p")
This is the Tag selector. It selects every instance of the <p> tag.
-
$(".example")
This is the Class selector. It will select every single element having the example class applied.
-
$("#example")
This is the Id selector. It only selects a single instance of the example id.
-
$("[type='text']")
This is the Attribute selector. It will select any given element with text applied to the type attribute.
-
$("p:first-of-type")
This is the Pseudo Element selector. It helps you select the first <p>.
What are Events?
There are some features of the webpage that load as soon as the page loads. Consider the “Hello, World” example. In this case, we could add the code directly to the source HTML. But what happens when loading a feature requires user interaction? That is where jQuery becomes useful.
Let’s say we want some text to appear after the user clicks a button. To add this feature, you have to add a <button> element to the index.html file. This button will be listening for the click ‘event’:
|
1 2 3 4 5 6 |
... <body> <button id="trigger">Click me</button> <p id="demo"></p> |
Any time the user interacts with the browser is considered an event. The interaction may be through the mouse pointer or the keyboard. In the above example, a click of a button is our event. That is why it is called a click event.
Next, we have to call a function that has the “Hello, World” code. To do that, we will use the click() method:
|
1 2 3 |
$(document).ready(function() { $("#trigger").click(); }); |
As you can see, the ID of our <button> element is named trigger. We can select it using $(“#trigger"). The purpose of adding the click() method is to make the program listen for the click event. Next, we will place the function with the text code inside the method:
|
1 2 3 |
function() { $("#demo").html("Hello, World!"); } |
Our code will look something like this at the end:
|
1 2 3 4 5 |
$(document).ready(function() { $("#trigger").click(function() { $("#demo").html("Hello, World!"); }); }); |
Now you can save the script.js file. Refresh the index.html in the browser to apply the changes. After you click the button, the test output “Hello, World!” will appear.
There are other types of jQuery events other than click as well. You can view a full list of these event methods from this official document. Here are some of the most frequently used ones that you may come across on occasion:
-
click()
The click event executes the code on a single mouse click.
-
hover()
The hover event executes the code when the mouse pointer hovers over an element. You can also specify if the code is triggered by the mouse entering or leaving with mouseenter() and mouseleave() respectively.
-
submit()
Submitting a form triggers the code.
-
scroll()
Scrolling down the screen will be the event that executes the code.
-
keydown()
Pressing the down key on the keyboard will execute the code.
What are Effects?
jQuery effects work together with jQuery events. The main purpose of effects, as understood by the term, is to add animations to the page. It allows you to manipulate the elements to apply various kinds of effects. These effects can be triggered by certain events.
To understand better, we shall consider an example. Let’s say we want to open and close a popup overlay. One way to do it would be to use two different IDs. One would open the overlay and the other would close it. The other way to do it is to use a class to do this. The benefit of using a class is that the same function is able to open and close the overlay.
Open your index.html file. Then, delete the <button> and <p> tags from the body. Now add the following lines of code to the HTML:
|
1 2 3 4 5 6 7 8 9 10 |
... <body> <button class="trigger">Open</button> <section class="overlay"> <button class="trigger">Close</button> </section> ... |
Let’s look at our style.css file next. Here, our goal is to use minimum CSS to hide the overlay. For that, we will use display: none and center it like this:
|
1 2 3 4 5 6 7 8 9 10 |
.overlay { display: none; position: fixed; top: 50%; left: 50%; transform: translate(-50%, -50%); height: 200px; width: 200px; background: gray; } |
Next, we will be using the toggle() method. This method will let us toggle the display property between none and block. Hence, the overlay will be hidden and shown whenever we click. Add this code to the script.js file:
|
1 2 3 4 5 |
$(document).ready(function() { $(".trigger").click(function() { $(".overlay").toggle(); }); }); |
Finally, refresh index.html to apply the changes. Now you will be able to toggle the visibility of the modal. All you have to do is click on the buttons. There are other jQuery effects that you can use in combination with this. For example, you can change simple toggle() to slideToggle() or fadeToggle().
Following are a few of the commonly used effects methods in jQuery:
-
toggle()
This method allows you to change the element visibility. The one-way effects associated with it are show() and hide().
-
fadeToggle()
This method will let you switch the element visibility and opacity through animation. The one-way effects in this case are fadeIn() and fadeOut().
-
slideToggle()
This method will let you use sliding effects to toggle the element visibility. The one-way effects in this case are slideUp() and slideDown().
-
animate()
This effect method lets you perform custom animation effects. It uses the CSS property of the given element.
Conclusion
Hopefully, this tutorial proved to be helpful in giving a thorough introduction to jQuery. It is an incredibly useful tool that goes a long way in facilitating web development and code writing. This is especially true if you are relatively new to the world of programming.
We explored the various elements that make up the fundamentals of jQuery. We also learned how you can select and modify these elements, and how to put events and effects to good use. Mastery over tools like jQuery can help you create websites filled with interactive features that account for an engaging user experience.
Check out some resources from our blog that will help you when working with JavaScript:
- A Guide on Adding JavaScript to HTML
- Working with JavaScript: How Classes Operate
- Working with JavaScript: How Prototypes and Inheritances Operate
Happy Computing!
- How to Deploy WordPress with Persistent Volume on Kubernetes Cluster - March 17, 2023
- Deploying Applications on Kubernetes Using Argo CD and GitOps - October 26, 2022
- Using Node.js Modules with npm and package.json: A Tutorial - October 6, 2022
- Using Ansible to Install and Configure WordPress with LAMP on Ubuntu - September 23, 2022
- Creating Views in the Django Web Application Framework - September 22, 2022