
Disclaimer: Before we begin, we need to point out that there is always a risk of data loss when you are doing disk expansion. Hence, you should always back up your data before you begin. We do not assume any responsibility for data loss caused by this guide. It is up to you to take proper backups.
One of the issues with providing our customers with complete freedom when it comes to their infrastructure is that we cannot make any assumptions. We do not have any fixed disk sizes and we don’t know anything about the file system or partition tables of our customer’s systems. As a result, when customers approach our support team with questions about how to add more disk space to a server, we cannot offer a single answer that fits all customers.
In this article we’re going to explore this topic and how you both plan ahead for this and how to resolve it in the least painful fashion. Unfortunately, both approaches below require downtime (but we are working on adding support for the ability to add resources to running servers).
The two recommended solutions for this are either to expand an existing disk, or to simply add a new disk to your logical volume (e.g. LVM). Most modern Linux distributions allow you to select to use LVM during the installation (but it might not be the default option, depending on the distribution).
If you’re reading this before you start installing a new server, we would strongly recommend that you use LVM. If you have already installed your server without LVM, you’re limited to the ‘Clone and resize’-approach. You can of course use the ‘Clone and resize’-approach even if you’re using LVM, but we would discourage it.
The primary reasons why we recommend LVM over resizing the actual disk are that it requires less downtime and that it is less prone to data corruption. With that sorted, let’s dive into the details.
Expand a logical volume
As alluded to above, this is the recommended approach. We’re going to assume that you’re using LVM and that you have your primary disk attached as VirtIO (which should show up as ‘/dev/vda’).
The first step is to power down the server and attach a new drive of the desired size (also as VirtIO). When you bring your system back up again and the new drive should be attached as ‘/dev/vdb’.
Now we need to partition this drive properly. This can be done with the following command:
[bash light=”true”]
$ echo -e ‘nnpn1nnntn8enw’ | sudo fdisk /dev/vdb
[/bash]
Next, we need to initialize the disk:
[bash light=”true”]
$ sudo pvcreate /dev/vdb1
[/bash]
With the disk initiated, we need to add it to the pool. However, before we can do that, we need to find the name of the pool:
[bash light=”true”]
$ sudo vgdisplay | grep ‘VG Name’
[/bash]
As we’ve identified the name, we can run can add the disk to the group:
[bash light=”true”]
$ sudo vgextend YourVGName /dev/vdb1
[/bash]
You probably already know the size of the extra disk you attached, but to verify the available size in the pool, you can run:
[bash light=”true”]
$ sudo vgdisplay | grep ‘Free PE / Size’
[/bash]
Next we need to look at the logical volumes we have at our disposal. For a regular Ubuntu installation with LVM, you will have two volumes: one for root and one for swap. You probably want to expand your root partition.
[bash light=”true”]
$ sudo lvdisplay
[/bash]
With the information from above, now run (replace 15G with the size you want to expand, and YourLVName with the name from lvdisplay):
[bash light=”true”]
$ sudo lvextend -L +15G YourLVName
[/bash]
Lastly, we need to resize the filesystem:
[bash light=”true”]
$ sudo resize2fs YourLVName
[/bash]
That’s it. You have now extended your file system.
The instructions were tested on Ubuntu 12.04. If you’re running a different distribution/version and something didn’t work, please let us know in a comment below.
Clone and resize
This method might seem simpler for novice users, but it will require more downtime and it is also a more dangerous operation. To resize the actual disk, we will use the gParted LiveCD which is available from the public drive marketplace in all CloudSigma cloud locations.
Similar to the method above, the first thing you need to do is to power off the server. With the server powered off, you need to clone the drive you want to expand. In the cloning dialogue, you will have an option to enter a new size. Enter the new desired larger size.
This is where it gets a bit messy. First you need to detach the previous disk from the server and replace it with the new drive. In addition to this, you also need to attach the ‘gParted’ disk image from the Marketplace as an IDE drive. Once done, it will look something like this:
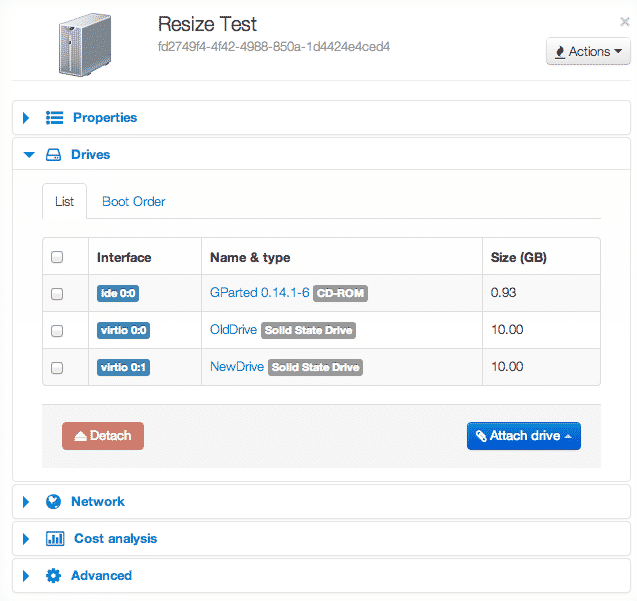
Please ensure that you make the gParted live CD the first drive in the boot order.
You can now power on the server, and you should be taken directly into the gParted tool, where you can expand the drive. Detailed instructions on how to do that can be found here.
When you’re done, simply power off the server, detach the gParted-drive and you should be back up and running with an expanded filesystem.
Once you’ve validated that the data is intact, you can go ahead and delete your old disk.
- Manage Docker resources with Cgroups - May 12, 2015
- Docker, Cgroups & More from ApacheCon 2015 - April 30, 2015
- How to setup & optimise MongoDB on public cloud servers - March 24, 2015
- Presentation deck from CloudExpo Europe - March 17, 2015
- CoreOS is now available on CloudSigma! - March 10, 2015