
Maintaining copies of the same files between two directories residing in different directories or computers is quite tasking. At the basic level, you will have to work on a file, then manually copy and replace it in the other directory. Such a process takes more time and bandwidth which can be avoided. You can use Rsync to solve this issue. In this tutorial, we will discuss this powerful tool and how you can get it running on your machines. While we will be using Ubuntu 20.04 VPS, the same instructions should work for any modern Linux distribution.
What is Rsync?
Rsync stands for “remote sync.” It’s a tool that helps with synchronizing files between two directories or computer systems. The Rsync algorithm minimizes network usage by moving the portions of the file that have changed, thus saving bandwidth. Rsync is a flexible tool – functioning as both a file transfer program and a file synchronization tool. Thus, most Linux distributions by default come with the Rsync utility.
Rsync Syntax
If you have worked with shell file transfer commands such as ssh, scp and cp, you will find Rsync easy to work with. We will create two directories and sync them. Let’s go into the home/documents directory and create some random files. Get your terminal up and enter the following commands:

We will then use touch to create some files in the sigma1 directory:
|
1 |
touch sigma1/cloud{1..60} |
The above command creates 60 empty files in the sigma1 directory. You can list them using the list command ls sigma1 as shown below:
The second directory, sigma2 is still empty. To sync the two directories, enter the following command:
|
1 |
rsync -r sigma1/ sigma2 |
The -r flag stands for recursive, necessary for directory syncing. Optionally, you may use the -a flag. The –a flag combines archiving and recursive syncing, additionally preserving symbolic links, modification times, groups, owner, permissions, and special and device files. So, you can enter the command as follows:
|
1 |
rsync -a sigma1/ sigma2 |
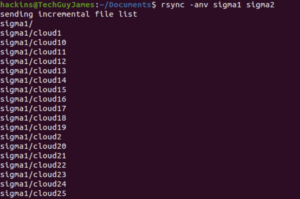
Notice the forward slash ‘/.’ It’s necessary for syncing only the contents of the directory. If you enter the command without the forward slash, then it will create a hierarchy inside the second directory: ~/sigma2/sigma1/[files]
Important Rsync Commands
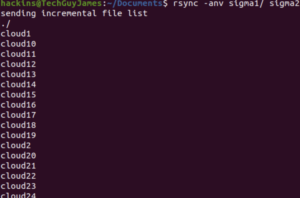
As mentioned above, always be careful before executing the Rsync command. Luckily, Rsync provides a way to check by passing the –n flag, and the –v flag, (also referred to as -dry-run options) to get the expected output. Here is how the command would look like with our directories:
|
1 |
rsync -anv sigma1/ sigma2 |
The expected output when you run it will be:
If you executed it without the forward slash, it would look like this:
Using Rsync with a Remote System
It’s easy to sync your computer with a remote server, e.g. a CloudSigma VPS, if you have SSH access to the remote server. If you want to know how to setup a server and add SSH keys, have a look at the linked article.
Once SSH is set up between the two systems, you can use the following commands with your ssh username. Since we want to move the whole dir, you leave out the forward slash:
|
1 |
rsync -a ~/Documents/sigma1 username@remote_host:destination_directory |
The above command pushes the specified directory from your local system to the remote directory. There’s an opposite command for pulling the directory from a remote system to your local computer:
|
1 |
rsync -a username@remote_host:/home/username/Documents/sigma1 place_to_sync_on_local_computer |
As you may have noticed, it works the same as the cp command i.e. the source is the first argument, while the destination is the second argument.
Additional Rsync Options
Apart from the options we have already discussed, Rsync comes with more capabiltiies as discussed below:
-z flag
It is Important when transferring files that have not initially been compressed to save on network transfer and bandwidth costs. Used together with –a flag discussed earlier:
|
1 |
rsync -az source destination |
-P flag
The -P flag is important for letting you know what is going on. It combines -progress and -partial. It gives you a progress bar while the files are transferring and the partial handles resumption of interrupted file transfers. You may use it together with the –z flag to compress the files before the transfer process as shown:
|
1 |
rsync -azP source destination |
File Deletion
Rsync, by default, does not delete files in the destination if you delete them in the source directory. To keep the two directories truly in sync, you must remove the files in the destination directory as well. Fortunately, Rsync provides the –delete flag for this process. Always do testing with the -dry-run options we discussed earlier to prevent unintended loss of data. You may add the -delete flag as follow:
|
1 |
rsync -a --delete source destination |
Excluding Files
You may want to exclude some files or directories. Rsync makes this possible by providing the exclude option. You may exclude files and directories using the exclude flag by specifying them in a comma-separated list following the -exclude=option. The command is as follows:
|
1 |
rsync -a --exclude=pattern_to_exclude source destination |
At times you may want to include other files that match the files we have excluded. Rsync provides the -include=option flag. The command is as follows:
|
1 |
rsync -a --exclude=pattern_to_exclude --include=pattern_to_include source destination |
Backing up Files
You may want to store backups of important files. Rsync offers the –backup flag for this purpose. You must specify the backup directory using the –backup-dir option. The full command is as follows:
|
1 |
rsync -a --delete --backup --backup-dir=/path/to/backups /path/to/source destination |
To sum up
As discussed in this guide, Rsync is an essential tool when it comes to file-level operations. It is a flexible tool that will keep your directories in sync, minimize costs of transferring whole file changes, exclude what you do not want to synchronize and ensure your files are backed up by just entering one command.
Happy computing!
- Removing Spaces in Python - March 24, 2023
- Is Kubernetes Right for Me? Choosing the Best Deployment Platform for your Business - March 10, 2023
- Cloud Provider of tomorrow - March 6, 2023
- SOLID: The First 5 Principles of Object-Oriented Design? - March 3, 2023
- Setting Up CSS and HTML for Your Website: A Tutorial - October 28, 2022