

When it comes to remote computing, SSH is one of the most popular and secure protocols. SSH is a cryptographic network protocol that establishes a secure connection with remote devices. Upon connecting to a remote device, a user can run commands on the remote shell. SSH is most common among network and system administrators.
This cheat sheet-style guide demonstrates an overview of SSH, some common ways of connecting with SSH, and various SSH configurations.
SSH Overview
SSH is an acronym for Secure Shell. Some also refer to SSH as Secure Socket Shell. SSH is the most common way of accessing a remote server. When connecting to a remote system using SSH, you connect to an existing account. When connected, you’ll have access to a shell session. All the commands run will be executed on the remote machine and the output printed on your local terminal.
SSH connection follows a client-server model. The remote system must be running the SSH daemon to accept remote SSH connections. SSH daemon listens to specific ports, authenticates connection requests, and generates the appropriate environment when the conditions are met.
For this guide, we have configured two Ubuntu servers. The primary server will be configured to connect to the secondary server. The secondary server will be configured to accept SSH connections from the primary server. These server IP addresses will be used throughout the guide:
-
Primary: 31.171.250.121
-
Secondary: 31.171.250.130
To begin with, you can take a look at our detailed guides on how to use SSH to connect to a remote server in Ubuntu and how to configure your Linux server to use SSH key-based authentication. Now, let’s start!
SSH Authentication
There are two major types of SSH authentication. The traditional method is by using a password. It’s less secure and strongly not recommended. The second method is SSH keys. SSH keys offer very strong security and are strongly recommended.
While password authentication is simpler to understand and configure, it’s easily exploited. For example, automated bots can use brute force to break into a system. SSH keys are cryptographic keys. Each key has two parts – a private key and a public key. The public key can be shared anywhere without any concern. However, the private key must remain safeguarded.
To use the SSH keys as the authentication method, the remote system must have a copy of the public key installed. Copies of private and public keys should also be installed on the local system. By default, the public keys are listed on the following file. Each unique user has a unique copy of this file:
|
1 |
~/.ssh/authorized_keys |
Here’s how the authentication process works:
-
The client system sends a connection request to the remote system. It also sends what SSH key to use.
-
The remote system checks if the public key is listed in authorized_keys.
-
If the key exists, a random string is generated and encrypted using the public key. The encrypted message can only be decrypted using the private key.
-
Upon receiving the string, the client will decrypt the string.
-
Combining the string and previously negotiated session ID, an MD5 hash is generated. The client sends the MD5 hash to the remote system.
-
The remote system knows the random string and the session ID. If the MD5 hash matches, the connection is allowed.
SSH Keys
In this guide, the SSH key will be the primary focus of authentication. So, this section will focus on how to work with SSH keys.
-
Generating an SSH key pair
By default, a Linux system does not have an SSH key installed. However, the system may contain SSH keys generated/installed previously. Assuming there’s no previous SSH key, we need to generate new SSH public and private key pair. SSH supports many cryptographic algorithms for generating SSH keys, for example, RSA, DSA, ECDSA, and EdDSA. RSA is the default and preferred algorithm.
-
Generating a normal RSA key pair
To generate an SSH key pair, run the following command:
|
1 |
ssh-keygen |
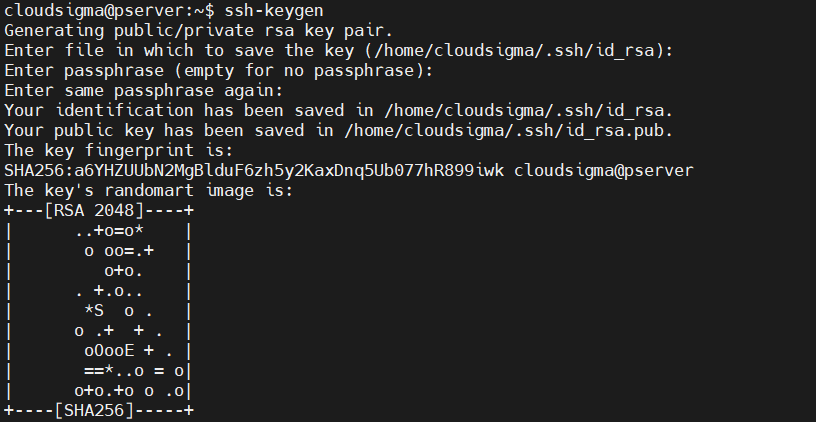
The prompt will ask you where to store the key pair. As mentioned, it’ll be an RSA key pair. If no value is entered, then SSH will save it to the default location /home/demo/.ssh/id_rsa.
The next step is to enter a passphrase. It’s recommended to use a passphrase. The length of the passphrase is arbitrary. It adds a layer of security. However, SSH allows generating keys without any passphrase. Just press Enter if you want keys without a passphrase.
The final output provides the following key information:
-
The location of the private key ( /root/.ssh/id_rsa). It should never be shared.
-
The location of the public key ( /root/.ssh/id_rsa.pub). It’s safe to share with anyone.
-
The key fingerprint.
-
A key random image. The idea is, that if there is a compromise with the keys, you may probably tell by noticing any change in the key image.
-
Generating an RSA key pair with different bits
By default, SSH keys are 2048 bit. For security, it’s considered to be good enough. However, we can manually specify to use a different number of bits. The higher the bit value, the stronger the key is.
Run the following command to generate an SSH key pair of 4096 bits. Most of the servers support 4096 bit SSH keys. If the key is too large, then it may not be accepted for DDoS protection purposes:
|
1 |
ssh-keygen -b 4096 |
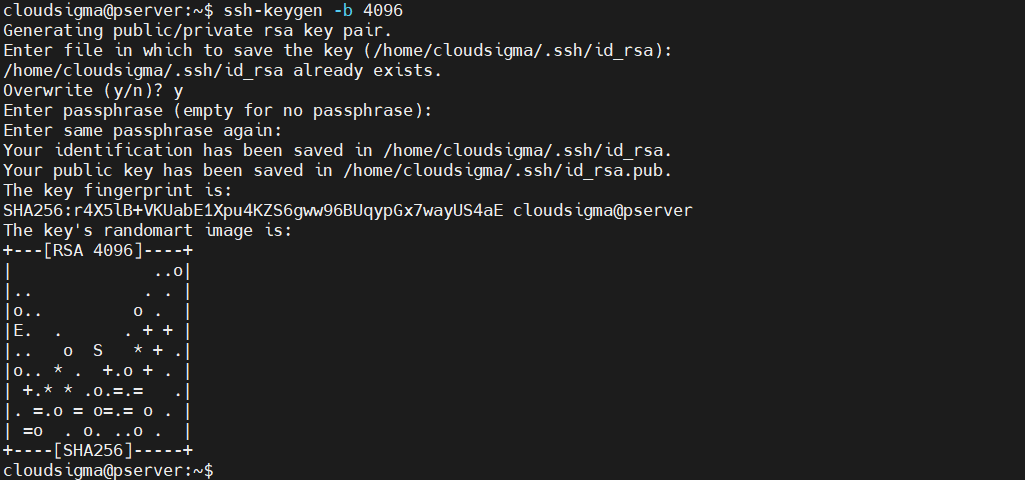 Because we already had generated a key pair, SSH will ask whether to overwrite the previous one. The rest of the process is the same as generating a normal key pair.
-
Changing the private key passphrase
We can change the passphrase of the private key. The process requires you to know the current passphrase. To change the passphrase, run the following command:
|
1 |
ssh-keygen -p |

The command will prompt you to enter the location of the private key. Press Enter if the key is stored at the default location. Enter the current passphrase. If accepted, then you can designate a new one.
-
Displaying an SSH key fingerprint
Every SSH key pair shares a cryptographic fingerprint. This fingerprint can be used to identify unique keys. It can be useful in numerous situations. Run the following command to check the fingerprint of an SSH key:
|
1 |
ssh-keygen -l |

Enter the location of the key. Press Enter if the key is stored at the default location.
Copying the Public Key
The SSH key pair is ready to secure remote connections. For the remote system to accept the SSH key for authentication, it needs to have a copy of the public key. There are multiple ways to make a copy of the public key to the remote server.
-
Using ssh-copy-id
The ssh-copy-id comes as a part of the OpenSSH package. It’s the default way of copying the SSH public key. It’s simple and easy to use. Run the following command to transfer a copy of the public key:
|
1 |
ssh-copy-id <username>@<secondary_server_ip> |
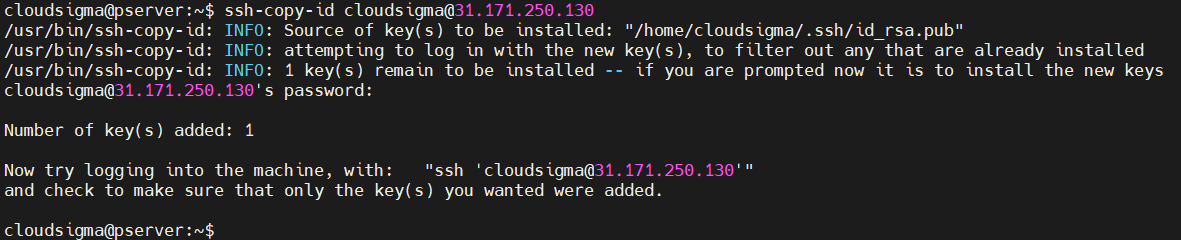
You need the password to the remote user account to complete the process. If successful, there will be a success message.
-
Using SSH connection
If using the ssh-copy-id utility isn’t available but the primary server can connect to the secondary server using SSH, then we can use a different trick to copy the key. It’s piping the content of the public key via the SSH command to the remote side. Note that if the directory ~/.ssh doesn’t exist on the remote system, it may not work:
|
1 |
cat ~/.ssh/id_rsa.pub | ssh <username>@<secondary_server_ip> "mkdir -p ~/.ssh && cat >> ~/.ssh/authorized_keys" |

-
Copying manually
If a remote connection isn’t an option, the only process left is to manually add the public key to the remote server. First, grab the content of the public key:
|
1 |
cat ~/.ssh/id_rsa.pub |
On the remote server, place the key to the appropriate location:
|
1 2 3 |
mkdir -pv ~/.ssh echo <public_key> >> ~/.ssh/authorized_keys |
Using SSH
Now that the public key is set, we’re ready to use SSH to connect remotely.
-
Connecting to a remote system
The first step is learning how to connect to the remote system using SSH. It assumes that both the local and remote system allows SSH traffic. To connect to the remote system, type the following:
|
1 |
ssh <secondary_server_ip> |

To connect to a specific user on the remote server, use the following structure instead:
|
1 |
ssh <username>@<secondary_server_ip> |

If it’s the first time connecting to the server, SSH may show a warning. Enter yes to continue the connection. If the remote account is password-protected, you’ll have to enter the password. If the SSH key is passphrase-protected, you also have to enter the passphrase.
-
Connecting to a different port
By default, SSH runs on port 22. The SSH client will assume the default port value when connecting to the remote system. However, if the remote system listens to a different port for SSH traffic, it won’t work. In such a situation, we need to manually declare the port number. To declare the specific port, use the -p flag:
|
1 |
ssh -p <port> <username>@<secondary_server_ip> |
Manually declaring the port all the time is counterproductive. We can change the default port value permanently. To do that, open the SSH configuration file. If the file doesn’t exist, the following command will create it:
|
1 |
nano ~/.ssh/config |
Then, add the following lines:
|
1 2 3 4 5 |
Host <remote_alias> HostName <remote_hostname> Port <port_value> |
-
Running commands on the remote server
Now that connection is established, any command you run on the local terminal will go to the remote server. Any output generated will be sent to the local terminal.
If it’s a single command to run, then we can run it without performing a full SSH login. We can simply declare the command after the SSH connection instruction:
|
1 |
ssh <username>@<secondary_server_ip> <command_to_run> |
-
Adding a key to an SSH agent
If the SSH key has a passphrase, then every time you connect to the remote system, you’ll have to enter the passphrase. Doing it repeatedly is counterproductive. We can let an SSH agent take care of it. It’s a small utility that stores the private key after you’ve entered the passphrase. The private key will be available during the terminal session. To start the SSH agent, run the following command:
|
1 |
eval $(ssh-agent) |

The program is running in the background. All you need is to add your private key to the agent. Run the following command:
|
1 |
ssh-add |

Enter the passphrase to complete the operation.
-
Forwarding SSH credentials
We can also configure SSH to connect from one server to another without a password. It can be quite efficient, especially when working with numerous remote servers. To achieve it, we need to forward the SSH credentials. Forwarding SSH credentials requires the remote server configured to accept a connection from the local machine/server. Then, all you need is to connect to the first server using the -A flag. It forwards your credentials to the servers for the current session:
|
1 |
ssh -A <username>@<secondary_server_ip> |
Remote Server Configurations
This section contains some of the common server-side configurations to help you improve server responses and connection security.
-
Disabling password authentication
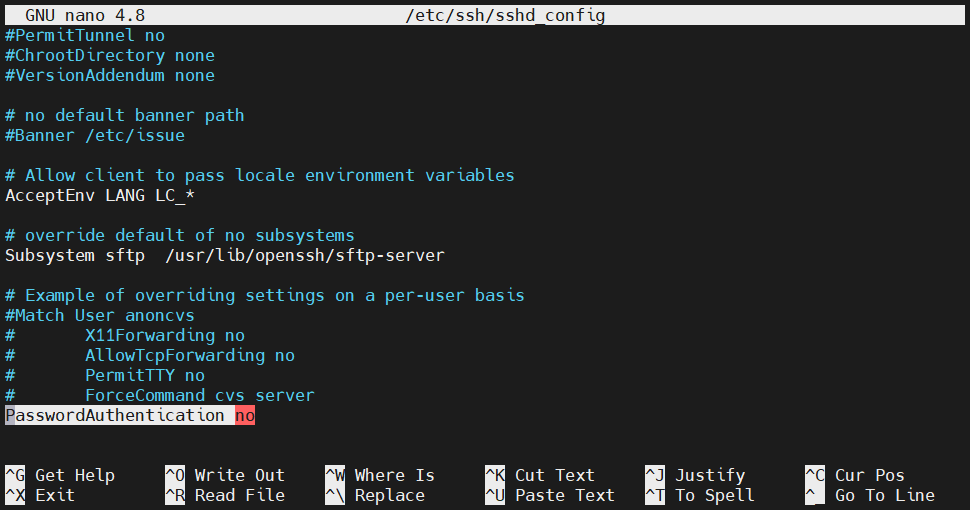
If the SSH keys are configured and the SSH connection is working as expected, then it’s safe to disable password authentication. The following configuration will stop asking for a password when any user connects through SSH. On the remote server, open the sshd_config file with root/sudo privilege:
|
1 |
sudo nano /etc/ssh/sshd_config |
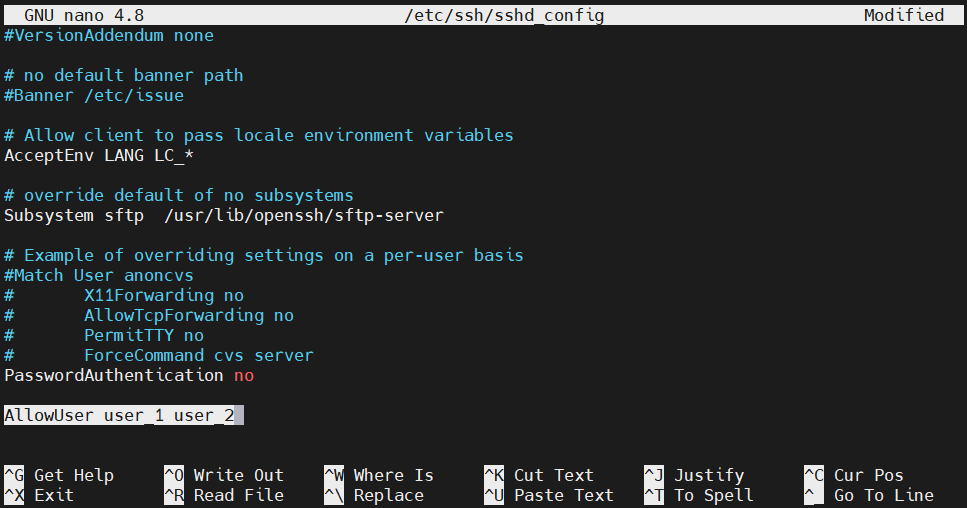
Next, search for the entry PasswordAuthentication. If the line is commented, uncomment it. Change the value to no:
|
1 |
PasswordAuthentication no |
Save the file and close the editor. To take the changes into effect, restart the SSH service:
|
1 |
sudo service ssh restart |
If the system is CentOS/Fedora, then use the following command instead:
|
1 |
sudo service sshd restart |
-
Changing the SSH port
As mentioned earlier, SSH uses port 22 to exchange SSH traffic. However, according to some system administrators, it’s better to assign a different port for SSH. It can help against automated bots flooding the port. To change the port SSH listens to, open up the sshd_config file:
|
1 |
sudo nano /etc/ssh/sshd_config |
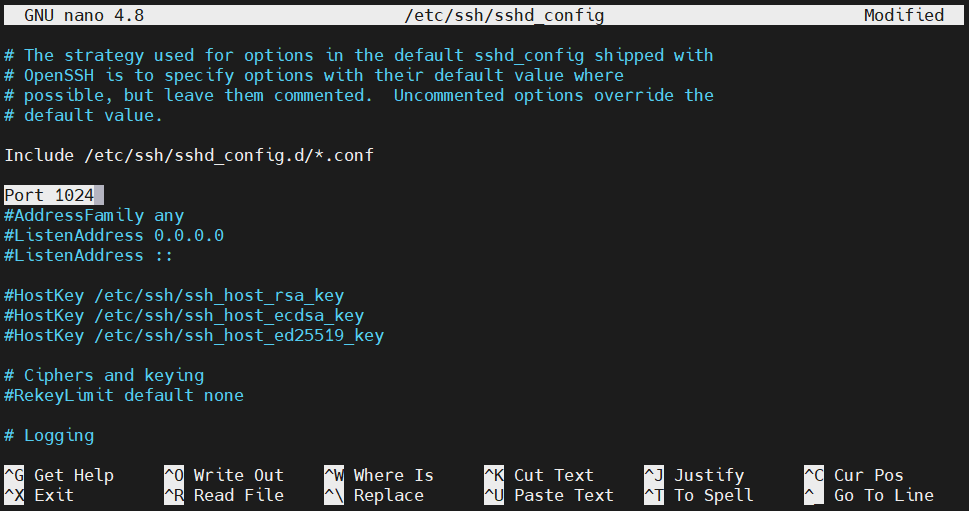
Search for the entry Port. If it’s commented, uncomment it. Then, change the value to a different value. The port value is an unsigned 16-bit integer (0-65535):
|
1 |
Port 1024 |
Save the file and close the editor. To implement the change, restart the SSH daemon:
|
1 |
sudo service ssh restart |
On CentOS/Fedora, run the following command instead:
|
1 |
sudo service sshd restart |
-
User limitation
We can configure which user accounts can connect using SSH. It also involves tweaking the sshd_config file. Open up the file with sudo/root privilege:
|
1 |
sudo nano /etc/ssh/sshd_config |
Search for the entry AllowUsers. Add the permitted users:
|
1 |
AllowUsers <user_1> <user_2> |
Save the file and close the editor. Restart SSH daemon to take the changes into effect:
|
1 |
sudo service ssh restart |
On CentOS/Fedora, run the following command instead:
|
1 |
sudo service sshd restart |
-
Group limitation
Similar to user limitation, we can also determine what user group can connect to the system using SSH. Open up the sshd_config file:
|
1 |
sudo nano /etc/ssh/sshd_config |
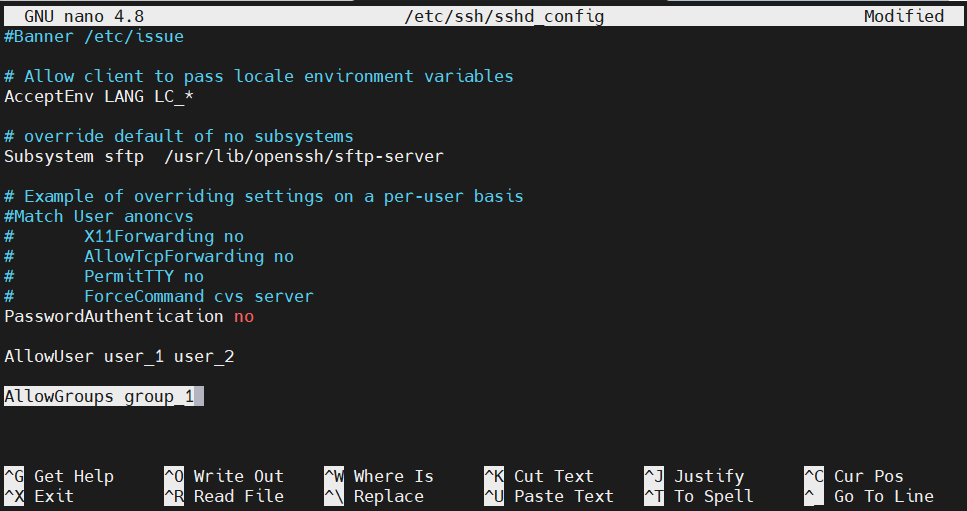
Use the entry AllowGroups to add a specific user group that can use SSH:
|
1 |
AllowGroups <user_group> |
Save the file and close the editor. Restart SSH daemon to take the changes into effect:
|
1 |
sudo service ssh restart |
For CentOS/Fedora, run the following command instead:
|
1 |
sudo service sshd restart |
Note that if there’s any user added or removed from the user group, the SSH daemon needs to be restarted. Otherwise, the group changes won’t be effective.
-
Disabling root login
If you have access to a user with sudo privileges, then it’s recommended to disable root login through SSH. Open up the sshd_config file:
|
1 |
sudo nano /etc/ssh/sshd_config |
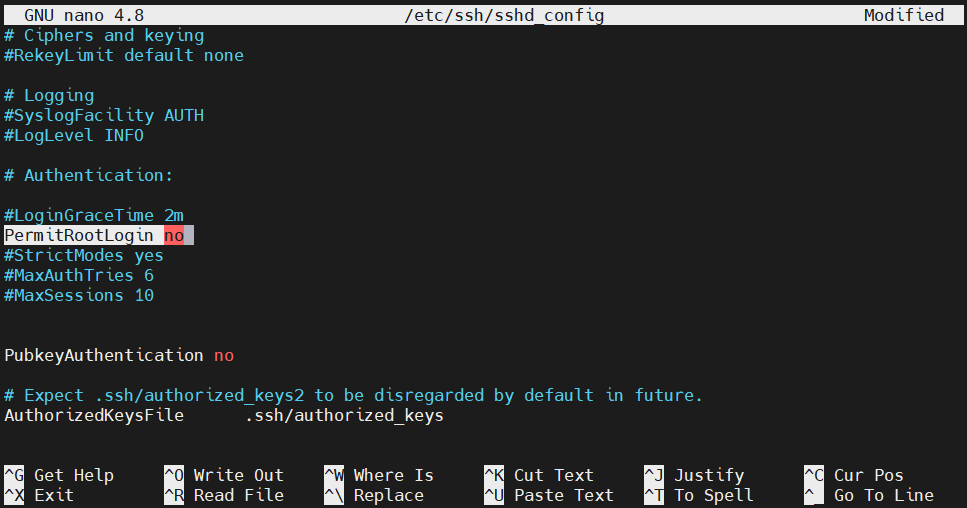
Change the value of the entry PermitRootLogin to no:
|
1 |
PermitRootLogin no |
Save the file and close the editor. Restart SSH daemon to take the change into effect:
|
1 |
sudo service ssh restart |
On CentOS/Fedora, run the following command instead:
|
1 |
sudo service sshd restart |
-
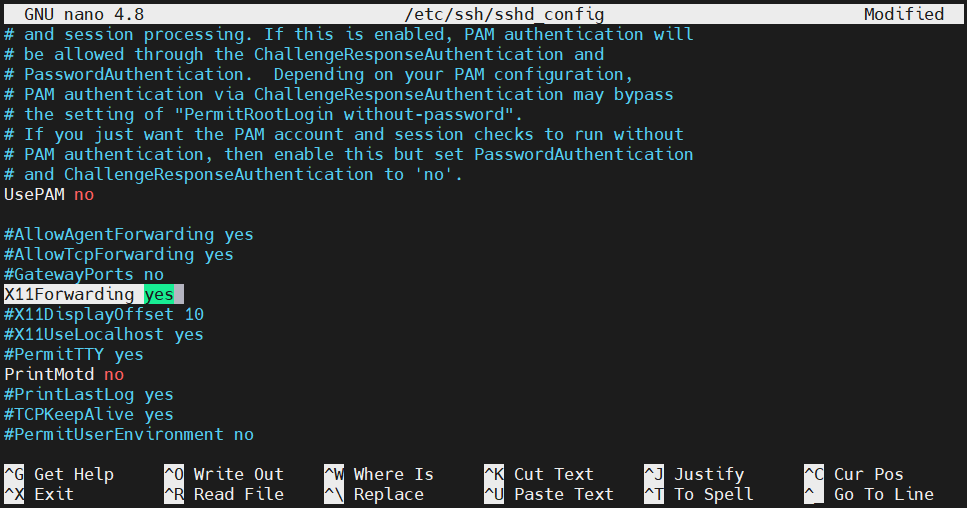
Forwarding X application displays
The SSH daemon can also forward the display of the X applications from the server to the client. For this to work, however, the remote system must have an X windows system configured. The feature also has to be enabled from the SSH configuration. Open up the SSH configuration file:
|
1 |
sudo nano /etc/ssh/sshd_config |
Change the value of the directive X11Forwarding to yes:
|
1 |
X11Forwarding yes |
Save the file and close the editor. Restart SSH daemon to take the change into effect:
|
1 |
sudo service ssh restart |
On CentOS/Fedora, run the following command instead:
|
1 |
sudo service sshd restart |
Client Configurations
In this section, check out some of the common configurations on the SSH client.
-
Server-specific connection information
On the local system, we can define the specifics of a remote connection. All the information is stored in the config file located at ~/.ssh/config:
|
1 |
nano ~/.ssh/config |
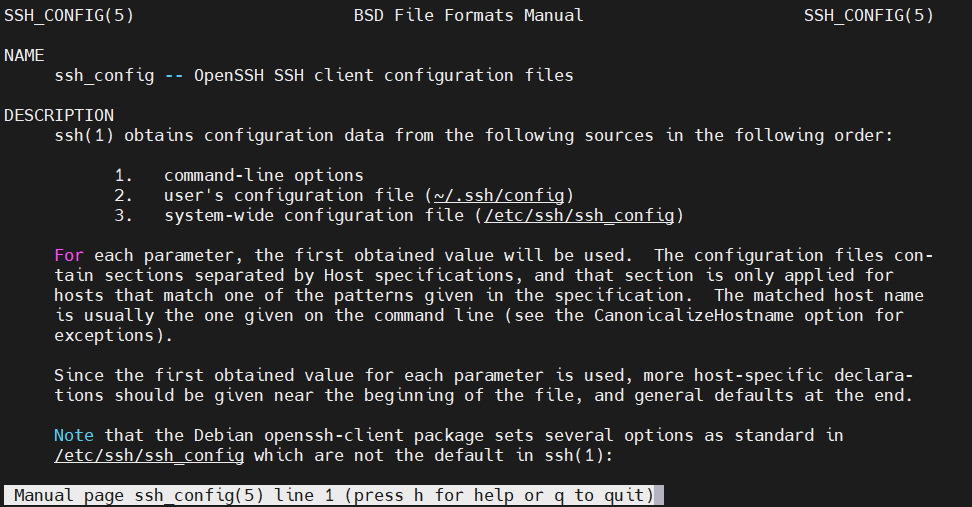
Each remote system block is signified by the keyword Host followed by an alias. All the system-specific directives go here. When connecting to the remote system, SSH will apply them automatically. For a full, in-depth explanation of the configuration, check out the man page:
|
1 |
man ssh_config |
The entry for a remote connection will follow the following structure:
|
1 2 3 |
Host <remote_hostname> <directive> <value> |
-
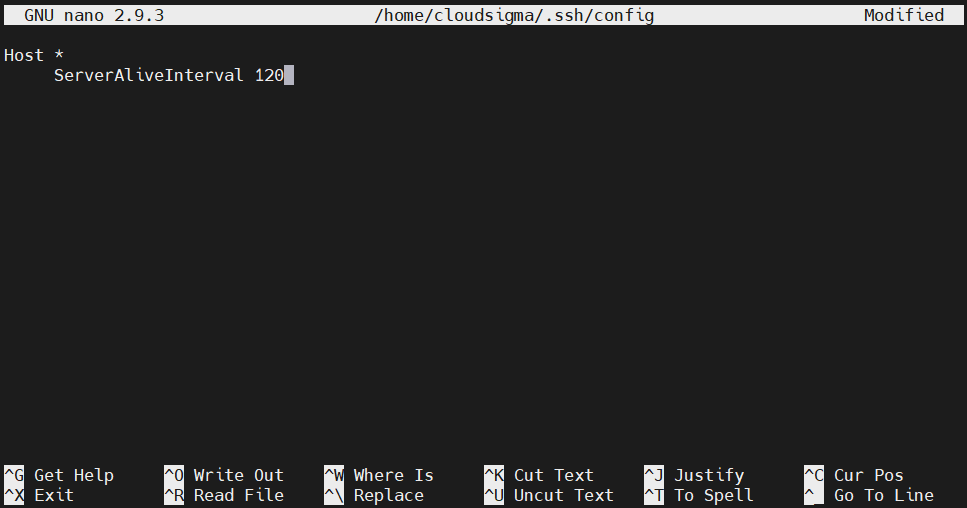
Connection timeout
You may find yourself disconnected from SSH sessions before you’re ready to perform any action. If the client isn’t sending any packet to the remote server, then after some time, the connection is timed out. To avoid such circumstances, we can configure the local client to send a packet every once in a while to keep the connection alive.
Open the local configuration file:
|
1 |
nano ~/.ssh/config |
Under the remote connection entry, add the directive ServerAliveInterval followed by the packet interval in seconds:
|
1 |
ServerAliveInterval 120 |
Save the file and close the editor.
-
Disabling host checking
By default, whenever trying to connect to a new server, the SSH client will report the fingerprint of the remote SSH daemon. It’s a useful feature to verify the host’s authenticity. If a malicious actor is trying to spoof the remote host, it will appear as a new server.
Disabling this feature can be a huge security risk. Generally, it’s recommended to keep this option on. In certain situations, however, disabling host checking can be of convenience. Open the configuration file:
|
1 |
nano ~/.ssh/config |
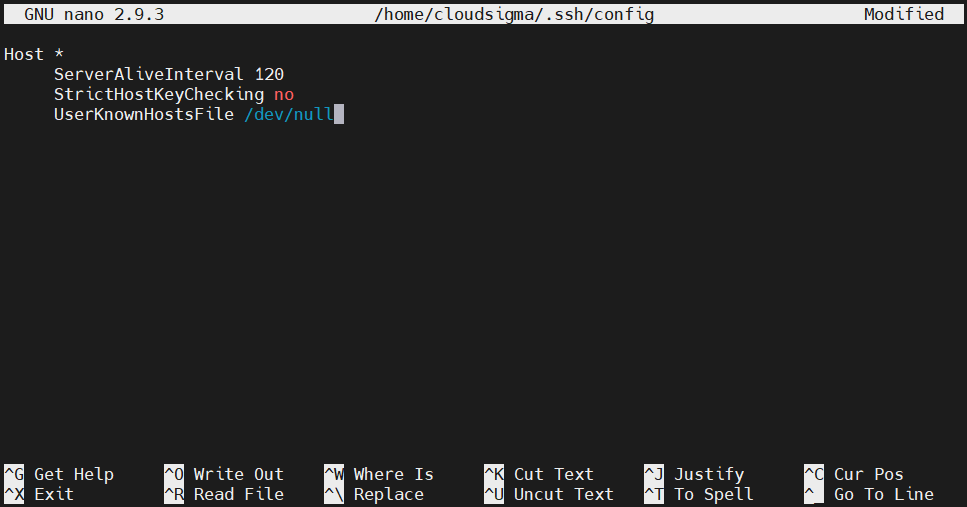
Under the remote host section, add the following directives:
|
1 2 3 |
StrictHostKeyChecking no UserKnownHostsFile /dev/null |
The first directive will disable adding new hosts automatically to the list of known hosts, stored in the known_hosts file. The second directive is not to warn off of any changes. Save the file and close the editor.
-
Multiplexing SSH over a single TCP connection
Sometimes, establishing a TCP connection may require quite some time. If it’s necessary to make multiple connections to the same machine, then multiplexing is a great feature you can take advantage of. SSH multiplexing allows using the same TCP connection for multiple SSH sessions. It reduces some of the workloads required to establish new sessions. Limiting the number of connections may also help.
We can manually set a multiplexing connection or let SSH use it whenever available. Here, we’ll configure SSH to follow the second route. Open the SSH configuration file:
|
1 |
nano ~/.ssh/config |
Add a wildcard host definition on top of the file. It ensures that the next set of directives will be applied to all remote connections. Add the following directives:
|
1 2 3 4 5 |
ControlMaster auto ControlPath ~/.ssh/multiplex/%r@%h:%p ControlPersist 1 |
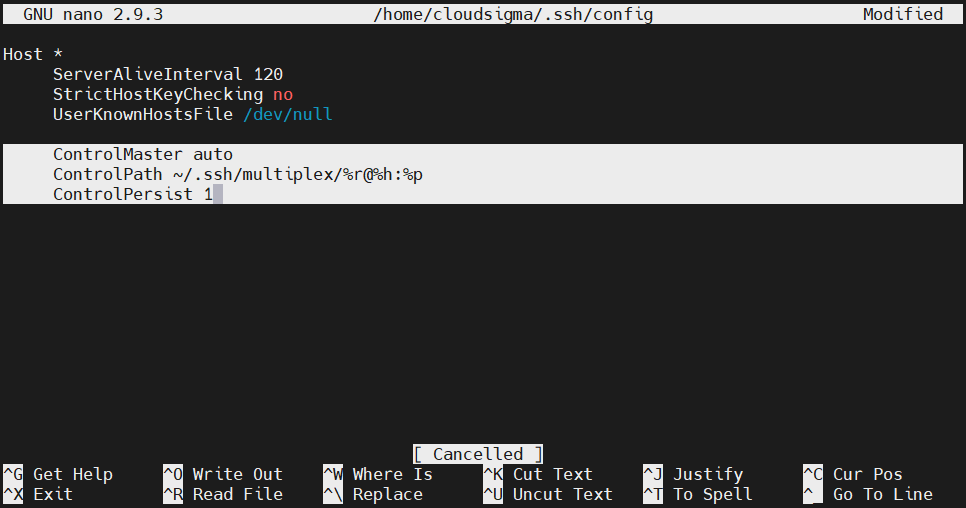
The first directive tells SSH to use multiplexing automatically whenever available. The second directive establishes the path to the control socket. This socket will be created when the first session is established. Subsequent sessions will follow this socket.
The last directive tells SSH to let the initial master connection be the background. It also signifies that TCP connections will terminate automatically one second after the last SSH session. Next, create the directory we declared in the configuration file:
|
1 |
mkdir -pv ~/.ssh/multiplex |
Finally, multiplexing should be active.
SSH Escape Codes
After establishing a connection, there are ways to control the connection behavior using escape codes.
-
Forcing disconnects
Are you stuck on an SSH session? SSH sessions are generally managed by the server. If the server is experiencing issues, then getting stuck on a dead SSH session can be frustrating. Thankfully, OpenSSH offers useful controls to manage the connection state from the client-side.
Press Enter a couple of times. Then, enter the following command:
|
1 |
~. |
![]()
Here, ~ is the control character. After running this command from the client, the connection should immediately close.
-
SSH background session
We can also put an SSH session into the background. When put to the background, you will return to the normal shell session. Once your work is finished, you can return to the SSH shell again. Note that you need to have a proper timeout configuration to avoid timeout while the SSH session remains in the background. To put an SSH session into the background, enter the control character followed by Ctrl + Z:
|
1 |
~<Ctrl + Z> |

If it was your most recent background task, then you can reactivate it using the following command:
|
1 |
fg |
If there are multiple background tasks, then we can determine from the job list:
|
1 |
jobs |

To bring the target job to the foreground, note the job value from the first column. Then, run the following command:
|
1 |
fg %<job_value> |

-
Changing port forwarding configuration
Using the control mechanism, we can change port forwarding rules on the fly. Once the connection is established, we can create or tear down port forwarding rules. It’s a part of the SSH command-line interface.
To access the SSH command-line interface, run the command:
|
1 |
~C |
![]()
To list the available options, enter the following command:
|
1 |
-h |
If the output is too minimal, try increasing the level of verbosity using the following control command:
|
1 |
~v |
Now, run the -h command again:
|
1 |
-h |

As the output explains, it’s quite simple to implement any of the port forwardings with a simple command. For example, a tunnel can also be destroyed using the kill command, signified by K in the command list.
Final Thoughts
SSH is quite common to come across. That’s why learning SSH is very useful. Our comprehensive SSH overview covers the most important SSH configurations that users need to know to use SSH on a day-to-day basis. Once mastered, you should be able to work with almost all SSH server configurations.
Happy computing!
- How to Deploy WordPress with Persistent Volume on Kubernetes Cluster - March 17, 2023
- Deploying Applications on Kubernetes Using Argo CD and GitOps - October 26, 2022
- Using Node.js Modules with npm and package.json: A Tutorial - October 6, 2022
- Using Ansible to Install and Configure WordPress with LAMP on Ubuntu - September 23, 2022
- Creating Views in the Django Web Application Framework - September 22, 2022