
Introduction
Docker is a container platform that is a lightweight, virtualized, portable, software-defined standardized environment that allows the software to run in isolation of other software running on the physical host machine. Docker is a defining component of the Continuous Development and Integration aspect of Software Development. By providing a consistent run-time environment, Docker ensures that software behaves the same regardless of the physical host machine on which it is deployed. For a thorough overview of the Docker ecosystem, check out this article.
While Docker containers are self-contained, they sometimes need to share access to data or persist data to disk after the container is stopped. Data can be in the form of databases, log files, or user-generated data. Such data is impossible to include in a Docker image configuration file but it needs to be available for your application to run as expected. Sharing and persisting data in Docker containers is handled by Docker Volumes. Docker Volumes can be created during container creation or created later and attached to containers. In this tutorial, we will be discussing the four different ways to share data between containers.
Prerequisites
- Set up a server running Ubuntu 20.04 and Create a non-root user with sudo privileges. Log in with the non-root user to proceed with the following steps.
- Install Docker-we have a tutorial on How to install and operate Docker on Ubuntu, you need to follow steps 1, 2, 3, and 4. This should work for any Ubuntu distribution.
Please note that, while we are working with Ubuntu 20.04, the instructions and commands for Docker will work on any other operating system with Docker installed and the sudo user added to the docker group as explained in the prerequisites above.
Step 1: Create Independent Docker Volumes
We will start by creating independent volumes that are not related to any Docker container. To achieve this, we have the command docker volume create that was introduced in Docker 1.9 version. Enter the following command to create a volume named Step1DataVolume :
|
1 |
docker volume create --name Step1DataVolume |
You should see the following output indicating the volume creation was successful:
![]()
Now that we have an independent volume, we can create a new container from the official Ubuntu image as an example to make use of it. Enter the following command to create the container and attach the volume:
|
1 |
docker run -ti --rm -v Step1DataVolume:/Step1DataVolume ubuntu |
In this command, the --rm flag will automatically delete the container after exiting. The -v flag is used to specify and mount the volume. The -v flag takes the name of the volume, a full colon, and the absolute path inside the container where the volume should appear. Keep in mind that when the command runs, if the specified directories in the path do not exist, they will be created. If they already exist, the mounted volume will hide the existing content. For the -ti flag, the -t gives access to the terminal, and the -i allows us to interact with the container through the terminal.
While inside the container, run the following command to write some data to the volume:
|
1 |
echo "Step One Sample Text" > /Step1DataVolume/StepOne.txt |
Type exit and press enter to exit the container. As explained, the container is automatically deleted when you exit, thanks to the --rm flag, however, the volume will still be accessible.
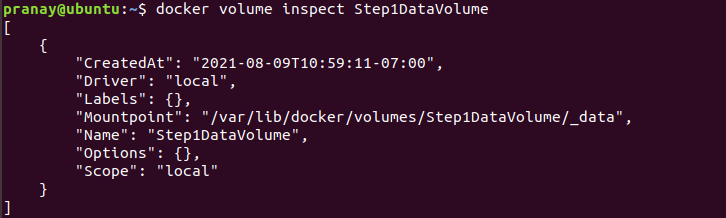
To verify that the volume still exists, you can use the
docker volume inspect command:
|
1 |
docker volume inspect Step1DataVolume |
You should see the following output:
Next, let’s create a new container. First, attach the volume and see if we can access the text we created in the previous container. Enter the following command to create and run the container using the
ubuntu image:
|
1 |
docker run -ti --rm -v Step1DataVolume:/Step1DataVolume ubuntu |
Inside the container, run the following command to verify that the
StepOne.txt file exists:
|
1 |
cat /Step1DataVolume/StepOne.txt |
You should see a similar output:

Next, type exit and press enter to exit the container. In this step, you learned how to handle data persistence using independent Docker volumes and how to attach volumes to containers.
Step 2: Creating a Docker Volume that Persists Data when you Delete a Container
In this step, we will use a single command to create a volume at the same time as we create a container. We will then delete the container and attach the volume to a new container. The command is similar to the one used in Step 1, however, we add one flag
--name, to specify a name for the container:
|
1 |
docker run -ti --name=Step2Container1 -v Step2DataVolume:/Step2DataVolume ubuntu |
While inside the container, enter the following command to write data to the volume and verify that the data is there:
|
1 2 3 |
echo "Step Two Sample Text" > /Step2DataVolume/StepTwo.txt cat /Step2DataVolume/StepTwo.txt |
Below is the output of the three commands:

Next, exit the container. When you restart the container using the following command, the volume will attach automatically:
|
1 |
docker start -ai Step2Container1 |
Inside the container, verify the volume is mounted by checking the existence of the
StepTwo.txt file using the command:
|
1 |
cat /Step2DataVolume/StepTwo.txt |
Here is the output:

You can exit the container now. Docker prevents the removal of a volume that another container references. You can try removing the volume using the command:
|
1 |
docker volume rm Step2DataVolume |
You should see the error message in the output:
![]()
Let’s remove the container using the container id shown in the output with the
docker rm command:
|
1 |
docker rm e3932e65e484bbf4524ca8de1b1dd99c4e92c12f92a9d6b0567a643d0aa6bb2d |
Replace the highlighted
container id with the
id of your container shown in your terminal. The command removes the container, but it does not remove the volume we created. You can list the volumes available using the
docker volume ls command to verify:
|
1 |
docker volume ls |
Here is the output:

To remove the container created in Step 2, enter the following command:
|
1 |
docker volume rm Step2DataVolume |
In this step, you were able to create a Docker volume at the same time when creating a container. Let’s see how we can create a volume from an existing directory with data.
Step 3: Creating a Docker Volume from an Existing Directory with Data
If you want to copy data into a volume, you can create a volume while creating a container and provide the path to a directory containing the data in the base image. In the command below, we create a container and add a data volume at
/var, which is a directory containing data in the base image:
|
1 |
docker run -ti --rm -v Step3DataVolume:/var ubuntu |
When the command runs, content from the base image’s /var directory will be copied into the volume. The volume can be attached to a new container. Next, exit the container:

Enter the following command to create the container, attach the volume and list the contents of the volume using the
ls command:
|
1 |
docker run --rm -v Step3DataVolume:/Step3DataVolume ubuntu ls Step3DataVolume |
You should see similar output from the command, which is a copy of the contents of the /var directory from the base image now available in the Step3DataVolume:
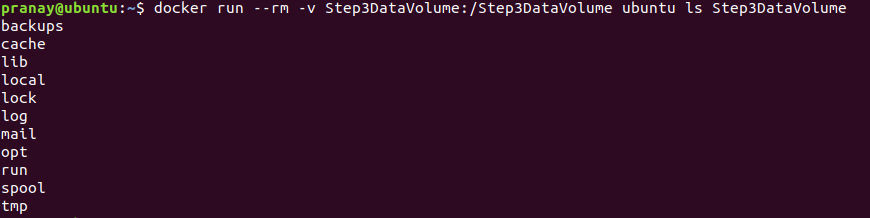
While mounting the /var directory as we did in this example may be impractical, it helps us understand that you can mount any directory created in your custom images to a Docker volume to make the data available to other containers.
Step 4: Sharing Data Between Multiple Docker Containers
In most cases, you will want multiple containers to access data from one Docker volume. In the previous examples, we have only attached a volume to one container. Now, you will learn how to attach a volume to multiple containers. While you can achieve this easily, Docker does not handle file locking. For multiple containers writing to the same volume, you must individually design the applications running in those containers to handle writing to shared data stores to avoid data corruption.
- Create Step4Container1 and Step4DataVolume
Use the
docker run command with the
--name flag to create a named container:
|
1 |
docker run -ti --name=Step4Container1 -v Step4DataVolume:/Step4DataVolume ubuntu |
Inside the container, run the following command to create a text file and add some text:
|
1 |
echo "Step Four Sample Text" > /Step4DataVolume/StepFour.txt |
After that, exit the container and get back to the host environment. Now, we want to create another container and mount the volumes from Step4Container1 to it.
- Create Step4Container2 and attach the volumes from the container Step4Container1
Execute the following command to create
Step4Container2 and mount volumes from
Step4Container1:
|
1 |
docker run -ti --name=Step4Container2 --volumes-from Step4Container1 ubuntu |
Inside the container, use the
cat command to verify data persistence:
|
1 |
cat /Step4DataVolume/StepFour.txt |
You should see the following output:

We can append some more text to the file from
Step4Container2 by entering the following command:
|
1 |
echo "We are appending text while inside Step4Container2" >> /Step4DataVolume/StepFour.txt |
Exit the container after this and we will go back to Step4Container1 to check if the data is still present.
- Verify changes made in the Docker volume between different containers
To view the changes, you will first restart the
Step4Container1 using the command:
|
1 |
docker start -ai Step4Container1 |
Check for changes using the command:
|
1 |
cat /Step4DataVolume/StepFour.txt |
You should see an output similar to the screenshot below:

Once you verify that both containers can read and write data to the same volume, you can now exit the container. As mentioned, Docker does not handle file locking, it’s the job of your application logic running inside the containers that should handle read-write access to shared data stores. Docker allows mounting volumes as read-only to prevent accidental data corruption by containers that only require read-only access by adding :ro as shown in the next example.
- Mounting a volume to a Docker container as read-only
For this example, we will create a container named
Step4Container3. In the create command, we mount volumes from
Step4Container1 and add
:ro to specify that this container has read-only access but cannot write to the volume. Execute the following command in your terminal:
|
1 |
docker run -ti --name=Step4Container3 --volumes-from Step4Container1:ro ubuntu |
Once inside the container, you can read the text file in the volume by entering the following command:
|
1 |
cat /Step4DataVolume/StepFour.txt |

However, if you try to remove the file using the command:
|
1 |
rm /Step4DataVolume/StepFour.txt |
You will get an error message in your terminal like:
![]()
Once you have verified the read-write permissions, you can exit the container. If you would like to clean up the containers and volume created in this tutorial, run the following commands:
|
1 2 3 |
docker rm Step4Container1 Step4Container2 Step4Container3 docker volume rm Step4DataVolume |
In this step, you learned how to share data among multiple containers using Docker volumes as well as mounting data volumes to containers as read-only.
Conclusion
In this tutorial, you created some Docker volumes and learned how to share data across Docker containers. While dealing with data sharing between containers, we noted that individual application logic inside the container must handle file locking to prevent data corruption when writing to shared data stores, since Docker has no implementation for handling file locking.
For further resources on utilizing Docker, you may want to check out more tutorials on our blog:
- How To Share Data Between a Docker Container and a Host
- Clean Up Docker Resources – Images, Containers, and Volumes
- Deploying Laravel, Nginx, and MySQL with Docker Compose
- Installing and Setting up Docker on CentOS 7
Happy Computing!
- How to Deploy WordPress with Persistent Volume on Kubernetes Cluster - March 17, 2023
- Deploying Applications on Kubernetes Using Argo CD and GitOps - October 26, 2022
- Using Node.js Modules with npm and package.json: A Tutorial - October 6, 2022
- Using Ansible to Install and Configure WordPress with LAMP on Ubuntu - September 23, 2022
- Creating Views in the Django Web Application Framework - September 22, 2022