
As time and technology continue to progress, the internet holds a central position in the modern world. That is why most companies and businesses have websites and applications to represent the online aspect of their brands. Regardless of whether you are the owner of a small or large website, you need the help of certain tools to make your job easier. Among these is the database management system.
A relational database management system allows you to properly categorize and organize the data on your website. This way, you can derive meaningful conclusions from a mountain of digital information.
What is PostgreSQL?
PostgreSQL is an open-source database management system that is quite popular. It is frequently used by website and application creators for easier management. This robust platform implements the SQL querying language.
One of the reasons for its popularity is its standard compliance. A standard-compliant database system ensures that website managers do not get in trouble with the legal authorities. Additionally, PostgreSQL gives its users access to a number of advanced tools that allow them to conveniently store, organize, and implement their data. Some of these features include secure online transactions and non-lock concurrency control.
In this guide, we will discuss how you can install and use PostgreSQL on an Ubuntu 18.04 cloud server on CloudSigma. We will also touch upon some basic administrative actions you can conduct on the database. Let’s start!
Pre-Installation Requirements
Before you move to the steps for installing PostgreSQL, you need to take care of the prerequisites. Needless to say, you will need an Ubuntu 18.04 server to continue. You will have to configure at least one of your Ubuntu 18.04 servers. After performing the initial server setup, you need to confirm that your server has a non-root user with sudo permissions. It should also have a firewall. You can easily install your server by following our tutorial on setting up your Ubuntu server. When this is ready, you can start installing PostgreSQL on your system.
Step 1: Install PostgreSQL
Ubuntu servers already offer PostgreSQL as a default. All you need to do is refresh the local package index and use the apt packaging system. The refresh is necessary for first-time use in a session only. In order to install the Postgres package, use this command:
|
1 2 |
sudo apt update sudo apt install postgresql postgresql-contrib |
The addition of the -contrib package ensures that you get some extra utilities and features.
Step 2: PostgreSQL Roles and Databases
Now that you have installed PostgreSQL on your system, let’s see how you can put the database management system to good use. We will begin by familiarizing ourselves with the concept of ‘roles’ in the database. A ‘role’ in Postgres is used for the purposes of authentication and authorization. This term encompasess both users and groups. Upon installation, the program creates a new user account for you. This account is called postgres and it is linked to the default Postgres role. You must log in to this account to use Postgres.
When installing PostgreSQL, you essentially link your Postgres roles with the corresponding Unix or Linux system account. This means that Postgres uses the ident authentication method. Therefore, you can use your Unix or Linux username to sign in to the system if a matching role exists in Postgres. Here are some utilities that you can extract from your Postgres account:
-
Switch to Your Postgres Account
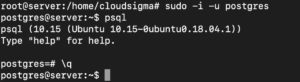
If you want to switch over to your postgres account, you can do so by entering this command on your server:
|
1 |
sudo -i -u postgres |
Type in the following to open up a new Postgres prompt:
|
1 |
psql |
Now you can start interacting with the various features of the PostgreSQL system. Once you are done, you can close the prompt and return to the postgres Linux command prompt by typing this:
|
1 |
\q |
-
Access a Postgres Prompt without Switching Your Account
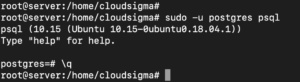
It is possible for you to open a Postgres prompt without switching your account. This means that you will be running the command directly with sudo. Instead of switching to the postgres user first, we will directly run the psql command with sudo:
|
1 |
sudo -u postgres psql |
As a result of this command, you will be able to directly log into Postgres. There will be no intermediary bash shell. You can exit the session once again with the following command:
|
1 |
\q |
Step 3: Set up a Role
So far, we have been working with a single postgres account or ‘role’. This role was configured in the database when you installed PostgreSQL. A lot of the time, you will find that you require more than one role on Postgres. To fulfill this need, you can create new roles in the database. This can be done with the help of the createrole command. Here is how you can set up a new role or user:
|
1 |
postgres@server:~$ createuser --interactive |
Make sure you are logged into your postgres account before running the command. Adding the –interactive flag means you will get the chance to name the role and determine its permissions. You can decide whether or not you want this particular user to have superuser permissions. In addition, you can perform this action without switching from your account. You can use sudo for this purpose as follows:
|
1 |
sudo -u postgres createuser --interactive |
You will then be asked to enter the desired role name and determine superuser status:

Apart from the above, you can make other specifications for new roles as well. To view the additional flags, you can access the man page with this prompt:
|
1 |
$ man createuser |
Step 4: Build a Database
Now that you know how to add new roles or users, you can start adding new databases. When you create a new role, the Postgres authentication system will automatically try to connect it to a database with a matching name. So if you have named the new role sammy, you can build a database with the name ‘sammy’ so that the two connect by default. You can create new databases with the createdb command. Run this command if you have switched to your postgres account:
|
1 |
postgres@server:~$ createdb sammy |
Use this command if you are using sudo instead:
|
1 |
$ sudo -u postgres createdb sammy |
Step 5: Open a New Prompt
To open a new prompt with your new role, you will first have to log in. Like mentioned before, PostgreSQL uses the ident based authentication method. Therefore, you will be needing a Linux user account that has the same name as the one you have put on your Postgres role and database. Do not worry in case you do not have such a Linux user. You can easily create one with the help of the adduser command:
|
1 |
sudo adduser sammy |
Make sure that you log out of your postgres user before you run this command. You need to run this from your non-root account using sudo. Now that you have added a new user with the name of your Postgres role, you can switch over to it. Type in the following to connect to the database:
|
1 2 |
sudo -i -u sammy psql |
You can also perform this action inline by using:
|
1 |
sudo -u sammy psql |
Ultimately, if everything is configured properly, you will be able to log in automatically to your user. In case you have multiple paths, you can specify which database you want to connect to with this command:
|
1 |
psql -d postgres |
Sometimes, when you are connecting to non default users or databases, you may want to check the current connection information. To check your connection information, type in the following:
|
1 |
sammy =# \conninfo |
You will see something like this:

Step 6: Table Creation and Deletion
Now that the basics of users and databases are out of the way, we can move on to some basic management tasks in Postgres. One of the most important ones is creating a table. You need to be able to create a table so that you can use it to store data. To create a new table, type in:
|
1 2 3 4 5 |
CREATE TABLE table_name ( column_name1 col_type (field_length) column_constraints, column_name2 col_type (field_length), column_name3 col_type (field_length) ); |
As you can see in the above syntax, you did not only name your table but also specified the number of columns, the type of columns, and the maximum length of the field data. If you want, you also have the option to add table constraints for each of the columns. We will use playground equipment as a sample set of data for explanation purposes. You can replace these values with your own when creating your Postgres tables:
|
1 2 3 4 5 6 7 8 9 |
CREATE TABLE playground ( equip_id serial PRIMARY KEY, type varchar (50) NOT NULL, color varchar (25) NOT NULL, location varchar(25) check (location in ('north', 'south', 'west', 'east', 'northeast', 'southeast', 'southwest', 'northwest')), install_date date ); |

As per the above command, you will have a table consisting of playground equipment. The first thing in the table is the equipment ID which we have specified to be of the serial type. Since this is set to be an auto-incrementing integer, the value will increase consistently. We applied the constraint of primary key to this column, which means each value must be unique and cannot be null. We did not specify any field lengths for the equip_id or the install_date column. The reason why these columns do not need a pre-determined field length is that the data type already implies the length.
Next up, we have the columns of the type and the color of the playground equipment. Neither of these values can be null. The subsequent command is for a location column. Because of the applied constraint, the value can only be one of the eight given options. The last command creates a date column so you can note down when the equipment was installed on the playground.
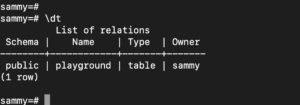
Once you are done editing your table, you can type in the following to view it:
|
1 |
sammy=# \d |

As seen above, you will find your table listing the equipment and another entry called playground_equip_id_seq. It is of the type sequence instead of table. This appears because of the serial type that you applied to the equip_id column in your table. The goal of this automatic entry is to keep track of the numbers in the sequence. If you wish, you can also visualize just your table without the sequence. Type in:
Step 7: Inserting and Editing Data in the Table
After formatting the table, you can start putting data into it. Continuing the example from the previous step, we can add equipment like slides and swings to the table. In the syntax, you will specify the table and the column that you want to edit, and then enter the data. Here is an example:
|
1 2 |
sammy=# INSERT INTO playground (type, color, location, install_date) VALUES ('slide', 'blue', 'south', '2017-04-28'); INSERT INTO playground (type, color, location, install_date) VALUES ('swing', 'yellow', 'northwest', '2018-08-16'); |
There are a few things you need to be extra careful about with this command. When entering the data, make sure that you put quotation marks around each value. In addition, remember that the column names do not need to be put within quotation marks. If you want to view the information you have just added, use the following command:
|
1 |
sammy=# SELECT * FROM playground; |
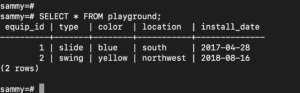
Remember that you do not need to enter values for the equip_id column as they are generated automatically with every new row. As you can see in the table above, each row gets a number correctly and automatically in the equip_id column. In case you want to delete an item instead of adding one, you can use the following command:
|
1 |
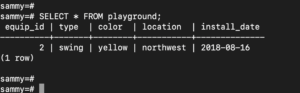
sammy=# DELETE FROM playground WHERE type = 'slide'; |
Call upon your table once again to see how the entry has been removed:
|
1 |
sammy=# SELECT * FROM playground; |
Step 8: Modifying Columns in a Table
Once you have created a table, it is not set in stone. You can modify it by adding and deleting columns as the need arises. For example, if we want to add the dates for the last maintenance visit for each individual piece of equipment as well, we can do so by typing:
|
1 |
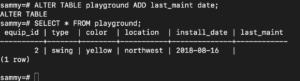
sammy=# ALTER TABLE playground ADD last_maint date; |
Summon your table again, and you will see that you added a new column to it. However, since you have not yet added any data, it will be empty.
|
1 |
sammy=# SELECT * FROM playground; |
Similarly, you can also delete a column from the table. If the column is deleted, all of its data will also be removed. The rest of the table, however, will not be altered. To remove the last maintenance visit date column, use this command:
|
1 |
sammy=# ALTER TABLE playground DROP last_maint; |
Step 9: Update Table Data
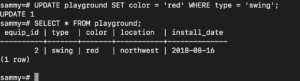
You know how to add new entries and remove them from the table, but is it possible to change the existing ones? You can update the values of existing entries with ease. First, you need to query the record you want to update. Next, you will use the SET command to change the value. Let’s say we want to change the color of the swing to red. Here is how to do it:
|
1 |
sammy=# UPDATE playground SET color = 'red' WHERE type = 'swing'; |
Query the table to confirm that the change has been made:
|
1 |
sammy=# SELECT * FROM playground; |
Conclusion
By following these steps, you will successfully set up PostgreSQL on your Ubuntu 18.04 server. If you would like to enhance your experience with server packages and extensions, you can find several of them on the PostgreSQL Apt Repository. With a little more guidance, you will be able to accomplish a lot with this database management system.
If you want to do more with PostgreSQL you can take a look at our tutorial covering how to use roles and manage permissions in PostgreSQL.
Happy Computing!
- Removing Spaces in Python - March 24, 2023
- Is Kubernetes Right for Me? Choosing the Best Deployment Platform for your Business - March 10, 2023
- Cloud Provider of tomorrow - March 6, 2023
- SOLID: The First 5 Principles of Object-Oriented Design? - March 3, 2023
- Setting Up CSS and HTML for Your Website: A Tutorial - October 28, 2022