

Introduction
Would you like to securely access the Internet from your smartphone or laptop when you connect to an untrustworthy network (e.g., WiFi in a hotel or coffee shop)? Luckily, there is a way to grant you your wishes. You can securely connect to an untrusted network as if you are on a private network using a Virtual Private Network (VPN).
What is a VPN?
VPN stands for a Virtual Private Network. It offers the possibility to open a secure tunnel to a trustworthy server. All requests are then sent and received via this server. The advantage is securing your access and transactions when using public networks such as free WiFi in a hotel.
Through the VPN, all data is encrypted and processed via the server. Devices that hang in between, such as third-party routers and the like, have no way of redirecting the traffic to unwanted destinations. Also, once the connection has been successfully established, you are a part of the server’s network. Other servers, computers or devices such as printers that would normally only be accessible in the server’s local network can now also be reached through the VPN tunnel. However, since not all data has to be sent through an encrypted tunnel, it is possible to configure the VPN client so that only a defined part of the requests is sent through the VPN tunnel. The rest of the traffic is processed normally over the Internet.
In this tutorial, we will walk you through the steps of setting up an OpenVPN server on Ubuntu 18.04.
Requirements
You need to have access to an Ubuntu 18.04 server to host your OpenVPN service to complete this tutorial. Before starting this guide, you also need to configure a non-root user with sudo permissions. You can easily install your server by following our tutorial on setting up an Ubuntu server.
In addition, you will need a separate computer to act as a certification authority (CA). Technically, you can use your OpenVPN server or your local computer as a certification authority. However, we don’t recommend this as it will expose your VPN to security flaws. According to the official OpenVPN documentation, you should place the certification authority on a separate computer dedicated to importing and signing certificate requests. So, we assume that your certification authority is on a separate Ubuntu 18.04 server that also has a non-root user with sudo permissions and a basic firewall. Throughout this guide, all installation and configuration steps will be as simple as possible for each of the installations. You can also take a look at our tutorial on how to set up an Open VPN server under Docker.
Step 1 – Install OpenVPN and EasyRSA
First, update your VPN server’s package index and install OpenVPN. You can install OpenVPN using apt because it is available in the default Ubuntu repositories:
|
1 2 |
sudo apt update sudo apt install openvpn |
Step 2: Create a certification authority
Create a simple certification authority (CA) to issue trusted certificates for the OpenVPN server. To do this, download the latest version of EasyRSA on both your CA machine and OpenVPN server using wget. To get the latest version, go to the Releases page of the official EasyRSA GitHub project, copy the download link for the file ending in .tgz and paste it into the following command:
|
1 |
wget -P ~/ https://github.com/OpenVPN/easy-rsa/releases/download/v3.0.4/EasyRSA-3.0.4.tgz <span class="s1">--no-check-certificate</span> |
Then, extract the tarball:
|
1 2 |
cd ~ tar xvf EasyRSA-3.0.4.tgz |
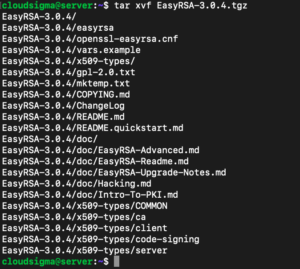
At this point, all required software has been successfully installed on your CA computer and server.
Step 3 – Configure EasyRSA variables and build the CA
EasyRSA comes with a configuration file that you can edit to define a number of variables for your CA using this command:
|
1 |
cd ~/EasyRSA-3.0.4/ |
There is a file in the directory with the name vars.example. Make a copy of this file, and name the copy vars without a file extension:
|
1 |
cp vars.example vars |
Use your preferred text editor to open this new file:
|
1 |
nano vars |
Next, find the settings that set field defaults for new certificates. It will be similar to this:
|
1 2 3 4 5 6 |
#set_var EASYRSA_REQ_COUNTRY "US" #set_var EASYRSA_REQ_PROVINCE "California" #set_var EASYRSA_REQ_CITY "San Francisco" #set_var EASYRSA_REQ_ORG "Copyleft Certificate Co" #set_var EASYRSA_REQ_EMAIL "me@example.net" #set_var EASYRSA_REQ_OU "My Organizational Unit" |
Update these variables to whatever you like as shown below:
|
1 2 3 4 5 6 |
set_var EASYRSA_REQ_COUNTRY "SL" set_var EASYRSA_REQ_PROVINCE "Zurich" set_var EASYRSA_REQ_CITY "Zurich City" set_var EASYRSA_REQ_ORG "CloudSigma" set_var EASYRSA_REQ_EMAIL "admin@example.com" set_var EASYRSA_REQ_OU "Community" |
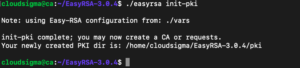
Save and close the file once you are ready. The next step is to call the easyrsa script and run it with the init-pki option to initiate the public key infrastructure on the CA server:
|
1 |
./easyrsa init-pki |
Next, run the build-ca command with the nopass option so that you will not be prompted for a password every time you interact with your CA:
|
1 |
./easyrsa build-ca nopass |
In the output, you’ll be asked to confirm the common name for your CA:
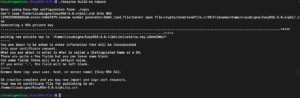
With that, your CA is in place and it’s ready to start signing certificate requests.
Step 4 – Generate server certificate, key, and encryption files
After the CA is ready, you can generate the private key and certificate request from the server and then send it to the CA for signature by creating the required certificate. First, navigate to the EasyRSA directory on the OpenVPN server:
|
1 |
cd EasyRSA-3.0.4 |
From there, run the easyrsa script with the init-pki option. Although you have already run this command on the CA computer, this command must be run here as well. That’s because the PKI directories of the server and the CA are different:
|
1 |
./easyrsa init-pki |
Then call the easyrsa script again, this time with the gen-req option, followed by the computer’s generic name:
|
1 |
./easyrsa gen-req server nopass |
This will create a private key for the server and a certificate request file named server.req. Copy the server key to the /etc/openvpn/ directory:
|
1 |
sudo cp ~/EasyRSA-3.0.4/pki/private/server.key /etc/openvpn/ |
Transfer the server.req file to your CA computer using a secure method (such as SCP in the following example):
|
1 |
scp ~/EasyRSA-3.0.4/pki/reqs/server.req cloudsigma@your_CA_ip:/tmp |
Next, navigate to the EasyRSA directory on your CA computer:
|
1 |
cd EasyRSA-3.0.4/ |
Use the easyrsa script again to import the server.req file and add its common name after the file path:
|
1 |
./easyrsa import-req /tmp/server.req server |
Then, sign the request by running the easyrsa script with the sign-req option followed by the request type and common name. For the certificate request of the OpenVPN server, make sure that you use the server request type:
|
1 |
./easyrsa sign-req server server |
The output prompts you to verify that the request is from a trusted source. Type yes and press Enter to confirm. Please check the details shown below to ensure accuracy. Please note that this request has not yet been password verified.
Request the subject and sign it as a server certificate for 3650 days:
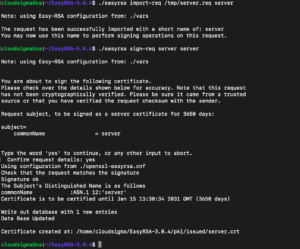
If you have encrypted the CA key, you will be asked for the password at this point. Next, use a secure method to transfer the signed certificate back to your VPN server:
|
1 |
scp pki/issued/server.crt siigma@your_server_ip:/tmp |
Transfer the ca.rt file to the server before you log out from the CA computer:
|
1 |
scp pki/ca.crt siigma@our_server_ip:/tmp |
Next, log in to your OpenVPN server again and copy the files server.crt and ca.crt to your /etc/openvpn/ directory:
|
1 |
sudo cp /tmp/{server.crt,ca.crt} /etc/openvpn/ |
Then, navigate to your EasyRSA directory:
|
1 |
cd ~/EasyRSA-3.0.4/ |
Enter the following code to create a strong Diffie-Hellman key you can use during the key exchange:
|
1 |
./easyrsa gen-dh |
When done, generate an HMAC signature to improve the server’s TLS health check functionality:
|
1 |
openvpn --genkey --secret ta.key |
When the command is complete, copy the two new files to the / etc / openvpn / directory:
|
1 2 |
sudo cp ~/EasyRSA-3.0.4/ta.key /etc/openvpn/ sudo cp ~/EasyRSA-3.0.4/pki/dh.pem /etc/openvpn/ |
In this way, all certificates and key files required by the server are generated. Now, you can create the appropriate certificate and key that the client computer will use to access the OpenVPN server.
Step 4 – Generate client certificate and key pair
Next, we will create a client key and several certificates. If you have multiple clients, you can repeat this process for each client. Note, however, that you must pass a unique name value to the script for each client. In this tutorial, we will name the first certificate/key pair client1. First, create a directory structure in your home directory to store client certificates and key files:
|
1 |
mkdir -p ~/client-configs/keys |
Since you save the certificate/key pair and the client’s configuration file in this directory for security reasons, you should now revoke the permissions:
|
1 |
chmod -R 700 ~/client-configs |
Then navigate back to the EasyRSA directory and run the easyrsa script with the options gen-req and nopass as well as the generic name of the client:
|
1 2 |
cd ~/EasyRSA-3.0.4/ ./easyrsa gen-req client1 nopass |
Press Enter to confirm the common name. After that, copy the client1.key file into the previously created / client-configs / keys / directory:
|
1 |
cp pki/private/client1.key ~/client-configs/keys/ |
Next, use a secure method to transfer the client1.req file to your CA computer:
|
1 |
scp pki/reqs/client1.req sigma@your_CA_ip:/tmp |
Log in to your CA computer, navigate to the EasyRSA directory and import the certificate request:
|
1 2 3 |
ssh siigma@your_CA_ip cd EasyRSA-3.0.4/ ./easyrsa import-req /tmp/client1.req client1 |

Then, as in the previous step, sign the request on the server. But this time you need to specify the client request type:
|
1 |
./easyrsa sign-req client client1 |
At the prompt, type yes to confirm that you want to sign the certificate request and that the certificate request is from a trusted source. Please enter the word “yes” to continue or enter anything else to be discarded:
|
1 |
Confirm Request Details: Yes |
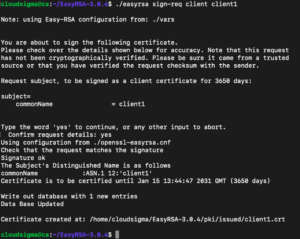
If you have encrypted the CA key, you will also be asked to enter the password here. This will create a client certificate file named client1.crt. Transfer this file back to the server:
|
1 |
scp pki/issued/client1.crt siigma@your_server_ip:/tmp |
SSH back to your OpenVPN server and copy the client certificate to the / client-configs / keys / directory:
|
1 |
cp /tmp/client1.crt ~/client-configs/keys/ |
Next, copy the ca.crt and ta.key files into the / client-configs / keys / directory:
|
1 2 |
cp ~/EasyRSA-3.0.4/ta.key ~/client-configs/keys/ sudo cp /etc/openvpn/ca.crt ~/client-configs/keys/ |
At the same time, all certificates and keys of the server and the client were generated and saved in the corresponding directories on the server. Now you can continue to set up OpenVPN on the server.
Step 5 – Configuring the OpenVPN service
After generating the client and server certificates, you can configure the OpenVPN service to use these credentials. First, copy the OpenVPN sample configuration file into your configuration directory and then extract it to use it for the setup basis:
|
1 2 |
sudo cp /usr/share/doc/openvpn/examples/sample-config-files/server.conf.gz /etc/openvpn/ sudo gzip -d /etc/openvpn/server.conf.gz |
Open the server configuration file in your preferred text editor:
|
1 |
sudo nano /etc/openvpn/server.conf |
Then, find the HMAC part by looking for the tls-auth command:
|
1 |
tls-auth ta.key 0 # This file is secret |
Find the password part by looking for the commented out password line. AES-256-CBC encryption offers a good level of encryption and is well supported. The line should not be commented, but if it isn’t, delete the “;” before:
|
1 |
cipher AES-256-CBC |
Below that, add an Auth command to select the HMAC message-digest algorithm. SHA256 is a good choice for this:
|
1 |
auth SHA256 |
Next, find the line with the dh statement that defines the Diffie-Hellman parameters. Due to some recent changes to EasyRSA, the Diffie-Hellman key filename may be different from the filename listed in the sample server configuration file. If necessary, change the filename listed here by deleting 2048 to align it with the previous step’s key:
|
1 |
dh dh.pem |
Finally, find the user and group settings and delete the “;” at the beginning of each line:
|
1 2 |
user nobody group nogroup |
So far, the changes you made to the sample server.conf file should allow OpenVPN to work.
Step 6 – Server network configuration
Configure IP forwarding to properly route traffic through the VPN. This is essential for the VPN functionality your server provides:
|
1 |
sudo nano /etc/sysctl.conf |
Look for the commented line that sets net.ipv4.ip_forward. Remove the “#” character from the beginning of the line to uncomment this setting:
|
1 |
net.ipv4.ip_forward=1 |
Save the file and close it once you are through. To read the file and adjust the values for the current session, type:
|
1 |
sudo sysctl -p |

Next, add the public network interface of your machine:
|
1 |
ip route | grep default |
Your public interface is the string within this command’s output that follows the word “dev”. For example, this result shows the interface named ens3.

Open the /etc/ufw/before.rules file to add the relevant configuration:
|
1 |
$ sudo nano /etc/ufw/before.rules |
Towards the top of the file, add the highlighted lines below to set the default policy for the POSTROUTING chain in the nat table and masquerade any traffic coming from the VPN. Change ens3 in the -A POSTROUTING line below with the interface you found in the above command:
|
1 2 3 4 5 6 7 8 9 10 11 12 13 14 15 16 17 18 |
# rules.before # Rules that should be run before the ufw command line added rules. Custom # rules should be added to one of these chains: # ufw-before-input # ufw-before-output # ufw-before-forward # START OPENVPN RULES # NAT table rules *nat :POSTROUTING ACCEPT [0:0] # Allow traffic from OpenVPN client to wlp11s0 (change to the interface you discovered!) -A POSTROUTING -s 10.8.0.0/8 -o ens3 -j MASQUERADE COMMIT # END OPENVPN RULES # Don't delete these required lines, otherwise there will be errors . . . |
Save the file and close it once you are through. Next, you need to tell UFW to allow forwarded packets by default as well. To do this, open the /etc/default/ufw file:
|
1 |
sudo nano /etc/default/ufw |
Inside, find the DEFAULT_FORWARD_POLICY directive and change the value from DROP to ACCEPT:
|
1 |
DEFAULT_FORWARD_POLICY="ACCEPT" |
Save and close the file when you are through. Next, adjust the firewall to enable traffic to OpenVPN. If you did not change the port and protocol in the /etc/openvpn/server.conf file, you will need to open up UDP traffic to port 1194. If you modified the port and/or protocol, substitute the values you selected here. In case you forgot to add the SSH port when following the prerequisite tutorial, add it here as well:
|
1 2 |
sudo ufw allow 1194/udp sudo ufw allow OpenSSH |
After adding those rules, disable and re-enable UFW to restart it and load the changes from all of the files you’ve modified:
|
1 2 |
sudo ufw disable sudo ufw enable |
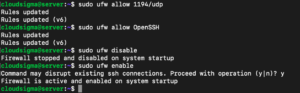
Congratulations, your server is now configured to correctly handle OpenVPN traffic!
Conclusion
If you followed this tutorial all the way through, you are now able to browse through the Internet safely. You will be able to keep your identity, location and traffic away from prying eyes.
Happy Computing!
- Removing Spaces in Python - March 24, 2023
- Is Kubernetes Right for Me? Choosing the Best Deployment Platform for your Business - March 10, 2023
- Cloud Provider of tomorrow - March 6, 2023
- SOLID: The First 5 Principles of Object-Oriented Design? - March 3, 2023
- Setting Up CSS and HTML for Your Website: A Tutorial - October 28, 2022