
Django is a free, and open-source web application framework that’s built in the Python programming language. Django is super-fast, secure, and highly scalable. At the hand of a skilled developer, Django can quickly establish a powerful website. It can seamlessly integrate with popular web servers (Apache, Nginx), and databases (MySQL, MariaDB, PostgreSQL, Oracle, and SQLite), etc. Django powers some of the world’s largest websites like Instagram, Mozilla, and NASA. This guide demonstrates setting up the baseline of a web app with the help of Django with PostgreSQL, Nginx, and Gunicorn on Ubuntu 20.04.
Prerequisites
This guide requires that you’re running an Ubuntu 20.04 server configured with a basic firewall and a non-root user with sudo privilege. Check out this detailed guide on how to set up an Ubuntu server. Follow this tutorial to configure a non-root user with sudo privilege. You can also configure an Iptables firewall by following the steps of this guide.
We’ll be installing Django within a virtual environment. Having a project-specific environment allows easier management of multiple projects from the same server. Once the databases and apps are set in place, we’ll be deploying the Gunicorn application server. Gunicorn will be the application interface that translates client requests from HTTP to Python calls that our application can make use of. Then, we will deploy Nginx in front of Gunicorn for its fast performance connection handling and easy-to-implement security features.
Installing the Necessary Packages
First, get started by installing all the necessary packages. Thankfully, all these packages are directly available from the official Ubuntu package repositories. Open up the terminal, and update the APT package cache:
|
1 |
sudo apt update |
The package list depends on whether the web application is going to use Python 2 or Python 3. Run the following command to install Django with Python 3:
|
1 |
sudo apt install python3-pip python3-dev libpq-dev postgresql postgresql-contrib nginx curl |
Django 1.11 LTS is the last release of Django that will support Python 2. If you intend to use Django with Python 2, then install the following packages:
|
1 |
sudo apt install python-pip python-dev libpq-dev postgresql postgresql-contrib nginx curl |
PostgreSQL Database and User
As for the database solution, we’ll be using PostgreSQL. It’s a powerful, open-source object-relational database system. PostgreSQL offers reliability, robustness, and performance. For detailed steps on setting up PostgreSQL, check out this guide on setting up PostgreSQL on the Ubuntu server. For the current guide, we’ll be setting up a dedicated database and user for our Django application.
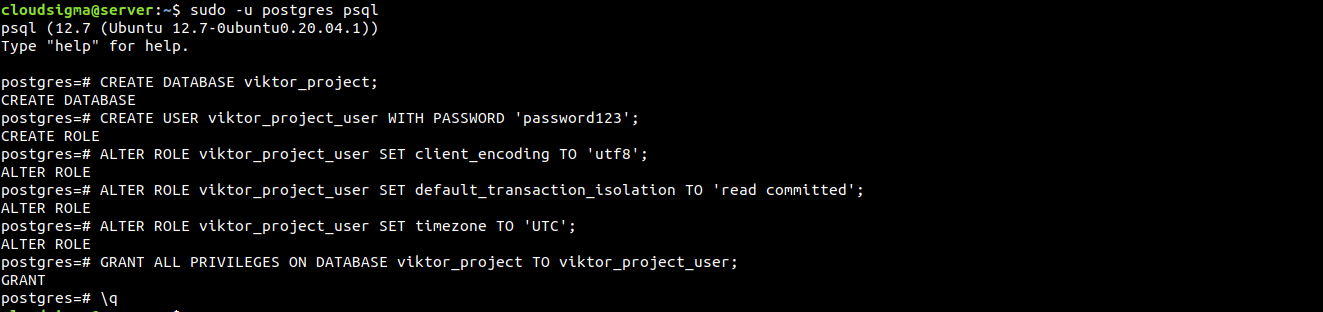
By default, PostgreSQL implements “peer authentication” as the authentication scheme for local connections. In short, “peer authentication” will authenticate the login if the user’s operation system username matches a valid PostgreSQL username. During the installation, PostgreSQL configured an operating system user postgres to correspond to the postgres PostgreSQL administrative user. Log into PostgreSQL interactive shell session as postgres using the following command:
|
1 |
sudo -u postgres psql |
You will land on the PostgreSQL prompt. The first step is to create a dedicated database for the project. For demonstration, the database will be named viktor_project:
|
1 |
CREATE DATABASE viktor_project; |
The next step is to create a dedicated user for the project database. The user should have a strong username. For demonstration, the username will be viktor_project_user:
|
1 |
CREATE USER viktor_project_user WITH PASSWORD 'password123'; |
Now, we will modify some parameters:
- Certain connection parameters. In short, it won’t be required to query and set correct values each time a connection is established. It greatly improves database performance.
- Default encoding to
UTF-8. It’s a universal encoding and Django expects it. - Default transaction isolation scheme to “read committed”. It blocks reading from uncommitted transactions.
- Time zone to
UTC.
All these parameter changes are recommended by the Django project itself. To implement these changes, run the following commands. Don’t forget to change the database username to the right one:
|
1 2 3 |
ALTER ROLE viktor_project_user SET client_encoding TO 'utf8'; ALTER ROLE viktor_project_user SET default_transaction_isolation TO 'read committed'; ALTER ROLE viktor_project_user SET timezone TO 'UTC'; |
Change the database administrator to the dedicated database user:
|
1 |
GRANT ALL PRIVILEGES ON DATABASE viktor_project TO viktor_project_user; |
Our work with PostgreSQL is done for now. Exit the PostgreSQL interactive shell:
|
1 |
\q |
Python Virtual Environment
With the database prepared, we can now focus on establishing the rest of the project requirements. For easier management, we’ll establish a virtual environment and install all the Python requirements there. To generate a virtual environment, we need virtualenv. It can be easily installed with pip.
The following commands will upgrade pip and install virtualenv. For Python 3, run the following commands:
|
1 2 |
sudo -H pip3 install --upgrade pip sudo -H pip3 install virtualenv |
For Python 2, run the following commands instead:
|
1 2 |
sudo -H pip install --upgrade pip sudo -H pip install virtualenv |
Once virtualenv is installed, it is time to create a virtual environment. Next, create a dedicated directory for the virtual environment:
|
1 |
mkdir -v ~/viktor_project |
After that, change the current active directory to the dedicated directory for the virtual environment:
|
1 |
cd ~/viktor_project |
Within the directory, run the following command. The virtualenv tool will create a virtual environment with the project name:
|
1 |
virtualenv viktor_project |
It will create a sub-directory with the project name. The sub-directory will contain a local version of Python and pip. It offers flexibility to install and configure an isolated Python environment for the project.
The following command will activate the virtual environment:
|
1 |
source viktor_project/bin/activate |

The terminal prompt will change indicating that you’re operating within a Python virtual environment. Now that we’re within the virtual environment, we’ll be installing the necessary Python requirements. We need Django, Gunicorn, and psycopg2 (PostgreSQL adapter). The following command will command the local pip to install the components:
|
1 |
pip install django gunicorn psycopg2-binary |
Even if you’re using Python 3, pip is the correct command. It’s because within the virtual environment, pip3 is renamed as pip.
New Django Project
With the Python components in place, we can start working with the actual Django project files.
-
Creating a Django project
The project directory is already established. We’ll tell Django to install its files there. This procedure will generate a second-level directory containing the actual codes. The directory will also contain a management script. The key is, we are telling Django the target directory explicitly instead of letting it decide the directory relative to the current one:
|
1 |
django-admin.py startproject viktor_project ~/viktor_project |
Django will create the project accordingly. Here are some of the important files and directories we’ll focus on. The directory and file names are used according to the demonstration.
~/viktor_project/manage.py: The project management script by Django.~/viktor_project/viktor_project/: It’s the package containing the Django project. It should contain files __init__.py, settings.py, urls.py, asgi.py, and wsgi.py.
-
Adjusting project settings
After the project is created, the first thing to do is adjusting its configuration. Open up settings.py in a text editor:
|
1 |
nano ~/viktor_project/viktor_project/settings.py |
The first directive we are looking for is ALLOWED_HOSTS. It defines the servers or domain names that can connect to the Django instance. If any incoming request with a Host header doesn’t match the list of ALLOWED_HOSTS, it will create an exception. It’s recommended by Django to avoid certain types of security vulnerabilities:
|
1 |
ALLOWED_HOSTS = ['<server_ip_or_domain_name_1>',' server_ip_or_domain_name_2','localhost'] |

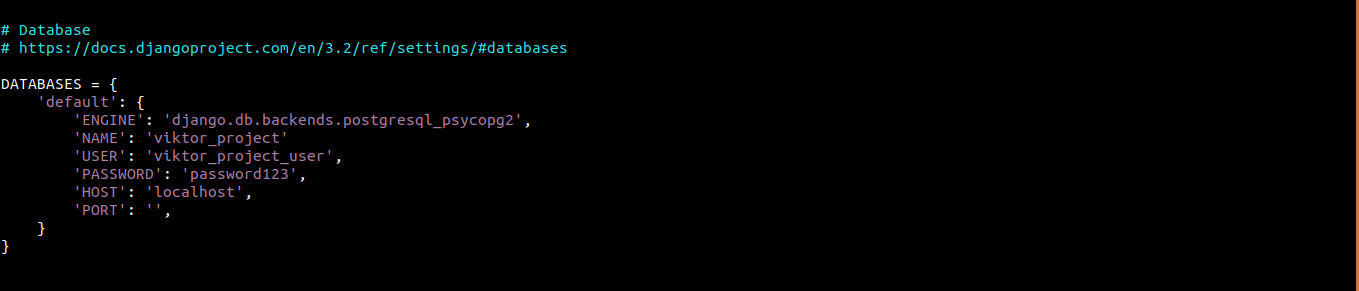
The next section we’ll focus on is DATABASE. It manages database access. By default, it contains configuration for SQLite database engine. However, we’re going to use the PostgreSQL database for the project. Django will use the psycopg2 adapter to communicate with PostgreSQL:
|
1 2 3 4 5 6 7 8 9 10 |
DATABASES = { 'default': { 'ENGINE': 'django.db.backends.postgresql_psycopg2', 'NAME': 'viktor_project', 'USER': 'viktor_project_user', 'PASSWORD': 'password123', 'HOST': 'localhost', 'PORT': '', } } |
Now, move to the bottom of the file. Add the following lines to indicate the location of static files. It helps Nginx handle requests for these items:
|
1 2 |
import os STATIC_ROOT = os.path.join(BASE_DIR, 'static/') |

Our work with settings.py is done for now. Save the file and close the editor.
-
Finalizing initial project setup
We can now migrate the initial database schema to the dedicated PostgreSQL database. Run the following command:
|
1 2 |
~/viktor_project/manage.py makemigrations ~/viktor_project/manage.py migrate |
Next, we need to create a superuser for the project. To generate a superuser, run the following command:
|
1 |
~/viktor_project/manage.py createsuperuser |

Collect all the static files into the location we specified in settings.py. The static files will be collected in a separate directory called “static” under the project directory:
|
1 |
~/viktor_project/manage.py collectstatic |
Now, we need to tinker with the server firewall. If you followed the server configuration guide, then you already have UFW configured and activated. We’ll create an exception for port 8000. This is the default port that Django uses. Check this guide to learn more about the UFW firewall basics and usage.
|
1 |
sudo ufw allow 8000 |
Next, verify the action:
|
1 |
sudo ufw status |
Finally, we can test the server in action. Start the Django development server:
|
1 |
~/viktor_project/manage.py runserver 0.0.0.0:8000 |
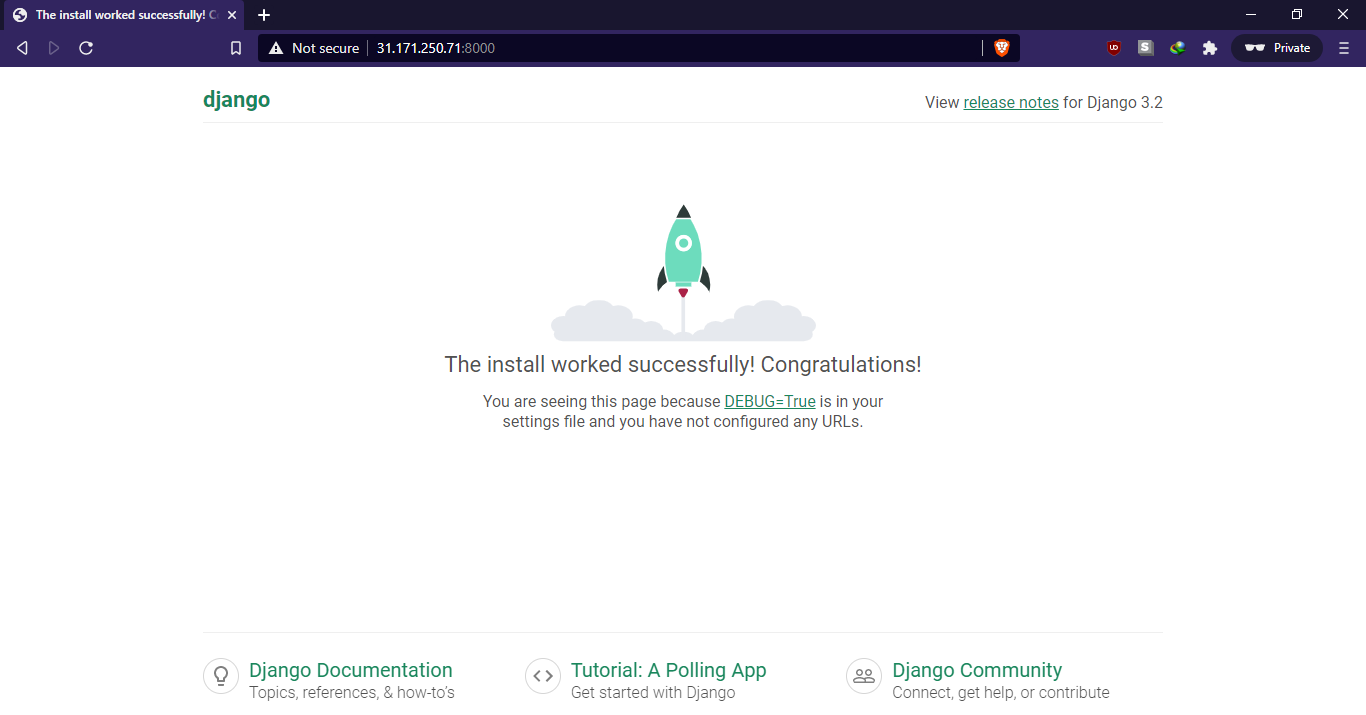
If the configuration went successfully, the Django development server should start and accept incoming requests. Open a browser and go to your server’s IP/domain on port 8000:
|
1 |
http://<server_or_domain>:8000 |
You should land on the Django default index page. To access the admin panel, append /admin to the URL. The admin panel is only accessible by the superuser we created beforehand:
|
1 |
http://<server_or_domain>:8000/admin |
After logging in, you’ll land on the default Django admin interface:
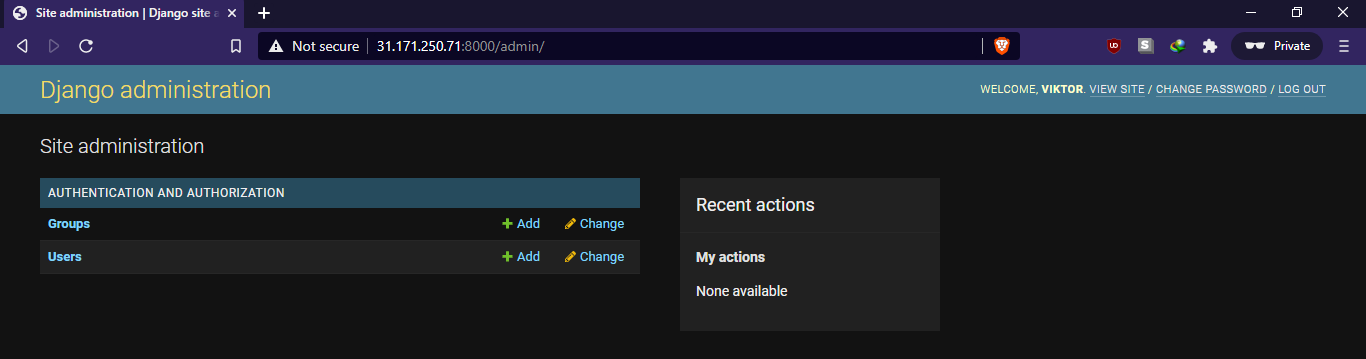
We’re finished testing for now. To stop the server, press “Ctrl + C” from the terminal window.
-
Testing Gunicorn
Before leaving the virtual environment, we want to make sure that Gunicorn can serve the applications. The way to test it is by using Gunicorn to load the WSGI module of the project.
The Gunicorn command is located within the project directory:
|
1 2 |
cd ~/viktor_project gunicorn --bind 0.0.0.0:8000 viktor_project.wsgi |
This will start Gunicorn at the same interface that Django was running on. We can test the app again from a normal web browser. Note that the admin interface won’t have any styling applied because Gunicorn still doesn’t know how to find the static CSS contents:
|
1 |
http://<server_or_domain>:8000 |
When finished, press “Ctrl + C” from the terminal window to stop the Gunicorn server.
-
Exiting virtual environment
The Django application configuration is finished. Run the following command to exit the virtual environment:
|
1 |
deactivate |
Gunicorn Socket and Service Files
We verified that Gunicorn can interact with the Django application. However, we need a more robust way of managing the application server. Here comes systemd into the equation. Systemd is one of the most popular init systems available on Linux. Here’s an in-depth guide on how to manage systemd services and units.
We can create socket and service files for Gunicorn to let systemd manage it as if it’s a service. At boot, the Gunicorn socket will be generated. The socket will listen for incoming connections. When a connection takes place, then systemd will start Gunicorn processes to handle the connection.
-
Gunicorn socket
Let’s start by creating a Gunicorn socket. The file needs to be created with sudo privilege:
|
1 |
sudo nano /etc/systemd/system/gunicorn.socket |
Enter the following code inside the file:
|
1 2 3 4 5 6 7 |
[Unit] Description=gunicorn socket [Socket] ListenStream=/run/gunicorn.sock [Install] WantedBy=sockets.target |
As you can see, there are three sections of the code.
[Unit]:This section describes the socket.[Socket]:It defines the socket location.[Install]:This part ensures that systemd creates the socket at the right time.
Save the file and close the editor.
-
Gunicorn service
Next, we’ll create a service file for Gunicorn. Similar to the socket file, it also has to be created with sudo privilege:
|
1 |
sudo nano /etc/systemd/system/gunicorn.service |
Enter the following code:
|
1 2 3 4 5 6 7 8 9 10 11 12 13 14 15 16 17 |
[Unit] Description=gunicorn daemon Requires=gunicorn.socket After=network.target [Service] User=cloudsigma Group=www-data WorkingDirectory=/home/cloudsigma/viktor_project ExecStart=/home/cloudsigma/viktor_project/viktor_project/bin/gunicorn \ --access-logfile - \ --workers 3 \ --bind unix:/run/gunicorn.sock \ viktor_project.wsgi:application [Install] WantedBy=multi-user.target |
The code contains multiple sections:
[Unit]:This section specifies metadata and dependencies. It also describes starting only after the network target is reached.[Service]:This section specifies the user and group that the process will run under. The ownership of the group is set to “www-data” so that Nginx can communicate with Gunicorn. It also maps out the working directories and specifies the starting commands.[Install]:This section tells systemd what to link this service to if it’s enabled at boot. It should start after the regular multi-user system starts running.
Next, save the file and close the editor.
-
Enabling Gunicorn socket
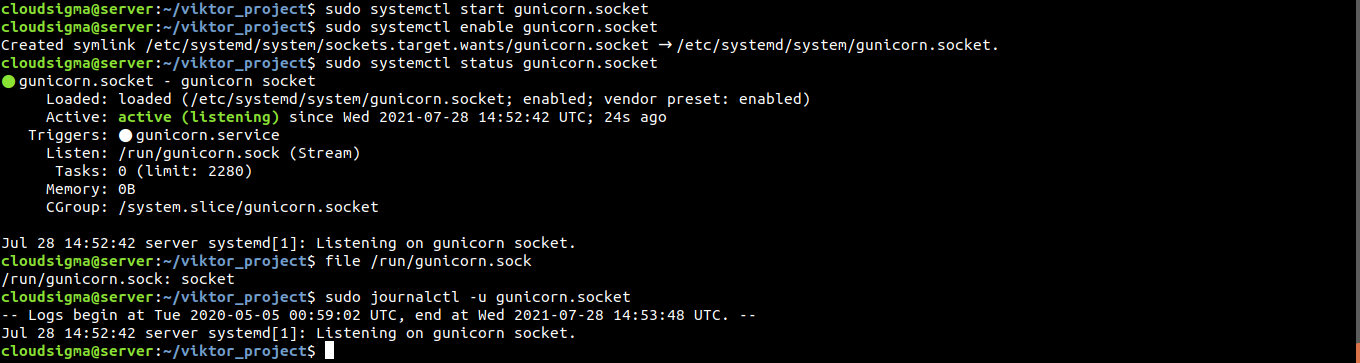
The Gunicorn socket is ready to use. Therefore, you can run the following commands. It’ll start and enable the socket. The socket file will be created at /run/gunicorn.sock at boot. When a connection is made to the socket, systemd will start the Gunicorn service to handle it:
|
1 2 |
sudo systemctl start gunicorn.socket sudo systemctl enable gunicorn.socket |
Check the status of the Gunicorn socket:
|
1 |
sudo systemctl status gunicorn.socket |
Now, check the existence of the socket file:
|
1 |
file /run/gunicorn.sock |
If the status from systemctl indicates an error or the gunicorn.sock file wasn’t found, it indicates that the socket wasn’t created correctly. Check out the detailed log for clues:
|
1 |
sudo journalctl -u gunicorn.socket |
Don’t forget to have another look at the gunicorn.socket file for potential errors.
-
Socket activation
We’ve started the gunicorn.socket so far. However, without any connection request, gunicorn.service won’t activate. Next, verify the status of Gunicorn:
|
1 |
sudo systemctl status gunicorn |
We can test the socket activation mechanism by sending a connection request using curl:
|
1 |
curl --unix-socket /run/gunicorn.sock localhost |
You should get an HTML output from the application. It indicates that Gunicorn started successfully and was able to serve the Django application. Verify the current status of Gunicorn service:
|
1 |
sudo systemctl status gunicorn |
If there’s any unexpected behavior or output (indicating an error), check out the detailed logs for clues:
|
1 |
sudo journalctl -u gunicorn |
If there were changes made to gunicorn.service file, then you need to reload the daemon to re-read the service definition. It also requires restarting the Gunicorn service:
|
1 2 |
sudo systemctl daemon-reload sudo systemctl restart gunicorn |
Configuring Nginx
Now, we’ll configure Nginx to pass incoming traffic to the process. First, create a new server block in Nginx:
|
1 |
sudo nano /etc/nginx/sites-available/viktor_project |
Then, enter the following code:
|
1 2 3 4 5 6 7 8 9 10 11 12 13 14 15 16 |
server { listen 80; server_name 31.171.250.71; location = /favicon.ico { access_log off; log_not_found off; } location /static/ { root /home/cloudsigma/viktor_project; } location / { include proxy_params; proxy_pass http://unix:/run/gunicorn.sock; } } |
Here are multiple blocks in the configuration:
service:This block defines that the server should listen normally on port 80 and should respond to the server’s domain name or IP address.location:This is the first location entry. It defines where to find the static assets.location:This is the second location entry. This block defines standard proxy parameters and how to pass the traffic to the Gunicorn socket.
Save the file and close the editor. Link the file to the “sites-enabled” directory to activate:
|
1 |
sudo ln -s /etc/nginx/sites-available/viktor_project /etc/nginx/sites-enabled |
After that, test if there’s any syntax error in the Nginx configuration:
|
1 |
sudo nginx -t |
If you didn’t find an error, then restart Nginx to implement the change:
|
1 |
sudo systemctl restart nginx |
We need to modify UFW rules again. We no longer need access to the development server, so we can remove the exception for port 8000. In addition, we want to open up port 80 for normal traffic:
|
1 2 |
sudo ufw delete allow 8000 sudo ufw allow 'Nginx Full' |
Verify these firewall rule changes:
|
1 |
sudo ufw status |
The server should now be accessible from a normal web browser.
Troubleshooting Procedures
If all the steps were followed properly, the Django application should be accessible via the internet. If it doesn’t, it indicates that the installation didn’t go as planned. We need to troubleshoot to figure out the source of the issue.
-
Nginx showing default page
If Nginx is displaying the default page instead of the application proxy, it usually means the server_name was configured wrong in the server block.
In this example, the server block is stored at the following location:
|
1 |
/etc/nginx/sites-available/viktor_project |
The server_name entry determines which server block Nginx will use to respond to requests. If showing the default page, then Nginx probably wasn’t able to match the request to an explicit server block, so it’s falling back to the default block instead:
|
1 |
/etc/nginx/sites-available/default |
Check out if the server block of your Django project has a proper server_name.
-
502 Bad Gateway
Error 502 indicates that Nginx couldn’t proxy the request successfully. There’s a wide range of possible configuration problems that can lead to error 502, so we need clues to troubleshoot properly.
The primary source of clues is the Nginx error logs. Generally, it’ll hint at the conditions that caused the problems during the proxy. Check the Nginx error log using the following command:
|
1 |
sudo tail -F /var/log/nginx/error.log |
Once the log opens, try accessing the server once again. It should generate a fresh error message in the log. It can help narrow down the problem. Here are a couple of possible messages:
- connect() to unix:/run/gunicorn.sock failed (2: No such file or directory)
It indicates that Nginx couldn’t find gunicorn.sock at the location defined in the configuration. The location is described by the proxy_pass directive under the site block. Check if proxy_pass indicates the proper location of gunicorn.sock generated by the gunicorn.socket systemd unit:
|
1 |
/etc/nginx/sites-available/viktor_project |
If gunicorn.sock wasn’t found under the /run directory, it means that systemd couldn’t generate it. You should re-check the Gunicorn socket file configuration steps.
- connect() to unix:/run/gunicorn.sock failed (13: Permission denied)
It indicates that Nginx couldn’t connect to the Gunicorn socket due to permission issues. It can happen if the process was performed as the root user instead of a sudo user. Although systemd generated gunicorn.sock successfully, Nginx is unable to use it.
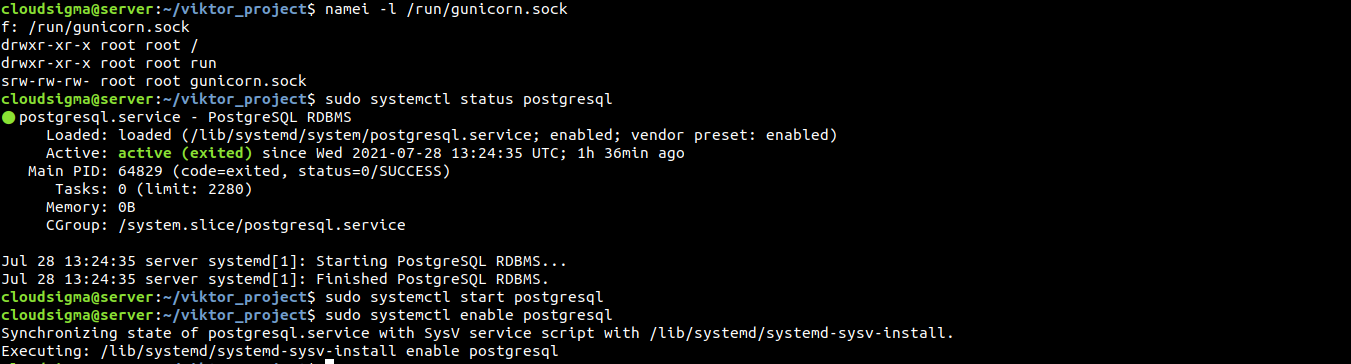
One possible culprit may be limited permissions between the root directory (/) and the gunicorn.sock file. Check the permission and ownership of the socket file and each of its parent directories:
|
1 |
namei -l /run/gunicorn.sock |
The first column describes file permission. The second column describes the user owner, and the third column the group owner. If any of the directories leading up to gunicorn.sock doesn’t have proper read and execute permissions, Nginx will fail to access the socket.
-
Django displaying “could not connect to the server: Connection refused”
It indicates that Django failed to connect to the PostgreSQL server. Ensure that the PostgreSQL server is up and running:
|
1 |
sudo systemctl status postgresql |
If it’s not running, then run the following commands to start and enable it:
|
1 2 |
sudo systemctl start postgresql sudo systemctl enable postgresql |
If you’re still having this error, then ensure that the database credentials are properly defined under settings.py:
|
1 |
~/viktor_project/viktor_project/settings.py |
More troubleshooting
For additional troubleshooting, there are various logs set in place. These logs can help narrow down the sources of the issues.
Here’s a list of logs that can help:
- Nginx logs
|
1 |
sudo journalctl -u nginx |
- Access logs-Nginx
|
1 |
sudo less /var/log/nginx/access.log |
- Error logs-Nginx
|
1 |
sudo less /var/log/nginx/error.log |
- Application logs-Gunicorn
|
1 |
sudo journalctl -u gunicorn |
- Socket logs-Gunicorn
|
1 |
sudo journalctl -u gunicorn.socket |
|
1 |
sudo systemctl restart gunicorn |
|
1 2 |
sudo systemctl daemon-reload sudo systemctl restart gunicorn.socket gunicorn.service |
|
1 2 |
sudo nginx -t sudo systemctl restart nginx |
Final Thoughts
This guide successfully demonstrates how to lay the foundation of Django. Django provides many of the common components of a web application, allowing you to focus on the unique elements. The Django project will operate within the virtual environment. Gunicorn manages the communication between client requests and Django. Lastly, Nginx acts as a reverse proxy for handling client connections.
Happy computing!
- How To Enable, Create and Use the .htaccess File: A Tutorial - March 8, 2023
- An Overview of Queries in MySQL - October 28, 2022
- Introduction to Cookies: Understanding and Working with JavaScript Cookies - October 25, 2022
- An Overview of Data Types in Ruby - October 24, 2022
- The Architecture of Iptables and Netfilter - October 10, 2022