

Apache is currently the most widely used web server in the world. It is an open-source software maintained by The Apache Software Foundation. As of September 2020, it is estimated to be serving 36% of all website traffic in the world. Developers love it for its speed, security, reliability, and robustness. Its ease of customization enables it to meet the needs of many environments by installing extensions and modules.
Apache comes with a matching system that you can use to host multiple domains or sites using a single Apache server installation exposed on a single IP address. The domains or sites are set up in one of the Apache configuration files defined as virtual hosts.
Each domain has one virtual host definition with a specific directory that it directs to. When a user visits a domain, the server examines every matching virtual host and selects which one to use to serve the visitor’s request depending on the hostname they entered. If no matching hostname is found, the server uses the first defined virtual host in the conf file as a fallback. The visitor will access the web page they requested without knowing that the same server is serving other sites. Depending on the resources you have on your server and how much traffic it can handle, you can host as many domains as you want.
In this tutorial, we will guide you through setting up virtual hosts on the Ubuntu 20.04 server.
First Things First
In order to follow the tutorial, you should have an installation of Ubuntu 20.04. You also need to create a non-root user and login with it.
The steps in this tutorial also require you to have Apache installed. If you haven’t already done so, you can install it using the commands below. You can follow our LAMP Stack setup – Linux Apache MySQL PHP tutorial for a more detailed setup guide.
|
1 2 |
sudo apt update sudo apt install apache2 |
You should have free or paid domain names registered from a domain registrar of your choice. Ensure the domains point to your server through configuring the DNS records. However, you can still use our configurations to follow through the steps in this tutorial. We will be using example.dev and mydomain.com for this tutorial. You are free to substitute them with your own. If you decide to use the test domains, then the hosts files on Apache must be edited to handle the domains. We will cover how to do this later in the tutorial.
Step 1 – Set up the Website Directories
These are the directories holding the site’s data that your website visitors will be accessing. Apache’s document root that is accessible from the internet is usually in the /var/www. Here is where we will create the directories for the individual domains we want to host. In each of the directories, we will add public_html directory to hold the actual website files. The virtual host points to the public_html directory. This gives you flexibility since you can keep crucial website files outside the public_html and only place public files inside.
Next, enter the commands below to create the directories. Always remember to substitute the test domains with your actual domains for subsequent setups:
|
1 2 |
sudo mkdir -p /var/www/example.dev/public_html sudo mkdir -p /var/www/mydomain.com/public_html |
Step 2 – Change Read-Write Permissions
The previous commands created the directory structure but kept the ownership to the root user. We want our non-root user to have full read-write permissions to the directories. We also want the general web to have read permissions.
First, change the ownership to the non-root user by entering the following command:
|
1 2 |
sudo chown -R $USER:$USER /var/www/example.dev/public_html sudo chown -R $USER:$USER /var/www/mydomain.com/public_html |
The $USER is a variable that takes the credentials of the currently logged-in user. The regular user now has ownership of the public_html. Next, you need to grant read permissions to the general web. The following command allows the permission to all the files in the directory ensuring the web pages are served correctly:
|
1 |
sudo chmod -R 755 /var/www |
From running the previous three commands, your website can now serve content. In addition, your user can equally create content to be served in the specific directories. Here you can find more information on Ubuntu permissions.
Step 3 – Create Demo Pages in the Directories for Each Virtual Host
With the directory structure in place, it’s time to do some scripting. We will be using HTML and nano text editor to create some basic web pages. Enter the following command to open nano and create an index.html file in the directory for the first domain:
|
1 |
vim /var/www/example.dev/public_html/index.html |
In the editor, put the following sample code that will show when we access the domain:
|
1 2 3 4 5 6 7 8 |
<html> <head> <title>Welcome to Example.dev!</title> </head> <body> <h1>Success! The example.dev virtual host is working!</h1> </body> </html> |
Once you have pasted the above lines, press “!wq” to save and exit the file.
Create the index.html page for the second domain using nano editor by entering the following command:
|
1 |
vim /var/www/mydomain.com/public_html/index.html |
Then, in the editor, paste the following HTML code, save and exit:
|
1 2 3 4 5 6 7 8 |
<html> <head> <title>Welcome to Mydomain.com!</title> </head> <body> <h1>Success! The mydomain.com virtual host is working!</h1> </body> </html> |
Now, you have the pages to test the two virtual hosts we are going to be creating in the next step.
Step 4 – Create Virtual Host Files for The Domain Names
Virtual host files contain configurations for each virtual host. They define how a domain name will be served. A new installation of Apache comes with a default virtual host file called 000-default.conf which we can use and adapt to our domains. As you can see, it ends with a .conf extension, which is what Ubuntu expects for configuration files.
Apache configuration files are located in the directory /etc/apache2/sites-available. There we will store our virtual host files. We can copy the default conf file and edit where necessary.
-
Create the first virtual host file for example.dev domain
Enter the following command to create example.dev.conf from copying the default conf file:
|
1 |
sudo cp /etc/apache2/sites-available/000-default.conf /etc/apache2/sites-available/example.dev.conf |
Next, open the created file using nano editor with sudo privileges using the following command:
|
1 |
sudo nano /etc/apache2/sites-available/example.dev.conf |
The default conf file looks like the screenshot below. The comments are for guiding you. We can remove them and leave only the clean file with the actual configuration lines:
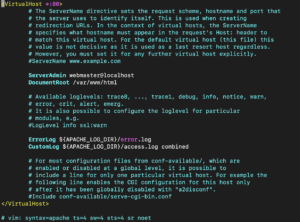
You need to customize this file for your domain name and directory path where you have saved the website files. In addition, we will update and add several directives to the file. It already has a ServerAdmin directive, which contains the email address on which the server administrator will receive emails. It also has a DocumentRoot directive, which points to the directory where you have stored the website files.
We need to add two new directives: ServerName and ServerAlias. ServerName sets the base domain name. It is where you put your domain. ServerAlias defines other names that Apache should match as if they are the base domain name. It allows you to match hosts like the www.
Update the file to look as shown below:
|
1 2 3 4 5 6 7 8 |
<VirtualHost *:80> ServerAdmin admin@example.dev ServerName example.dev ServerAlias www.example.dev DocumentRoot /var/www/example.dev/public_html ErrorLog ${APACHE_LOG_DIR}/error.log CustomLog ${APACHE_LOG_DIR}/access.log combined </VirtualHost> |
After that, update your domains and email appropriately. Once done, press CTRL + O and ENTER to save the file. To exit the editor, press CTRL + X.
-
Create the first virtual host file for mydomain.com domain
We can just copy the virtual host for the first domain and update it where necessary for the second domain. Use the following command to copy the file:
|
1 |
sudo cp /etc/apache2/sites-available/example.dev.conf /etc/apache2/sites-available/mydomain.com.conf |
Then, open it in nano editor using the command:
|
1 |
sudo nano /etc/apache2/sites-available/mydomain.com.conf |
Find the directives and update them appropriately so the file looks like shown below:
|
1 2 3 4 5 6 7 8 |
<VirtualHost *:80> ServerAdmin admin@mydomain.com ServerName mydomain.com ServerAlias www.mydomain.com DocumentRoot /var/www/mydomain.com/public_html ErrorLog ${APACHE_LOG_DIR}/error.log CustomLog ${APACHE_LOG_DIR}/access.log combined </VirtualHost> |
Once done, save the file and exit the editor.
Step 5 – Enabling the Virtual Host Files
In step four, we created the virtual host files. However, they are not functional until you enable them. Apache has a tool called a2ensite that we will use to enable the virtual hosts.
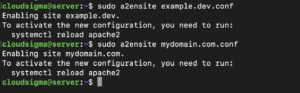
Enter the following two commands to enable the virtual hosts:
|
1 2 |
sudo a2ensite example.dev.conf sudo a2ensite mydomain.com.conf |
The output of the above commands is as shown below:
Next, you should disable the default configuration file, we use the a2dissite Apache tool for disabling sites. Enter the following command:
|
1 |
sudo a2dissite 000-default.conf |
As seen from the output, you must restart Apache for the configurations to pick up. Use the following command:
|
1 |
sudo systemctl restart apache2 |
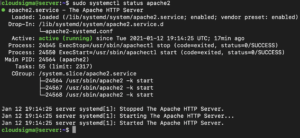
Then, check the status of Apache using the following command:
|
1 |
sudo systemctl status apache2 |
The output shows that your server is up and running, and it is able to serve the two websites.
Step 6 – Modify Local Hosts with Example Domains
If you had not registered an actual domain but you were instead using test domains, you will have to update your local host files. They need to intercept traffic and direct to your website directory when you navigate to any of the domains set in the virtual host files. Remember this will only work on your local computer. If your local computer runs a Windows Operating System, then follow the instructions for setting up hosts on this link.
If you are on a Mac or Linux machine, the hosts file is located in the /etc directory. We will use a nano editor to open and add our test domains. First, find your VPS IP address by entering the following command:
|
1 |
curl -4 icanhazip.com |
Enter the following command to open the file and update with your server’s IP address:
|
1 |
sudo nano /etc/hosts |
|
1 2 3 4 |
127.0.0.1 localhost 127.0.1.1 ComputerName your_server_IP example.dev your_server_IP mydomain.com |
Then, save and close the file. Whenever you enter a domain name in your browser, the host file is first checked. If the domain name is found, the traffic is directed to the IP address specified. If not found, the DNS system is used for global redirection. For our test domains, the traffic will be directed to the IP address specified.
Step 7 – Test Your Virtual Hosts
With the domain names set up, you can test whether they are working by checking them in the browser/terminal:
|
1 |
curl http://example.dev |
The output should display something like this:

|
1 |
http://mydomain.com |
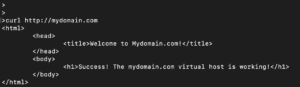
Congratulations! You have successfully configured two websites to run on one server.
Conclusion
In this guide, you learned how to configure your Apache Server to serve more than one website. If you would like to add more websites, you can do so, by following the steps and setting up virtual hosts. Apache can handle as many domains as you may wish, as long as your server resources can handle them.
Happy Computing!
- Removing Spaces in Python - March 24, 2023
- Is Kubernetes Right for Me? Choosing the Best Deployment Platform for your Business - March 10, 2023
- Cloud Provider of tomorrow - March 6, 2023
- SOLID: The First 5 Principles of Object-Oriented Design? - March 3, 2023
- Setting Up CSS and HTML for Your Website: A Tutorial - October 28, 2022