

The Network File System (NFS) is a distributed storage solution. It’s a file system protocol that allows mounting remote directories on the local server and uses it as if it was local storage. NFS allows multiple clients to share remote storage. It is well-suited for environments that regularly require shared resources. NFS is built on the ONC RPC (Open Network Computing Remote Procedure Call) system. It’s an open standard defined in RFC (Request for Comments). This allows anyone to implement the protocol.
In this guide, we will go over the steps of setting up and configuring an NFS mount on Ubuntu 20.04.
Prerequisites
As the description of NFS suggests, there are two parts to the NFS configuration:
-
Host: Physically stores the data and shares the storage with “client” systems.
-
Client: The system that connects to the “host” and uses the remote storage as if it was local.
For our demonstration, we will be using two servers, both configured with Ubuntu 20.04. Here’s an easy guide on how to set up your Ubuntu server. Throughout the guide, these servers will be referred to as the host and the client. Note that the action for the client will be the same even if there’s more than one.
The servers are assigned the following IP addresses. These servers are hosted by CloudSigma:
-
host: 31.171.240.79
-
client: 31.171.250.109
Ensure to replace them with the appropriate IP addresses.
Installing NFS
NFS is readily available from the official Ubuntu repositories. There are different software packages for the host and the client systems.
-
Installing NFS on the host
On the host, we need the components that equip the machine to serve as an NFS host. It comes in the form of the package nfs-kernel-server. Ubuntu uses APT as the package manager. First, launch the terminal, and update the APT package database:
|
1 |
host$ sudo apt update |
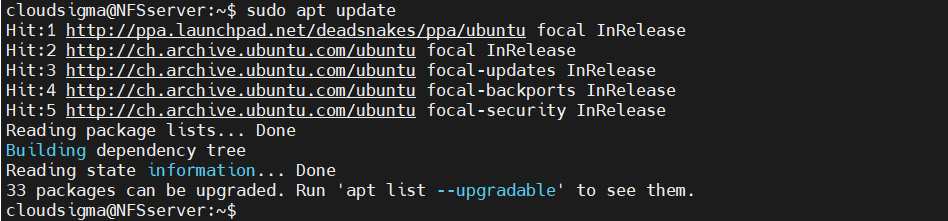
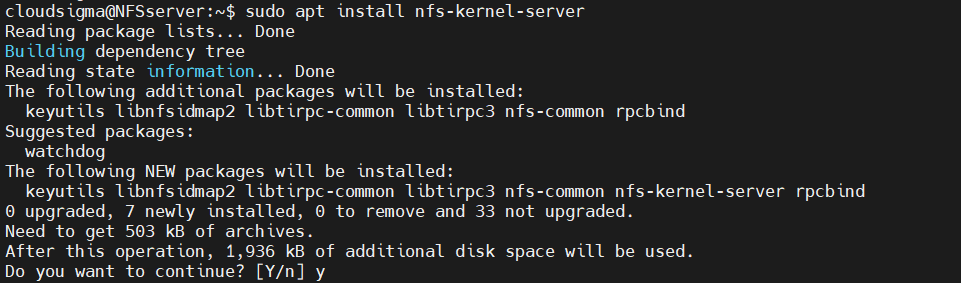
Next, install the nfs-kernel-server package. If necessary, APT will take care of any additional dependencies:
|
1 |
host$ sudo apt install nfs-kernel-server |
-
Installing NFS on the client
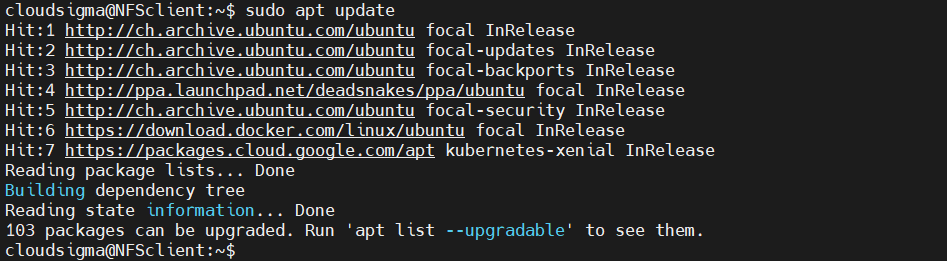
On the client system, we need the functionality to connect to the host directories over the network. It doesn’t require the NFS server functionality. On Ubuntu, it’s bundled in the package nfs-common. Update the APT package database:
|
1 |
client$ sudo apt update |
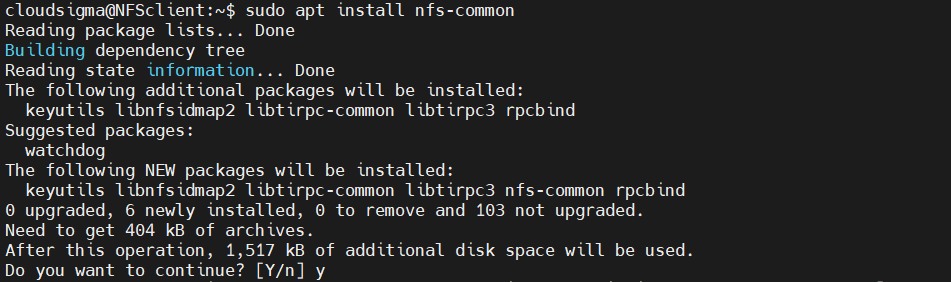
Then, install the nfs-common package:
|
1 |
$ sudo apt install nfs-common |
Shared Directories on the Host
Next, we are going to share two separate directories, each with a different configuration. We will demonstrate two key ways NFS mounts work with respect to superuser access. By default, superusers have the authority to perform anything on the entire system. However, the NFS-mounted directories are not part of the system they are mounted on. The NFS server will refuse to perform any operation that requires superuser privilege. This restriction translates to clients having no authority to write, re-assign ownerships, and other superuser tasks on the NFS mounts.
It’s possible to allow certain trusted users to perform these tasks on the mounted filesystems. However, it comes with an element of risk, as such a client can potentially gain full access to the host. It can be mitigated with proper user permission management. On Linux, the sudoers file controls all the user privileges on the system. For further information, you can take a look at our tutorial on how to configure Linux sudoers file.
-
General-purpose mount
The first example will be a general-purpose NFS mount with default NFS behaviors. In this approach, it’s extremely difficult for the client to perform super user actions on the mounts. This type of NFS mount is common to deploy for file storage, uploading using a CMS (Content Management System), or sharing project files, etc.
The following steps are to be performed on the host system. First, create a directory for sharing labeled nfs:
|
1 |
host$ sudo mkdir -pv /var/nfs/general |

As the directory was created with sudo privilege, the owner will be root:
|
1 |
$ ls -la /var/nfs/general |

As the default configuration, NFS will translate any root operation from the client-side to the nobody:nogroup credentials for security measures. For consistency, change the directory ownership to match the credentials:
|
1 |
host$ sudo chown nobody:nogroup /var/nfs/general |
![]()
-
Home directory
The second example is to make the home directory of the host user available for clients. Trusted admins from the selected clients can access to conveniently manage users. The /home directory exists by default, so there is no need for creating any directory. As for the directory permission, there is no need to perform any changes as it will cause more issues than benefits.
Configuring NFS Exports
The directories to be shared are now created. Next, NFS has to be configured to make them available for clients. NFS uses a configuration file to keep track of what directories to share. Open the following NFS configuration file in your text editor of choice:
|
1 |
host$ sudo nano /etc/exports |

The comment section of the file describes the general syntax structure of the configuration. In short, any directory has to be declared in the following format:
|
1 |
$ <directory> <client>(<option_1>,<option_2>,...,<option_N>) |
For the two directories, we decided to share, the configuration will look like this. Both directories have almost the same configuration options:
|
1 2 3 |
host$/var/nfs/general 31.171.250.221(rw,sync,no_subtree_check) host$ /home 31.171.250.221(rw,sync,no_root_squash,no_subtree_check) |

Here’s a quick breakdown of the configuration options:
-
rw: The client is granted both read and write permission to the volume.
-
sync: Forces NFS to write the changes to disk before replying. It offers a more stable and consistent experience. The reply will reflect the actual state of the remote volume. However, the file operations will be slower.
-
no_subtree_check: Prevents subtree checking. If not disabled, hosts will be forced to check the existence of the file in the exported tree for every single request from the client. It can lead to many problems, for example, a file is renamed while the client is using it. In most cases, disabling subtree checks is the way to go.
-
no_root_squash: As mentioned earlier, NFS will translate any request from the remote root user to a non-privileged user. This is an intended security feature to prevent unwanted access to the host system. However, using this option will disable this behavior.
Save the configuration file and exit the editor. To take the changes into effect, restart the NFS server:
|
1 |
host$ sudo systemctl restart nfs-kernel-server |
![]()
Adjusting Firewall
For any server, proper firewall configuration is a must. Assuming you have configured your Ubuntu 20.04 server accordingly, the UFW firewall should be active. It’s a simple yet powerful firewall that most Linux distros come with. For beginners, here is a quick guide explaining UFW, how it works, and common UFW usage with examples.
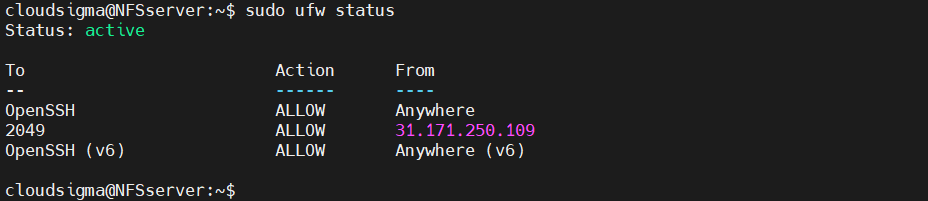
By default, the firewall will block any incoming and outgoing traffic. To ensure that the NFS server can connect and exchange traffic properly, we need to add an exception for the NFS protocol. First, check the status of the firewall. It will also print all the current rules:
|
1 |
host$ sudo ufw status |

As we can see, only SSH traffic is allowed to the system. We need to add an exception to allow NFS traffic.
In most cases, it’s strongly recommended to use the most restrictive rule that still allows the necessary traffic. So, we will only be allowing the selective client(s) to connect to the host:
|
1 |
host$ sudo ufw allow from 31.171.250.221 to any port nfs |

After that, check the firewall status again:
|
1 |
host$ sudo ufw status |
Creating Mount Point
The server is now ready to allow the client system to connect to the NFS protocol. Next, we have to prepare the client. To access the remote volume, it has to be mounted locally on the client. As for the mount point, it’s recommended to use a dedicated empty directory.
For the two remote volumes, create two separate mount points:
|
1 |
client$ sudo mkdir -pv /nfs/general |

|
1 |
client$ sudo mkdir -pv /nfs/home |

Now that the mount points are ready, you need to mount the remote volumes:
|
1 |
client$ sudo mount 31.171.240.236:/var/nfs/general /nfs/general |
![]()
|
1 |
client$ sudo mount 31.171.240.236:/home /nfs/home |
![]()
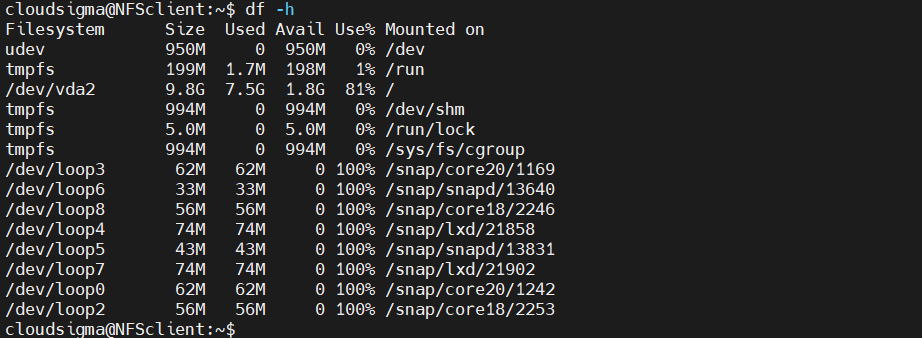
We can verify if the mounts were successful. Check the list of all mounted volumes:
|
1 |
client$ df -h |
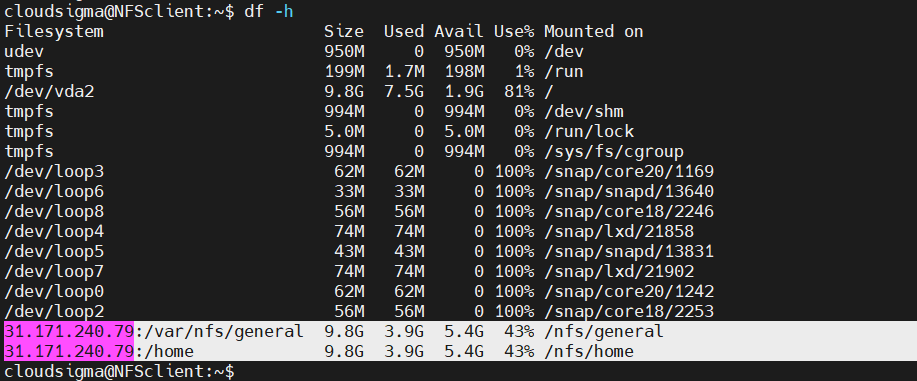
Voila! The remote volumes are mounted successfully. We can also check space usage using the following command:
|
1 |
client$ du -sh /nfs/home |

Testing NFS Access
So far, the remote volumes have been mounted properly. However, it will be of no use if the client can’t read/write data on the remote volume. To verify, create a dummy file on the NFS mount(s). Here, the file will be created with root privilege to test if the root-specific configurations are functioning properly:
|
1 |
client$ sudo touch /nfs/general/write_test.txt |
![]()
Next, check the ownership of the file:
|
1 |
client$ ls -l /nfs/general/write_test.txt |

As we can see, NFS is translating the file owner to nobody:nogroup. The /var/nfs/ general directory has ownership of nobody:nogroup, so NFS is translating the file ownership. Time to test the other NFS mount:
|
1 |
client$ sudo touch /nfs/home/test_home.txt |
![]()
Check the existence and ownership of the file:
|
1 |
Client $ ls -l /nfs/home/test_home.txt |

In this case, NFS didn’t translate the ownership of the file. This client was configured to be able to perform administrative actions. Moreover, the original host directory /home doesn’t have the ownership to nobody:nogroup.
Additional Tricks
-
Mounting at boot
So far, we had to manually mount the NFS volume on a local directory. If not unmounted, the NFS mounts will last until the system reboots. If the NFS volume is used regularly, then manual mounting becomes extremely tedious. In the case of multiple NFS mounts, then it’s impractical to manually mount them one by one.
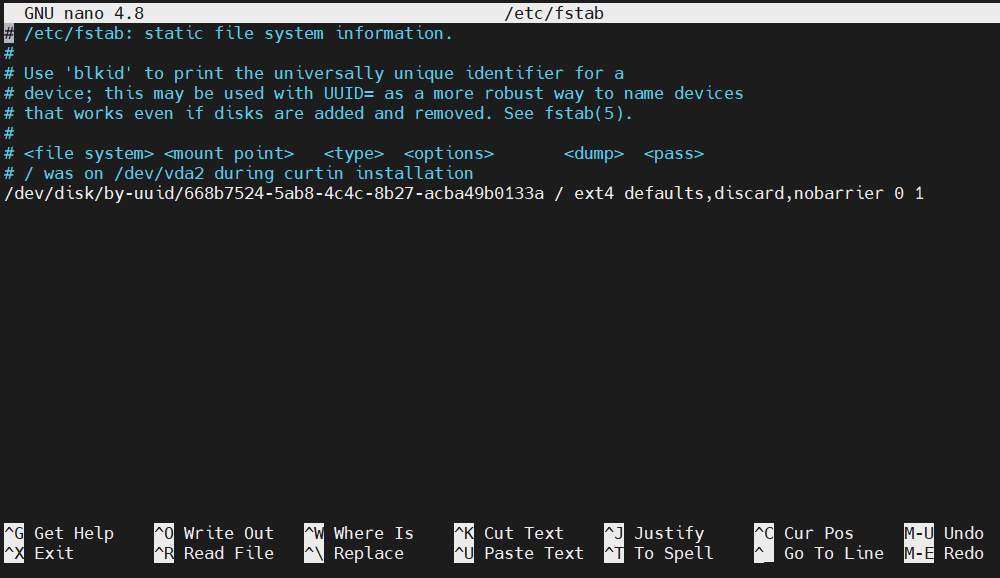
Using the /etc/fstab file, we can automate the process. During boot, this script will automatically mount the NFS volumes on the target mount points. Open the file in a text editor:
|
1 |
client$ sudo nano /etc/fstab |
Add the following lines to mount the remote volumes of the host system:
|
1 2 3 |
client$ 31.171.240.236:/var/nfs/general /nfs/general nfs auto,nofail,noatime,nolock,intr,tcp,actimeo=1800 0 0 client$31.171.240.236:/home /nfs/home nfs auto,nofail,noatime,nolock,intr,tcp,actimeo=1800 0 0 |
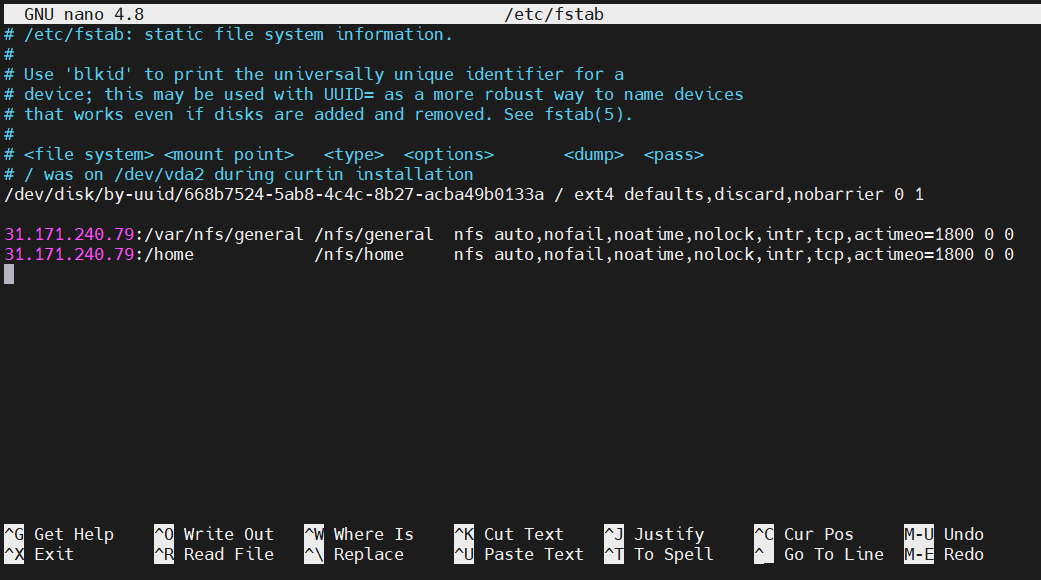
Save the script and close the text editor. At the next boot, Linux will automatically mount the remote volumes. Note that it may take some time for the system to boot as it connects and mounts the volumes.
-
Unmounting NFS volume
If the remote volume is no longer necessary, then unmounting the volumes will remove them from the client system. Before unmounting, however, ensure that no application/script is using the remote volume. Unmounting NFS mounts is similar to unmounting any other mounts. In this case, unmount /nfs/home and /nfs/general:
|
1 2 3 |
client$ sudo umount /nfs/home client$ sudo umount /nfs/general |

Then, verify the action:
|
1 |
client$ df -h |
Final Thoughts
In this guide, we created an NFS server and demonstrated some of the basics of NFS remote sharing. If you are interested in implementing NFS in a production environment, then keep in mind that the NFS protocol isn’t encrypted. It may pose some security concerns, for example, man-in-the-middle attacks.
Happy computing!
- How to Deploy WordPress with Persistent Volume on Kubernetes Cluster - March 17, 2023
- Deploying Applications on Kubernetes Using Argo CD and GitOps - October 26, 2022
- Using Node.js Modules with npm and package.json: A Tutorial - October 6, 2022
- Using Ansible to Install and Configure WordPress with LAMP on Ubuntu - September 23, 2022
- Creating Views in the Django Web Application Framework - September 22, 2022