
Introduction
Docker Registry is a centralized application that handles the delivery and storage of various Docker container images. This collection of container images saves a lot of time for developers. Docker images provide the exact same environment as to how it was built using virtualization. Thus, building Docker images takes a good amount of time from developers. A good example of using a Docker registry would be when a developer can download an image from a registry with all his requirements. This in turn saves him a lot of time in preparing all these packages and prerequisites. Various continuous integration tools can also be used to update the Docker images throughout the development.
Docker Hub is a free public registry in which you can host your Docker images, though there may be cases when you want to keep your Docker images private. Therefore, it is recommended to use a private registry that allows you to protect your Docker images.
This tutorial will guide you through setting up and securing a private Docker Registry. You will be using Docker Compose to define the configurations required to run your Docker applications and an Nginx server for diverting traffic to a running Docker container. After completing this tutorial you will be able to host your Docker images in a private Docker registry and pull your custom Docker images from a remote machine.
Prerequisites
To carry on with the tutorial, you’ll need the following:
- Two Ubuntu 18.04 servers set up by following How to Set Up Your Ubuntu 18.04 Server. One server to host the private Docker Registry, another one as a client for the registry.
- You can follow this guide to Install Docker Compose.
- To install Nginx follow the guide Installing Nginx on Ubuntu 18.04, and secure Nginx with How to Secure Nginx With Let’s Encrypt. Make sure to redirect traffic from HTTP to HTTPS in Step 4.
Step 1: Docker Registry – Installation and Configuration
You can use the Docker command-line tool for managing a few Docker containers, but once you move towards complex applications more and more Docker containers are required to run in parallel. Many web applications usually consist of a database like MySQL or MongoDB, a web server like Nginx or Apache Tomcat, and a scripting language.
Docker Compose is an excellent tool for managing multiple containers through one .yml file. You can easily set up configurations and communication information for the containers. Docker Compose also provides some commands for the user to effectively manage the application.
You will use Docker Compose to configure the Docker Registry since it is also an application that has multiple components. First, let’s set up a compose.yml file with a storage location for the private Docker Registry.
After that, create a Docker Registry directory on the machine meant to host the private Docker Registry, and create a data directory by following:
|
1 2 |
mkdir ~/docker-registry && cd $_ mkdir data |
You can use any text editor to edit the
docker-compose.yml:
|
1 |
nano docker-compose.yml |
The basic configurations for Docker Registry are as follows:
|
1 2 3 4 5 6 7 8 9 10 11 |
version: '3' services: registry: image: registry:2 ports: - "5000:5000" environment: REGISTRY_STORAGE_FILESYSTEM_ROOTDIRECTORY: /data volumes: - ./data:/data |
In the above configuration, the environment section sets up any environment variables to be included during the runtime of the container. Since we have set "REGISTRY_STORAGE_FILESYSTEM_ROOTDIRECTORY" environment variable, the Docker Registry application will take the directory for storage of data as /data.
However, because of the configuration in the volumes section – ./data:/data, the /data directory from the container will be mapped to your server’s /data directory. All the data that gets stored will be in the ~/docker-registry/data on the machine.
The ports section configuration essentially translates to the mapping of port 5000 from the server to port 5000 in the Docker container. This will forward the requests received on port 5000 of the server to the Docker registry application.
Verifying Installation
To verify the setup, start Docker Compose using:
|
1 |
docker-compose up |
In the output you will see that the Docker Registry image is getting downloaded. After some time an output similar to the following screenshot will show up:

The No HTTP secret provided warning will be resolved at a later point in the tutorial. The output listening on 5000 port determines that the application is running successfully.
After this step, Docker Compose will keep waiting for your input. Hit CTRL+C to stop the Docker registry container. Now you have a Docker Registry setup ready. In the next steps of the tutorial, you will set up an authentication mechanism to get rid of the security concerns.
Step 2: Using Nginx for Port Forwarding
After setting up HTTPS on the Docker registry server using Nginx, you can use port forwarding to port 5000. This will enable you to access the Docker registry at example.com.
When securing Nginx using How to Secure Nginx With Let’s Encrypt prerequisite, you already have your configurations in /etc/nginx/sites-available/example.com.
Next, open the file with any text editor:
|
1 |
sudo nano /etc/nginx/sites-available/example.com |
Go to the location line, it will look similar as below:
|
1 2 3 4 5 6 |
/etc/nginx/sites-available/example.com ... location / { ... } ... |
Now that your registry is running on port 5000, Nginx will forward the traffic to the same port. Also, it will append the headers that are coming with the request which are required for additional information by the server. Replace the content of the location section with the following:
|
1 2 3 4 5 6 7 8 9 10 11 12 13 14 15 16 |
... location / { # Do not allow connections from docker 1.5 and earlier # docker pre-1.6.0 did not properly set the user agent on ping, catch "Go *" user agents if ($http_user_agent ~ "^(docker\/1\.(3|4|5(?!\.[0-9]-dev))|Go ).*$" ) { return 404; } proxy_pass http://localhost:5000; proxy_set_header Host $http_host; # required for docker client's sake proxy_set_header X-Real-IP $remote_addr; # pass on real client's IP proxy_set_header X-Forwarded-For $proxy_add_x_forwarded_for; proxy_set_header X-Forwarded-Proto $scheme; proxy_read_timeout 900; } ... |
In the code snippet, the $http_user_agent section confirms whether the incoming request from a client is above version 1.5 and verifies that the Go application is not a user agent. More information about the header configuration can be found at Docker Registry Nginx Guide.
After modifying the configurations, you can restart Nginx to apply the changes:
|
1 |
sudo service nginx restart |
Check whether Nginx is routing the traffic to port 5000 using:
|
1 2 |
cd ~/docker-registry docker-compose up |
Open any browser, and try to open the below url:
|
1 |
https://example.com/v2 |
You should see an empty curly brace or an empty JSON object:
|
1 |
{} |
And the terminal should print similar output as shown below:
|
1 2 |
Output: registry_1 | time="2021-06-01T17:58:11.101262322Z" level=info msg="response completed" go.version=go1.11.2 http.request.host=example.com http.request.id=4c53fae1-0b8d-42a1-aba2-f365c68742ff http.request.method=GET http.request.remoteaddr=31.171.250.65 http.request.uri="/v2" http.request.useragent="Mozilla/5.0 (Windows NT 10.0; Win64; x64) AppleWebKit/537.36 (KHTML, like Gecko) Chrome/90.0.4430.212 Safari/537.36" http.response.contenttype="text/html; charset=utf-8" http.response.duration="1.83212ms" http.response.status=200 http.response.written=2 |
The last line depicts that a request was made /v2/, which was requested from the browser. The container received the request you made via port forwarding resulting in the response of an empty curly brace. Code 200 signifies that the request handling is successful. In the next step, let’s move towards security improvements.
Step 3: Authentication Setup
Now that Nginx is handling the requests properly, let’s secure your Docker registry with HTTP authentication for controlling the access to your registry. To do this create an authentication file using htpasswd and add users to it. This method is swift to set up and start.
First, install
htpasswd package using:
|
1 |
sudo apt install apache2-utils |
Create a directory for storing authentication information and switch to that directory.
$_ essentially translates to the last argument of the previous command:
|
1 |
mkdir ~/docker-registry/auth && cd $_ |
Now, create the user as shown below, and change the username with the username you desire. You will be using
BCrypt encryption, denote that by using the
-B flag. The prompt will then ask for a password:
|
1 |
htpasswd -Bc registry.password username |
|
1 |
Note: For adding more users, you can use the same command with another username. |
Now, let’s instruct Docker to use the file you created for authentication:
|
1 2 |
cd ~/docker-registry nano docker-compose.yml |
Add the below content to the
docker-compose.yml for enabling Docker to authenticate users based on your configuration:
|
1 2 3 4 5 6 7 8 9 10 11 12 13 14 15 |
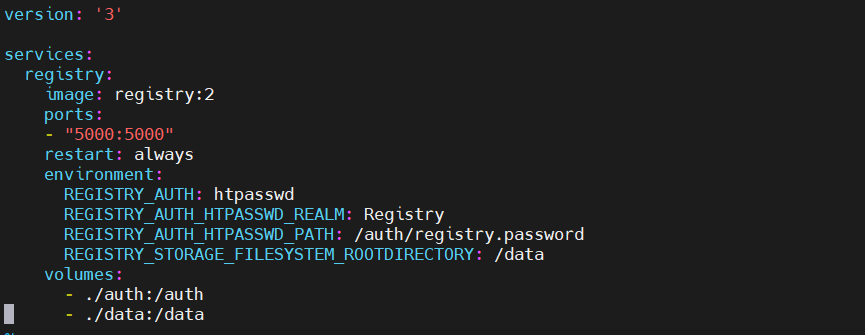
version: '3' services: registry: image: registry:2 ports: - "5000:5000" environment: REGISTRY_AUTH: htpasswd REGISTRY_AUTH_HTPASSWD_REALM: Registry REGISTRY_AUTH_HTPASSWD_PATH: /auth/registry.password REGISTRY_STORAGE_FILESYSTEM_ROOTDIRECTORY: /data volumes: - ./auth:/auth - ./data:/data |
The authentication scheme htpasswd is specified using the REGISTRY_AUTH environment variable. Similarly, REGISTRY_AUTH_HTPASSWD_REALM and REGISTRY_AUTH_HTPASSWD_PATH refer to the htpasswd realm and path to authentication file.
To verify that the authentication is working you can try running the registry and checking if it prompts for username and password:
|
1 |
docker-compose up |
Open any browser and try to open https://example.com/v2. You should get a prompt for username and password. After a successful authentication you will see an empty curly brace again. This confirms your authentication setup is successful.
Step 4: Setting up Docker Registry as a Service
To make sure that the registry starts whenever the system starts, you have to make some changes in
docker-compose.yml. Also, you can set the registry to restart, in case of any system failures. Use any text editor to modify the
docker-compose.yml and add the below content:
|
1 |
nano docker-compose.yml |
|
1 2 3 4 |
... registry: restart: always ... |
The final docker-compose.yml file should look similar to the screenshot below:
Start the Docker registry in the background using the
-d flag. This will keep the process running even after you exit the session:
|
1 |
docker-compose up -d |
Now your registry is secure and running in the background. You will start working on file uploads in the next step.
Step 5: Changing Nginx File Upload Size
Nginx holds a limit of 1MB on file uploads. Before doing large-size image uploads you may have to increase this limit in Nginx. Even though Docker images are split into separate layers by Docker, they sometimes go over 1GB. To increase the limit make the following configuration changes in Nginx:
|
1 |
sudo nano /etc/nginx/nginx.conf |
|
1 2 3 4 5 6 |
... http { client_max_body_size 2000M; ... } ... |
Afterward, restart the Nginx service for the configuration changes to take effect:
|
1 |
sudo service nginx restart |
Step 6: Publishing Images to Private Docker Registry
Your private Docker registry is ready to host the images. For the sake of this tutorial, let’s create a simple Ubuntu image. You will download this image from the publically available Docker Hub. You will use this Ubuntu image to check pushing and pulling from your private Docker registry.
Using the client machine, create an Ubuntu image. The
-i and
-t flags denote interactive mode and provide you shell access into the container:
|
1 |
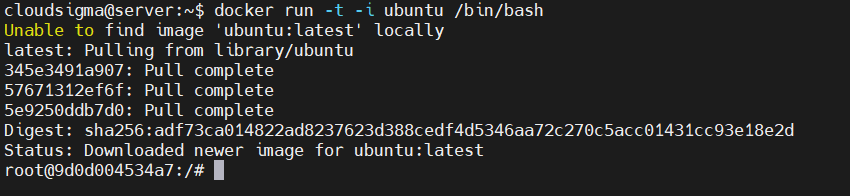
docker run -it ubuntu /bin/bash |
After finishing the downloading you will land up inside the Ubuntu container, as you can see below:
Create any file, in this example
'cloudsigma'. In the next step you will be able to verify the existence of this file, in turn confirming publishing is successful:
|
1 |
touch /cloudsigma |
To exit the running container use:
|
1 |
exit |
The below command will create a new image, consisting of the
ubuntu base image and an additional file
'cloudsigma'. Commit the changes:
|
1 |
docker commit $(docker ps -lq) ubuntu-image |
Now this image exists locally in the machine. You can now push the image to the Docker registry you have created. Start with logging in to your registry:
|
1 |
docker login https://example.com |
Provide the username and password as you have set in the previous steps. Then, tag the new image with the location of the private registry so as to push the image in the registry:
|
1 |
docker tag test-image example.com/ubuntu-image |
Push the image to the registry using:
|
1 |
docker push example.com/ubuntu-image |
You should get a similar output as below:
|
1 2 3 4 5 6 7 8 9 |
Output: The push refers to a repository [example.com/ubuntu-image] ee30e80cbcc5: Pushed d720bf23a086: Pushed a3cch80a4eba: Pushed 7eb45442342b: Pushed 3c2d12da3rr8: Pushed 43aeg5ew4b2d: Pushed ... |
So far you have confirmed whether your registry allows authenticated users to push the images to the registry. In the next step, you will verify if you can pull the images from the private Docker registry.
Step 7: Pulling Images From the Docker Registry
Log in to the machine hosting the registry server so as to check if you can pull the images from the client-server.
Log in to the registry using a previously set username and password:
|
1 |
docker login https://example.com |
Now check if you can pull the image which was created in the last step:
|
1 |
docker pull example.com/ubuntu-image |
You will return to your prompt once Docker finishes downloading the image. Try running the downloaded image and you will see the
'cloudsigma' file which you created in the previous step:
|
1 |
docker run -it example.com/ubuntu-image /bin/bash |
List and verify the files:
|
1 |
ls |
|
1 2 |
Output: bin boot cloudsigma dev etc home lib lib32 lib64 libx32 media mnt opt proc root run sbin srv sys tmp usr var |
You have successfully set up a secure Docker registry to host your custom Docker images.
Conclusion
In this tutorial, you have set up your private Docker Registry and published a Docker image as well. The next step will be to explore various CI tools so that you can automate this process of pushing the images to a private registry. This can be of great help for having the same behavior of the code in development or in a production environment.
You can also check out our other Docker tutorials to get more information about what you can do with Docker:
- What is Docker? An Overview of the Docker Ecosystem
- How To Share Data Between a Docker Container and a Host
- How to install & operate Docker on Ubuntu in the public cloud
- Deploying Laravel, Nginx, and MySQL with Docker Compose
- Clean Up Docker Resources – Images, Containers, and Volumes
- How to Deploy WordPress with Persistent Volume on Kubernetes Cluster - March 17, 2023
- Deploying Applications on Kubernetes Using Argo CD and GitOps - October 26, 2022
- Using Node.js Modules with npm and package.json: A Tutorial - October 6, 2022
- Using Ansible to Install and Configure WordPress with LAMP on Ubuntu - September 23, 2022
- Creating Views in the Django Web Application Framework - September 22, 2022