

Introduction
Firewalld is a firewall management solution that is available to many Linux distributions. It serves as an interface to the iptables packet filter system provided by the Linux kernel. In this guide, you will learn how to configure a firewall for your server. We will also show you the basics of managing the firewall with the firewall-cmd administration tool.
Firewalld Basics
FirewallD uses the concepts of zones and services, rather than the chain and rules of iptables. Depending on the zones and services you configure, you can control what traffic is allowed or not allowed to and from the system. FirewallD can be configured and managed using the command line utility firewall-cmd.
Install and Enable your Firewall to Start at Boot
On most Linux distributions firewallD is already installed. However, if you need to install it yourself type the syntax below:
|
1 |
sudo yum install firewalld |
You can enable the service and reboot your server once firewalld is installed:
|
1 2 |
sudo systemctl enable firewalld sudo reboot |
Next, restart your server. Your firewall will be enabled when you have successfully restarted the server. After that, use the command below to verify that service has been activated:
|
1 |
sudo firewall-cmd --state |

The output shows that the default firewall setting is working.
Checking the Defaults
You can check the zone selected by the server using this command:
|
1 |
firewall-cmd --get-default-zone |

Verify the active zone by typing:
|
1 |
firewall-cmd --get-active-zones |

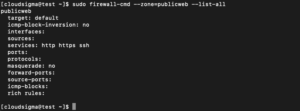
Print the configuration of the default zone to know the rules attached to the public area using this syntax:
|
1 |
sudo firewall-cmd --list-all |
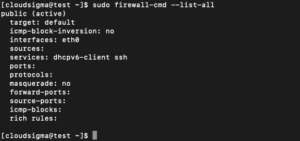
The output indicates that this zone is both the default and active zone. It also shows that eth0 and eth1 interfaces are assigned to this zone.
Checking Alternative Zones
In addition to default and active zones, there are other zones that you can explore. Enter this command to see all the available zones:
|
1 |
firewall-cmd --get-zones |

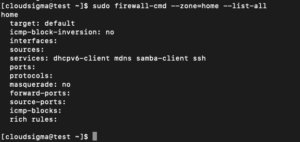
Check the particular configuration assigned to a zone by adding –zone= parameter in the –list-all command:
|
1 |
sudo firewall-cmd --zone=home --list-all |
Changing the Interface Zone
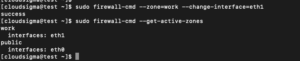
You can easily change the interface zone using the option –change-interface combined with the option –change-interface. The following command will assign the interface eth1to the workspace:
|
1 |
sudo firewall-cmd --zone=work --change-interface=eth1 |
You can verify the changes by typing:
|
1 |
sudo firewall-cmd --get-active-zones |
Changing the Default Zone
To change the default zone, use the –set-default-zone followed by the name of the zone you want to set as default. For example, to change the default zone to start, you should run the following command:
|
1 |
sudo firewall-cmd --set-default-zone=home |
Next, you can verify the changes with:
|
1 |
sudo firewall-cmd --get-default-zone |

Setting Rules for your Applications
Let’s run through the basics required to define firewall exceptions for the services:
Adding a Service to your Zones
The most straightforward way is by adding the ports or services you need to the zones you are using. Ditto, you can use the –get-services option to see all the available services:
|
1 |
firewall-cmd --get-services |
You can activate the service for a zone with the parameter –add-service =. The action targets the default zone or any zone defined by the –zone = parameter. By default, only the current firewall session is configured. You can set up a permanent firewall configuration by activating the –permanent flag. For example, if you are running a web server that provides regular HTTP traffic, you can allow this traffic for interfaces in our “public” zone for this session by entering:
|
1 |
sudo firewall-cmd --zone=public --add-service=http |
You can omit –zone = if you want to change the default zone. You can check the success of the operation with the –list-all or –list-services operations:
|
1 |
sudo firewall-cmd --zone=public --list-services |

Once you’ve verified that everything is working as expected, you’ll most likely want to change the permanent firewall rules to make your service still available after a restart. We can make the change to our “public” zone permanently by entering the syntax:
|
1 2 3 4 |
sudo firewall-cmd --zone=public --permanent --add-service=http output: success |
You can check if this was successful by adding the –permanent flag to the –list-services operation. You must use sudo for –all permanent operations:
|
1 2 3 4 |
sudo firewall-cmd --zone=public --permanent --list-services output: dhcpv6-client http ssh |
Your “public” zone now allows HTTP traffic on port 80. You can add this to the current session and persistent rule set using the command below:
|
1 2 3 |
sudo firewall-cmd --zone=public --add-service=https sudo firewall-cmd --zone=public --permanent --add-service=https |
If there are no services that fit your requirements, you have two excellent options to handle this situation:
- Opening a Port for your Zones
The most straightforward way to add support for your particular application is to open the ports used in each zone. It is as simple as designating a port or port range and the corresponding protocol for the ports that you need to open. For example, if your application runs on port 5000 and uses TCP, you can add it to the “public” zone for this session with the –add-port = parameter. Protocols can be TCP or UDP:
|
1 2 3 4 |
sudo firewall-cmd --zone=public --add-port=5000/tcp output: success |
In order to check that the operation is successful, use the –list-ports operation:
|
1 2 3 4 |
sudo firewall-cmd --zone=public --list-ports Output: 5000/tcp |
You can also specify a range for the serial interface by separating the start and end ports in the range with a hyphen. For example, if your application uses UDP ports 4990 to 4999, you can open them in “public” by writing:
|
1 |
sudo firewall-cmd --zone=public --add-port=4990-4999/udp |
After testing, we will probably want to add them to the permanent firewall. You can do this by typing the following:
|
1 2 3 |
sudo firewall-cmd --zone=public --permanent --add-port=5000/tcp sudo firewall-cmd --zone=public --permanent --add-port=4990-4999/udp sudo firewall-cmd --zone=public --permanent --list-ports |

- Defining a Service
A service is a collection of ports with an associated name and description. Services are easier to manage than ports, but it requires a little initial work. The most straightforward way to get started is to copy an existing script (in / usr / lib / firewalld / services) to the /etc/firewalld/services directory. For example, you can copy the SSH service definition to use in the “example” service definition as follows. The file name minus the XML suffix determines the service name in the list of firewall services:
|
1 |
sudo cp /usr/lib/firewalld/services/ssh.xml /etc/firewalld/services/example.xml |
At this point, you can adjust the definition in the copied file:
|
1 |
sudo vi /etc/firewalld/services/example.xml |
First, the file contains the SSH definition you copied:
|
1 2 3 4 5 6 |
<?xml version="1.0" encoding="utf-8"?> <service> <short>SSH</short> <description>Secure Shell (SSH) is a protocol for logging into and executing commands on remote machines. It provides secure encrypted communications. If you plan on accessing your machine remotely via SSH over a firewalled interface, enable this option. You need the openssh-server package installed for this option to be useful.</description> <port protocol="tcp" port="22"/> </service> |
Most of this definition consists of metadata. You must change the service short name in the <short> tags. This is a legible service name. Imagine for our “example” service, we have to open port 7777 for TCP and 8888 for UDP. You can change the existing definition by entering INSERT mode by pressing i:
|
1 2 3 4 5 6 7 |
<?xml version="1.0" encoding="utf-8"?> <service> <short>Example Service</short> <description>This is just an example service. It probably shouldn't be used on a real system.</description> <port protocol="tcp" port="7777"/> <port protocol="udp" port="8888"/> </service> |
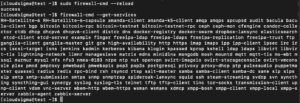
Next, press ESC and type: x to save and close the file. Then, type the command below to restart your firewall in order to have access to your new service;
|
1 |
sudo firewall-cmd --reload |
After that, use the command below to a list of available services:
|
1 |
firewall-cmd --get-services |
This service is now available in your zone.
Creating Your Zones
While the predefined zones are likely to be sufficient for most users, it may be useful to define your zones that describe their function more fully.
When adding a zone, add it to your permanent firewall settings. Then you can reload to bring the settings to your session. For example, you can create the two zones discussed earlier by typing:
|
1 2 |
sudo firewall-cmd --permanent --new-zone=publicweb sudo firewall-cmd --permanent --new-zone=privateDNS |
You can confirm that they are present in your permanent configuration using this command:
|
1 |
sudo firewall-cmd --permanent --get-zones |
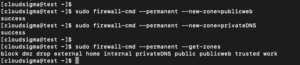
Reload the firewall to bring these new zones into active configuration:
|
1 2 3 4 5 |
sudo firewall-cmd --reload firewall-cmd --get-zones output: block dmz drop external home internal privateDNS public publicweb trusted work |
Now, you can assign the appropriate services and ports to your zones. For example, for the “publicweb” zone you might like to add the services SSH, HTTP and HTTPS:
|
1 2 3 |
sudo firewall-cmd --zone=publicweb --add-service=ssh sudo firewall-cmd --zone=publicweb --add-service=http sudo firewall-cmd --zone=publicweb --add-service=https |
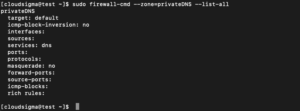
Also, you can add the DNS service to your “privateDNS” zone using this command:
|
1 2 |
sudo firewall-cmd --zone=privateDNS --add-service=dns sudo firewall-cmd --zone=privateDNS --list-all |
Next, you can change your interfaces to these new zones to test them:
|
1 2 3 |
sudo firewall-cmd --zone=publicweb --change-interface=eth0 sudo firewall-cmd --zone=privateDNS --change-interface=eth1 |
Test the configuration to see if it works. If these values work for you, you must add the same rules to the permanent configuration. You can do this by reapplying the rules with the —permanent indicator:
|
1 2 3 4 5 6 7 |
sudo firewall-cmd --zone=publicweb --permanent --add-service=ssh sudo firewall-cmd --zone=publicweb --permanent --add-service=http sudo firewall-cmd --zone=publicweb --permanent --add-service=https sudo firewall-cmd --zone=privateDNS --permanent --add-service=dns |
After applying these rules permanently, you can restart your network and reload your firewall service:
|
1 2 3 |
sudo systemctl restart network sudo systemctl reload firewalld |
Check that the zones were assigned correctly:
|
1 |
firewall-cmd --get-active-zones |

Furthermore, make sure both zones have the correct service:
|
1 2 3 4 |
sudo firewall-cmd --zone=publicweb --list-services output: http https ssh |
|
1 2 3 4 5 |
sudo firewall-cmd --zone=privateDNS --list-services output: dns |
If you want to set one of your zones as the default for other interfaces, you have to configure this behavior with the parameter –set-default-zone= using this command:
|
1 |
sudo firewall-cmd --set-default-zone=publicweb |
Conclusion
At this point, you have created your own zones successfully. You should have a basic understanding of administering the firewalld service on your CentOS system for everyday use. Having a good grasp of the firewalld service enables you to take full advantage of its power and flexibility.
Happy Computing!
- Removing Spaces in Python - March 24, 2023
- Is Kubernetes Right for Me? Choosing the Best Deployment Platform for your Business - March 10, 2023
- Cloud Provider of tomorrow - March 6, 2023
- SOLID: The First 5 Principles of Object-Oriented Design? - March 3, 2023
- Setting Up CSS and HTML for Your Website: A Tutorial - October 28, 2022