


So, let’s talk about how to encrypt your data in the cloud.
One common concern that many people have against putting their data in the cloud is that it isn’t as secure as storing it on premise. While there is some truth to this argument, depending on your legal jurisdiction, it may or may not be true. Yet, if you are running an unpatched server that is exposed to the world, it doesn’t matter if it is in your own basement or in the cloud; it’s equally vulnerable.
(If you’re interested in learning how your data is safe with us, we published a blog post that talks about why and how your data is kept safe with us from a legal perspective.)
In this article, we will focus on how you can keep your data safe once you have decided to move to the cloud. The key to this is disk encryption. Since our cloud provides you with a lot more control and flexibilities than most other clouds, we will cover two different types of encryption: disk/volume encryption and full disk encryption.
Given the complexity of this topic, we will not dive too deep into the various encryption algorithms, but rather focus on the big picture.
Disk/Volume Encryption
The most convenient form of encryption is disk/volume encryption. If you have any data on an existing Virtual Machine (VM), you can easily add an encrypted disk or volume. Then, when you unmount the encrypted volume (or power off the server), as long as you don’t store the encryption key on the server, your data is safe.
The drawback with this type of encryption however is that if your server gets compromised somehow, there is a possibility that the attacker could capture your passphrase/key (and/or data) the next time you mount the disk image.
There are a number of different ways you could encrypt your data. For instance, as of recent versions, Ubuntu provides you with the ability to encrypt your home directory out-of-the-box.
Generally speaking, in order to use this type of encryption, you need either a disk image (i.e a big file on disk, which is commonly referred to as a ‘sparse image’) or a partition/disk. There are pros and cons with both approaches, but yours truly prefers putting the data on a separate disk, as it is a more logical structure and gives you the ability to easily mount the partition/disk on a separate server.
In the examples below, we’re going to use an Ubuntu 14.04 box running on our cloud with two disks: one for the operating system (‘/dev/vda’), and one for storing the sensitive data (‘/dev/vdb’).
Using Cryptsetup
If you’re running on Ubuntu, the easiest setup you can do is likely to use cryptsetup. Assuming the disk you want to encrypt is ‘/dev/vdb’ (which should be empty), you’d run the following commands:
[bash light="true"]
$ sudo apt-get install cryptsetup
$ sudo cryptsetup --verbose --verify-passphrase luksFormat /dev/vdb
$ sudo cryptsetup luksOpen /dev/vdb enc_disk
$ sudo mkfs.ext4 /dev/mapper/enc_disk
$ sudo mount /dev/mapper/enc_disk /mnt
[/bash]
The next time you want to mount this partition, simply run:
[bash light=”true”]
sudo cryptsetup luksOpen /dev/vdb enc_disk
sudo mount /dev/mapper/enc_disk /mnt
[/bash]
Using Truecrypt
The recent development around TrueCrypt aside, TrueCrypt is still a very powerful tool for encryption. Your truly will still keep using it until it is proven to be insecure (Is TrueCrypt Audited Yet?).
While the version available on the official website no longer has support for creating volume, our friends over at TrueCrypt.ch (hosted with CloudSigma) still hosts a copy of version 7.1a, which is the latest version with this support.
Since we’re running this on a server, we’ll be using the headless version of TrueCrypt. Using TrueCrypt is a bit more messy, since it provides you with a lot more knobs to turn. There’s a large set of encryption options that you could set. The ArchWiki and the TrueCrypt User Guide should give you a good idea on what best fits your need.
Create the volume
[bash light=”true”] $ sudo truecrypt –volume-type=normal -c /dev/vdbEncryption algorithm:
1) AES
2) Serpent
3) Twofish
4) AES-Twofish
5) AES-Twofish-Serpent
6) Serpent-AES
7) Serpent-Twofish-AES
8) Twofish-Serpent
Select [1]:
Hash algorithm:
1) RIPEMD-160
2) SHA-512
3) Whirlpool
Select [1]:
Filesystem:
1) None
2) FAT
3) Linux Ext2
4) Linux Ext3
5) Linux Ext4
Select [2]: 5
Enter password:
Re-enter password:
Enter keyfile path [none]:
Please type at least 320 randomly chosen characters and then press Enter:
Done: 100.000% Speed: 120 MB/s Left: 0 s
The TrueCrypt volume has been successfully created.
[/bash]
That was pretty straightforward. As you can see, we decided to use regular AES encryption with EXT4. This is fine for most purposes.
Mount the volume
Next up, we mount the device:
[bash light=”true”]
$ sudo truecrypt –mount-options=nokernelcrypto /dev/vdb /mnt
[/bash]
Umount the volume
When you’re done with your drive, make sure to umount it properly by issuing the following command:
[bash light=”true”]
$ sudo truecrypt -d
[/bash]
Full Disk Encryption (FDE)
As pointed out earlier, using an encrypted partition or disk leaves you vulnerable to certain attacks. Using FDE solves this problem, since the passphrase will have to be entered upon boot. Hence, there is no way for an intruder to retrieve your passphrase from within the server (since no user process are running at the time you enter the passphrase). Also, with our interface, you can access your server using encrypted VNC to avoid man-in-the-middle attacks.
FDE in the public cloud is a rather rare thing, as it requires greater control over your VM than most public clouds offer. Luckily, setting up FDE is both possible and easy in our environment.
For the encryption, we will use Ubuntu’s built-in encrypted LVM. There are plenty of other options, but this is probably one of the easiest to get started with.
Similar to in the last example, we’ll use Ubuntu 14.04. However, we will not use any of the pre-installed systems, but rather install Ubuntu from scratch using the installation disk (yes, this is possible in our cloud).
Once you’ve booted up the server and have launched the installer, simply proceed as usual. When you get the first question if you want to encrypt your home directly, select no and proceed.
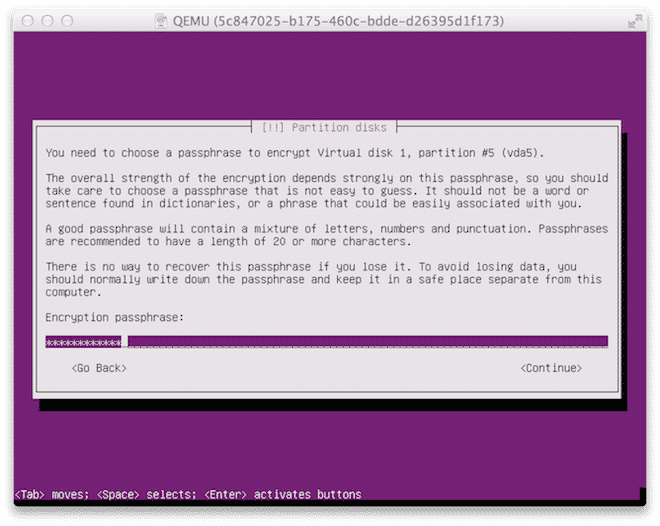
When you get to the screen below, make sure to select “Use entire disk and set up encrypted LVM”.

Now enter the passphrase. You will need to enter this passphrase every time you power off or reboot your server.
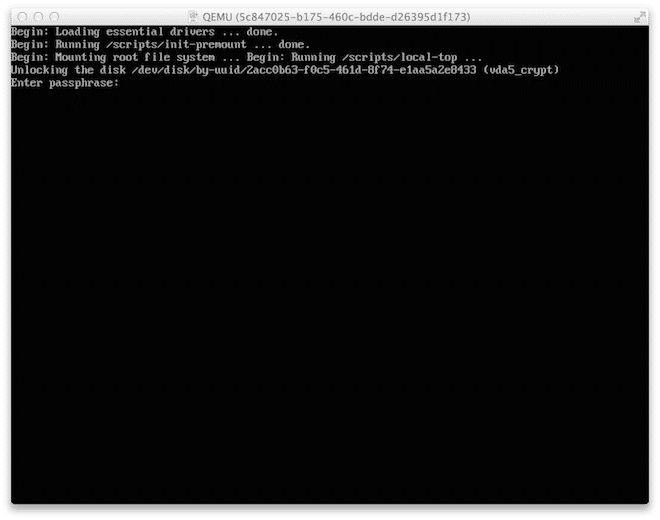
When you’ve finalized your installation and the server comes up for the first time, you’ll notice that you will have to enter the passphrase.
That’s it! You know have a server with full disk encryption in the cloud.
A note on performance
While encryption is a great way to ensure that your data is safe at rest, it doesn’t come entirely free. Every time you write or read off of an encrypted disk, there is some overhead. The size of this overhead is largely determined by the encryption you’re using. In TrueCrypt for instance, you have a number of options to choose from. It is basically up to you to determine how sensitive the data is, and how much overhead it’s worth. If it is just something you’re reading and writing to once in a while, it may be worth the extra overhead, but if it is something you’re frequently reading and writing to, it may not be.
Final words
As stated in the opening of the article, encryption is a very complex topic. This post is merely intended to point you in the right direction. If you are serious about keeping your data safe, you will have to do more reading to asses what algorithm and tools fits your need best.
Please also note that when you are using encryption (both FDE and volumes), you are more vulnerable to disruptions in the cloud. While it is our goal to keep all hosts up at any given time, in the real world, it does happen that hosts go down and VMs get restarted. If you use the encrypted volume for your server workload (or use FDE), you will need to manually log in and restore the server to working state. Any encrypted storage set-up should therefore be married to a tightly integrated monitoring set-up to ensure proper recovery from any service interruptions, two great options with regards to this are Pingdom for basic availability monitoring or New Relic for more advanced system monitoring.
- Manage Docker resources with Cgroups - May 12, 2015
- Docker, Cgroups & More from ApacheCon 2015 - April 30, 2015
- How to setup & optimise MongoDB on public cloud servers - March 24, 2015
- Presentation deck from CloudExpo Europe - March 17, 2015
- CoreOS is now available on CloudSigma! - March 10, 2015