
Website and data security are topics that cannot be taken lightly. Highly sensitive information which includes financial records and customers’ private information is always in transit between the user’s computer and your website. When you consider this fact, it’s not hard to see why unsecured websites could result in a breach that could seriously damage your business. There are a number of steps you can take to secure your website. In this tutorial, we will focus on the SSL certification. SSL ensures all communication between a user’s browser and the website is secured by enabling encrypted HTTPS. How do you set up SSL on your site? We introduce to you Let’s Encrypt. It is a Certificate Authority that provides a straightforward way to install free TLS/SSL on web servers.
Let’s Encrypt offers Certbot, a software solution that automates the process of obtaining and installing SSL certificates on both Apache and Nginx web servers. Our focus for this tutorial is on securing Apache with Let’s Encrypt using Certbot on Ubuntu 18.04.
First things first
First, you need to ensure you have the following to enable you to try out the steps as we go along:
- A VPS running Ubuntu 18.04, including a sudo non-root user and firewall.
- A registered domain name, you may get one from your preferred domain registrar. In this tutorial, we will use example_domain.com.
- You should have Apache installed. You may use our Apache setup guidelines. After installing the Apache web server, create a separate Apache virtual host for your domain. We recommend having a new virtual host for each domain to avoid mistakes and keep the default configuration as a fallback.
Step 1: Install Certbot
Certbot is the software package that Let’s Encrypt provides to help you set up SSL. Certbot developers maintain an active and up to date repository that we will use. Fire up your terminal and enter the following command to add the repository. Then, press ENTER to accept the prompt:
|
1 |
sudo add-apt-repository ppa:certbot/certbot |
Once the repository is added, you can install Certbot’s Apache package using the following command:
|
1 |
sudo apt install python3-certbot-apache |
First, Certbot will complete the installation. Then, you must verify Apache’s configuration for Certbot to configure SSL.
Step 2: Confirm the ServerName directive matches your domain name
Certbot must find the correct virtual host in your Apache configuration for the automatic configuration of the SSL certificate. This step expects that you have already set up virtual hosts with the ServerName that matches the domain name you are requesting a certificate for. A sample virtual host file for the domain name example_domain.com would look like this:
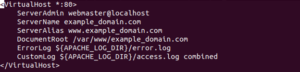
To be sure that you are doing the right thing, open your virtual host’s configuration, and check whether the ServerName directive matches your domain name using the command below. Replace example_domain.com with your actual domain name:
|
1 |
sudo nano /etc/apache2/sites-available/example_domain.com.conf |
If it matches, then you are good to go. Just hit ctrl + x to close the nano editor. However, if it fails to match, then update the value for ServerName to match your domain name, save the conf file, and close. Take into consideration that whenever you edit the Apache configuration files, you must make sure that they are working properly and there are no typos using the following command:
|
1 |
sudo apache2ctl configtest |
If there’s an error, reopen the file with nano and check for any errors. If no error, you will get a “Syntax OK” message on your terminal. Then, you can proceed to reload the Apache server using the following command:
|
1 |
sudo systemctl reload apache2 |
Now that your domain matches what Certbot expects, the automatic configuration will go as expected.
Step 3: Allow HTTPS traffic through the firewall
Since your website is going to be served over HTTPS, you must allow HTTPS traffic through the firewall. UFW is the default firewall manager which comes with the installation of the Ubuntu operating system. When you installed Apache in Step 1, it registered a few profiles with ufw. You can view the current ufw setting by entering the following command:
|
1 |
sudo ufw status |
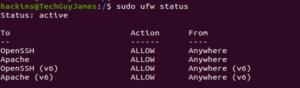
The screenshot above shows that only HTTP traffic is allowed through the firewall. You need to allow both HTTP and HTTPS traffic. You can do this by entering the following command:
|
1 |
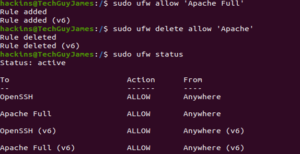
sudo ufw allow 'Apache Full' |
Then, you need to remove the unnecessary Apache profile by entering the ufw profile deletion command as shown:
|
1 |
sudo ufw delete allow 'Apache' |
Lastly, check the status to see if you have the Apache Full profile status using the command below:
|
1 |
sudo ufw status |
From the above commands, your terminal should look like this:
Step 4: Install an SSL Certificate from Certbot
This is the ultimate step you have been working towards. Certbot has a few options to install the SSL certificate through plugins. We will use the Apache plugin for reconfiguring and reloading the config files whenever we need. Enter the following command in your terminal:
|
1 |
sudo certbot --apache -d example_domain.com -d www.example_domain.com |
The -d flag allows you to specify the domain name for Certbot to install the certificate on. Certbot runs with an Apache plugin specified as –apache. Follow the onscreen prompts to proceed. When running Certbot for the first time, it prompts you to enter the email address where Let’s Encrypt sends the renewal emails. It also prompts you to agree to the terms and conditions of service. Certbot will then communicate with the Let’s Encrypt server which will run a challenge to verify that you actually own the domain you’re obtaining the SSL certificate for.
Once you have verified ownership of the domain name, Certbot prompts you to configure some HTTPS settings. For example, you need to determine whether you would like to redirect HTTP traffic to HTTPS:
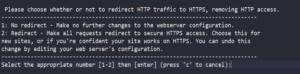
Once you select your choice and hit enter, the configuration will be updated and automatically reload Apache to pick up the new settings. Certbot displays a message to show the configuration was successful:
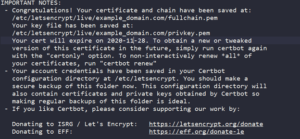
Now, you have successfully installed SSL on your website. You can try reloading it using https://example_domain.com and you should see the padlock in the address bar of your browser.
Step 5: Verify the SSL Certificate Auto-Renewal
The Certbot package takes care of a lot of things including automatic renewals of the SSL certificate. Task scheduling in Unix systems is handled by a utility called Cron. The tasks are set up using scripts stored in the directory /etc/cron.d
Certbot installs a renewal script in this location. Furthermore, Certbot installs a service called certbot.timer that runs the renewal script twice a day. The service will automatically renew any certificate that is left with about 30 days till expiration. To check the status of the service, enter the following command:
|
1 |
sudo systemctl status certbot.timer |
The output below confirms that the service is up and running:

Optionally, you can test the renewal process using the following command. The –dry-run flag is for simulation:
|
1 |
sudo certbot renew --dry-run |
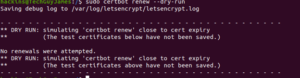
The above output indicates that there are no errors and everything will run as expected. For every renewal, Certbot automatically reloads Apache, hence there’s nothing required on your part. However, if it fails to renew, then an email will be sent to the address you provided with further instructions.
Conclusion
The focus of this tutorial was to guide you through installing an SSL certificate from Let’s Encrypt on your server. We have gone through installing Certbot – the SSL client for Let’s Encrypt installed the SSL certificate onto a domain and configured Apache to use the certificates and serve content over secure HTTPS.
Happy Computing!
- Removing Spaces in Python - March 24, 2023
- Is Kubernetes Right for Me? Choosing the Best Deployment Platform for your Business - March 10, 2023
- Cloud Provider of tomorrow - March 6, 2023
- SOLID: The First 5 Principles of Object-Oriented Design? - March 3, 2023
- Setting Up CSS and HTML for Your Website: A Tutorial - October 28, 2022