
CloudSigma is currently participating in a Horizon 2020 research and innovation project called COLA (Cloud Orchestration at the Level of Application). You can read a general overview of the COLA project here, or visit the official project website here.
CloudSigma’s primary contribution to the project is to manage the testbed and production of cloud infrastructure and to provide expertise into various cloud technologies with a particular focus on cloud orchestration. Additionally, as a part of our remit, we are supporting project partners from the Hungarian Academy of Sciences Institute for Computer Science and Control (SZTAKI). In the development of Occopus, a cloud orchestration tool which will be used when implementing the orchestration layer of MiCADO (Microservices-based Cloud Application-level Dynamic Orchestrator) services.
This is something we believe will be of great interest to many of our customers, especially developers deploying applications on CloudSigma.
What is Occopus?
Occopus is a cloud management and orchestration framework that provides automatic features for configuring and orchestrating distributed applications across virtualized infrastructures on single or multi-cloud systems. It can be used by application developers and application controllers to manage virtual infrastructures at deployment time and at runtime. Occopus provides a flexible and extensible way to build and manage single- or multi-cloud infrastructure applications, without any restrictions on the cloud provider or service-management components used during the process. It encompasses several software delivery approaches from custom and on-the-fly virtual machine construction (e.g. with Chef) to support user-built virtual machine images that are optimized for a particular purpose. It incorporates a unified infrastructure description model, which allows the system to determine the current state of the infrastructure and repair broken or missing functionalities.
How does it work?
Firstly, the Occopus cloud management platform works based on a descriptor that describes the services to be deployed in the cloud and the order of their deployment. It not only deploys the services in the cloud according to deployment order specified in the descriptor, but it also checks their availability and accessibility before deploying the next service. Furthermore, the descriptor can contain contextualization information for every deployable service, and based on that information Occopus carries out contextualization for the deployed services. As a result, after contextualization the services can reach each other, i.e. they can collaborate to realize a higher level service (the virtual infrastructure).
Sounds great, how do I get started?
A great place to start is SZTAKI’s dedicated Occopus website, where you will find excellent documentation, with many tutorials specifically compiled for different cloud stacks including CloudSigma. Moreover, we have reviewed and tested them relating to our own cloud platform, checked for inconsistencies and sent feedback to our friends at SZTAKI. As part of the wider testing, we have also identified potential problems, debugged several issues that occurred during testing and offered some suggestions for improvement. We are now happy to report that Occopus is running optimally and that we will include it in our partnership page within the CloudSigma WebApp, which is due to be announced very soon.
We repost below an example configuration of Occopus for CloudSigma for your convenience. The original post can be found here.
The following tutorial will show users how to collect the attributes for the resource section in the node definition through the web interface of the CloudSigma cloud. In the following example we will use the Zurich site of CloudSigma.
What steps should I follow?
A minimal version of the resource section for CloudSigma may look like as the example below:
resource:
type: cloudsigma
endpoint: https://zrh.cloudsigma.com/api/2.0
libdrive_id:
description:
cpu: 2000
mem: 2147483648
pubkeys:
–
#uuid_of_your_registered_public_key#
nics:
–
firewall_policy: #uuid_of_your_registered_firewall_policy#
ip_v4_conf:
conf: dhcp
contextualisation:
…
The example above assumes the following:
- Virtual machine will be started at the Zurich site, see
endpointattribute. To use an alternative location, select one from the CloudSigma documentation on API endpoints. - CPU speed will be 2000Mhz. See
cpuattribute. - Memory size will be 2GByte. See
memattribute. - VM will have a public ip address defined by dhcp. See
ip_v4_confattribute.
You need to collect the following 3 more attributes to complete the section:
Libdrive_idPubkeysfirewall_policy
libdrive_id
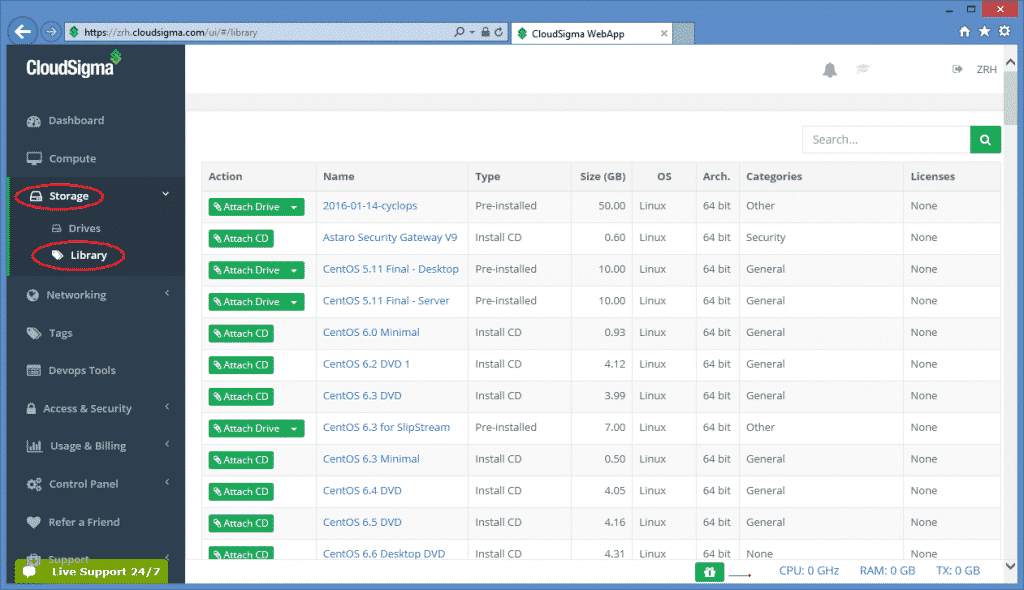
The value of this attribute is an uuid referring to a particular drive in the storage library on which an operating system is preinstalled usually. After login to the CloudSigma Web UI, select Storage/Library menu and you will see a full list of available drives below.
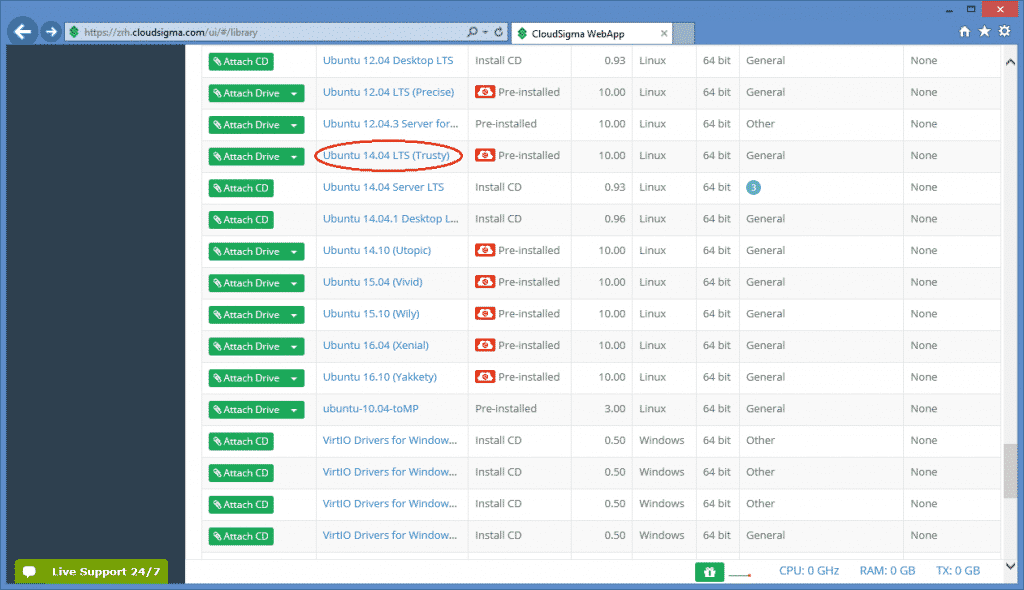
Assuming we need an Ubuntu 14.04 LTS(Trusty), scroll down and search for that drive.
After that, click on the item and copy its uuid from the address bar.
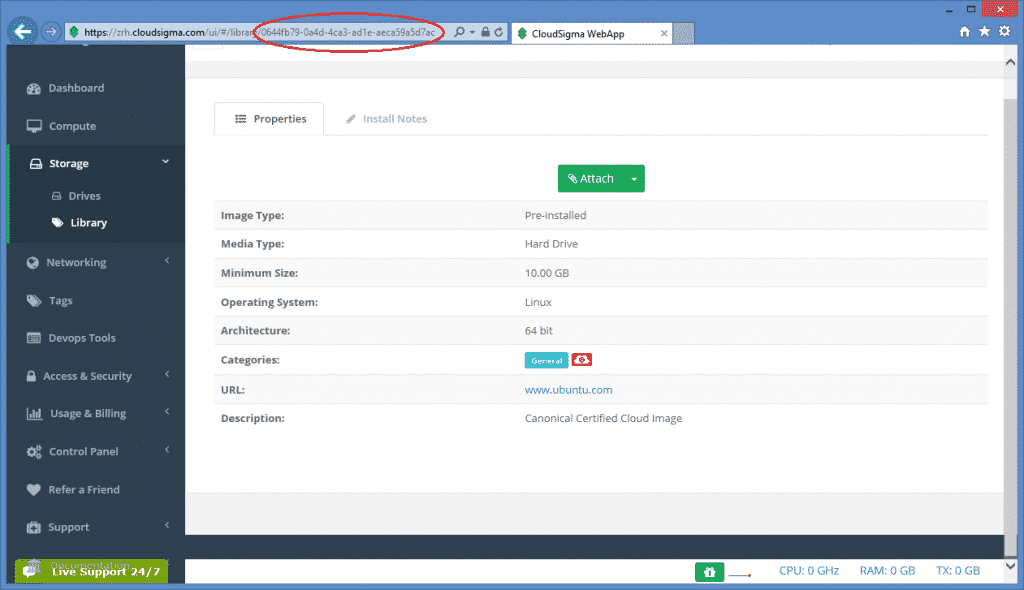
As a result, the libdrive_id attribute in the resource section will be 0644fb79-0a4d-4ca3-ad1e-aeca59a5d7ac referring to the drive containing an Ubuntu 14.04 LTS(Trusty) operating system.
pubkeys
The value of this attribute is the uuid referring to a particular public key registered under your CloudSigma account. To register a new ssh keypair, generated or upload one at page under the Access & Security/Keys Management menu. On this page you can see the list of registered keys and their uuid.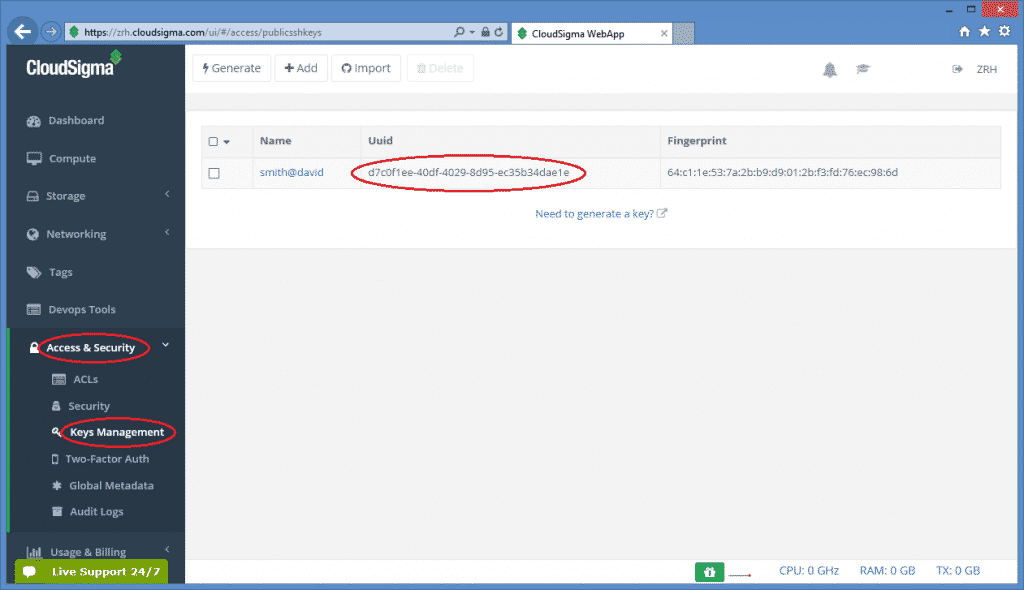
As a result, the pubkeys attribute in the resource section will be d7c0f1ee-40df-4029-8d95-ec35b34dae1e in this case referring to the selected key. Multiple keys can be specified, if necessary.
firewall_policy
So, the value of this attribute is the uuid referring to a particular firewall policy registered under your CloudSigma account. To register a new firewall policy, use the page under the Networking/Policies menu. On this page you can see the list of registered firewall policies as shown below:
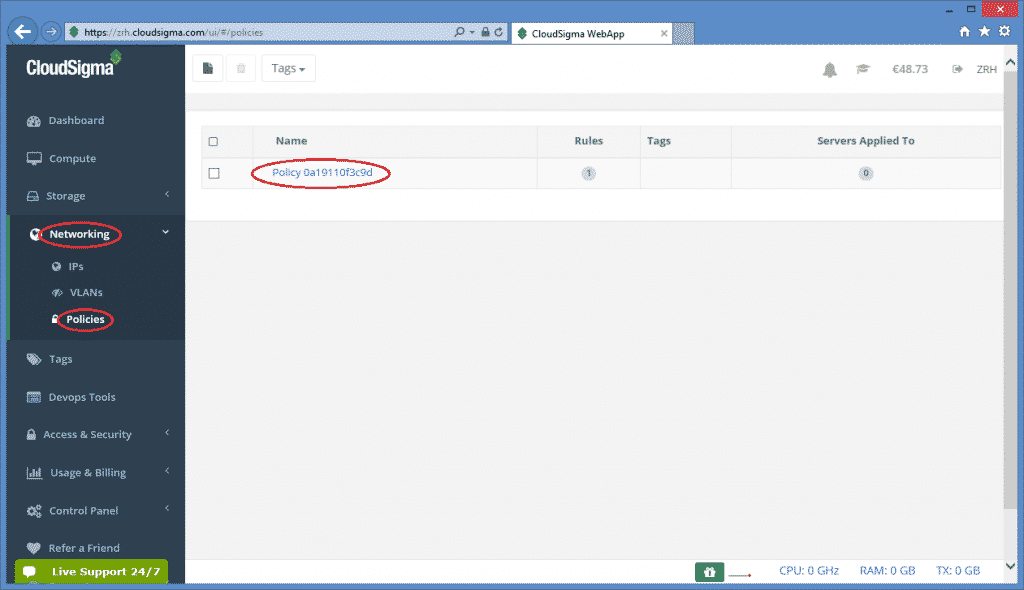
Next, click on the firewall policy to apply it on the VM, the new page will show the uuid of the policy.
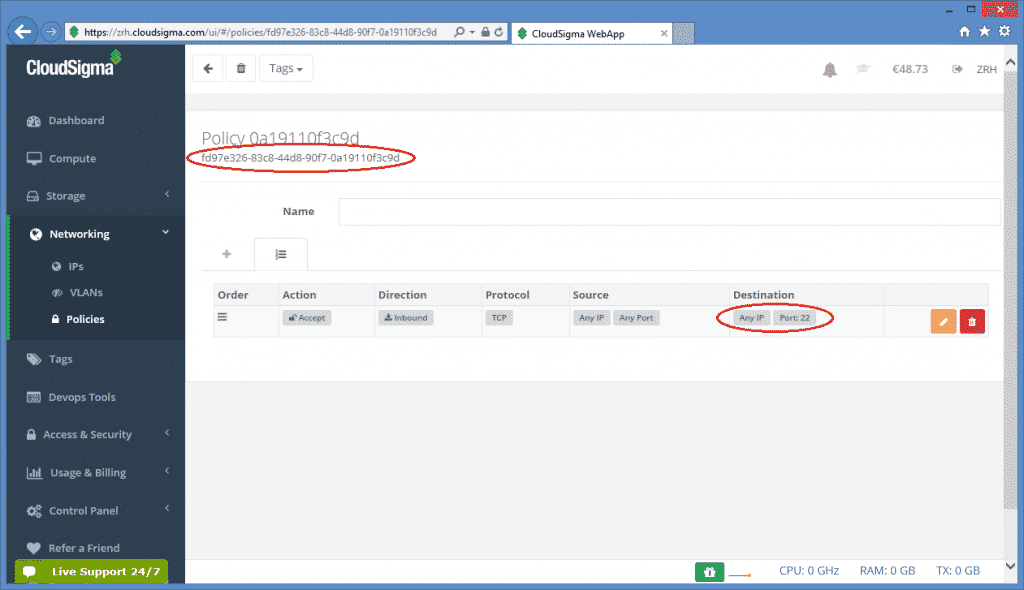
Therefore, the firewall_policy attribute in the resource section will be fd97e326-83c8-44d8-90f7-0a19110f3c9d in this case referring to the selected policy. Also, in this policy, port 22 is open for ssh. Thus, multiple policies can be specified, if necessary.
Was that it?
Finally, the resource section with the uuids collected in the example above will look like this:
resource:
type: cloudsigma
endpoint: https://zrh.cloudsigma.com/api/2.0
libdrive_id:
description:
cpu: 2000
mem: 2147483648
pubkeys:
–
d7c0f1ee-40df-4029-8d95-ec35b34dae1e
nics:
–
firewall_policy: fd97e326-83c8-44d8-90f7-0a19110f3c9d
ip_v4_conf:
conf: dhcp
contextualisation:
…
Important! Collect the uuids under your account instead of using the ones in this example!
Important! The resource section must follow YAML syntax! Because of this, you must make sure indentation is proper, avoid using #tab#, use spaces!
- Cloudification of Production Engineering for Predictive Digital Manufacturing - April 2, 2018
- OCCOPUS – a Powerful Interface for Orchestrating Infrastructure in the Cloud - January 4, 2018
- Improving Data-intensive Applications by Moving Data and Computation into Mixed Cloud/Fog Environments - November 15, 2017
- Cloud Orchestration at the Level of Application - November 10, 2017