

What is OAuth 2?
The IETF OAuth 2.0 is an authorization framework that aims to give third-party applications limited access to a given HTTP service. A good place to start when trying to learn about OAuth 2 is to go through its specifications. Thus, you can maximize the functionality you get out of it.
If you need to access certain resources or information from a particular user without gaining access to the entirety of the contents of their account or platform, you can do so with the help of OAuth 2. This authorization platform works with commonly used HTTP services across the globe, including the likes of Facebook and GitHub. Furthermore, it is able to create authorization flows for a multitude of platforms and digital devices. You can use it to gain access over the web/desktop or through mobile applications. In this guide, we will explore the various constituents and terms associated with OAuth 2. You will learn about the critical roles, their interactions, and flows. Moreover, you will learn about the different types of authorization grants and how to obtain them.
The Four Roles in OAuth
There are four critical roles on the OAuth platform. The interactions between them determine the various protocol flows in the ecosystem. These key players include the resource owner, the client, and the resource and authorization servers.
- The Client or The Third-Party Application
The client is an application on desktop or on mobile devices. The client is responsible for making the request to the resource server to grant you access to the protected information or resources on behalf of the resource owner.
- The Resource Owner or The User
The resource owner or the user, in turn, is the one with the power to authorize the limited access of the application into the protected assets. The access is usually limited to what kind of authorization has been granted by the resource owner.
- The Resource Server or The API
This is the server that is hosting the accounts and the protected assets that they contain. To give you the ability to be able to read or write over these resources, the resource server verifies the identity of the resource owner and provides access tokens to the client.
- The Authorization Server
The authorization server is where the resource owner approves or designs the request. This component, in certain cases, combines with the API server, but in larger systems, it can be a standalone role.
Understanding the Protocol Flow Among the OAuth Roles
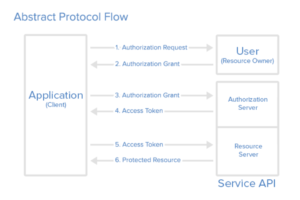
The above diagram summarizes the primary interactions between the various OAuth 2 roles. These interactions create the protocol flow within the system. Let’s take a look at the different chronological steps that take place within this flow. It is important to remember, however, that different grant types may have some differences in these interactions. We will explore this later on in the guide.
Step 1
First, the application has to send a request for authorization by the user to gain access to the protected resources.
Step 2
In case the user approves the authorization request, the application will receive it.
Step 3
Next, the application verifies its identity at the authorization server and submits a request to get an access token as well as the authorization grant.
Step 4
Once the identity of the application is verified and the grant is deemed acceptable, the application receives an access token to signify the completion of authentication and authorization.
Step 5
After that, the application sends a request to the resource server to gain access to the assets it is hosting by presenting the issued access token.
Step 6
The validity of the access token is confirmed and the API allows the application access to the resources within the bounds of the grant.
Registering Your Application
Now that you know the essential terms and flows associated with the OAuth 2 authorization framework, we will learn about how you can start using it for your own application. To begin with, you need to start by registering your application with the OAuth service. On the website for OAuth 2, you will find a developer or API section with the registration form. Next, you have to enter the name of your application, the website for your application, as well as the redirect or callback URL. This information ensures that users can return back to your website after they have approved or denied your request to gain authorization. After you register, you will receive your very own client credentials. Namely, a client identifier and a client secret:
The Client ID: This is the public aspect of your ID. This string identifies your app and builds authorization URLs for the user.
The Client Secret: The client secret, on the other hand, can only be accessed by the app and the API. It is a private string that verifies the identity of the app to the service API after a request for authorization and access to the user account is made.
Obtaining Authorization Grant
There are variations in the protocol flow depending on what kind of authorization grant is used by the application to gain access to the assets.
The Four Grant Types in OAuth 2
Below we will describe in detail the four types of authorization grants that the API can issue in OAuth 2.
- Authorization Code
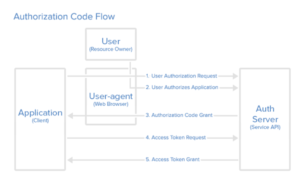
This type of grant requires the application to receive an authorization code from the resource server before the access token can be granted. It is the most secure and foolproof type of grant. A practical example of such a code grant can be seen in action when your application launches the browser to ask you to log in to your account on that server such as Facebook before you can proceed further. That is why the authorization code is best suited for server-side applications. This ensures a level of security that other types may not be able to grant because you are asked to enter your credentials on the resource server. This means it cannot be accessed by the application at all. Next, we will go over the process of how an authorization code type of grant works:
Step 1
First, the user receives an authorization code which is a string of code or a link as follows:
|
1 |
https://cloud.cloudsigma.com/v1/oauth/authorize?response_type=code&client_id=CLIENT_ID&redirect_uri=CALLBACK_URL&scope=read |
This link consists of various components. Each of them specifies a particular aspect of your request or authorization:
https://cloud.cloudsigma.com/v1/oauth/authorize refers to the API authorization endpoint
client_id=client_id verifies the client ID of the apparition
redirect_uri=CALLBACK_URL is the page to which the user is redirected after receiving the authorization code
granted response_type=code shows that you are requesting an authorization code type of grant
scope=read specifies the level of access you wish to acquire as a result of the authorization
Step 2
The next step is for the user to authorize the application. In order to do so, the user has to log into the service by using their credentials in the browser. The user should either allow or deny access to the application in regards to their account on that service.
Step 3
After that, the connection will redirect the user to the redirect URL that was previously mentioned upon registration. The authorization code will be a part of the redirect link:
|
1 |
https://dropletbook.com/callback?code=AUTHORIZATION_CODE |
Step 4
The next step is to request an access token from the API. Before you are granted one, your identity will be verified along with the authorization code. This is what your request would look like if you were to send it to the token endpoint of CloudSigma:
|
1 |
https://cloud.cloudsigma.com/v1/oauth/token?client_id=CLIENT_ID&client_secret=CLIENT_SECRET&grant_type=authorization_code&code=AUTHORIZATION_CODE&redirect_uri=CALLBACK_URL |
Step 5
Once the service validates your authorization, you will receive a response with the access token for the application that looks something like this:
|
1 |
{"access_token":"ACCESS_TOKEN","token_type":"bearer","expires_in":2592000,"refresh_token":"REFRESH_TOKEN","scope":"read","uid":100101,"info":{"name":"Mark E. Mark","email":"mark@thefunkybunch.com"}} |
You can take a look at the above steps as a sum with the help of this flowchart:
- Implicit
The implicit authorization grant is typically used when the app is present on the client as its code is in the browser. This means that there is no need to receive an authorization code first and the access token can be presented directly. This type of grant is usually for mobile and web applications that will be running on the user’s device. It is also useful for clients that do not need to protect their confidentiality. The major benefit of an implicit authorization grant is that it improves the responsiveness and speed of the application. On the other hand, it is important to consider its potential security limitations and vulnerabilities.
Next, we have prepared a step-by-step guide on how an implicit type of grant works in OAuth. You can follow the steps for a more holistic understanding on this flow map:

Step 1
First, you will work with an authorization link from the API that serves to request a token. This is in place of the request for an authorization code in the previous type of grant:
|
1 |
https://cloud.cloudsigma.com/v1/oauth/authorize?response_type=token&client_id=CLIENT_ID&redirect_uri=CALLBACK_URL&scope=read |
Step 2
Next, click on the link and verify your identity by logging in to the service with your credentials. Similar to the authorization code grant, you will have to authorize the application or deny it access to the account.
Step 3
In case the user allows access, the service will turn them to the redirect URL which will contain the access token, as seen in this example:
|
1 |
https://dropletbook.com/callback#token=ACCESS_TOKEN |
Step 4
Next, the user will retain the access token even when they follow the redirect URL.
Step 5
After that, the application will launch a webpage that will extract the access token from the retained URL.
Step 6
Finally, the user will execute the script on the webpage and the token will go to the application. Then, the application will receive authorization.
- Resource Owner Password Credentials
If there are certain applications that you own or come from sources you trust, you can use the resource owner password credentials authorization grant. It uses a simple username and password for logging in purposes. This means that the authorization server directly validates the credentials of the client and issues an access token in response.
First, you will enter your credentials and submit them to the application. Next, the application will communicate with the authorization server to obtain an access token:
|
1 |
https://oauth.example.com/token?grant_type=password&username=USERNAME&password=PASSWORD&client_id=CLIENT_ID |
If the app accepts your credentials, you will receive an access token for your application and it will be authorized.
- Client Credentials
You can typically use client credentials with applications having API access. This means that you do not need to have a user in the middle. This is especially useful when you need access to the protected resources on behalf of the application itself, such as to access your own backend storage. In such a scenario, you can use this authorization grant to get an access token from the authorization server by simply entering your client ID and client secret.
Enter and send your client ID and secret to the authorization server for verification:
|
1 |
https://oauth.example.com/token?grant_type=client_credentials&client_id=CLIENT_ID&client_secret=CLIENT_SECRET |
If they are valid, you will receive an access token and the authorization grant to access your own account resources.
Access Tokens Usage and Flow
Throughout this guide, we have repeatedly referred to ‘access tokens.’ By now, you probably have a basic understanding of what purpose they serve. They are critical to ensure that you have proof of your authorization. Overall, they act as keys that can get you through the locked door on your way to protected assets.
Access tokens also include restrictions that determine the scope of your activity and access to the data on any server. You can revoke them at any time. They have expiration dates to keep the server secure from unauthorized entries and usage. The token that you receive will give you limited access to the account resources based on the kind of authorization grant you used. A typical API request containing an access token looks like this:
|
1 |
curl -X POST -H "Authorization: Bearer ACCESS_TOKEN""https://api.cloudsigma.com/v2/$OBJECT" |
You can use the token to access the assets as long as it is active or not revoked. If it expires or is revoked, you will receive an ‘invalid_request’ error instead. One way to bypass the token expiration dilemma is to refresh the token flow. Also, you can issue a refresh token along with the original access token. It can be used to request renewed access to the resources even after the original token has expired. This is what it would look like after a request for a refresh token has been made:
|
1 |
https://cloud.cloudsigma.com/v1/oauth/token?grant_type=refresh_token&client_id=CLIENT_ID&client_secret=CLIENT_SECRET&refresh_token=REFRESH_TOKEN |
All in All
Finally, the kind of authorization grant you use depends on your specific requirements on a case to case basis. You have to take into consideration factors such as ease of access, trustworthiness, as well as security. They will determine what is of the utmost priority in a given situation. Overall, this guide aimed to equip you with essential knowledge about the workings and operation of the OAuth 2 framework.
Happy Computing!
- Removing Spaces in Python - March 24, 2023
- Is Kubernetes Right for Me? Choosing the Best Deployment Platform for your Business - March 10, 2023
- Cloud Provider of tomorrow - March 6, 2023
- SOLID: The First 5 Principles of Object-Oriented Design? - March 3, 2023
- Setting Up CSS and HTML for Your Website: A Tutorial - October 28, 2022