
Introduction
One of the biggest advantages of using Linux is the plethora of helpful utilities it provides. The in-program features are usually sufficient for most programmers to do their work. This means that most of the time, you will not need to download external programs and software. The built-in tools will provide you enough utility. Among these helpful features is the netcat utility.
When it comes to the world of networking tools, netcat is something of an overpowered weapon. It is an incredibly versatile command that you can use for multiple purposes. For example, you can use this single tool to monitor, test, as well as transfer all kinds of files and data across your system’s connections. In this guide, we will explore how to perform all of these actions on a VPS using netcat.
Finding Netcat
Netcat is typically available on all modern Linux distributions. Meaning you most likely have it already and do not need to go out of your way to install it. In our tutorial, we will be using the Ubuntu 12.04 VPS. You can install your own Ubuntu server by following our tutorial. Ubuntu normally comes with the BSD variant of netcat utility. Keep in mind that if you have another version, it may work a little differently.
Going Over the Basic Syntax
We begin by learning about the general syntax that works in the netcat utility. You can operate netcat by starting a TCP connection. The connection has to be initiated to a remote host. Here is the basic syntax for netcat:
|
1 |
netcat [options] host port |
This command will try to launch a TCP connection to a remote host. Which host it connects to depends on the port number you specify in the command. The connection will be unencrypted. As you can see, this command works similarly to the way that the telnet command works.
On the other hand, you can also initiate a UDP collection. To send a UDP packet instead of TCP, you have to use the -u option. This is what it would look like:
|
1 |
netcat -u host port |
If you wish, you can also specify a range of ports. To do this, you need to put a dash between the first and the last port. Here is an example:
|
1 |
netcat host startport-endport |
You can add more flags to this as well. Another thing to note is that you can use netcat and nc interchangeably. They will launch you into the same command, meaning they are each other’s aliases.
Using Netcat for Port Scanning
To begin with, let’s explore one of the most common uses of netcat. We will figure out how to use it as a port scanner. In most situations, you are better off using a tool like nmap. However, if you just need to perform simple port scans, then netcat is useful. It can help you identify open ports with ease.
To use netcat as a port scanner, you need to mention the range of ports. You will do this using the -z option. Thus, the system will scan the range of ports instead of attempting a connection. Let’s say we want to scan port 1 till port 1000:
|
1 |
netcat -z -v domain.com 1-1000 |
In addition to the -z command, we have also used the -v option. The latter enables us to give more information to the command. It allows us to be more ‘verbose.’
You will get an output like this in return:
The output shows a lot of information for each individual port. You know the connection status of each port. On the other hand, you can use the IP address in place of the domain name if you know it. This makes the process much faster. Here is an example:
|
1 |
netcat -z -n -v 198.51.100.0 1-1000 |
We used the -n flag to indicate that the system does need to use DNS to resolve the IP address.
Typically, the return messages get sent to standard error. To filter the results out quicker, you can redirect them to standard out. We will use the 2>&1 bash syntax to do this. Subsequently, we shall filter the results using grep. Let’s apply this to our example:
|
1 |
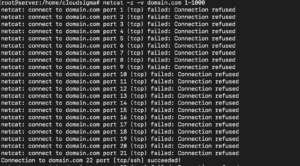
netcat -z -n -v 198.51.100.0 1-1000 2>&1 | grep succeeded |
The output will look similar to this:
![]()
The output shows that only port 22 is open for connection in the given range. Port 22 happens to be the traditional SSH port.
Communication through Netcat: How Does it Work?
Next, we will see how you can use netcat to send TCP and UDP packets. Not only that, but it can receive packets on various ports as well. As a result of this capability, you can use two netcat instances to create a client-server relationship. In the beginning, you will determine the client and the server. After the initial configuration, both clients can send and receive packets in either direction.
Naturally, you will have to configure netcat on one system to listen for connections on one port. To do this, you have to use the -l parameter. With this, you can select your port of choice like this:
|
1 |
netcat -l 4444 |
Now TCP on this machine will be listening for connections on port 4444. A point to note is that if you are a non-root or regular user, you will not be able to access ports under 1000.
Next, you have to configure a second machine to establish a connection. You will use the same port number and indicate a specific domain name like this:
|
1 |
netcat domain.com 4444 |
Running this command will not give you any output. It will, however, establish the connection. This means you can start sending messages from either of the servers to the other one. To do this, all you have to do is type the message and then press ENTER. The message will show on both screens.
Once you are done, you can close the TCP connection by pressing CTRL+D.
Can you Send Files Using Netcat?
Next, we will show you how you can send files through netcat. With a TCP connection, you can send messages as well as other kinds of data. To start off, you must select one machine to listen for connections. However, instead of typing out the information in the command, we will place it in a file like this:
|
1 |
netcat -l 4444 > received_file |
On the other machine, you will have to make a new text file. Here is the command to use:
|
1 |
echo "Hello, this is a file" > original_file |
To transmit the file, you will use it as an input for the connection on the computer that is listening:
|
1 |
netcat domain.com 4444 < original_file |
The other computer will show a new file called ‘receieved_file.’ It will contain all the information that we typed up:
|
1 |
cat received_file |
 You can use this utility and turn it into a file transfer program. Let’s say you want to transfer the contents of a directory. We will do it by making an unnamed tarball which we will transfer to the system and unpack into the remote directory. On the other machine, we need to get ready to receive the file. We know that we will need to unzip and extract it. To do this, issue this command:
|
1 |
netcat -l 4444 | tar xzvf - |
The dash indicates that the tar will operate on standard input. This comes from the netcat on the initial server when we established the initial connection.
Finally, we can put the contents of the entire directory in a tarball and send it through netcat like this:
|
1 |
tar -czf - * | netcat domain.com 4444 |
The dash in the tar command shows that we are telling the system to tar and zip the directory contents. It also instructs it to write the result to standard output. The file will go through the TCP connection to the other end. The receiving server will decompress and save it to the current remote directory.
Just like this, you can transfer other kinds of data through netcat as well. Many people use the dd command to image disks and transfer them. For another way to transfer data and files take a look at our tutorial showing how to ensure security while transferring files with SFTP.
Using Netcat as a Web Server
Another useful function of netcat is that you can use it to test your pages. Let’s say we are using a server to make an HTML file like this one:
|
1 |
nano index.html |
This is the HTML code that the file contains:
|
1 2 3 4 5 6 7 8 9 10 |
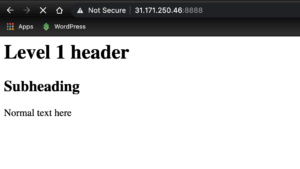
<html> <head> <title>Test Page</title> </head> <body> <h1>Level 1 header</h1> <h2>Subheading</h2> <p>Normal text here</p> </body> </html> |
Enter this into the file, then save and close it. Typically, port 80 is the default web port. As a regular, non-root user, we will select port 8888. Assuming that you want to serve and check the page once, you shall use this command:
|
1 |
printf 'HTTP/1.1 200 OK\n\n%s' "$(cat index.html)" | netcat -l 8888 |
In order to visualize the content of the file, go to your browser. Visit the following:
|
1 |
http://server_IP:8888 |
You will be able to see the page which you coded with the HTML file:
Once you get the page, the netcat connection will close. This means that refreshing the page will give you an error instead of the content. This is because we configured it to serve the page one time only. If you want to continue receiving connections to see the page indefinitely, you will use a different code:
|
1 |
while true; do printf 'HTTP/1.1 200 OK\n\n%s' "$(cat index.html)" | netcat -l 8888; done |
Here, we wrapped the last command in an infinite loop. If you want to stop the loop, all you have to do is type CTRL-C. Now you can continue viewing your page and its rendering even after the first connection closes. However, this is the maximum functionality you can extract from using the netcat utility as a web server. Do not try to use it to serve actual websites as it does not provide any security. Instead, you can take a look at our tutorials on how to install web server software such as Nginx or Apache.
Conclusion
In this tutorial, we covered the netcat utility and explored its versatility as a tool on Ubuntu. As we covered in the above sections, you can use it for communication, data transfer, and page serving purposes. It works perfectly for quick interactions between servers through TCP/UDP connections. It is a very helpful feature for a lot of base-level functionality and diagnostics.
Happy Computing!
- Removing Spaces in Python - March 24, 2023
- Is Kubernetes Right for Me? Choosing the Best Deployment Platform for your Business - March 10, 2023
- Cloud Provider of tomorrow - March 6, 2023
- SOLID: The First 5 Principles of Object-Oriented Design? - March 3, 2023
- Setting Up CSS and HTML for Your Website: A Tutorial - October 28, 2022