
If you have been developing an application using AngularJS, you are probably aware of HTTP interceptors. However, these HTTP interceptors were not available in Angular until version 4.3. In this tutorial, we will be using interceptors in Angular to handle HTTP requests and responses, and process errors.
Prerequisites
Angular applications use Node.js runtime. To complete this tutorial, you will need to have Node.js installed on your machine. Fortunately, Node.js is quite easy to install. We have a complete guide on How to Install Node.js on Ubuntu 18.04 here.
In addition, it will be beneficial for you to know Angular and to be familiar with using Angular CLI to build Angular applications. We will be using Node v8.12.0 and npm v6.4.1.
Step 1: Create Angular App
To begin with, let’s create a new Angular app using Angular CLI. We will name our application
Angular-Interceptor. Run the command below to create the app:
|
1 |
npx @angular/cli@7.0.6 new Angular-Interceptor |
You will be asked for some choices. Enter the default values and go ahead:

Next, navigate to the application directory, and run the below command to start the application:
|
1 |
npx ng serve --open |

Then, view http://localhost:4200 in your browser to see the app. You’ve now configured a basic Angular app.
Step 2: Style Angular App
Here we will be styling our Angular app using Angular Material. To install Angular Material in your project, run the below command:
|
1 |
npm install --save @angular/material@7.0.4 @angular/cdk@7.0.4 @angular/animations@7.0.4 |
This will install
@angular/material,
@angular/cdk, and
@angular/animation in your project. Next, we will set up an animation in the project. Add
BrowserAnimationsModule in your
src/app/module.ts file:
|
1 2 3 4 5 6 7 8 9 10 11 12 13 |
... import { BrowserAnimationsModule } from '@angular/platform-browser/animations'; @NgModule({ ... imports: [ ... BrowserAnimationsModule ], ... }) export class AppModule { } |
We will be using the Dialog component from Angular Material. To use the Dialog component, we have to import
MatDialogModule in the
src/app/app.module.ts file:
|
1 2 3 4 5 6 7 8 9 10 11 12 13 |
... import { MatDialogModule } from '@angular/material'; @NgModule({ ... imports: [ ... MatDialogModule ], ... }) export class AppModule { } |
To make the UI more attractive, let’s add
indigo-pink.css to your
styles.scss file:
|
1 |
@import "~@angular/material/prebuilt-themes/indigo-pink.css"; |
Step 3: Build Your Angular Interceptor
Under the app folder, we will create a new folder called interceptor. Inside this newly created folder, create a new httpconfig.interceptor.ts file.
We need to import some dependencies in our httpconfig.interceptor.ts to make our interceptor work. These dependencies are HttpInterceptor, HttpRequest, HttpResponse, and HttpHandler, HttpEvent, HttpErrorResponse.
Our
httpconfig.interceptor.ts file will look like below after import:
|
1 2 3 4 5 6 7 8 9 10 11 12 13 |
import { Injectable } from '@angular/core'; import { HttpInterceptor, HttpRequest, HttpResponse, HttpHandler, HttpEvent, HttpErrorResponse } from '@angular/common/http'; import { Observable, throwError } from 'rxjs'; import { map, catchError } from 'rxjs/operators'; |
Next, create a class
HttpConfigInterceptor and implement the interface
HttpInterceptor. This is an example:
|
1 2 3 4 5 6 7 |
@Injectable() export class HttpConfigInterceptor implements HttpInterceptor { intercept(request: HttpRequest<any>, next: HttpHandler): Observable<HttpEvent<any>> { // ... } } |
Add the below code to the
httpconfig.interceptor.ts file:
|
1 2 3 4 5 6 7 8 9 10 11 12 13 14 15 16 17 18 19 20 21 22 23 24 25 26 27 |
... @Injectable() export class HttpConfigInterceptor implements HttpInterceptor { intercept(request: HttpRequest<any>, next: HttpHandler): Observable<HttpEvent<any>> { const token: string = localStorage.getItem('token'); if (token) { request = request.clone({ headers: request.headers.set('Authorization', 'Bearer ' + token) }); } if (!request.headers.has('Content-Type')) { request = request.clone({ headers: request.headers.set('Content-Type', 'application/json') }); } request = request.clone({ headers: request.headers.set('Accept', 'application/json') }); return next.handle(request).pipe( map((event: HttpEvent<any>) => { if (event instanceof HttpResponse) { console.log('event--->>>', event); } return event; })); } } |
To make it work, we need to import
httpconfig.interceptor.ts in our
app.module.ts file:
|
1 2 3 4 5 6 7 8 9 10 11 12 13 |
... import { HttpClientModule, HTTP_INTERCEPTORS } from '@angular/common/http'; ... import { HttpConfigInterceptor } from './interceptor/httpconfig.interceptor'; @NgModule({ ... imports: [ ... HttpClientModule ], ... }) |
Add
HttpConfigInterceptor to
providers. We will set
multi: true to handle multiple interceptors:
|
1 2 3 4 5 6 7 8 9 10 |
... @NgModule({ ... providers: [ ... { provide: HTTP_INTERCEPTORS, useClass: HttpConfigInterceptor, multi: true } ], ... }) ... |
In the next section, we shall create our service to handle errors.
Step 4: Service for Handling Errors
Here we will be writing code to handle errors. We will need to capture the errors and appropriately display them to the end users. In a nutshell, below are the steps we will be following:
- Create a folder called error-dialog in the app folder.
- Create a service for errors called errorDialogService in a file called errordialog.service.ts.
- Add the below code in the errordialog.service.ts :
|
1 2 3 4 5 6 7 8 9 10 11 12 13 14 15 16 17 18 19 20 21 22 23 24 25 26 27 |
import { Injectable } from '@angular/core'; import { MatDialog, MatDialogRef, MAT_DIALOG_DATA } from '@angular/material'; import { ErrorDialogComponent } from './errordialog.component'; @Injectable() export class ErrorDialogService { public isDialogOpen: Boolean = false; constructor(public dialog: MatDialog) { } openDialog(data): any { if (this.isDialogOpen) { return false; } this.isDialogOpen = true; const dialogRef = this.dialog.open(ErrorDialogComponent, { width: '300px', data: data }); dialogRef.afterClosed().subscribe(result => { console.log('The dialog was closed'); this.isDialogOpen = false; let animal; animal = result; }); } } |
|
1 2 3 4 5 6 7 8 9 10 11 12 |
import { Component, Inject } from '@angular/core'; import { MAT_DIALOG_DATA } from '@angular/material'; @Component({ selector: 'app-root', templateUrl: './errordialog.component.html' }) export class ErrorDialogComponent { title = 'Angular-Interceptor'; constructor(@Inject(MAT_DIALOG_DATA) public data: string) {} } |
|
1 2 3 4 5 6 7 8 9 10 |
<div> <div> <p> Reason: {{data.reason}} </p> <p> Status: {{data.status}} </p> </div> </div> |
To summarize, let’s list the steps below:
- Start with importing errordialog.service.
- Then, we will add the constructor for errorDialogService.
- We will also add the code to handle the error response using catchError and throwError.
- Import errordialog.service and errordialog.component into the AppModule.
After we have done the changes, two files will be modified:
app.module.ts and
httpconfig.interceptor.ts:
|
1 2 3 4 5 6 7 8 9 10 11 12 13 14 15 16 17 18 |
... import { ErrorDialogComponent } from './error-dialog/errordialog.component'; ... import { ErrorDialogService } from './error-dialog/errordialog.service'; ... @NgModule({ ... declarations: [ ... ErrorDialogComponent ], ... providers: [ ... ErrorDialogService ], entryComponents: [ErrorDialogComponent], }) |
|
1 2 3 4 5 6 7 8 9 10 11 12 13 14 15 16 17 18 19 20 21 22 23 24 25 26 |
... import { ErrorDialogService } from '../error-dialog/errordialog.service'; ... @Injectable() export class HttpConfigInterceptor implements HttpInterceptor { constructor(public errorDialogService: ErrorDialogService) { } intercept(request: HttpRequest<any>, next: HttpHandler): Observable<HttpEvent<any>> { ... return next.handle(request).pipe( map((event: HttpEvent<any>) => { if (event instanceof HttpResponse) { console.log('event--->>>', event); } return event; }), catchError((error: HttpErrorResponse) => { let data = {}; data = { reason: error && error.error && error.error.reason ? error.error.reason : '', status: error.status }; this.errorDialogService.openDialog(data); return throwError(error); })); } } |
Step 5: Creating Sample Services
In this step we will create two services as a sample:
- Login API
- Customer Detail API
Create a new folder called
services in the
src folder. Next, inside this newly created folder, create a new file called
login.service.ts, and add two functions:
|
1 2 3 4 5 6 7 8 9 10 11 12 13 14 15 16 |
import { Injectable } from '@angular/core'; import { HttpClient } from '@angular/common/http'; @Injectable() export class LoginService { constructor(private http: HttpClient) { } login(data) { data = { email: 'admin', password: 'admin' }; return this.http.post('http://localhost:3070/api/login', data); } getCustomerDetails() { return this.http.get('http://localhost:3070/customers/details'); } } |
Step 6: Calling the HTTP Client Service
Finally, we are at the last part of our tutorial. We shall be calling our HTTP service from the
app.component.ts file. Add the two
LoginService functions to
app.component.ts. Call login API with onload and the customers/details with
onclick:
|
1 2 3 4 5 6 7 8 9 10 11 12 13 14 15 16 17 18 19 20 21 22 |
import { Component } from '@angular/core'; import { LoginService } from './services/login.service'; @Component({ selector: 'app-root', templateUrl: './app.component.html', styleUrls: ['./app.component.scss'] }) export class AppComponent { title = 'Angular-Interceptor'; constructor(public loginService: LoginService) { this.loginService.login({}).subscribe(data => { console.log(data); }); } getCustomerDetails() { this.loginService.getCustomerDetails().subscribe((data) => { console.log('----->>>', data); }); } } |
Now we have to add a UI element in
app.component.html, so that the user can click it:
|
1 |
<h2 (click)="getCustomerDetails()">Get customer details</h2> |
To finish, you will need to include the
LoginService to
providers in
AppModule:
|
1 2 3 4 5 6 7 8 9 10 11 12 |
... import { LoginService } from './services/login.service'; ... @NgModule({ ... providers: [ ... LoginService ] ... }) |
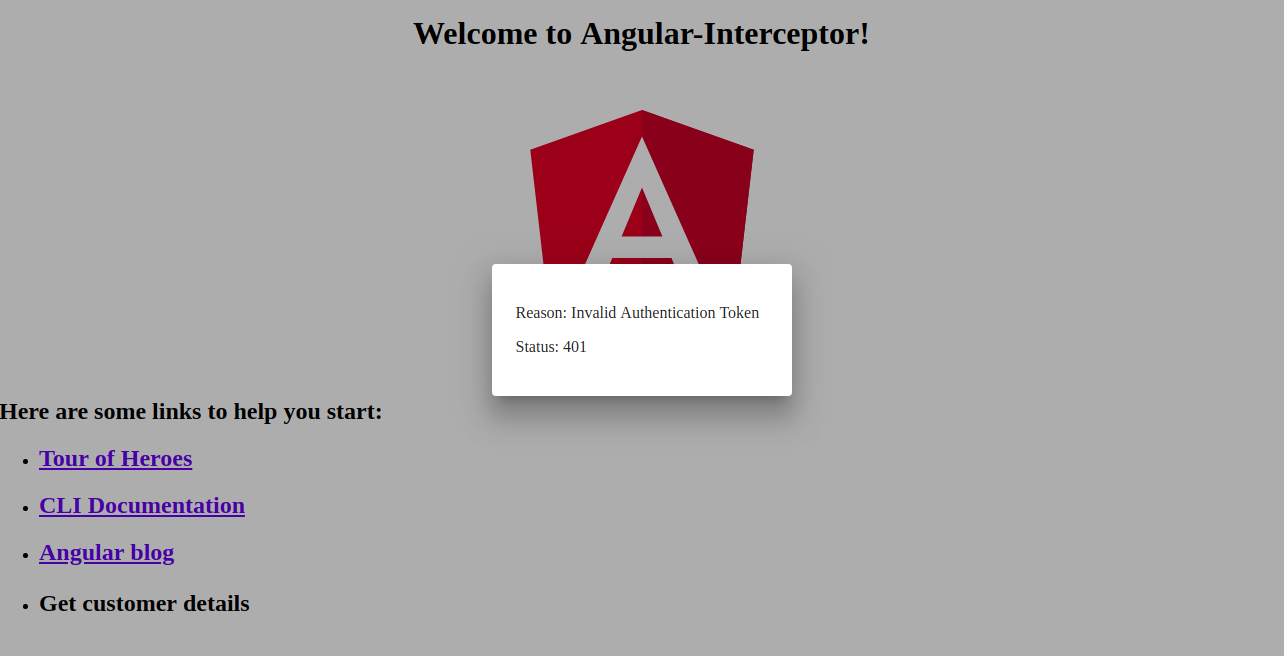
Below, find a screenshot of the error handler dialog:
Conclusion
In this tutorial, we learned how to handle HTTP requests and responses using Angular interceptors. We also learned how to handle errors using dialog in Angular Material.
Angular apps use Node.js as their runtime. If you want to learn more about Node.js and how to deploy Node.js applications on Docker, check out our How to Deploy a Node.js (Express.js) App with Docker on Ubuntu 20.04 guide. You can also check out How To Perform Production Tasks On Ubuntu 20.04 With Node.js and Installing Node.js on CentOS 8: a Complete Guide.
Happy Computing!
- How to Deploy WordPress with Persistent Volume on Kubernetes Cluster - March 17, 2023
- Deploying Applications on Kubernetes Using Argo CD and GitOps - October 26, 2022
- Using Node.js Modules with npm and package.json: A Tutorial - October 6, 2022
- Using Ansible to Install and Configure WordPress with LAMP on Ubuntu - September 23, 2022
- Creating Views in the Django Web Application Framework - September 22, 2022