


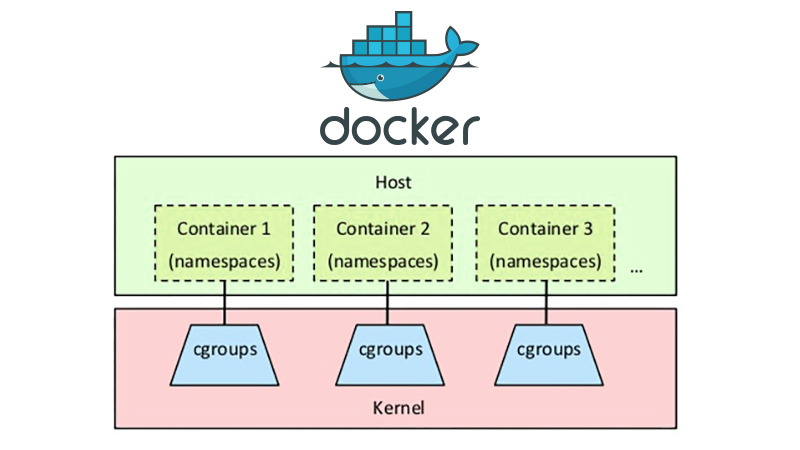
Last month I spoke at ApacheCon about Cgroups. It appears as very few Linux users (including yours truly until not too long ago) are familiar with Cgroups and their power. This is a pity, because Cgroups are very powerful, and allows you to allocate resources on your servers in a far more granular fashion than any other tool available in the Linux toolkit. Moreover, it’s built directly into the kernel and comes out-of-the-box with most Linux distributions.
In this article I will cover how to use Cgroups with Docker as something of a follow-up to another talk I gave at the Docker Meetup in Austin, Texas.
This article does requires some basic understanding of Cgroups. If you’re completely new to Cgroups, I recommend that you look over my slide deck from ApacheCon as well as the resources at the end. Don’t worry though, we won’t dive too deep. If you just skim over the slide deck, you should be able to pick up on the basic concepts.
Docker and Cgroups
Docker comes with two different drivers: LXC and libcontainer. The LXC driver is the legacy driver, and libcontainer is the new and default driver. In most cases, libcontainer is the preferred driver, as that’s where the innovation happens (for instance docker exec doesn’t work with the LXC driver).
It is however important to note that there are two different drivers, as not all Cgroup capabilities have been ported to libcontainer yet (or at least exposed to Docker). When using the LXC driver, you simply pass on LXC arguments directly, whereas with libcontainer there are explicit Cgroup policy arguments exposed to Docker. You will need to explicitly set a driver when you launch the Docker daemon, so you cannot run the two drivers simultaneously.
Here’s an example of how you can check:
[bash light=”true”] # With the LXC driver$ docker run -d –name=’lxc_test’ \
–lxc-conf="lxc.cgroup.cpu.shares=50" \
busybox
# With the libcontainer driver
$ docker run -d –name=’libcontainer_test’ \
–cpu-shares=50 \
busybox
[/bash]
Here’s an overview of some of the Cgroup features and how they map between the two drivers:
| Feature | Libcontainer | LXC |
|---|---|---|
| Relative CPU share | -c, –cpu-shares | –lxc-conf=”lxc.cgroup.cpu.shares” |
| Lock to a CPU core | –cpuset-cpus | –lxc-conf=”lxc.cgroup.cpuset.cpus” |
| Limit memory | -m, –memory | –lxc-conf=”lxc.cgroup.cpuset.mems” |
LXC
If you want to use the LXC driver for Docker, you will first need to enable it. The method for doing this will differ depending on your Linux distribution, but here are the instructions on how to enable the LXC driver on Ubuntu 14.04.
As mentioned above, you are giving up on a number of features when doing this. Hence, unless you really need a functionality that isn’t yet exposed in Docker using libcontainer, you should really stick with the default driver.
Some useful Cgroup policies that are yet to be exposed in libcontainer include I/O throttling (covered in the presentation deck), which can be very handy for certain applications.
If you have decided to use the LXC driver, adding arguments are straight forward. All you need to do is to add the argument --lxc-conf and pass in the Cgroup policy that you’d like to set.
Libcontainer
As you can see in the table above, the basic Cgroup policies are already exposed in the current version of Docker (1.6 as of writing this).
Using these policies is very simple. If you for instance want to lock down a Docker container to the first CPU core, you’d append --cpuset-cpus=0 to your docker run command.
You can also use the --cgroup-parent argument with libcontainer and manually set more granular resource constraints. You would then map it to that group using argument.
Demo: Docker with Cgroups
In the screencast below, we’ll use two Docker containers (‘low_prio’ and ‘high_prio’). We use the ‘busybox’ base container and run md5sum /dev/urandom to simulate a CPU hungry process. By default, this would consume all available CPU resources. However, we’ll apply two Cgroup policies to manage the resources. First we use ‘cpuset.cpus’ to lock down the containers to the same CPU core (core 0).
Next we use ‘cpu.shares’ to assign a relative CPU share. We give the ‘low_prio’ container a value of 20 and ‘high_prio’ a value of 80. This means that 20% of the CPU will be allocated to the ‘low_prio’ container, and 80% of the CPU will be allocated to the ‘high_prio’ container. Please note however that the relative share is an arbitrary scale (we could as well have used 2 and 8 as values).
After we’ve demonstrated that the resource management indeed works, we launch the same set of containers without any Cgroup policies to see how they behave.
As a reference, here are the commands used to launch the containers.
[bash light=”true”] $ docker run -d \–name=’low_prio’ \
–cpuset-cpus=0 \
–cpu-shares=20 \
busybox md5sum /dev/urandom
$ docker run -d \
–name=’high_prio’ \
–cpuset-cpus=0 \
–cpu-shares=80 \
busybox md5sum /dev/urandom
[/bash]
Summary
If you’re managing multiple Docker containers on the same host, using Cgroups to manage the resources between the containers makes a lot of sense. For instance, perhaps you have some background processing tasks running in one container, and another container serving user content. In that case, you can use your newfound knowledge to ensure that the you prioritize the user facing containers prior to the background tasks.
- Manage Docker resources with Cgroups - May 12, 2015
- Docker, Cgroups & More from ApacheCon 2015 - April 30, 2015
- How to setup & optimise MongoDB on public cloud servers - March 24, 2015
- Presentation deck from CloudExpo Europe - March 17, 2015
- CoreOS is now available on CloudSigma! - March 10, 2015