
Introduction
On Ubuntu 20.04, you can use tools like Postfix, Dovecot, MySQL, and SpamAssassin to configure a mail server. The process can be confusing for someone attempting it for the first time. This tutorial aims to simplify the mail server configuration process for you with detailed steps. At the end of this tutorial, you will know how to add virtual domains, users, and aliases. Ultimately, you will make your virtual server more secure from spam hubs.
Prerequisites
Before you start with the mail server configuration, there are some prerequisites to take care of. First, make sure that your virtual private server has a domain that is forwarding to your server. You also need to install and configure MySQL. In addition, you need to have a user with root privileges granted and install an SSL certificate. Finally, make sure that your FQDN is configured and identified.
If you install your packages as the root user, you will have all of the privileges. That is why we recommend it:
|
1 |
sudo -i |
Enter your user’s password. At this point, you will see the $ symbol change to #. Next, let’s explore the different aspects of configuration one by one.
Step 1: Installing Packages
We will start off by learning how to install packages:
|
1 |
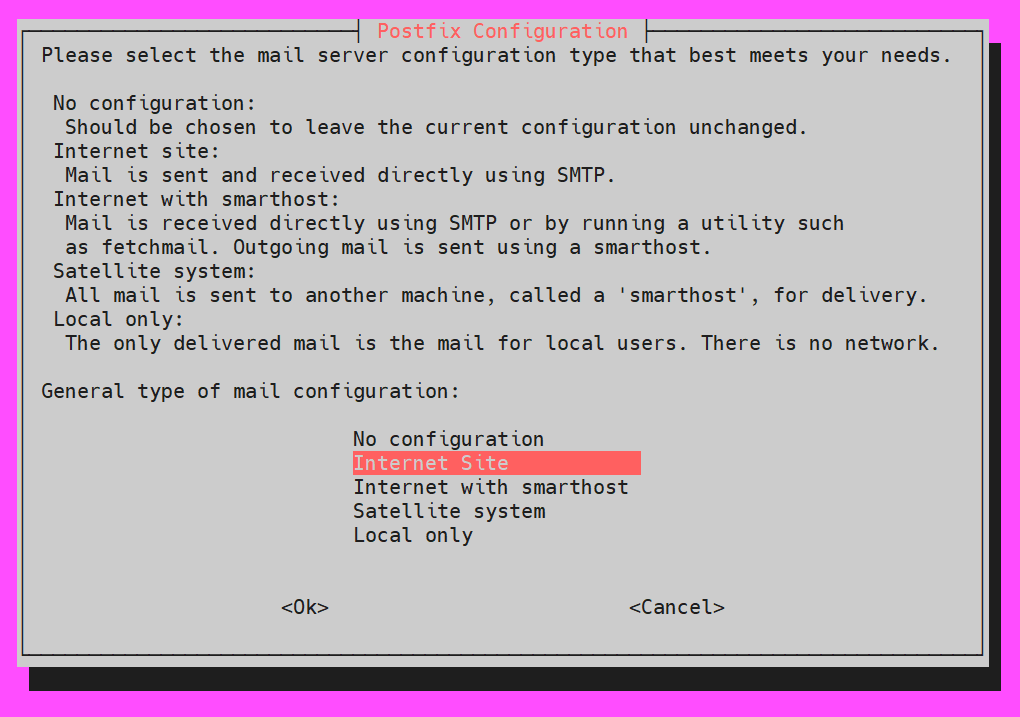
apt-get install postfix postfix-mysql dovecot-core dovecot-imapd dovecot-lmtpd dovecot-mysql |
When the Postfix configuration pops up, select the Internet Site:
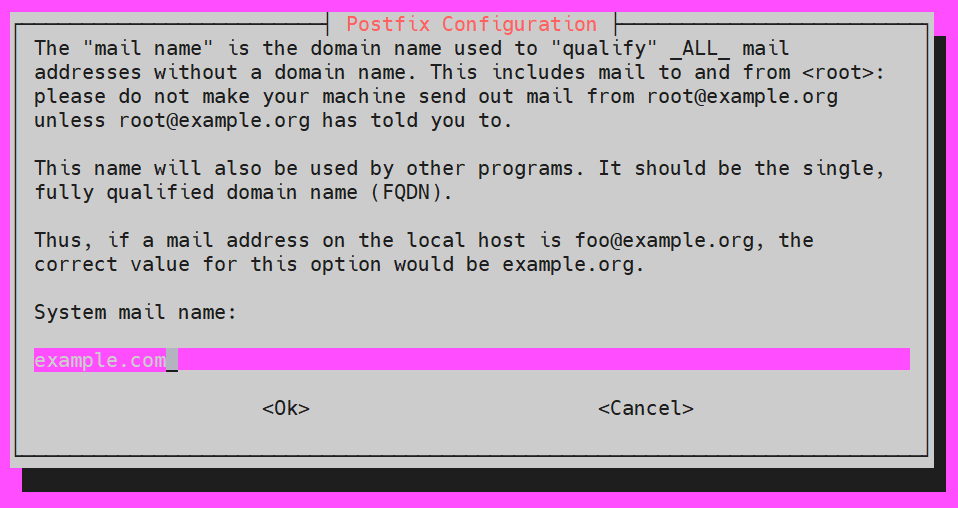
You will be asked about the System mail name. Here, you can use the FQDN or the main domain:
Step 2: Creating a MySQL Database, Virtual Domains, Users, and Aliases
Next, once all the packages are installed, we will move on with the configuration. Our goal is to configure three tables. One will be for domains, one for users, and one for aliases. These will be housed in a MySQL database that we will create.
Let’s say we want to name our database servermail. You are free to use the name of your choice. Here is how we will create it:
|
1 |
mysqladmin -p create servermail |
You have to log in as the MySQL root user:
|
1 |
mysql -u root -p |
Then, enter your password. A successful attempt will show this as a result:
|
1 |
mysql > |
Next, we will make a new user for mail authentication in particular. Give the SELECT permission like so:
|
1 |
mysql > GRANT SELECT ON servermail.* TO 'usermail'@'127.0.0.1' IDENTIFIED BY 'mailpassword'; |
After that, reload your MySQL privileges to apply the permissions successfully:
|
1 |
mysql > FLUSH PRIVILEGES; |
Next, we will use our database to make the tables and enter the data:
|
1 |
mysql> USE servermail; |
We will make individual tables for the specific domains that are recognized as authorized domains:
|
1 2 3 4 5 |
CREATE TABLE `virtual_domains` ( `id` INT NOT NULL AUTO_INCREMENT, `name` VARCHAR(50) NOT NULL, PRIMARY KEY (`id`) ) ENGINE=InnoDB DEFAULT CHARSET=utf8; |
The goal is to introduce users to the table. Hence, we will be adding the relevant email address and password. Keep in mind that you have to associate each user with a domain:
|
1 2 3 4 5 6 7 8 9 |
CREATE TABLE `virtual_users` ( `id` INT NOT NULL AUTO_INCREMENT, `domain_id` INT NOT NULL, `password` VARCHAR(106) NOT NULL, `email` VARCHAR(120) NOT NULL, PRIMARY KEY (`id`), UNIQUE KEY `email` (`email`), FOREIGN KEY (domain_id) REFERENCES virtual_domains(id) ON DELETE CASCADE ) ENGINE=InnoDB DEFAULT CHARSET=utf8; |
Next, we will make a table for all of our virtual aliases to specify all the emails that we will forward to the other email:
|
1 2 3 4 5 6 7 8 |
CREATE TABLE `virtual_aliases` ( `id` INT NOT NULL AUTO_INCREMENT, `domain_id` INT NOT NULL, `source` varchar(100) NOT NULL, `destination` varchar(100) NOT NULL, PRIMARY KEY (`id`), FOREIGN KEY (domain_id) REFERENCES virtual_domains(id) ON DELETE CASCADE ) ENGINE=InnoDB DEFAULT CHARSET=utf8; |
By the end of this process, you will have successfully made three tables. Next, we have to introduce the data.
-
Virtual Domains
In this section, we will learn how to introduce domains within the
virtual_domains table. Specifically, we will focus on how to introduce the primary domain (example.com) and the FQDN (hostname.example.com):
|
1 2 3 4 5 |
INSERT INTO `servermail`.`virtual_domains` (`id` ,`name`) VALUES ('1', 'example.com'), ('2', 'hostname.example.com'); |
-
Virtual Emails
Next, enter the email address and associated passwords for each of the domains. Ensure that all of the info is changed with your specific information:
|
1 2 3 4 5 |
INSERT INTO `servermail`.`virtual_users` (`id`, `domain_id`, `password` , `email`) VALUES ('1', '1', ENCRYPT('firstpassword', CONCAT('$6$', SUBSTRING(SHA(RAND()), -16))), 'email1@example.com'), ('2', '1', ENCRYPT('secondpassword', CONCAT('$6$', SUBSTRING(SHA(RAND()), -16))), 'email2@example.com'); |
-
Virtual Aliases
Now you can introduce the email address to which you will forward the other email address. The former is the source while the latter is the destination:
|
1 2 3 4 |
INSERT INTO `servermail`.`virtual_aliases` (`id`, `domain_id`, `source`, `destination`) VALUES ('1', '1', 'alias@example.com', 'email1@example.com'); |
Then, you can exit MySQL:
|
1 |
mysql > exit |
Step 3: Configuring Postfix
It is important to configure Postfix so that it can manage the SMTP connections. It also has to be able to send the messages for all of the users entered in the MySQL database. Let’s start off by making a copy of the default file. This is so that you can easily revert back to the default configuration if and when needed:
|
1 |
cp /etc/postfix/main.cf /etc/postfix/main.cf.orig |
Now open the main.cf file to modify it:
|
1 |
nano /etc/postfix/main.cf |
Start by commenting the TLS parameters and then append any other parameters. In our example, we are using the Free SSL certificates. You can, of course, change the configuration as per your requirements:
|
1 2 3 4 5 6 7 8 9 10 11 |
# TLS parameters #smtpd_tls_cert_file=/etc/ssl/certs/ssl-cert-snakeoil.pem #smtpd_tls_key_file=/etc/ssl/private/ssl-cert-snakeoil.key #smtpd_use_tls=yes #smtpd_tls_session_cache_database = btree:${data_directory}/smtpd_scache #smtp_tls_session_cache_database = btree:${data_directory}/smtp_scache smtpd_tls_cert_file=/etc/ssl/certs/dovecot.pem smtpd_tls_key_file=/etc/ssl/private/dovecot.pem smtpd_use_tls=yes smtpd_tls_auth_only = yes |
Next, you will be appending these parameters below the TLS settings:
|
1 2 3 4 5 6 7 |
smtpd_sasl_type = dovecot smtpd_sasl_path = private/auth smtpd_sasl_auth_enable = yes smtpd_recipient_restrictions = permit_sasl_authenticated, permit_mynetworks, reject_unauth_destination |
After that, we have to comment the
mydestination default settings. Then, we will replace it with
localhost. With this change, the VPS will be able to use the virtual domains in the MySQL table:
|
1 2 |
#mydestination = example.com, hostname.example.com, localhost.example.com, localhost mydestination = localhost |
Now use this command to verify that myhostname parameter is set in your FQDN:
|
1 |
myhostname = hostname.example.com |
Additionally, append this line to have local mail delivery to all virtual domains listed in the table activated:
|
1 |
virtual_transport = lmtp:unix:private/dovecot-lmtp |
Lastly, we will be adding the following parameters in order to tell Postfix to configure the virtual domains, users, and aliases:
|
1 2 3 |
virtual_mailbox_domains = mysql:/etc/postfix/mysql-virtual-mailbox-domains.cf virtual_mailbox_maps = mysql:/etc/postfix/mysql-virtual-mailbox-maps.cf virtual_alias_maps = mysql:/etc/postfix/mysql-virtual-alias-maps.cf |
To make sure there are no errors, compare these changes with the following file:
https://www.dropbox.com/s/x9fpm9v1dr86gkw/etc-postfix-main.cf.txt
Once all of that is checked, you will create three files to append in the
main.cf file. The goal here is to give Postfix instructions on how to connect with MySQL. To do this, we will start by creating the
mysql-virtual-mailbox-domains.cf file. Of course, in your file, you will make changes as per your personal configuration:
|
1 |
nano /etc/postfix/mysql-virtual-mailbox-domains.cf |
|
1 2 3 4 5 |
user = usermail password = mailpassword hosts = 127.0.0.1 dbname = servermail query = SELECT 1 FROM virtual_domains WHERE name='%s' |
Next, restart Postfix:
|
1 |
service postfix restart |
You must ensure that Postfix is able to find your domain. To test this, use this command:
|
1 |
postmap -q example.com mysql:/etc/postfix/mysql-virtual-mailbox-domains.cf |
The command will return 1 if it is successful. In this case, you can process by creating the
mysql-virtual-mailbox-maps.cf file:
|
1 |
nano /etc/postfix/mysql-virtual-mailbox-maps.cf |
|
1 2 3 4 5 |
user = usermail password = mailpassword hosts = 127.0.0.1 dbname = servermail query = SELECT 1 FROM virtual_users WHERE email='%s' |
Restart Postfix once again:
|
1 |
service postfix restart |
Again, we will ensure that Postfix is able to find the first email address. To test this, use the following command:
|
1 |
postmap -q email1@example.com mysql:/etc/postfix/mysql-virtual-mailbox-maps.cf |
If it is successful, you will get an output of 1 in return. As such, we will move to create the last file:
|
1 |
nano /etc/postfix/mysql-virtual-alias-maps.cf |
|
1 2 3 4 5 |
user = usermail password = mailpassword hosts = 127.0.0.1 dbname = servermail query = SELECT destination FROM virtual_aliases WHERE source='%s' |
This completes the configuration between Postfix and MySQL. Restart Postfix to apply:
|
1 |
service postfix restart |
To confirm that Postfix is indeed finding your aliases, use this command:
|
1 |
postmap -q alias@example.com mysql:/etc/postfix/mysql-virtual-alias-maps.cf |
You should ideally receive the mail that is forwarded to the alias as the output. You can also modify the
/etc/postfix/master.cf file like this if you want to connect port
587 with email clients safely:
|
1 |
nano /etc/postfix/master.cf |
Here is how to uncomment certain lines and append parameters:
|
1 2 3 4 5 |
submission inet n - - - - smtpd -o syslog_name=postfix/submission -o smtpd_tls_security_level=encrypt -o smtpd_sasl_auth_enable=yes -o smtpd_client_restrictions=permit_sasl_authenticated,reject |
Sometimes, you may need to restart Postfix to confirm that the port is open:
|
1 |
service postfix restart |
This tool can be used to scan the domain ports too. You can use it to verify that ports 25 and 587 are open.
Step 4: Configuring Dovecot
Now it is time to configure Dovecot. For this section, we will have to copy the 7 files you want to modify. This is to ensure you can revert back if needed. Enter this command one by one:
|
1 2 3 4 5 6 |
cp /etc/dovecot/dovecot.conf /etc/dovecot/dovecot.conf.orig cp /etc/dovecot/conf.d/10-mail.conf /etc/dovecot/conf.d/10-mail.conf.orig cp /etc/dovecot/conf.d/10-auth.conf /etc/dovecot/conf.d/10-auth.conf.orig cp /etc/dovecot/dovecot-sql.conf.ext /etc/dovecot/dovecot-sql.conf.ext.orig cp /etc/dovecot/conf.d/10-master.conf /etc/dovecot/conf.d/10-master.conf.orig cp /etc/dovecot/conf.d/10-ssl.conf /etc/dovecot/conf.d/10-ssl.conf.orig |
You have to edit the configuration file from Dovecot:
|
1 |
nano /etc/dovecot/dovecot.conf |
Make sure that the option if uncommented:
|
1 |
!include conf.d/*.conf |
Next, we will enable protocols below the
!include_try /usr/share/dovecot/protocols.d/*.protocol line. If you want, you can also add pop3:
|
1 2 |
!include_try /usr/share/dovecot/protocols.d/*.protocol protocols = imap lmtp |
To ensure there are no mistakes, compare it with this file:
https://www.dropbox.com/s/wmbe3bwy0vcficj/etc-dovecot-dovecot.conf.txt
Next, edit the mail confirmation file:
|
1 |
nano /etc/dovecot/conf.d/10-mail.conf |
Locate the
mail_location line. You need to uncomment it and add this parameter:
|
1 |
mail_location = maildir:/var/mail/vhosts/%d/%n |
After that, locate the
mail_privileged_group line. Again, uncomment it and add the mail parameter:
|
1 |
mail_privileged_group = mail |
To eliminate any possibility of errors, compare it with this file:
https://www.dropbox.com/s/hnfeieuy77m5b0a/etc.dovecot.conf.d-10-mail.conf.txt
-
Verifying Permissions
To verify the permissions, use this command:
|
1 |
ls -ld /var/mail |
Make sure that your permissions show up like the following:
|
1 |
drwxrwsr-x 3 root vmail 4096 Jan 24 21:23 /var/mail |
You can create a folder for each domain. All of these folders will be registered in the MySQL table:
|
1 |
mkdir -p /var/mail/vhosts/example.com |
Make a vmail user and group using an id of 5000:
|
1 2 |
groupadd -g 5000 vmail useradd -g vmail -u 5000 vmail -d /var/mail |
Next, you must change the owner of the
/var/mail folder to the vmail user:
|
1 |
chown -R vmail:vmail /var/mail |
Now edit the
/etc/dovecot/conf.d/10-auth.conf file:
|
1 |
nano /etc/dovecot/conf.d/10-auth.conf |
Add the following line after uncommenting the plain text authentication:
|
1 |
disable_plaintext_auth = yes |
Use this to modify the
auth_mechanisms parameter:
|
1 |
auth_mechanisms = plain login |
Now comment this line:
|
1 |
#!include auth-system.conf.ext |
To enable MySQL authorization, you have to uncomment the following line:
|
1 |
!include auth-sql.conf.ext |
To detect and edit mistakes, use the following file:
https://www.dropbox.com/s/4h472nqrj700pqk/etc.dovecot.conf.d.10-auth.conf.txt
Making a
/etc/dovecot/dovecot-sql.conf.ext file with your information will allow you to authenticate:
|
1 |
nano /etc/dovecot/conf.d/auth-sql.conf.ext |
Enter this code in the file:
|
1 2 3 4 5 6 7 8 9 |
passdb { driver = sql args = /etc/dovecot/dovecot-sql.conf.ext } userdb { driver = static args = uid=vmail gid=vmail home=/var/mail/vhosts/%d/%n } |
We will use out custom MySQL information to modify the
/etc/dovecot/dovecot-sql.conf.ext file:
|
1 |
nano /etc/dovecot/dovecot-sql.conf.ext |
Set MySQL as the parameter after uncommenting the driver parameter like this:
|
1 |
driver = mysql |
You can introduce your MySQL specific information by uncommenting the connect line:
|
1 |
connect = host=127.0.0.1 dbname=servermail user=usermail password=mailpassword |
Now you have to uncomment the
default_pass_scheme line and change it to
SHA-512:
|
1 |
default_pass_scheme = SHA512-CRYPT |
Add the following information after uncommenting
password_query:
|
1 |
password_query = SELECT email as user, password FROM virtual_users WHERE email='%u'; |
To detect errors, use this file to compare:
https://www.dropbox.com/s/48a5r0mtgdz25cz/etc.dovecot.dovecot-sql.conf.ext.txt
Next, you can change the owner and the group of the dovecot folder to the vmail user:
|
1 2 |
chown -R vmail:dovecot /etc/dovecot chmod -R o-rwx /etc/dovecot |
The next step is to modify the
/etc/dovecot/conf.d/10-master.conf file. You have to be extra careful here as different parameters will be changed:
|
1 |
nano /etc/dovecot/conf.d/10-master.conf |
|
1 2 3 4 5 6 7 8 9 10 11 12 13 14 15 16 17 18 19 20 |
##Uncomment inet_listener_imap and modify to port 0 service imap-login { inet_listener imap { port = 0 } #Create LMTP socket and this configurations service lmtp { unix_listener /var/spool/postfix/private/dovecot-lmtp { mode = 0600 user = postfix group = postfix } #inet_listener lmtp { # Avoid making LMTP visible for the entire internet #address = #port = #} } |
Use the following code to change the
unix_listener parameter to
service_auth:
|
1 2 3 4 5 6 7 8 9 10 11 12 13 14 15 16 17 18 19 |
service auth { unix_listener /var/spool/postfix/private/auth { mode = 0666 user = postfix group = postfix } unix_listener auth-userdb { mode = 0600 user = vmail #group = } #unix_listener /var/spool/postfix/private/auth { # mode = 0666 #} user = dovecot } |
Next, you have to edit
service auth-worker like so:
|
1 2 3 4 5 6 |
service auth-worker { # Auth worker process is run as root by default, so that it can access # /etc/shadow. If this isn't necessary, the user should be changed to # $default_internal_user. user = vmail } |
Detect errors by comparing to this file:
https://www.dropbox.com/s/g0vnt233obh6v2h/etc.dovecot.conf.d.10-master.conf.txt
The next step is for us to modify the SSL configuration file from Dovecot. If you are planning on using the default confirmation, then you can skip past this step onto the next section:
|
1 |
# nano /etc/dovecot/conf.d/10-ssl.conf |
Next, change the
ssl parameter to required like this:
|
1 |
ssl = required |
We will also modify the path for both
ssl_cert and
ssl_key:
|
1 2 |
ssl_cert = </etc/ssl/certs/dovecot.pem ssl_key = </etc/ssl/private/dovecot.pem |
Restart Dovecot:
|
1 |
service dovecot restart |
Make sure to check that port
993 is open. If you have enabled
pop3, then also check on port
995:
|
1 |
telnet example.com 993 |
If you have completed the steps until this point, congratulations! You have configured your mail server successfully. To make sure you did all the steps correctly, you can test your account with the help of an email client like this:
|
1 2 3 4 |
- Username: email1@example.com - Password: email1's password - IMAP: example.com - SMTP: example.com |
Port 993 is used for secure IMAP and port 587/port 25 for SMTP.
Step 5: Configuring SpamAssassin
We have finally arrived at the last section of the tutorial where we will configure SpamAssassin. We will start by installing SpamAssassin:
|
1 |
apt-get install spamassassin spamc |
Make a user for SpamAssassasin like this:
|
1 |
adduser spamd --disabled-login |
You must open and modify the configuration settings to be able to configure SpamAssassin:
|
1 |
nano /etc/default/spamassassin |
Now that you are here, you must change the
ENABLED parameter to enable SpamAssassin daemon:
|
1 |
ENABLED=1 |
Modify the home and options parameters with this code:
|
1 2 |
SPAMD_HOME="/home/spamd/" OPTIONS="--create-prefs --max-children 5 --username spamd --helper-home-dir ${SPAMD_HOME} -s ${SPAMD_HOME}spamd.log" |
Use this line to specify the
PID_File parameter:
|
1 |
PIDFILE="${SPAMD_HOME}spamd.pid" |
Next, use this command to indicate that SpamAssassin’s rules will be updated automatically:
|
1 |
CRON=1 |
Check for mistakes by comparing with the following document:
https://www.dropbox.com/s/ndvpgc2jipdd4bk/etc.default.spamassassin.txt
If you want to set up the anti-spam rules, then you must open the
/etc/spamassassin/local.cf file again:
|
1 |
nano /etc/spamassassin/local.cf |
The way SpamAssassin works is that it scores every mail that is received by the user. It assesses the scores for the emails and if it is greater than 5.0 on its spam check, the mail is marked as spam. Here are the parameters you can use to configure these anti-spam rules:
|
1 2 3 4 5 6 7 8 9 10 |
rewrite_header Subject ***** SPAM _SCORE_ ***** report_safe 0 required_score 5.0 use_bayes 1 use_bayes_rules 1 bayes_auto_learn 1 skip_rbl_checks 0 use_razor2 0 use_dcc 0 use_pyzor 0 |
Once the anti-spam rules are set, you need to tell Postfix that each email is to be checked with SpamAssassin. For this purpose, we need to modify the
/etc/postfix/master.cf file:
|
1 |
nano /etc/postfix/master.cf |
Find the following line and add the
spamassassin filter:
|
1 2 |
smtp inet n - - - - smtpd -o content_filter=spamassassin |
Now you can append these parameters:
|
1 2 3 |
spamassassin unix - n n - - pipe user=spamd argv=/usr/bin/spamc -f -e /usr/sbin/sendmail -oi -f ${sender} ${recipient} |
Finally, start SpamAssassin and restart Postfix to apply the changes. When you relaunch, Postfix will start to verify spam from emails:
|
1 2 |
service spamassassin start service postfix restart |
And that is it! You have successfully configured your mail server with Postfix and Dovecot. You also performed MySQL authentication and set up spam filtering with SpamAssassin.
Conclusion
This tutorial outlines the steps you need to follow to perform the configuration of your mail server with the above-mentioned tools. It could be utilized as a comprehensive guide for you to set up your mail server independently. If you are interested in utilizing Google’s SMTP server feature follow along with this tutorial.
Happy Computing!
- How to Deploy WordPress with Persistent Volume on Kubernetes Cluster - March 17, 2023
- Deploying Applications on Kubernetes Using Argo CD and GitOps - October 26, 2022
- Using Node.js Modules with npm and package.json: A Tutorial - October 6, 2022
- Using Ansible to Install and Configure WordPress with LAMP on Ubuntu - September 23, 2022
- Creating Views in the Django Web Application Framework - September 22, 2022