
Se hai sviluppato un'applicazione utilizzando AngularJS, probabilmente sarai a conoscenza degli intercettori HTTP. Tuttavia, questi intercettori HTTP non erano disponibili in Angular fino alla versione 4.3. In questo tutorial, utilizzeremo gli intercettori in Angular per gestire le richieste e le risposte HTTP e per elaborare gli errori.
Prerequisiti
Angular le applicazioni utilizzano il runtime Node.js. Per completare questo tutorial, dovrai avere Node.js installato sulla tua macchina. Fortunatamente, Node.js è abbastanza facile da installare. Abbiamo una guida completa su Come installare Node.js su Ubuntu 18.04 qui.
Inoltre, sarà utile per te conoscere Angular ed essere familiare con l'uso di Angular CLI per creare applicazioni Angular. Utilizzeremo Node v8.12.0 e npm v6.4.1.
Passo 1: Creare l'app Angular
Per iniziare, creiamo una nuova app Angular utilizzando Angular CLI. Chiameremo la nostra applicazione Angular-Interceptor. Esegui il comando seguente per creare l'app:
|
1 |
npx @angular/cli@7.0.6 new Angular-Interceptor |
Ti verranno chieste alcune opzioni. Inserisci i valori predefiniti e procedi:

Successivamente, naviga nella directory dell'applicazione ed esegui il comando seguente per avviare l'applicazione:
|
1 |
npx ng serve --open |

Quindi, visualizza http://localhost:4200 nel tuo browser per vedere l'app. Ora hai configurato un'app Angular di base.
Passo 2: Definire lo stile dell'app Angular
Qui definiremo lo stile della nostra app Angular utilizzando Angular Material. Per installare Angular Material nel tuo progetto, esegui il comando seguente:
|
1 |
npm install --save @angular/material@7.0.4 @angular/cdk@7.0.4 @angular/animations@7.0.4 |
Questo installerà @angular/material, @angular/cdk, e @angular/animation nel tuo progetto. Successivamente, configureremo un'animazione nel progetto. Aggiungi BrowserAnimationsModule nel tuo file src/app/module.ts :
|
1 2 3 4 5 6 7 8 9 10 11 12 13 |
... import { BrowserAnimationsModule } from '@angular/platform-browser/animations'; @NgModule({ ... imports: [ ... BrowserAnimationsModule ], ... }) export class AppModule { } |
Utilizzeremo il componente Dialog di Angular Material. Per utilizzare il componente Dialog, dobbiamo importare MatDialogModule nel file src/app/app.module.ts :
|
1 2 3 4 5 6 7 8 9 10 11 12 13 |
... import { MatDialogModule } from '@angular/material'; @NgModule({ ... imports: [ ... MatDialogModule ], ... }) export class AppModule { } |
Per rendere l'interfaccia utente più attraente, aggiungiamo indigo-pink.css al tuo file styles.scss :
|
1 |
@import "~@angular/material/prebuilt-themes/indigo-pink.css"; |
Passo 3: Creare il tuo intercettore Angular
Sotto la cartella app, creeremo una nuova cartella chiamata interceptor. All'interno di questa cartella appena creata, crea un nuovo file httpconfig.interceptor.ts .
Dobbiamo importare alcune dipendenze nel nostro file httpconfig.interceptor.ts per far funzionare il nostro intercettore. Queste dipendenze sono HttpInterceptor, HttpRequest, HttpResponse, e HttpHandler, HttpEvent, HttpErrorResponse.
Il nostro file httpconfig.interceptor.ts sarà simile al seguente dopo l'importazione:
|
1 2 3 4 5 6 7 8 9 10 11 12 13 |
import { Injectable } from '@angular/core'; import { HttpInterceptor, HttpRequest, HttpResponse, HttpHandler, HttpEvent, HttpErrorResponse } from '@angular/common/http'; import { Observable, throwError } from 'rxjs'; import { map, catchError } from 'rxjs/operators'; |
Successivamente, crea una classe HttpConfigInterceptor e implementa l'interfaccia HttpInterceptor. Questo è un esempio:
|
1 2 3 4 5 6 7 |
@Injectable() export class HttpConfigInterceptor implements HttpInterceptor { intercept(request: HttpRequest<any>, next: HttpHandler): Observable<HttpEvent<any>> { // ... } } |
Aggiungi il codice sottostante al file httpconfig.interceptor.ts :
|
1 2 3 4 5 6 7 8 9 10 11 12 13 14 15 16 17 18 19 20 21 22 23 24 25 26 27 |
... @Injectable() export class HttpConfigInterceptor implements HttpInterceptor { intercept(request: HttpRequest<any>, next: HttpHandler): Observable<HttpEvent<any>> { const token: string = localStorage.getItem('token'); if (token) { request = request.clone({ headers: request.headers.set('Authorization', 'Bearer ' + token) }); } if (!request.headers.has('Content-Type')) { request = request.clone({ headers: request.headers.set('Content-Type', 'application/json') }); } request = request.clone({ headers: request.headers.set('Accept', 'application/json') }); return next.handle(request).pipe( map((event: HttpEvent<any>) => { if (event instanceof HttpResponse) { console.log('event--->>>', event); } return event; })); } } |
Per farlo funzionare, dobbiamo importare httpconfig.interceptor.ts nel nostro file app.module.ts :
|
1 2 3 4 5 6 7 8 9 10 11 12 13 |
... import { HttpClientModule, HTTP_INTERCEPTORS } from '@angular/common/http'; ... import { HttpConfigInterceptor } from './interceptor/httpconfig.interceptor'; @NgModule({ ... imports: [ ... HttpClientModule ], ... }) |
Aggiungi HttpConfigInterceptor a providers. Imposteremo multi: true per gestire più interceptor:
|
1 2 3 4 5 6 7 8 9 10 |
... @NgModule({ ... providers: [ ... { provide: HTTP_INTERCEPTORS, useClass: HttpConfigInterceptor, multi: true } ], ... }) ... |
Nella prossima sezione, creeremo il nostro servizio per gestire gli errori.
Passo 4: Servizio per la gestione degli errori
Qui scriveremo il codice per gestire gli errori. Dovremo catturare gli errori e mostrarli in modo appropriato agli utenti finali. In sintesi, di seguito sono riportati i passaggi che seguiremo:
- Crea una cartella chiamata error-dialog nella cartella app .
- Crea un servizio per gli errori chiamato errorDialogService in un file chiamato errordialog.service.ts.
- Aggiungi il codice sottostante nel file errordialog.service.ts :
|
1 2 3 4 5 6 7 8 9 10 11 12 13 14 15 16 17 18 19 20 21 22 23 24 25 26 27 |
import { Injectable } from '@angular/core'; import { MatDialog, MatDialogRef, MAT_DIALOG_DATA } from '@angular/material'; import { ErrorDialogComponent } from './errordialog.component'; @Injectable() export class ErrorDialogService { public isDialogOpen: Boolean = false; constructor(public dialog: MatDialog) { } openDialog(data): any { if (this.isDialogOpen) { return false; } this.isDialogOpen = true; const dialogRef = this.dialog.open(ErrorDialogComponent, { width: '300px', data: data }); dialogRef.afterClosed().subscribe(result => { console.log('Il dialogo è stato chiuso'); this.isDialogOpen = false; let animal; animal = result; }); } } |
|
1 2 3 4 5 6 7 8 9 10 11 12 |
import { Component, Inject } from '@angular/core'; import { MAT_DIALOG_DATA } from '@angular/material'; @Component({ selector: 'app-root', templateUrl: './errordialog.component.html' }) export class ErrorDialogComponent { title = 'Angular-Interceptor'; constructor(@Inject(MAT_DIALOG_DATA) public data: string) {} } |
|
1 2 3 4 5 6 7 8 9 10 |
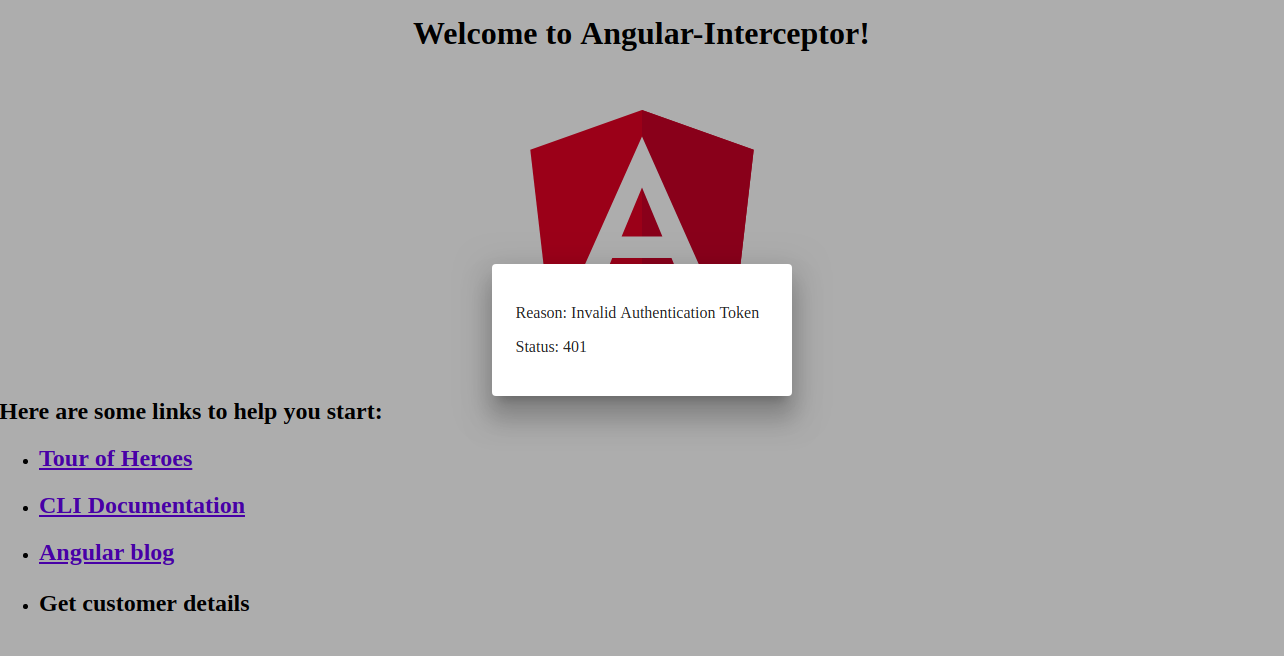
<div> <div> <p> Motivo: {{data.reason}} </p> <p> Stato: {{data.status}} </p> </div> </div> |
In sintesi, elenchiamo i passaggi seguenti:
- Inizia importando errordialog.service.
- Quindi, aggiungeremo il costruttore per errorDialogService.
- We will also add the code to handle the error response using catchError and throwError.
- Importa errordialog.service e errordialog.component in AppModule.
Dopo aver apportato le modifiche, verranno modificati due file: app.module.ts e httpconfig.interceptor.ts:
|
1 2 3 4 5 6 7 8 9 10 11 12 13 14 15 16 17 18 |
... import { ErrorDialogComponent } from './error-dialog/errordialog.component'; ... import { ErrorDialogService } from './error-dialog/errordialog.service'; ... @NgModule({ ... declarations: [ ... ErrorDialogComponent ], ... providers: [ ... ErrorDialogService ], entryComponents: [ErrorDialogComponent], }) |
|
1 2 3 4 5 6 7 8 9 10 11 12 13 14 15 16 17 18 19 20 21 22 23 24 25 26 |
... import { ErrorDialogService } from '../error-dialog/errordialog.service'; ... @Injectable() export class HttpConfigInterceptor implements HttpInterceptor { constructor(public errorDialogService: ErrorDialogService) { } intercept(request: HttpRequest<any>, next: HttpHandler): Observable<HttpEvent<any>> { ... return next.handle(request).pipe( map((event: HttpEvent<any>) => { if (event instanceof HttpResponse) { console.log('event--->>>', event); } return event; }), catchError((error: HttpErrorResponse) => { let data = {}; data = { reason: error && error.error && error.error.reason ? error.error.reason : '', status: error.status }; this.errorDialogService.openDialog(data); return throwError(error); })); } } |
Passo 5: Creazione di servizi di esempio
In questo passaggio creeremo due servizi come esempio:
- API di login
- API dei dettagli del cliente
Crea una nuova cartella chiamata services nella cartella src. Successivamente, all'interno di questa cartella appena creata, crea un nuovo file chiamato login.service.ts, e aggiungi due funzioni:
|
1 2 3 4 5 6 7 8 9 10 11 12 13 14 15 16 |
import { Injectable } from '@angular/core'; import { HttpClient } from '@angular/common/http'; @Injectable() export class LoginService { constructor(private http: HttpClient) { } login(data) { data = { email: 'admin', password: 'admin' }; return this.http.post('http://localhost:3070/api/login', data); } getCustomerDetails() { return this.http.get('http://localhost:3070/customers/details'); } } |
Passo 6: Chiamata del servizio HTTP Client
Infine, siamo all'ultima parte del nostro tutorial. Chiameremo il nostro servizio HTTP dal file app.component.ts . Aggiungi le due funzioni LoginService a app.component.ts. Chiama l'API di login all'onload e customers/details con onclick:
|
1 2 3 4 5 6 7 8 9 10 11 12 13 14 15 16 17 18 19 20 21 22 |
import { Component } from '@angular/core'; import { LoginService } from './services/login.service'; @Component({ selector: 'app-root', templateUrl: './app.component.html', styleUrls: ['./app.component.scss'] }) export class AppComponent { title = 'Angular-Interceptor'; constructor(public loginService: LoginService) { this.loginService.login({}).subscribe(data => { console.log(data); }); } getCustomerDetails() { this.loginService.getCustomerDetails().subscribe((data) => { console.log('----->>>', data); }); } } |
Ora dobbiamo aggiungere un elemento UI in app.component.html, in modo che l'utente possa cliccarlo:
|
1 |
<h2 (click)="getCustomerDetails()">Ottieni i dettagli del cliente</h2> |
Per finire, dovrai includere il LoginService nei providers in AppModule:
|
1 2 3 4 5 6 7 8 9 10 11 12 |
... import { LoginService } from './services/login.service'; ... @NgModule({ ... providers: [ ... LoginService ] ... }) |
Di seguito, trovi uno screenshot della finestra di dialogo del gestore degli errori:
Conclusione
In questo tutorial, abbiamo imparato come gestire le richieste e le risposte HTTP utilizzando gli interceptor di Angular. Abbiamo anche imparato come gestire gli errori utilizzando la finestra di dialogo in Angular Material.
Le app Angular utilizzano Node.js come runtime. Se vuoi saperne di più su Node.js e su come distribuire le applicazioni Node.js su Docker, dai un'occhiata alla nostra guida Come distribuire un'app Node.js (Express.js) con Docker su Ubuntu 20.04. Puoi anche consultare Come eseguire attività di produzione su Ubuntu 20.04 con Node.js e Installazione di Node.js su CentOS 8: una guida completa.
Buona programmazione!
Commenti
Ancora nessun commento. Scrivi il primo.