

Composer is a popular PHP dependency management tool. It is primarily leveraged to assist in project dependency updates and installation. It works by checking and verifying the versions of other packages that are appropriate for project requirements and dependencies and installing them for your convenience. In this tutorial, we will walk you through the steps of installing Composer on Ubuntu 18.04.
In order to be able to follow the tutorial make sure that you have already configured a non-root user with sudo privileges on the local server. To help you with that take a look at our tutorial on configuring the Linux sudoers file. In addition, you have to enable your basic firewall and block the nonessential ports. Here is a tutorial on setting up a UFW on Ubuntu and Debian cloud server. Before you start the installation, log into your non-root user with privileges. You can easily install your server by following our tutorial on setting up an Ubuntu server. Now, let’s start!
Dependencies Installation
Prior to installing Composer, you should verify that all of the necessary dependencies are installed. You can start by updating the packet manager. You can do this by running:
|
1 |
sudo apt update |
Next, we can install the dependencies. To do so, you will need curl to download Composer and php-cli to install and run it. Necessary functions for the library which we will utilize need the php-mbstring package, git will download project dependencies, and extraction of zipped files required to unzip. All of these can be installed with just one command. It is as follows:
|
1 |
sudo apt install curl php-cli php-mbstring git unzip |
Once the prerequisite installations are handled, we can move on to installing Composer.
Composer Download and Installation
We will download the Composer installer, verify that there is no corruption, and then install it. After making certain that you are in your home directory, you should use curl to get the installer:
|
1 2 |
cd ~ curl -sS https://getcomposer.org/installer -o composer-setup.php |
Using the Composer keys and signatures page, we will need to ensure that the installer matches the SHA-384 of the latest available version. To do so, we will copy that hash from that page. Then, we have to store it in the form of a shell variable with the latest hash in place of the following example:
|
1 |
HASH=756890a4488ce9024fc62c56153228907f1545c228516cbf63f885e036d37e9a59d27d63f46af1d4d07ee0f76181c7d3 |
Next, verify that the installation script is safe to run by executing the following PHP script:
|
1 |
php -r "if (hash_file('SHA384', 'composer-setup.php') === '$HASH') { echo 'Installer verified'; } else { echo 'Installer corrupt'; unlink('composer-setup.php'); } echo PHP_EOL;" |
This should return:
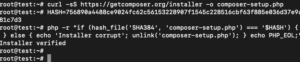
If the returned output includes Installer corrupt, you will need to download the installation script over. Then, you need to verify that you are using the right hash. At this point you can run the verification command again. Once the verification is successful, you can proceed.
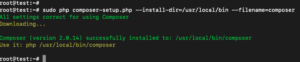
To install composer globally, you can use the following sudo command. This will install Composer as a command on a system-wide level named composer. It will be installed under /usr/local/bin:
|
1 |
sudo php composer-setup.php --install-dir=/usr/local/bin --filename=composer |
After running it, the following output will appear:
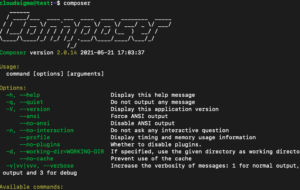
Let’s verify that the installation was successful by launching Composer:
|
1 |
composer |
This will display the following version and argument information about Composer:
composer-setup.php command, which will create a composer.phar in the current directory, and can be executed using the command: ./composer.phar.
Next, we’ll look at managing dependencies using Composer.
Utilizing Composer for PHP Projects
Very often, PHP projects rely on external libraries. This creates a challenge in managing versions and dependencies. Composer helps to ease the process by tracking the dependencies, simplifying others’ installations of them.
You will need a composer.json file to use Composer for your project. This file will serve as a roadmap for Composer. It will inform it about which dependencies still need to be downloaded, as well as which package versions will be allowed to be installed. This is an essential component of mitigating the use of unstable versions and keeping the project consistent. Outdated or unstable versions could create backward compatibility problems.
Since creating the file manually is tough to do without running into syntax issues, the file is autogenerated by Composer once you use a require command to add a dependency to your project. Other dependencies can be added similarly without needing to manually edit the file.
The installation of a package with Composer as a dependency for a project can be done as per the following:
- Identifying the library needed by the application.
- Look through Packagist.org, Composer’s official package repository to research the appropriate open-source library.
- Choose the appropriate dependency package.
- Include the dependency in the
composer.jsonfile by running thecomposer requirecommand.
Let’s presuppose that we have an application with the goal of converting a sentence provided into a slug (a URL-friendly string), something commonly utilized to convert page titles into URL paths. We will first need to create a project directory. For the sake of this example, we will label it as slugify:
|
1 2 3 |
cd ~ mkdir slugify cd slugify |
Next, we will need to search Packagist.org for the package that can help us form slugs. You should query the term “slug” and observe the results:
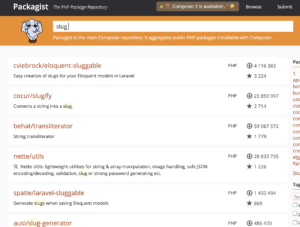
The list will have two numbers in the right column of each listed package. The top number represents the amount of downloads for that particular package. The bottom number shows how many times a package was starred on GitHub. These results can be sorted based on the ascending or descending order of either of those two numbers. The packages with both numbers on the high end are used by more people, meaning that they are more likely to be stable. However, it is still vital to thoroughly read the descriptions of the packages to make certain the package contains what you require.
As stated, for this example, we need only to locate a converter from string to slug. We can see that the package cocur/slugify seems to have a respectable download and star number, with a description fitting our needs. The Packagist package choices will all have a package name and a vendor name associated with them. GitHub uses a vendor/package format to set up identifiers for each package, with Packagist following the same formatting schematic. The package we are looking to install is cocur/slugify so we will need to retain that name in order to require the package. Once the package to install is formally identified, we will need to run composer require to link it to the compose.json file as a dependency:
|
1 |
composer require concur/slugify |
Composer will return the following dependency:
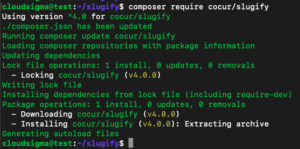
You will note that Composer has detected and determined the appropriate version of the package automatically. After this, the project’s directory will contain two new files (composer.json and composer.lock) and a vendor directory.
|
1 |
ls -l |

The information about the package versions will be stored in the composer.lock file. This will also be used to ensure that if anyone else clones your project, they will be using the same dependency versions. The dependencies will be placed in the vendor directory, but that folder will not need to be committed to version control. Only composer.json and composer.lock files will need to be included.
Version constraints should also be taken under consideration. Looking at the composer.json file, you will see something resembling this:
|
1 |
cat composer.json |
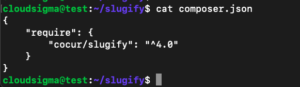
Ahead of the version number in composer.json you will note there is a special character (^). Since Composer offers additional flexibility and support for a variety of formats and constraints when the package version is defined to ensure project stability, the caret (^) is auto-generated by composer.json file to allow for interoperability power after semantic versioning. With the above example, version 3.1 is defined as being a minimal requirement to allow compatibility, but any version up to 4.0 is allowed to be updated to.
It is unlikely that any adjustments will be required to version numbers, but certain situations might require tampering with this constraint. For instance, if a new version of the library does not follow semantic versioning or when a major new version is a mandated requirement.
To better understand how Composer constraints function, note the following chart:
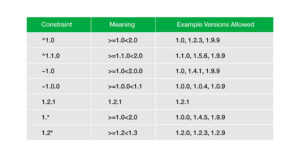
More details about Composer’s version constraints can be found in their official documentation. We will now turn our focus to loading dependencies with Composer automatically.
Autoload Scripting Inclusion
To make working with dependencies easier and because PHP does not offer a way to load classes automatically, Composer includes a script that can be included in a project to autoload the necessary dependencies for free.
Before establishing any class, you just need to make sure to include the vendor/autoload.php file as part of your PHP scripts. Composer will automatically generate this file as the initial dependency is added. We will test this by creating a test.php file and opening it in a text editor:
|
1 |
nano test.php |
We then need to add the following code that pulls in the vendor/autoload.php file, sets the concur/slugify dependency, in order to create a slug:
|
1 2 3 4 |
<?php require __DIR__ . '/vendor/autoload.php'; use Cocur\Slugify\Slugify; $slugify = new Slugify(); echo $slugify->slugify('Hello World, this is a long sentence and I need to make a slug from it!'); |
Next, we will save the file, close down the text editor, and run the script via:
|
1 |
php test.php |
This will generate the following output:

When newer versions are released, dependencies will/might require updates. Next, we will look into how to do this.
Dependency Updates
To update project dependencies to the most recent versions, we can use the update command in the following manner:
|
1 |
composer update |
This will check your project against the newer versions that it requires, and if one is found to be compatible, Composer will replace the prior version according to the version constraints as defined in the composer.json file. Alongside this, the composer.lock file will also be updated with these changes. Specific libraries can also be updated in this manner:
|
1 |
composer update vendor/package vendor2/package2 |
After updating the dependencies, you will want to make sure to check out the composer.json and composer.lock files to ensure that other users can also install newer versions.
Conclusion
Composer is one of PHP’s most powerful tools. This guide helped you install Composer and illustrated how to use it for a basic project, along with illustrating how dependencies are installed and updated. Aside from allowing for a simple and reliable method to manage project dependencies, Composer sets up a new standard in how community-created PHP packages are discovered and shared.
Here are some more resources on PHP tools that you might find useful:
Happy Computing!
- Removing Spaces in Python - March 24, 2023
- Is Kubernetes Right for Me? Choosing the Best Deployment Platform for your Business - March 10, 2023
- Cloud Provider of tomorrow - March 6, 2023
- SOLID: The First 5 Principles of Object-Oriented Design? - March 3, 2023
- Setting Up CSS and HTML for Your Website: A Tutorial - October 28, 2022