

Introduction
Laravel is a web application framework that comes with a set of built-in tools and resources to develop modern PHP applications. It’s well-known for its reliability, performance, efficiency, modularity, and security. Because of its various built-in features, Laravel has seen incredible growth in its popularity. Many developers are adopting Laravel to streamline the web development process.
This guide will demonstrate how to install and configure a new Laravel application on Ubuntu 20.04.
Laravel on Ubuntu
We will use Composer, a PHP dependency manager, to download and manage Laravel. To install Composer follow the instructions of this tutorial. The Nginx server will serve the application. It will establish a demo Laravel application using the MySQL database.
This guide requires some preconditions. We assume that you already have a properly configured Ubuntu 20.04 server up and running. For reference, here’s a quick guide on setting up an Ubuntu server. It’s also required to have the LEMP (Linux, Nginx, MySQL, and PHP) stack installed and configured. We have a detailed guide on installing and configuring the LEMP stack.
Because we’re going to install various packages, it requires root permission. In the case of Ubuntu, the root user is disabled by default. So, we need access to a non-root user with sudo privilege. Here’s how to grant sudo permission to other users.
Step 1 – Installing PHP Modules
Before installing Laravel, we need some important PHP modules for the framework. These modules are directly available from the Ubuntu default package repos. These modules support features like character encoding, XML, and precision mathematics.
First, update the APT cache and install the packages:
|
1 2 |
$ sudo apt update $ sudo apt install php-mbstring php-xml php-bcmath |
Step 2 – Creating a Database for the Application
To demonstrate the functionality of Laravel, we will make a travel list application that shows the list of places the user would like to visit, and a list of places that are already visited. We can store this data in a table place with fields name (location name) and visited (marking as visited or nonvisited). An additional field will feature a unique identity for each entry. To connect the data with our Laravel application, we will create a dedicated MySQL user, and grant the user full permission over the database travellist.
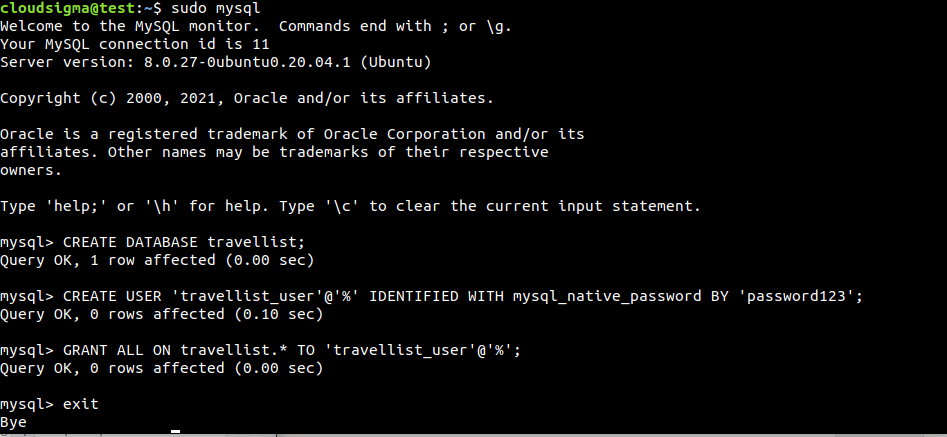
The native MySQL PHP library mysqlnd no longer supports caching_sha2_authentication. Thus, we need to set our database with the authentication method mysql_native_password. Access the MySQL shell as the root:
|
1 |
$ sudo mysql |
Next, create a new database named travellist:
|
1 |
> CREATE DATABASE travellist; |
After that, create a dedicated user travellist_user with a suitable password:
|
1 |
> CREATE USER 'travellist_user'@'%' IDENTIFIED WITH mysql_native_password BY 'password123'; |
Give the user travellist_user full permission over the database travellist. It will also prevent the user from creating and modifying any other database on the server:
|
1 |
> GRANT ALL ON travellist.* TO 'travellist_user'@'%'; |
Exit the MySQL shell:
|
1 |
> exit |
Let’s put the new user to the test. The following command will log in to the MySQL shell as the user travellist_user. The flag -p will prompt for the user password:
|
1 |
$ mysql -u travellist_user -p |
Print all the available databases. As configured earlier, it should show travellist and information_schema only:
|
1 |
> SHOW DATABASES; |
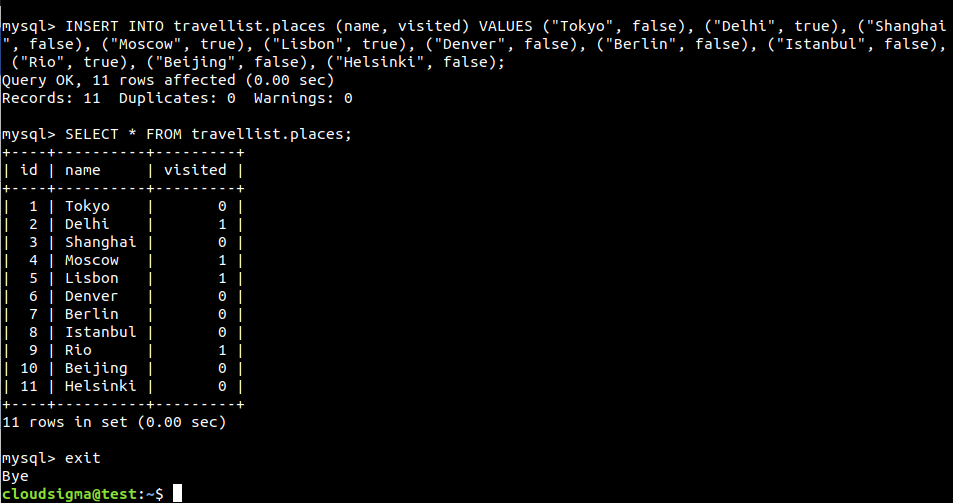
Next, we need to create the data table places. Run the following MySQL statement:
|
1 2 3 4 5 6 |
> CREATE TABLE travellist.places ( id INT AUTO_INCREMENT, name VARCHAR(255), visited BOOLEAN, PRIMARY KEY(id) ); |
Let’s populate the table with some sample data:
|
1 2 3 4 5 6 7 8 9 10 11 12 |
> INSERT INTO travellist.places (name, visited) VALUES ("Tokyo", false), ("Delhi", true), ("Shanghai", false), ("Moscow", true), ("Lisbon", true), ("Denver", false), ("Berlin", false), ("Istanbul", false), ("Rio", true), ("Beijing", false), ("Helsinki", false); |
Let’s see if the data was stored successfully on the database:
|
1 |
> SELECT * FROM travellist.places; |
As we can see, the test table is populated with valid data. We can now exit the MySQL shell:
|
1 |
> exit |
Step 3 – Creating a New Laravel App
We are now ready to create a new Laravel application using Composer. We’ll use travellist as a demo application. This application will display the location list from the MySQL database, demonstrating the basic configuration of Laravel. Go to the user’s home directory:
|
1 |
$ cd ~ |
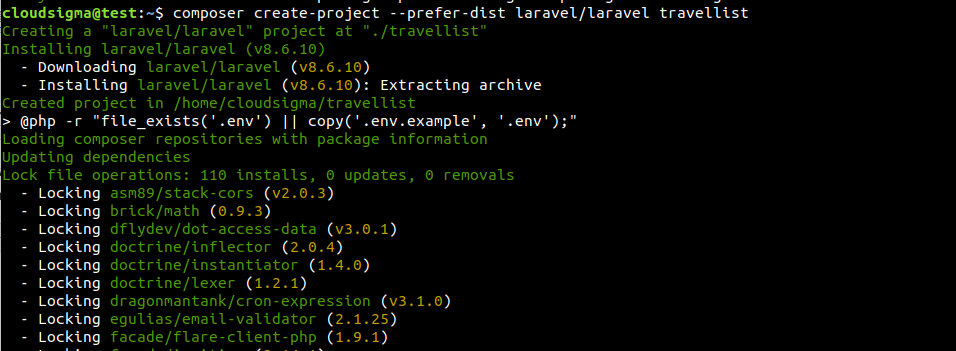
The next step is to create a new Laravel application using Composer. It will create a dedicated directory travellist with a barebones Laravel application with default settings. Run the following command:
|
1 |
$ composer create-project --prefer-dist laravel/laravel travellist |
Once the app is established, we can verify if all the components were installed successfully:
|
1 2 |
$ cd travellist $ php artisan |
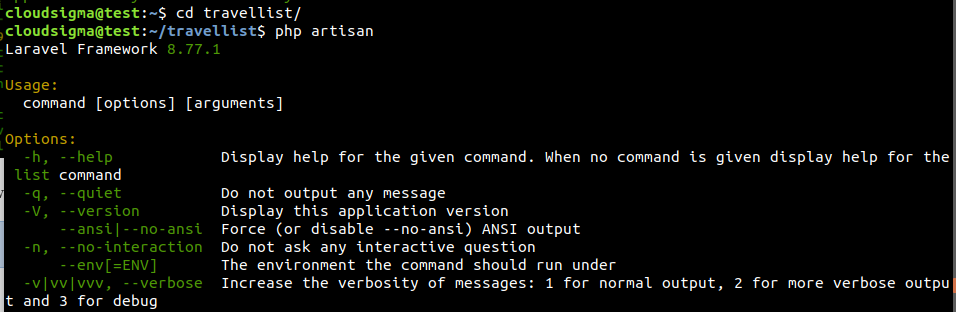
The output verifies that all the application files are in place. It also assures that all the Laravel command-line tools are functional. However, it still requires app configuration to set up the database and a few extra tweaks.
Step 4 – Laravel Configuration
All the Laravel configuration files are stored within a directory named config within the root app directory. In addition, when installing Laravel with Composer, it also creates an environment file. It contains various settings specific to the current environment. Values declared within it will take precedence over the values set in regular configuration files at config.
Each unique installation will require its own environment file to define values like database connection settings, app URL, debug options, etc. Note that the environment file contains sensitive info like database credentials, security keys, etc. That’s why it’s strongly recommended to never share this file publicly.
Open the environment file with a text editor:
|
1 |
$ nano .env |
Here’s a sample environment code:
|
1 2 3 4 5 6 7 8 9 10 11 12 |
APP_NAME=TravelList APP_ENV=development APP_KEY=<unique_app_key> APP_DEBUG=true APP_URL=http://<domain_or_ip> LOG_CHANNEL=stack DB_CONNECTION=mysql DB_HOST=127.0.0.1 DB_PORT=3306 DB_DATABASE=travellist DB_USERNAME=travellist_user DB_PASSWORD=password123 |
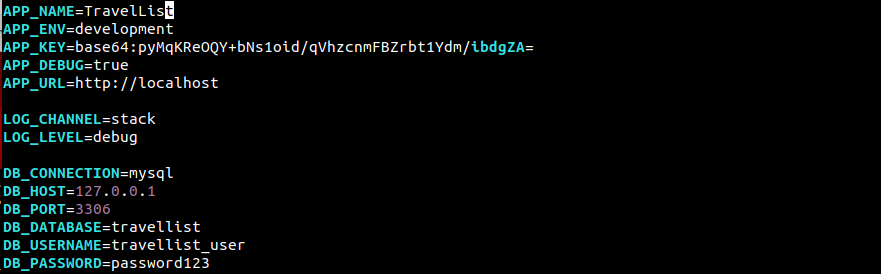
Let’s break down the values:
APP_NAME: This field describes the name of the application. This name will be used for notifications and messages.APP_ENV: The current environment of the application.APP_KEY: This key is generated automatically when installing Laravel through Composer. It is used to generate salts and hashes. No need to change it.APP_DEBUG: Debug mode toggle. When turned on, it will show debug info on the client-side.APP_URL: App base URL. It’s also used for generating application links.DB_DATABASE: The name of the database. In this case, it will be the dedicated database we created.DB_USERNAME: The username to connect to the database.DB_PASSWORD: The password to connect to the database.
Once the changes are made, save the file and close the editor.
Step 5 – Setting up Nginx
We’ve successfully installed Laravel on a local folder of the user’s home directory. This configuration works fine for the local development environment. However, it’s not recommended to implement it for web servers that are open to the public internet.
Our next step is to move the application to /var/www as it’s the usual location for web apps running on Nginx. Use the mv command to move travellist to /var/www/travellist:
|
1 |
$ sudo mv ~/travellist /var/www/travellist |
Next, assign the user write access to the storage and cache folders. These are the locations of Laravel app-generated files:
|
1 2 |
$ sudo chown -R www-data.www-data /var/www/travellist/storage $ sudo chown -R www-data.www-data /var/www/travellist/bootstrap/cache |
The application files are now in place. However, we need to tell Nginx to serve the content. Create a new virtual host configuration file:
|
1 |
$ sudo nano /etc/nginx/sites-available/travellist |
Here’s a sample of recommended settings for a Laravel application running on Nginx:
|
1 2 3 4 5 6 7 8 9 10 11 12 13 14 15 16 17 18 19 20 21 22 23 24 25 |
server { listen 80; server_name <domain_or_ip>; root /var/www/travellist/public; add_header X-Frame-Options "SAMEORIGIN"; add_header X-XSS-Protection "1; mode=block"; add_header X-Content-Type-Options "nosniff"; index index.html index.htm index.php; charset utf-8; location / { try_files $uri $uri/ /index.php?$query_string; } location = /favicon.ico { access_log off; log_not_found off; } location = /robots.txt { access_log off; log_not_found off; } error_page 404 /index.php; location ~ \.php$ { fastcgi_pass unix:/var/run/php/php7.4-fpm.sock; fastcgi_index index.php; fastcgi_param SCRIPT_FILENAME $realpath_root$fastcgi_script_name; include fastcgi_params; } location ~ /\.(?!well-known).* { deny all; } } |
Time to activate the new virtual host configuration file. Create a symbolic link to sites-enabled directory:
|
1 |
$ sudo ln -s /etc/nginx/sites-available/travellist /etc/nginx/sites-enabled/ |
The following Nginx command will test the configuration files for syntax errors:
|
1 |
$ sudo nginx -t |
Then, reload Nginx:
|
1 |
$ sudo systemctl reload nginx |
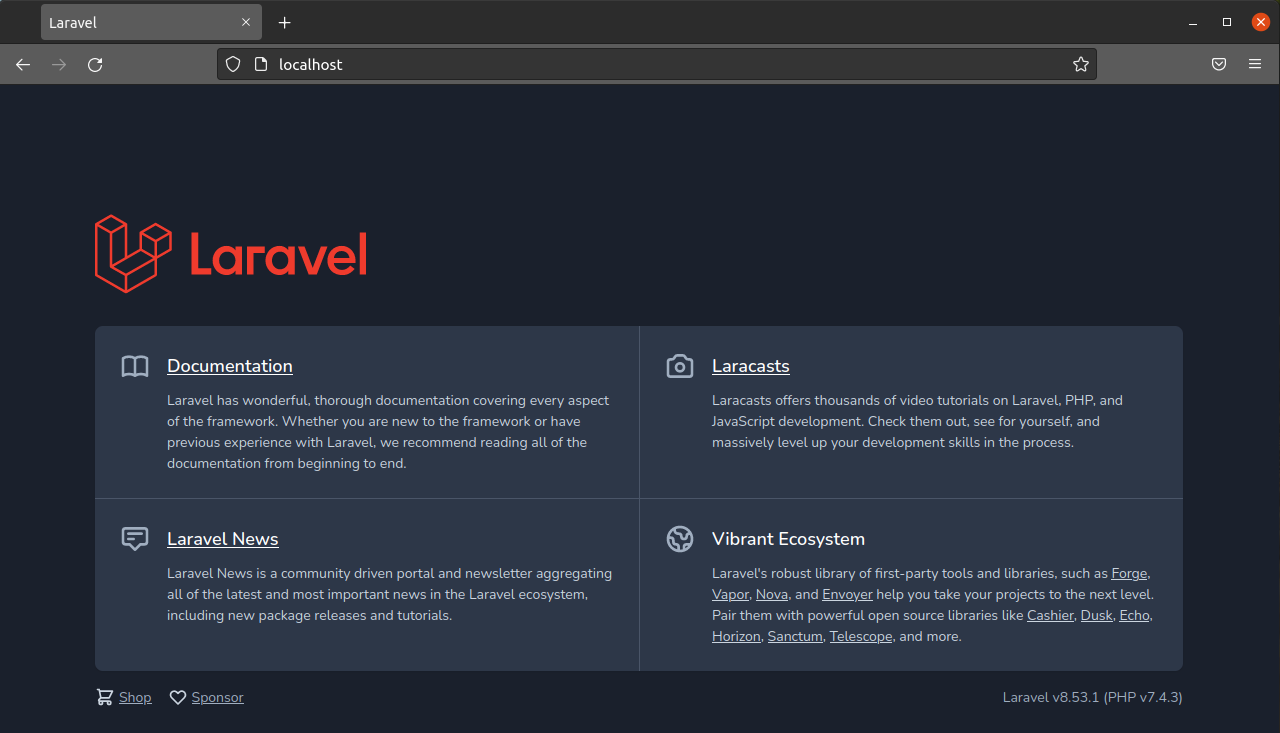
The application should now be available using the domain name or IP address (as defined by the server_name directive):
Step 6 – Customizing the Main Page
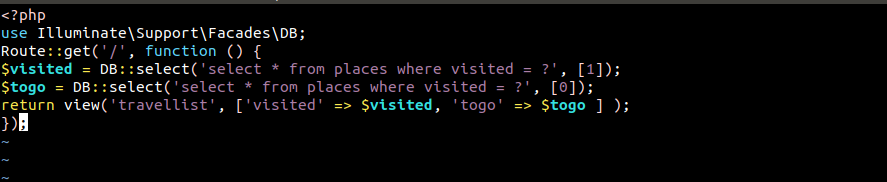
With the Laravel application configured, we can now start working on it. For demonstration, it’s time we created a sample page showcasing the sample data from the database table places. First, open the main route file in a text editor:
|
1 |
$ nano routes/web.php |
The file will contain some content by default. Here, routes are defined using the static method (Route::get). It receives a path and a callback function as arguments.
Replace the code with the following one:
|
1 2 3 4 5 6 7 |
<?php use Illuminate\Support\Facades\DB; Route::get('/', function () { $visited = DB::select('select * from places where visited = ?', [1]); $togo = DB::select('select * from places where visited = ?', [0]); return view('travellist', ['visited' => $visited, 'togo' => $togo ] ); }); |
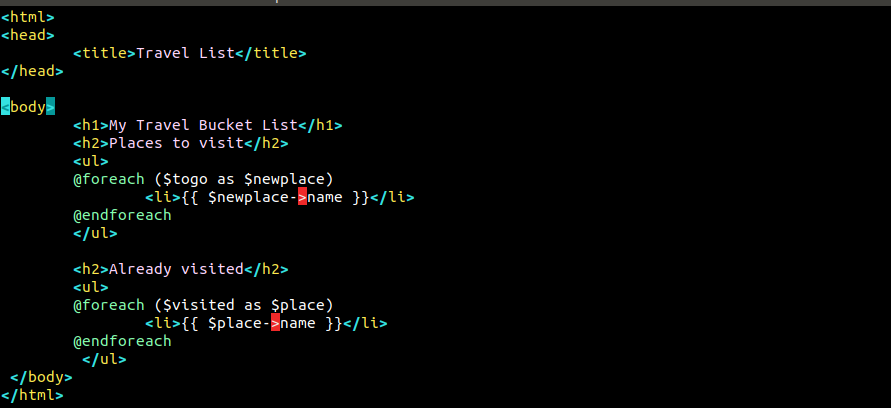
Save the file and close the editor. Next, we’ll create the layout to render the database query results to the user. Create a new file within resource/views:
|
1 |
$ nano resources/views/travellist.blade.php |
In the following code, we’ve created two lists of places depending on the value of visited and togo:
|
1 2 3 4 5 6 7 8 9 10 11 12 13 14 15 16 17 18 19 20 21 |
<html> <head> <title>Travel List</title> </head> <body> <h1>My Travel Bucket List</h1> <h2>Places to visit</h2> <ul> @foreach ($togo as $newplace) <li>{{ $newplace->name }}</li> @endforeach </ul> <h2>Already visited</h2> <ul> @foreach ($visited as $place) <li>{{ $place->name }}</li> @endforeach </ul> </body> </html> |
Save the file and close the editor. Now, access the web app page again:
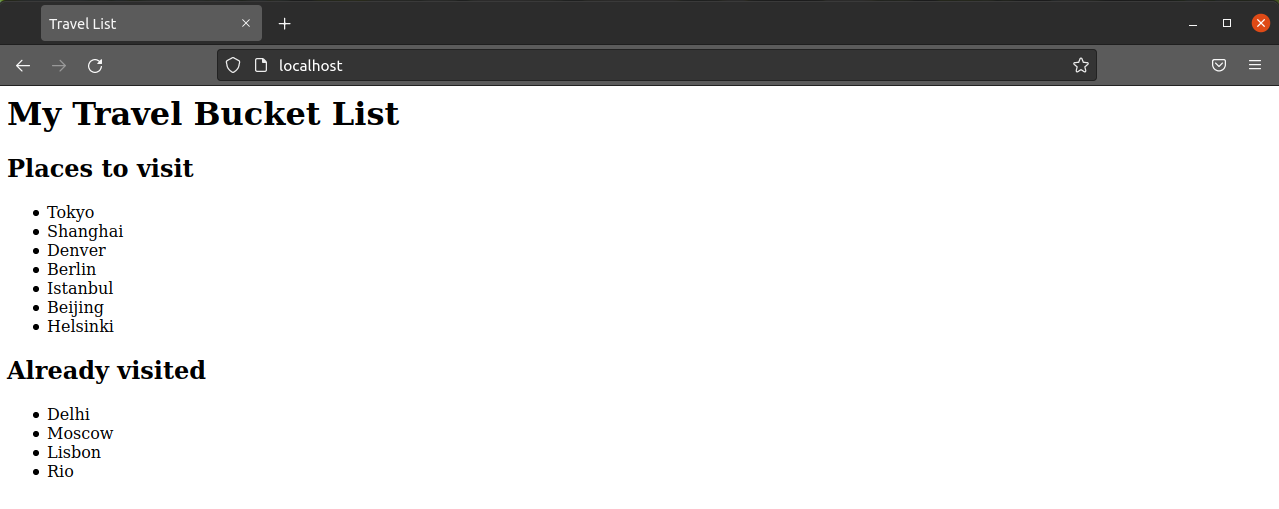
Voila! We now have a functional Laravel application using MySQL database for contents.
Final Thoughts
In this tutorial, we demonstrated how to set up a Laravel application on top of the LEMP stack running on the Ubuntu 20.04 server. We also showcased how to customize the default route to query database content and display results in a custom view. For more information on Laravel, review the official documentation on views, routes, and database support.
The installation of this tutorial is performed on a standalone virtual machine. However, you can also deploy Laravel on the LEMP stacks on Docker.
Happy Computing!
- How To Enable, Create and Use the .htaccess File: A Tutorial - March 8, 2023
- An Overview of Queries in MySQL - October 28, 2022
- Introduction to Cookies: Understanding and Working with JavaScript Cookies - October 25, 2022
- An Overview of Data Types in Ruby - October 24, 2022
- The Architecture of Iptables and Netfilter - October 10, 2022