

PostgreSQL is an open-source DBMS which in turn uses SQL. It’s a very powerful tool that is used to manage applications and host web data on VPS. In this tutorial, you will learn how to manage permissions in PostgreSQL. It will help you to provide your application roles the required permissions. We will perform this tutorial using PostgreSQL on a Ubuntu 18.04 cloud server on CloudSigma.
Installing PostgreSQL
To download and install PostgreSQL, run the following commands:
|
1 2 |
sudo apt-get update sudo apt-get install postgresql postgresql-contrib |
The installer will create a default user – “Postgres” to operate under. We will use this user for most of this tutorial. You can log in to the user with this command:
|
1 |
sudo su - postgres |
Now that PostgreSQL is installed, you will learn how it handles permission. You can also follow our tutorial on setting up PostgreSQL on Ubuntu for a detailed step-by-step guide of the installation process.
PostgreSQL Permission Concepts
Postgres manages the permissions through the concept of “roles.” With roles, there’s no distinction between users and groups. Roles are more flexible than the traditional Unix system of users and groups. For example, a role can act as a member of another role, inheriting its permissions.
Viewing Roles in PostgreSQL
To view the roles in PostgreSQL, you need to first login to the prompt using the following command:
|
1 |
psql |
Then, run the following to view the roles:
|
1 |
\du |

As of now, there’s only one default role with all the privileges.
How to Create Roles in PostgreSQL
You can create roles for Postgres either from the command line or from within the Postgres shell. You can try the following two approaches, following which you will see how to manage permissions and accesses in PostgreSQL.
How to Create Roles From Within PostgreSQL
The easiest way to create roles is from within the prompt of Postgres. You can do so with the following command:
|
1 |
CREATE ROLE demo_role; |
To check if it’s created, run the command:
|
1 |
\du |
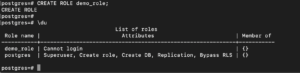
It specifies that the new role has no login permissions. You will learn how to change that later in the tutorial.
How to Create Roles from the Command Line
The alternative to the above method is to create the user from the command line. To quit the PostgreSQL prompt, type the following:
|
1 |
\q |
You can create a role called “test” with the following command:
|
1 |
createuser test |
Once you have executed the above command, login to the psql, and list the roles using the following commands:
|
1 2 |
psql \du |
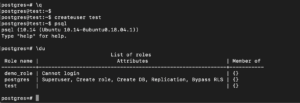
You can observe that the user-created this way doesn’t have the same attributes.
How to Delete Roles In PostgreSQL
You can easily delete roles in PostgreSQL using the following syntax:
|
1 |
DROP ROLE role_name; |
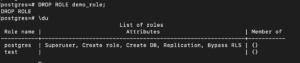
You can delete the demo role that we created earlier using the command:
|
1 |
DROP ROLE demo_role; |
If we try to drop a role that doesn’t exist, it will just throw an error. To see that, you can try to drop the same role again:
|
1 |
DROP ROLE demo_role; |

If you want the command not to throw an error when the role doesn’t exist, you can add ‘IF EXISTS’ in the command:
|
1 |
DROP ROLE IF EXISTS role_name; |
You can retry deleting the role with this command:
|
1 |
DROP ROLE IF EXISTS demo_role; |

How to Define Privileges Upon Role Creation
As of now, you have created and dropped roles. In this section, you will create roles with altered permissions. You can do so by specifying the permissions for the role with the create command:
|
1 |
CREATE ROLE role_name WITH optional_permissions; |
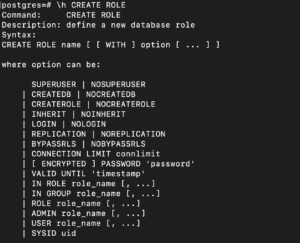
To see the options for this, you can open help using this command:
|
1 |
\h CREATE ROLE |
If you want to create a role with login permissions, you can form the command like this:
|
1 |
CREATE ROLE demo_role WITH LOGIN; |
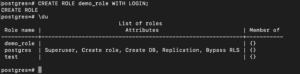
As we saw earlier, if you want to create roles with login permission, you can also use the following command:
|
1 |
CREATE USER role_name; |
The sole difference between the two commands is that ‘CREATE USER’ gives login permission to the role by default.
How to Change Privileges of Roles in PostgreSQL
Until now, you have tried how to give permissions while creating the user. In this section, you will alter the permissions of the already created users. The syntax for the alter command is:
|
1 |
ALTER ROLE role_name WITH attribute_options; |
For example, if you want, you can change the login permissions of the demo_role to ‘log in’ with this command:
|
1 |
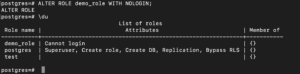
ALTER ROLE demo_role WITH NOLOGIN; |
To allow the user to log in again, you can alter the permissions with the following command:
|
1 |
ALTER ROLE demo_role WITH LOGIN; |
How to Log In as a Different User in PostgreSQL
PostgreSQL allows you to log in only locally by default if your username matches the system username. To get around this, you can either change the login type or configure PostgreSQL to use the loopback network interface. This interface would change the connection type to remote, even if the connection is local.
In this section, you will try the second one. To start with, you can set the password of the user, so authentication is possible.
Set the password of the ‘demo_user’ with the following command:
|
1 |
\password test |
When prompted, enter, and confirm the password. Once done, you can exit the PostgreSQL interface and return it to your normal machine user:
|
1 2 |
\q exit |
PostgreSQL requires you to login with a username that matches your operating system’s username and also to connect the database with the same username. Since you are not doing that in this case, you will have to explicitly specify the options you want to use. You can use the following syntax:
|
1 |
psql -U <span class="highlight">user</span> -d <span class="highlight">db</span> -h 127.0.0.1 -W |
user: The username you want to connect with
DB: An existing database that you have access to
-h 127.0.0.1: Specifies to PostgreSQL that you will be connecting through a network interface to the local machine. This option allows us authentication even though the username doesn’t match the system username.
-W: Indicates PostgreSQL that you will enter a password
To log in with our “test_user,” we can issue the following command:
|
1 |
psql -U test -d postgres -h 127.0.0.1 -W |
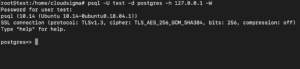
Once you enter the password, you’ll be logged onto the shell. In our example, we use the database ‘postgres,’ the default database automatically set up during the installation.
In this session, based on the user you selected to log in, you will face an issue that you don’t have the right permissions to perform various actions. The reason for the issue is that you haven’t already given the user sufficient permissions to administer things.
In the next section, you will grant the required permissions to users. First, you will need to change the user back to an administrative one:
|
1 2 3 |
\q sudo su - postgres psql |
Manage Permissions in PostgreSQL: How to Grant Permissions in PostgreSQL
In PostgreSQL, if a database or table is created by a particular role, only that role has permissions to modify it. The exception to this would be the roles that have superuser permissions. In this section, you will grant permissions to other roles. You can grant permissions to other roles using the ‘GRANT’ statement. The syntax is:
|
1 |
GRANT permission_type ON table_name TO role_name; |
You can create a simple table to perform the command:
|
1 2 3 4 |
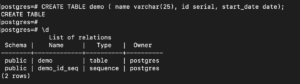
CREATE TABLE demo ( name varchar(25), id serial, start_date date); |
To see the table created, run the command:
|
1 |
\d |
Now that you have a demo table, you can grant privileges to the ‘demo’ table to ‘demo_role.’ You can give the role ‘UPDATE’ privilege with this command:
|
1 |
GRANT UPDATE ON demo TO demo_role; |
You can grant all permissions to a role by specifying the permission as ‘ALL’:
|
1 |
GRANT ALL ON demo TO demo_role; |
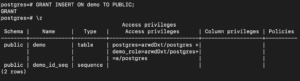
If you want to grant specific permission to all roles on the system, you can use the keyword ‘public’ instead of the role like the following command:
|
1 |
GRANT INSERT ON demo TO PUBLIC; |
You can view all the permissions granted using the following command:
|
1 |
\z |
Manage Permissions in PostgreSQL: How to Remove Permissions in PostgreSQL
You can easily remove permissions of a role using the ‘REVOKE’ command. It’s very similar to the grant command:
|
1 |
REVOKE permission_type ON table_name FROM user_name; |
Like with GRANT, we can use the keywords – ‘ALL’ and ‘PUBLIC’ to grant all permissions or grant permissions to all roles:
|
1 |
REVOKE INSERT ON demo FROM PUBLIC; |
How to Use Group Roles in PostgreSQL
For enabling widespread permissions control, roles are flexible enough to allow for grouping with other roles. For example, you can create a role – ‘temporary_role’ and then add ‘demo_role’ and ‘test_user’ to that role:
|
1 2 3 |
CREATE ROLE temporary_role; GRANT temporary_role TO demo_role; GRANT temporary_role TO test_user; |
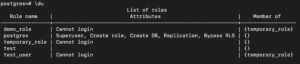
Now you can manage these two roles’ permissions just by managing the permissions of the ‘temporary_role’ role. This allows for easier management of permissions. You can see the role of membership information with this command:
|
1 |
\du |
Any group member can act as the group by using the ‘set role’ command. As the ‘postgres’ user is a superuser, you can use ‘set role’ even if you’re not a member of the group:
|
1 |
SET ROLE temporary_role; |
Any tables that you will create now are owned by temporary_role:
|
1 2 3 4 |
CREATE TABLE hello ( name varchar(25), id serial, start_date date); |
To check the ownerships of the table, run the following command:
|
1 |
\d |
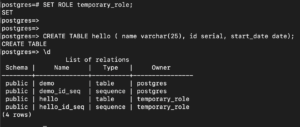
You can see that the ‘temporary_role’ role owns the new table and the sequence associated with the serial data type. To revert to the original role permissions, run the following command:
|
1 |
RESET ROLE; |
If you want the role to have all the privileges of the role they belong to, you can specify the ‘inherit’ property with the ‘alter role’ command:
|
1 |
ALTER ROLE test_user INHERIT; |
With the above command, ‘test_user’ has got all the privileges of the roles it belongs to. To drop a role, you can use the ‘drop role’ command:
|
1 |
DROP ROLE temporary_users; |

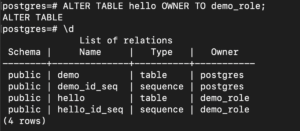
The above command throws an error because we have some objects, like table ‘hello,’ which depends upon it. To drop it, you can transfer the ownership of the table to a different role:
|
1 |
ALTER TABLE hello OWNER TO demo_role; |
You can check that temporary_role doesn’t own any tables now with the following command:
|
1 |
\d |
You can drop the ‘temporary_role’ now as it doesn’t have any dependencies now:
|
1 |
DROP ROLE temporary_users; |
Even though the above command will drop the temporary_users role, the former members of the role group aren’t removed.
Conclusion
You have completed the tutorial, and now you know how to manage permissions in PostgreSQL. You can administer the permissions easily. Knowing how to manage permissions ensures that your applications have access to the required databases while not having access to any other database used by a different application.
Happy Computing!
- Removing Spaces in Python - March 24, 2023
- Is Kubernetes Right for Me? Choosing the Best Deployment Platform for your Business - March 10, 2023
- Cloud Provider of tomorrow - March 6, 2023
- SOLID: The First 5 Principles of Object-Oriented Design? - March 3, 2023
- Setting Up CSS and HTML for Your Website: A Tutorial - October 28, 2022