
Kubernetes is an open-source tool that is crucial in container orchestration. Kubernetes helps in orchestrating and managing clusters at scale across various cloud environments or even on-premise servers. A cluster is a set of hosts meant for running containerized applications and services. A cluster needs a minimum of two nodes to work – one master node and a worker node. You may scale your Kubernetes infrastructure by adding more worker nodes. A master node and its worker nodes must be able to communicate over a network for the infrastructure to work. For an overview of the most important features of Kubernetes, please follow our tutorial on Getting to Know Kubernetes.
In this tutorial, we will be showing you several tools and techniques to help with the inspection and troubleshooting of Kubernetes networking.
Prerequisites
-
To follow along with this tutorial, you should have a Kubernetes cluster. We have a tutorial explaining How to Install and Use Kubernetes on Ubuntu 20.04 that can guide you through setting up a basic cluster for the demonstration.
-
You should also have kubectl installed locally. Depending on your local environment, follow the official docs on installing Kubernetes tools. The kubectl should be configured to connect to your cluster. We will explain that further in the section below.
We will be running several commands both locally and on the Kubernetes node. Let’s begin!
Configuring Local kubectl to Connect to a Remote Kubernetes Cluster
Let’s start by installing kubectl. Our local environment is running Ubuntu, follow this link if you are running a different local environment. To install kubectl tools on an Ubuntu/Debian local environment with the apt package manager, run the following commands to update the apt repository and install the necessary packages:
|
1 2 |
sudo apt-get update sudo apt-get install -y apt-transport-https ca-certificates curl |
Next, run the following command to download Google cloud public signing key:
|
1 |
sudo curl -fsSLo /usr/share/keyrings/kubernetes-archive-keyring.gpg https://packages.cloud.google.com/apt/doc/apt-key.gpg |
Then, add Kubernetes apt repository:
|
1 |
echo "deb [signed-by=/usr/share/keyrings/kubernetes-archive-keyring.gpg] https://apt.kubernetes.io/ kubernetes-xenial main" | sudo tee /etc/apt/sources.list.d/kubernetes.list |
After that, Update the apt index and install kubectl with the following command:
|
1 2 |
sudo apt-get update sudo apt-get install -y kubectl |
Then, verify that kubectl is installed by checking the version with the following command:
|
1 |
kubectl version |
Here is the output if you have just installed kubectl locally:

In the screenshot above, kubectl is trying to connect to the local Kubernetes cluster. However, it’s failing because we do not have a Kubernetes cluster running on our local machine yet.
To connect to the remote Kubernetes cluster, you will first download Kubernetes credentials from the remote cluster. Here is a command to copy the credentials from the master node:
|
1 |
scp -r hackins@178.22.66.253:/home/hackins/.kube . |
Replace the highlighted parts with your ssh username and the public IP of the master node. Once the credentials have finished downloading, copy the credentials to your home directory:
|
1 |
cp -r .kube $HOME/ |
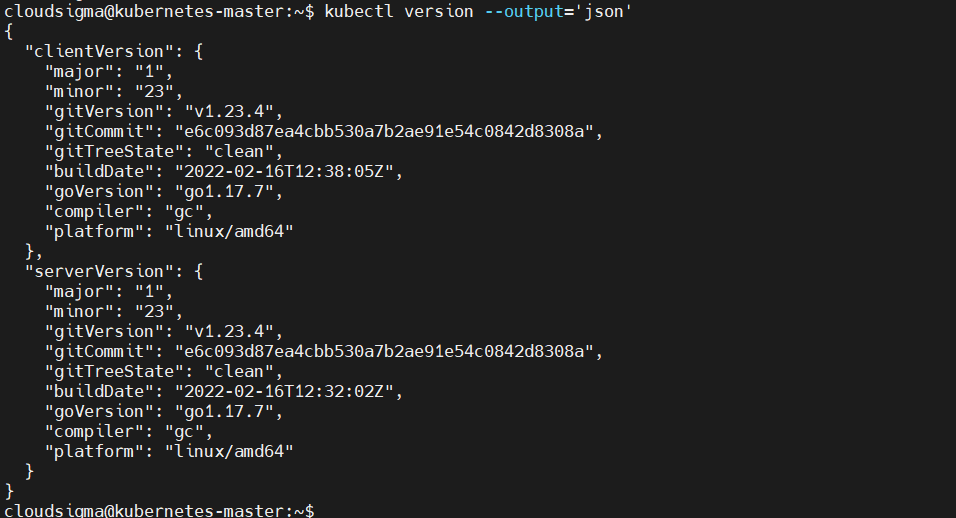
That’s all. Your local kubectl should be able to connect to and issue commands on your remote Kubernetes cluster. To confirm that your local kubectl is connected to the remote cluster, check with the version command again:
|
1 |
kubectl version --output='json' |
Here is the output, showing a successful connection:
Optionally, you can execute the get nodes command like so:

Getting a Pod’s Cluster IP
You can get a Pod’s Cluster IP by running the kubectl get pod command on your local machine. To list more information such as the node hosting the pod, and the pod’s cluster IP, add the flag -o wide to the command:
|
1 |
kubectl get pod -o wide |
Here is an output from our Kubernetes cluster. In the prerequisite tutorial we had made an Nginx web server deployment as you can see:

The IP column shows the internal IP address of individual pods. If the pod you are looking for does not appear in the list, you could be on a different namespace. You can issue the following command to list pods in all namespaces:
|
1 |
kubectl get pod -o wide --all-namespaces |
Getting the IP address of a Service
You can also get the IP address of a Service on your cluster. By adding the --all-namespaces flag, you get all services running on the cluster:
|
1 |
kubectl get service --all-namespaces |
The output from the command above is the following. The Service IP is in the cluster-ip column:

Getting and Accessing Pod Network Namespaces
Each Kubernetes pod has a network namespace assigned to it. Network namespaces also referred to as netns, are native networking libraries in Linux that provide isolation between network devices.
To check the DNS resolution or general network connectivity, you can run commands within a pod’s network namespace. To achieve this, you start by looking up the process ID of one of the containers in a pod. You can easily do this in Docker using Docker-specific commands. The first command lists the containers running on a node. Log into one of your worker nodes and run the following command:
|
1 |
docker ps |
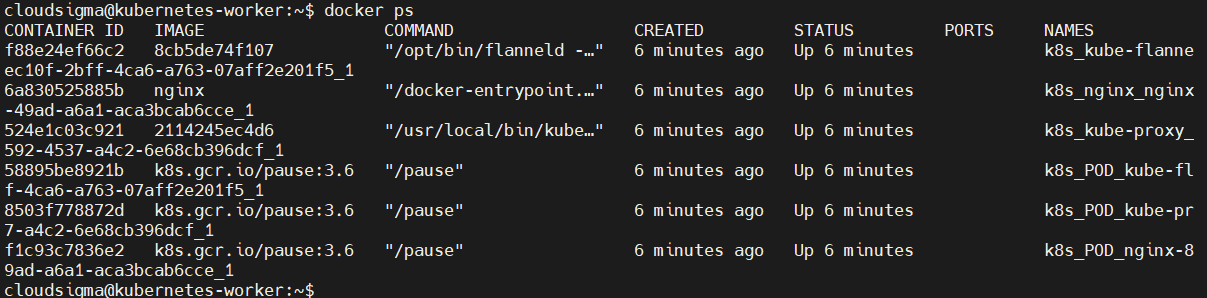
In the output, we are interested in the container ID or Names column. Notice the Nginx container we deployed in the prerequisite tutorial How to Install and Use Kubernetes on Ubuntu 20.04.
Next, copy the container ID or Name as we will use it in the next command to find the process ID:
|
1 |
docker inspect --format '{{ .State.Pid }}' container-id-or-name |
Replace the highlighted part with your value as copied from the previous command. Below is the output we got, which is the process ID:

Now that we have a process ID, we can use it to run the nsenter command inside the network namespace of the process:
|
1 |
sudo nsenter -t container-pid -n ip addr |
Replace the highlighted part with the process ID you got in the previous command. Then in the place of ip addr, you can put any command you would like to run inside the pod’s network namespace. You may also run it with sudo in the case that you get a permission denied error.
The nsenter command allows you to run a wider range of commands available on a node as opposed to using docker exec which only limits you to the commands installed inside the container.
Retrieving a Pod’s Virtual Ethernet Interface
A network namespace on a pod communicates with the node’s root netns through a virtual ethernet pipe. On the node’s side, this pipe appears as a device whose name begins with veth and ends in a unique identifier, such as veth742f721 or veth90. While inside the pod the pipe identifies as eth0.
You may want to know which veth device is paired with which pod. You can start by listing all network devices on the node, then list all the devices in the pod’s network. To identify which veth device is paired with a particular pod, you can correlate the device numbers between the two listings.
Use the nsenter command to run the ip addr command in the pod’s network namespace. You will need to know one of the container’s process IDs. For that, refer to the previous section on Getting and Accessing Pod Network Namespaces.
Next, execute the following command on your worker node’s terminal, replacing the highlighted part appropriately:
|
1 |
sudo nsenter -t container-pid -n ip addr |
The command outputs a list of the pod’s interfaces:

Notice the if7 characters after the eth0@ in the output above. This means the pod’s eth0 is paired with the node’s 7th interface. Next, list the interfaces inside the node’s default namespace by running the ip addr command:
|
1 |
ip addr |
The command lists the interfaces as shown below:
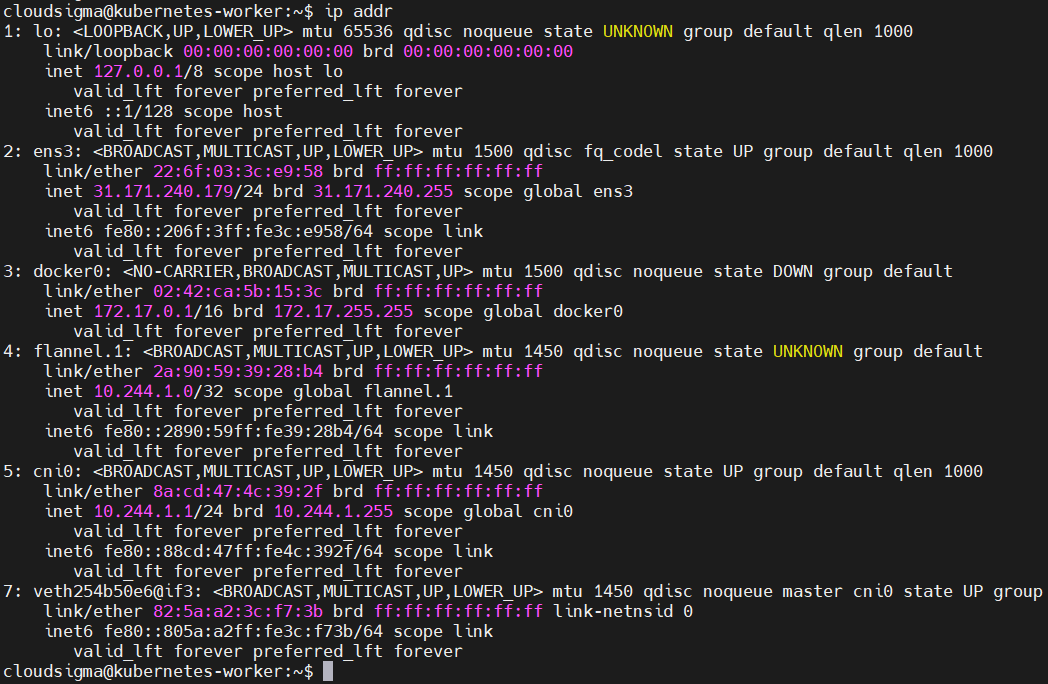
In the output, the 7th interface is veth254b50e6@if3 – the virtual ethernet pipe paired with the pod we are testing against.
Reviewing Iptables Rules
You can execute the command iptables-save to list all iptables on a node:
|
1 |
iptables-save |
The output of the command can be long, so you may save it to a file for later inspection:
|
1 |
iptables-save > iptables.txt |
You can also use less to paginate the output:
|
1 |
iptables-save | less |
Since we are only interested in the Kubernetes NAT rules, add the -L flag to specify the correct target:
|
1 |
sudo iptables -t nat -L KUBE-SERVICES |
Here is the output:

Inspecting IPVS Details
Kube-proxy is a network proxy running on each node in your Kubernetes cluster. It can be used to configure IPVS to handle the translation of virtual Service IPs to pod IPs. To list the translation table of IPs, you may use the ipvsadm command. First, you need to install it on your node:
|
1 |
sudo apt install ipvsadm |
Now you can execute the following command:
|
1 |
sudo ipvsadm -Ln |
To show a single Service IP, add the -t flag, specifying the desired IP address:
|
1 |
ipvsadm -Ln -t 10.244.1.255 |
Querying Cluster DNS
There are a few ways you may follow to debug your cluster DNS resolution. The official documentation describes one way as deploying a debug container with all the necessary tools, then using kubectl to exec nslookup.
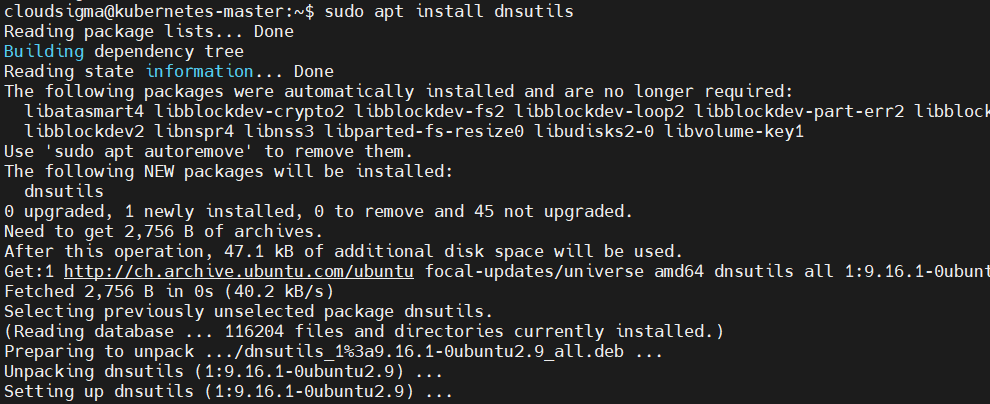
Optionally, you may query the DNS using dig and nsenter command from the node itself. First, you will have to install dig on your master node. For Ubuntu, install with the apt command:
|
1 |
sudo apt install dnsutils |
Go back to the terminal on your local machine, and run the command below to find the cluster IP of the kube-dns service:
|
1 |
kubectl get service -n kube-system kube-dns |
The command outputs:

The cluster-ip column contains the value we need. Now we can use nsenter to run dig in the container namespace. However, you will need a container process ID to access its namespace. Look at the section Getting and Accessing Pod Network Namespaces above for guidance.
Once you have the container-id, execute the following command on your master node:
|
1 |
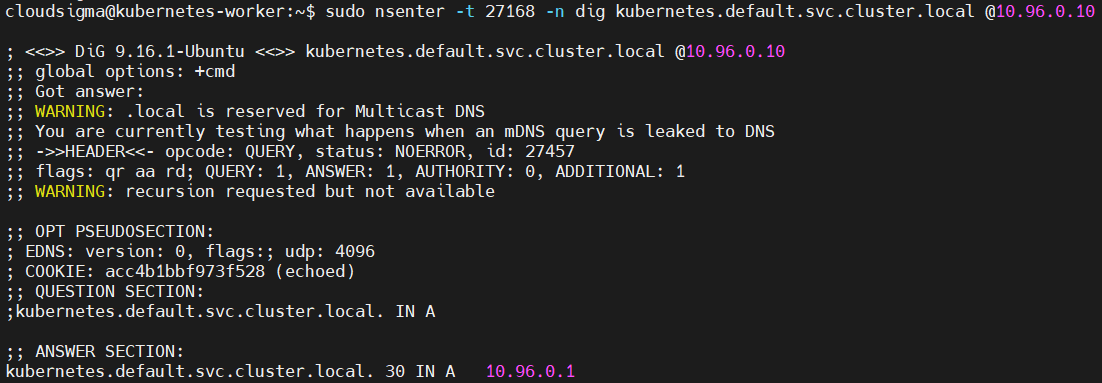
sudo nsenter -t 27168 -n dig kubernetes.default.svc.cluster.local @10.96.0.10 |
The dig command takes the IP of the cluster DNS service IP ( @10.96.0.10) and looks up the full domain name of the Service service-name.namespace.svc.cluster.local:
For information on finding service names and namespaces, have a look at the section Getting the IP address of a Service.
Reviewing Conntrack Connection Tracking
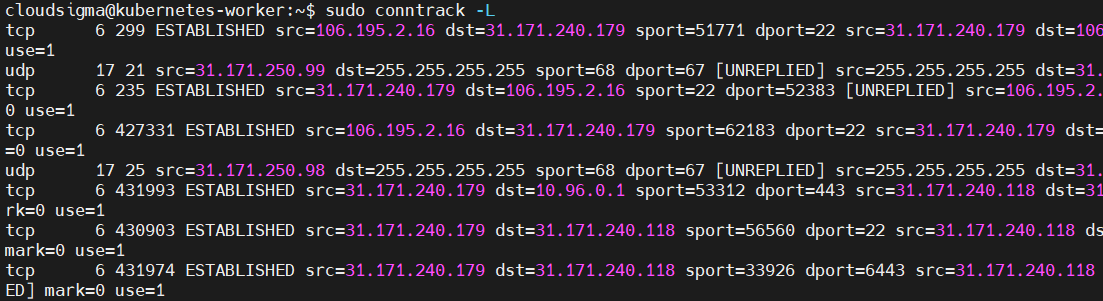
You can use the conntrack command to view all the connections currently being tracked:
|
1 |
sudo conntrack -L |
It outputs something similar to the screenshot:
Add the -E flag to continuously watch for incoming connections:
|
1 |
sudo conntrack -E |
To view connections tracked to a particular destination address, add the -d flag and specify the destination address:
|
1 |
sudo conntrack -L -d 80.45.6.4 |
Sometimes the connection tracking table gets filled, resulting in new connections being dropped. This causes issues preventing your nodes from making reliable connections. If this happens, you will see messages such as the following in your system logs, at the location /var/log/syslog:
|
1 |
Mar 07 19:12:11 worker-105 kernel: nf_conntrack: table full, dropping packet. |
A system setting exists for the maximum connections to track. Use the following command to list your current value:
|
1 |
sysctl net.netfilter.nf_conntrack_max |
It outputs:

You can modify the value by using the -w flag:
|
1 |
sudo sysctl -w net.netfilter.nf_conntrack_max=231074 |
You may want to modify your /etc/sysctl.conf file to make the value permanent and ensure it persists across reboots. Open the file with nano:
|
1 |
sudo nano /etc/sysctl.conf |
Next, modify the value if the line exists or add the line at the end of the file, specifying the new value:
|
1 |
net.netfilter.nf_conntrack_max=231074 |
Conclusion
When deploying multiple containerized services, you will greatly benefit from Kubernetes since it gives you a central management point. To ensure there is connectivity among the various Kubernetes pods, we showed you some network inspection commands you can use to troubleshoot any issues around your Kubernetes infrastructure.
To learn more about Kubernetes, its advantages, setting up and deploying applications on Kubernetes, have a look at our various Kubernetes tutorials.
Happy Computing!
- How to Deploy WordPress with Persistent Volume on Kubernetes Cluster - March 17, 2023
- Deploying Applications on Kubernetes Using Argo CD and GitOps - October 26, 2022
- Using Node.js Modules with npm and package.json: A Tutorial - October 6, 2022
- Using Ansible to Install and Configure WordPress with LAMP on Ubuntu - September 23, 2022
- Creating Views in the Django Web Application Framework - September 22, 2022