

Most of the devices we use run on JAVA. Therefore, in this CloudSigma tutorial, you will learn how to setup JAVA on Ubuntu 18.04 server.
JVM (JAVA Virtual Machine) is required to run various kinds of software like Jenkins, Tomcat, etc. In addition, JAVA Development Kit (JDK) is used to compile and run some specific JAVA Based Softwares. Using the tutorial, you can choose and install any specific version of JRE and JDK. You can then use it to run various applications or develop new software.
Creating the machine
As a first step, you have to create a machine. You can do that easily on CloudSigma WebApp’s compute section.
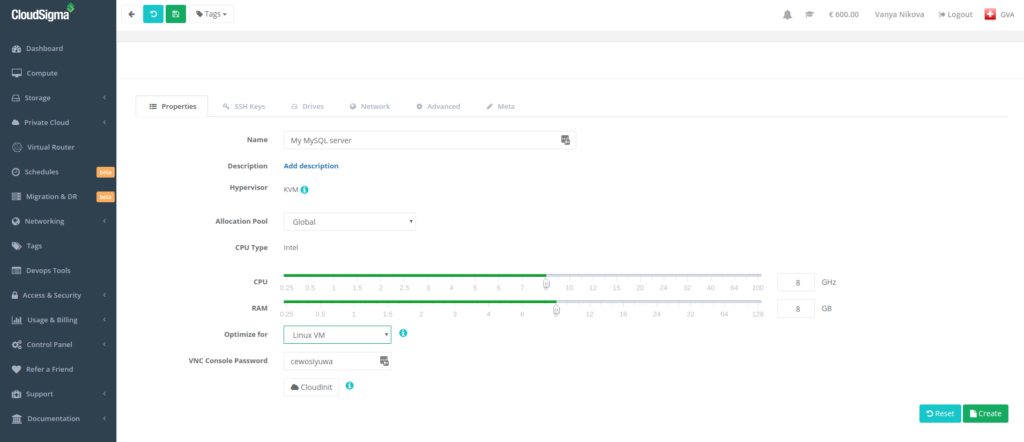
For the purposes of the tutorial, you can use the following resources:
CPU: 8 GHz
RAM: 8 GB
SSD: 50 GB
You can mount the disk with Ubuntu 18.04 LTS image available in CloudSigma’s library:
Ubuntu 18.04: Pre-installed 64bit with VirtIO drivers, superuser, Python 2.7.17, Pip 20.0.2 OpenSSL 1.1.1d, Cloud-init and latest updates until 2019-03-03.
After starting the machine, you can update all the existing repos and packages on the machine by running the following commands:
|
1 2 |
sudo apt update sudo apt upgrade |
Installing the JRE/JDK
The simplest way to install JAVA is to install the version packaged with Ubuntu using ‘apt’. Ubuntu 18.04 includes OpenJDK Version 11, which is an open-source variant of JAVA.
First, you should run the following command to check if JAVA is already installed on your server:
|
1 |
java -version |
You will be able to see this output if JAVA is not installed on your server :
|
1 2 3 4 5 6 7 |
# java -version Command 'java' not found, but can be installed with: apt install default-jre apt install openjdk-11-jre-headless apt install openjdk-8-jre-headless |
Next, you can run the following command to install the Java Runtime Environment once you have confirmed that JAVA is not installed:
|
1 |
sudo apt install default-jre |
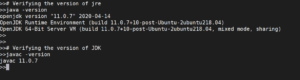
Verify the installation by checking the version of JAVA:
|
1 2 3 4 |
# java -version openjdk version "11.0.7" 2020-04-14 OpenJDK Runtime Environment (build 11.0.7+10-post-Ubuntu-2ubuntu218.04) OpenJDK 64-Bit Server VM (build 11.0.7+10-post-Ubuntu-2ubuntu218.04, mixed mode, sharing) |
Some software requires Java Development Kit (JDK) to compile and run. You can run the following command to install it:
|
1 |
sudo apt install default-jdk |
Verify the installation by checking its version:
|
1 |
javac -version |
Now that you have learned how to install the open-sourced version of JAVA, you can move to the next section if you want to learn how to setup Oracle JDK.
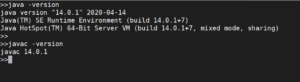
Installing Oracle JDK 14
Since Oracle’s licensing doesn’t allow installations through package managers, you will have to use a third party script/installer to install JAVA.
To install the Oracle’s JDK, you can add the repo of a linuxuprising and update the packages. After that you can run the install command:
|
1 2 3 |
sudo add-apt-repository ppa:linuxuprising/java sudo apt update sudo apt install oracle-java14-installer |
Managing different JAVA Versions
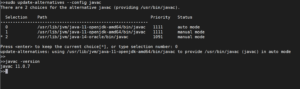
If you have multiple JAVA versions installed on one server, you can configure one of them to be the default. In order to do this, use the following command:
|
1 |
sudo update-alternatives --config java |
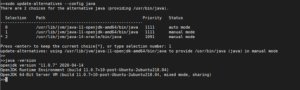
You can choose the number associated with the preferred JAVA version. Press the ‘Enter’ key to configure the selected version as the default one.
You can also do the same for the JAVA compiler:
Setting Environment Variable – JAVA_HOME
A lot of programs that require JAVA find the installation location from “JAVA_HOME” environment variable. To set the variable, you need to find the location of installation. You can do that by using the update-alternatives command:
|
1 |
sudo update-alternatives --config java |
Copy the path of the required JAVA version and put it in the below command:
|
1 2 3 4 |
echo "JAVA_HOME=[[INSTALLATION LOCALTION]]" >> /etc/environment Example: echo "JAVA_HOME=/usr/lib/jvm/java-11-openjdk-amd64/bin/java" >> /etc/environment |
Next, for the settings to take effect, you need to reload the environment file using the command:
|
1 |
source /etc/environment |
After that, you can execute the following command to verify if the variable is set :
|
1 |
echo $JAVA_HOME |

Users working on the server will have to log out and log in for this change to take effect.
Now that you know how to setup JAVA on Ubuntu and manage its different versions, you are all set to install various programs that need JAVA.
Happy Computing!
- Removing Spaces in Python - March 24, 2023
- Is Kubernetes Right for Me? Choosing the Best Deployment Platform for your Business - March 10, 2023
- Cloud Provider of tomorrow - March 6, 2023
- SOLID: The First 5 Principles of Object-Oriented Design? - March 3, 2023
- Setting Up CSS and HTML for Your Website: A Tutorial - October 28, 2022