

Having a secure website is vital to ensuring a reputable online presence for any business. Website security should be among your top concerns especially if you are transferring sensitive data between your website and your website visitors. A simple Google search of ‘how to secure a website’ will bring you several directives. One of the top results is an SSL certificate. SSL stands for Secure Sockets Layer which is a feature that provides end-to-end encryption of data such as payment details passing between your website and your visitors. In this tutorial, we will guide you through installing an SSL certificate on a website running on an Nginx server on Ubuntu 20.04 VPS. Several online authorities offer SSL certificates in free and premium packages. In this guide, we will secure the Nginx server with Let’s Encrypt, a free and open Certificate Authority owned by the nonprofit Internet Security Research Group (ISRG).
Let’s Encrypt provides an easy way to acquire free TSL or SSL certificates that you can install on your website. It provides a software package called Certbot that automates the whole process of installing and renewing the SSL certificate on your Nginx server. In this guide, we will use Certbot to get the SSL certificate installed on our server. We will use a separate Nginx server block to avoid common mistakes and keep the default one as a fallback. Let’s get to it!
First things first
Since we will be using an Ubuntu 20.04 server, it’s paramount that you have it already correctly configured. It needs to be equipped with a non-root user with sudo privileges, with updated and installed packages, including a firewall. You can easily install your server by following our tutorial on setting up your Ubuntu server. You can also take advantage of our tutorials on various tools you can install on Ubuntu, including phpMyAdmin, Anaconda, and Node.js.
You will also need to have either a free or paid domain name registered from a domain registrar of your choice. Ensure the domain points to your server through configuring the DNS records. In this tutorial, we will use example.dev as our domain name.
Next, you need to have Nginx installed and configured a server block for your domain above. You can get Nginx easily with our tutorial on installing Nginx on Ubuntu.
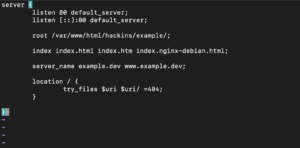
Server blocks are usually located in the directory: /etc/nginx/sites-available/. For our case, we will have our server block at the location /etc/nginx/sites-available/example.dev. The root directive points to the location where you have saved your website files. A sample server block may look like this:
Step 1: Installing Certbot
Since we will be using Certbot to automate the process of acquiring an SSL certificate, we will first need to install it on our server. The following apt command installs Certbot and its Nginx plugin:
|
1 |
sudo apt install certbot python3-certbot-nginx |
Once Certbot is installed from the command, it must be configured with Nginx for automatic SSL configuration.
Step 2: Confirming the Nginx server blocks configurations
Certbot must find the correct server block for the automatic configuration to be successful. It does this by checking the server_name directive. The server_name must match the domain you are requesting the certificate for. For our case it’s example.dev. You may open your server block configuration to confirm that they actually match using the following command:
|
1 |
sudo nano /etc/nginx/sites-available/example.dev |
Find the server_name directive and update it accordingly if it does not match:
|
1 |
server_name example.dev www.example.dev; |
For any updates you make to Nginx configurations, you must validate them before reloading to prevent your server from crashing. Use the following command:
|
1 |
sudo nginx –t |
This would be the output if everything is okay:

If you receive an error, reopen the configuration file and check for errors and typos, update, save, and validate again. If the syntax is okay, reload the Nginx configurations using the command:
|
1 |
sudo systemctl reload nginx |
Step 3: Configuring the firewall
We are installing the SSL certificate to ensure our website is accessed securely via HTTPS. For that reason, you must enable HTTPS traffic through the firewall. Otherwise, things might not work as expected. An installation of Nginx registers a few profiles with ufw. UFW – Uncomplicated Firewall, is the default firewall configuration tool for Ubuntu. Ufw provides a few commands to help you in configuring firewalls for your server. To view the current setting, enter the following command:
|
1 |
sudo ufw status |
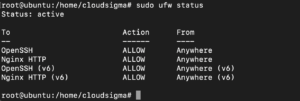
As you can see, you can have only HTTP traffic. However, we want HTTPS to be allowed on the server. To achieve this, we activate the Nginx Full profile to allow both HTTPS and HTTP and delete the unnecessary HTTP profile. Finally, confirm the new settings. Enter the following commands:
|
1 2 3 |
sudo ufw allow 'Nginx Full' sudo ufw delete allow 'Nginx HTTP' sudo ufw status |
The output from the above commands may look like this:
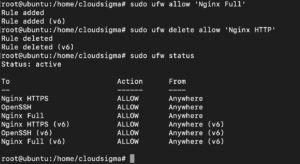
Your server will now allow HTTPS traffic.
Step 4: Installing an SSL certificate from Certbot
The ultimate goal we’re working towards in this tutorial is to install an SSL certificate. Certbot provides several ways to acquire SSL certificates through plugins. We will be using the Nginx plugin for configuring, automating, and reloading the config files whenever it is needed. Next, you need to enter the following command in your terminal to start the SSL installation process: (remember to change the domain name to match your server block configurations):
|
1 |
sudo certbot --nginx -d example.dev -d www.example.dev |
The –nginx flag instructs Certbot to run the command with the Nginx plugin, while the -d flag specifies the domain name. The onscreen prompts should guide you through. If you are installing an SSL certificate for the first time, Certbot asks you to specify the email address and agree to the terms of service. The email you provide is where you will receive renewal emails and other communications. Certbot will then communicate with the Let’s Encrypt server which will confirm the validity of the domain name and run a challenge to verify that you actually own the domain you’re obtaining the SSL certificate for.
If the process is successful, Certbot prompts you to configure some HTTPS settings. For example, you will need to configure whether you would like to redirect HTTP traffic to HTTPS hence removing HTTP access or not:

After that, select your choice and press enter. Certbot updates the configuration and automatically reloads Nginx with the new configurations. Certbot will display a message to show that the configuration was successful.
You have successfully configured your Nginx server to serve traffic over HTTPS. You can try reloading using https://example.dev and you should see the padlock in the address bar of your browser.
Step 5: Confirming Certbot auto-renewal configurations
While Let’s Encrypt Certificates are free, they are only valid for 90 days. Fortunately for us, the Certbot package takes care of automatic renewals of the SSL certificates by using Cron – a Unix utility that handles Task Scheduling. Scheduled tasks are usually set up using scripts stored in the /etc/cron.d directory.
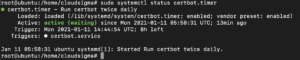
Certbot installs a renewal script in this location. Furthermore, Certbot installs a service with Systemd called certbot.timer that runs the renewal script twice a day. The service will automatically renew any certificate that is left with about 30 days until expiration. If it fails to renew, an email is sent to the address you provided during the initial set up. This gives enough time to fix any SSL renewal errors if the auto-renewal fails. To query the status of the timer, enter the following command:
|
1 |
sudo systemctl status certbot.timer |
The output of the command may look like the screengrab below, confirming that the service is running as expected:
Optionally, Certbot offers the dry run command to simulate the renewal of an SSL certificate. Enter the following command to test the renewal:
|
1 |
sudo certbot renew --dry-run |
The output would confirm that the auto-renewal of the SSL certificate is properly configured. For every renewal, Certbot automatically reloads Nginx configuration, hence there’s nothing required on your part. However, if it fails to renew, then an email will be sent to the address you provided with further instructions.
Conclusion
In this tutorial, you learned how to secure an Nginx server by installing an SSL certificate from Let’s Encrypt and ensuring your website traffic is served over HTTPS. You were able to install and configure the Certbot software package which automates the process of acquiring an SSL certificate as well as configuring the auto-renewal of the certificates. This brings us to the end of the tutorial. It’s time to promote a secure browsing experience for your website visitors!
Happy computing!
- Removing Spaces in Python - March 24, 2023
- Is Kubernetes Right for Me? Choosing the Best Deployment Platform for your Business - March 10, 2023
- Cloud Provider of tomorrow - March 6, 2023
- SOLID: The First 5 Principles of Object-Oriented Design? - March 3, 2023
- Setting Up CSS and HTML for Your Website: A Tutorial - October 28, 2022