

The majority of the tech community enjoys interacting with systems through the command-line interface (CMD) or shell. Generally, it makes their work easier. For instance, you can create a shell command that can execute several tasks automatically as opposed to having to click through several buttons of a GUI.
When you launch a shell or CMD program, it compiles several pieces of information. The information sets how the program accesses the underlying system resources as well as overall behavior. You can store it in a place called the environment. The environment consists of strings that represent key-value pairs. In this tutorial, we will be using Ubuntu 20.04 VPS as an example to guide you while setting up environmental or shell variables. The guide should apply to other Linux distributions as well.
What is the Difference between Environmental Variables and Shell Variables?
When you start a session, information is gathered from the system’s settings and configuration files. Then, it is available to the shell process and its child processes. This information is a set of key-value pairs in this format:
|
1 2 3 |
KEY=value KEY="Some value" KEY=data1:data2 |
The names of the variables, i.e. keys, are case sensitive. However, it’s conventionally accepted to have them in UPPER CASE. It helps you distinguish them within other contexts. With the colon ‘:’ character you can assign multiple values to the same variable. It’s also important to ensure not to leave a space around the =. The keys are the variables and are classified into two: environmental variables and shell variables. Environmental Variables contain all variables defined system-wide and available to every child shells or processes. They help pass information into the processes you start through the shell commands. Shell Variables include only variables defined in the specific shell session. Furthermore, they include only variables available exclusively within their shell instance.
Listing Environmental and Shell Variables
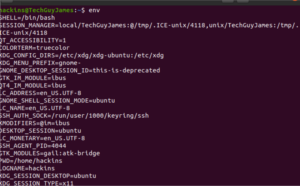
By default, the terminal provides two commands to list the environmental and shell variables: env or printenv. They show the same information in their default state. Here is sample output from these commands:
Using env:
Using printenv:
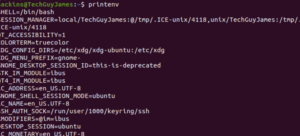
As you can see, the output is the same. The difference comes in when you want the value of a specified key. That’s when you will use printenv with the name of the variable:

To see multiple values, you can pass more than one argument to the printenv command. The values will appear in the order you entered the arguments:

You may also use the echo command with the variable name to display the value of a variable:

The env command allows you to modify the environment that programs run in by passing variable definitions in a syntax such as:
|
1 |
env VAR1="var 1 value" command_to_run command_options |
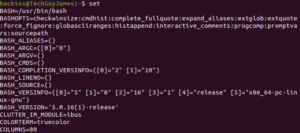
This allows you to override values or set new values that can be used by the child process. The printenv and env commands list environmental variables as seen above. Those were already defined for the system processes. If you want to see a list of shell variables, you can use the set command. Typing set without any variables will return a list of all environmental variables, shell variables, local variables, and shell functions:
The variables might be too many. If needed, you can paginate them using the command:
|
1 |
set | less |
You can clean up the output further by specifying the set command to execute in POSIX, hence not printing the shell functions. Here we execute in a subshell (separate instance of the command processor) to prevent the command from changing the current environment:
|
1 |
(set -o posix; set) |
The above lists all environmental and shell commands available on the system. You can trim down the output using the following command to try getting only shell variables:
|
1 |
comm -23 <(set -o posix; set | sort) <(env | sort) |
A sample output from the above command is:
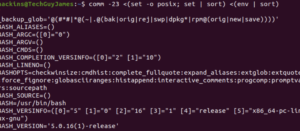
While the command may include a few environmental variables, it will help you differentiate between the shell and environmental variables. That’s because the set command quotes the values of the variables while printenv and env commands do not quote the values. Shell variables are useful for setting persistent values for sessions, while not permanently writing changes to files.
Common Environmental Variables
USER – The current logged in user.
SHELL – The shell that will be interpreting the commands you enter. The default is bash, but you can change that.
HOME – Home directory of the current user.
TERM – Specifies the type of terminal to emulate. Shows the current emulated terminal.
PWD – The current working directory.
OLDPWD – The previous working directory. This helps the shell to switch to the previous directory when you enter the change directory command as cd.
EDITOR – The default file editor when you type edit in your terminal.
LS_COLORS – Defines color codes used to add colored output when you enter the ls command. It helps differentiate file types and provide info to users.
LOGNAME – The name of the current user.
MAIL – Defines the path to the current user’s mailbox.
LANG – Defines the current locale setting.
PATH – Specifies a list of directories to search when executing the commands. During the execution of a command, the system searches through these directories and uses the first found executable.
_ – The last executed command.
Common Shell Variables:
BASH_VERSION – The version of bash, in human-readable output.
BASH_VERSINFO – The version of bash, in machine-readable output.
BASHOPTS – The list of options that were used when bash was executed. Useful for determining if the shell environment will operate as you expect.
COLUMNS – The number of columns wide being used to draw output on the screen.
DIRSTACK – The stack of directories that are available with the pushd and popd commands.
HOSTNAME – The hostname of the computer at this time.
HISTFILESIZE – Number of lines of command history stored in a file.
HISTSIZE – Number of lines of command history allowed in memory.
IFS – The internal field separator to separate input on the command line. It is a space by default.
SHELLOPTS-Used to set shell options.
UID-The UID of the current user.
PS1– The primary command prompt definition. This is used to define what your prompt looks like when you start a shell session.
PS2 – Declare secondary prompts for when a command spans multiple lines.
Setting Environmental and Shell Commands
First, as explained previously we will be keeping the variable names as all uppercase. Next, we will go through creating shell variables. Finally, we will be creating environmental variables.
Creating Shell Variables
Let’s start off with the usual hello world. Enter the following into your terminal:
|
1 |
MY_FIRST_VAR=’Hello World!’ |
The quotation is used because the variable has space. Notice we used a single quotation because the exclamation mark is a special character and should either be escaped or put in single quotes. Now, you have created your first shell variable. It’s available in the current shell session only. Shell variables are not available to child shells and processes. You can print it to the terminal by using the set with grep command:

Or display the value using echo, referencing it using the $ sign and the variable name:

If you try to print using printenv, it will not show any output. This helps you confirm that this is not an environmental variable:

Creating Environmental Variables
The previously created shell variable can be turned into an environmental variable using the export command. First, you create a shell variable. Then, to create an environmental variable, you need to use the export command. After executing this command, the variable will be available to child shells and processes:
|
1 |
export MY_FIRST_VAR |
Now, if you test using the printenv command, you should see the variable and value:

You can also create an environmental variable in one step using the syntax:
|
1 |
export MY_SECOND_VAR='This is my second variable' |
Environmental variables are only passed to the child shells and not to the parent. This helps prevent child processes from affecting the environment of the program that called them.
Demoting and Unsetting Variables
If you have been following the tutorial up to this moment, then you still have MY_FIRST_VAR defined as an environmental variable. You can change it back into a shell command by typing the echo command with the –n flag:
|
1 |
export -n MY_FIRST_VAR |
If you test with printenv, there will be no output. However, the echo command will display it because it’s still a shell command:

You can unset either a shell or environmental variable using the unset command. And you can confirm it no longer exists by using echo. As you can see it shows no output:

Setting Environmental Variables at Login
Many programs depend on environmental variables for execution. Since it’s not efficient to set the variables every time you want to execute a program Linux provides a way to define them and save them to a file. This way, they can be set automatically at login time. The shell reads different configuration files depending on how the session is started. Those are discussed below:
Types of Shell Sessions and their Differences
- Login Shell Session – begins by authenticating the user. The session is set when you sign through SSH or terminal session.
- Non-login Shell Session – begins when you start a new shell from within your authenticated shell. You can start a new shell using the bash command. No authentication details are required.
- Interactive Shell Session – a shell session attached to a terminal session.
- Non-interactive Shell Session – a shell session not attached to a terminal session – runs in the background.
A session is classified as either login or non-login, and either interactive or non-interactive. When you login and begin a shell session through SSH, then that will be a login and interactive shell session. When you run a script on the terminal it usually runs in a non-login non-interruptive session. A shell session can also be a combination of the two. So, which configuration file gets picked?
A login session first reads configuration files from the directory /etc/profile. Secondly, it checks the user’s specific configuration files from the user’s home directory. Only the first file found out of ~/.bash_profile, ~/.bash_login, and ~/.profile is read and all other files ignored. A non-login session will first read from the /etc/bash.bashrc, followed by ~/.bashrc. Non-interactive sessions read the environmental variable called BASH_ENV to get the name of the file to use to define the new environment.
Implementing Environmental Variables
When you set your variables, always note in which file you place them based on our discussion above. This will provide flexibility by ensuring certain variables are only available in certain sessions. You do not want a crucial variable missing in one session.
In some cases, we want the variable existing in login and non-login sessions. Luckily, most Linux distributions by default, have configured login configurations to read the non-login configurations and make them available to your processes. Hence, you can simply define your variables in the non-login configuration files. Usually, we set user-specific environmental variables and want our settings to be available in both login and non-login shell sessions. For this reason, we will use the ~/.bashrc file. We will be using nano to edit the file. Enter the following in your terminal to open the file:
|
1 |
nano ~/.bashrc |
In the open configuration file, you can see several variables already. You can add environmental variables the same way you do when using the command line. Just type the command:
|
1 |
export KEYNAME=value. |
You can add them anywhere in the file-on a new line, and not inside a looping function. Then, save and close the file. Any next shell session you start will read from the file. If you want the current shell to read the settings you’ve just added without having to restart it, you can use the command:
|
1 |
source ~/.bashrc |
You should add system-wide environmental variables in any of the following: /etc/profile, /etc/bash.bashrc, or /etc/environment.
To Sum Up
Finally, you can now set shell and environmental variables and enjoy the great power these tools bring to your VPS! It has many advantages such as automating the running of some processes, or auto deployment configuration that requires authentication information, passing variables to child processes, and more. Environmental variables help you hide sensitive data like authentication information from public repos amongst other data. With this foundation, you can create complex scripts that you can execute automatically via the command line without requiring constant user input.
Happy Computing!
- Removing Spaces in Python - March 24, 2023
- Is Kubernetes Right for Me? Choosing the Best Deployment Platform for your Business - March 10, 2023
- Cloud Provider of tomorrow - March 6, 2023
- SOLID: The First 5 Principles of Object-Oriented Design? - March 3, 2023
- Setting Up CSS and HTML for Your Website: A Tutorial - October 28, 2022