

Introduction
WordPress is undoubtedly the most popular Content Management System. You can host about anything on WordPress- from simple portfolio websites, company landing pages, and blogs to full-fledged eCommerce websites. It guarantees flexibility, robustness, and security, which are key for the success of any website. Downloading and installing WordPress is straightforward. Then, once you have installed it on your server, most of the administration tasks can be done from the web frontend. WordPress requires a combination of software components to run. These software components usually come together to form a stack. In this tutorial, we will be focusing on using the LAMP stack to run our WordPress site.
LAMP stack is a very popular stack in the web development industry. Its popularity can be attributed to Apache, which is currently the most widely used web server in the world, PHP which is an open-source programming language with heavy support from the open-source community, and MySQL, a high-performance database management system guaranteeing concurrent high read-write speeds.
Let’s get started!
First things first
This tutorial requires you to have an Ubuntu 20.04 installation. You can easily install your server by following our tutorial on setting up an Ubuntu server. First, log in to your Ubuntu 20.04 server and create a sudo user. This is the user we will be using to install the necessary packages and software as we go along with this tutorial.
Next, you need to set up the LAMP stack. Since you will be running a complete website with dynamic data, a web server will be required. The LAMP (Linux, Apache, MySQL, PHP) stack combines four software packages that make up a webserver. Ubuntu stands in for the Linux requirement, Apache is the server, MySQL is the database that will hold our dynamic data, and PHP is the processing language. You can easily set up the LAMP stack by following our LAMP stack setup tutorial.
Next, install an SSL certificate. For any website handling dynamic content and user authentication, it’s paramount that you secure it with SSL. This ensures that any traffic to and from your site is encrypted. You can obtain a free SSL certificate from Let’s Encrypt. If you have a registered domain name, you may follow our tutorial on securing your Apache web server with Let’s Encrypt. If you do not have a domain name, you may self-sign your certificate. However, be ready for browser warnings.
At this point, you should have a fully running Apache server with SSL in place. Let’s get started with the installation of WordPress!
Step 1: Set up a New MySQL Database and User for WordPress.
The very first step in installing a WordPress site is to create a database that WordPress will use to store and manage the site and user data. For brevity, we won’t go through the steps of installing and setting up the MySQL software itself since we have that in the LAMP stack tutorial. However, we need a database and a user that WordPress will use to login to the database. Login to the MySQL root account by entering the following on your terminal:
|
1 |
mysql -u root -p |
Then, type the root password you set when installing MySQL, the very first time, and hit enter to log in. After that, create a database that WordPress will control. You can choose any name for the database, but for the sake of this tutorial, we will call it wordpress.
Next, enter the following SQL statement in your terminal to create the database. Do not forget the semicolon at the end of the SQL statement:
|
1 |
CREATE DATABASE wordpress DEFAULT CHARACTER SET utf8 COLLATE utf8_unicode_ci; |
Now that we have a database, we need a separate user account to use to log in to this account. It’s always a good practice to follow the one-function rule when building systems. For this case, one separate user who will only log in to this one database. It makes things easier from a security and management point of view. We can call this user wordpressuser. You can feel free to go with a username of your choice. This user needs to have all privileges to control the data in the database, i.e. create, read, update, delete, (CRUD). Enter the following command to create the user. Remember to replace password with a strong password:
|
1 |
CREATE USER 'wordpressuser'@'localhost' IDENTIFIED BY 'password'; |
The next step is to grant all privileges on the wordpress database to this user. Enter the following command:
|
1 |
GRANT ALL ON wordpress.* TO 'wordpressuser'@'localhost'; |
Once the user has been created and permissions granted, adjust the user login method to mysql_native_password with the following command. This is to allow WordPress to access the database with a username and password combination:
|
1 |
ALTER USER 'wordpressuser'@'localhost' IDENTIFIED WITH mysql_native_password BY 'password'; |
Lastly, flush privileges for these changes to take effect immediately:
|
1 |
FLUSH PRIVILEGES; |
Now we have a wordpress database and user that we will use for the WordPress installation. Exit the Mysql prompt by typing exit and hit enter:
|
1 |
EXIT; |
Step 2: Configuring PHP to Work with WordPress Plugins
Of course, with the LAMP stack installation, you already have PHP installed, with some of the basic extensions necessary to serve a web page and communicate with MySQL. However, WordPress needs additional PHP extensions for its plugins to work. First, let’s update and install the necessary extensions using the following commands:
|
1 2 |
sudo apt update sudo apt install php-curl php-gd php-mbstring php-xml php-xmlrpc php-soap php-intl php-zip |
The PHP extensions we installed here are for the basic WordPress installation. As you continue working with WordPress, you may realize that you need more WordPress plugins. These different plugins may require you to install additional PHP extensions. You can always find out more about the system requirements of each plugin you wish to install from the plugin’s documentation page. Once you know which PHP extension is required, you can install it just as shown above with the apt command, i.e. sudo apt install php_extension_name.
For the extensions to start working, you must restart the Apache server. Enter the following command:
|
1 |
sudo systemctl restart apache2 |
Step 3: Configuring Apache’s .htaccess to Handle Override and Rewrite Rules
The .htaccess files sit in the root directory of a website. They contain rules that Apache uses to direct requests appropriately. WordPress uses its .htaccess to manipulate how Apache serves files from its root directory and subsequent subdirectories. Virtual hosts can help you host unlimited websites on one server. To learn more about virtual hosts, you can have a look at our tutorial on how to set up Apache Virtual Hosts on Ubuntu 20.04.
The virtual hosts config files are stored in the /etc/apache2/sites-available/ directory. The directory already has the 000-default.conf that comes with the Apache installation. It’s fine to use this default configuration file if you are only hosting one site on this server. In this tutorial, we are only hosting one site, so we can comfortably use this file.
Moreover, Ubuntu only allows access through the web to files stored in the /var/www directory. If you have a fresh LAMP installation, the default Apache welcome page appears when you navigate to your site’s public IP address. The welcome page index file is in the /var/www/html directory. We will be replacing this file with the WordPress files:
Enable .htaccess Overrides.
By default, the .htaccess directory override is disabled. For WordPress and its plugins to work, you must enable directory overrides. This is usually done in the virtual host files. To open the 000-default.conf file using nano editor, enter the following command:
|
1 |
sudo nano /etc/apache2/sites-available/000-default.conf |
The default configuration file looks like this without the comments that come with it:
|
1 2 3 4 5 6 7 |
<VirtualHost *:80> ServerAdmin webmaster@localhost DocumentRoot /var/www/html ErrorLog ${APACHE_LOG_DIR}/error.log CustomLog ${APACHE_LOG_DIR}/access.log combined </VirtualHost> |
The AllowOverride directive is added within the Directory block pointing to the website’s document root. Add the directory block and update the document root. The configuration file should now look like this:
|
1 2 3 4 5 6 7 8 9 10 11 |
<VirtualHost *:80> ServerAdmin webmaster@localhost DocumentRoot /var/www/html ErrorLog ${APACHE_LOG_DIR}/error.log CustomLog ${APACHE_LOG_DIR}/access.log combined <Directory /var/www/html> AllowOverride All </Directory> </VirtualHost> |
To save the file, press Ctrl + O, ENTER. Press Ctrl + X to exit the editor.
Enable the Rewrite Module.
WordPress comes with a permalink feature which ensures beautiful search engine optimized URLs. They depend on an Apache module called mod_rewrite. You can enable the module using the following command:
|
1 |
sudo a2enmod rewrite |
Test the Configuration Changes.
To be sure that everything will work fine after the changes you made, enter the following command to test the changes:
|
1 |
sudo apache2ctl configtest |
![]()
If you see Syntax ok, then we are good to proceed. If you see something else, you will have to go back and correct any typos you may have left in the configuration files.
Enable the Changes.
To enable the new changes, enter the following command to restart Apache:
|
1 |
sudo systemctl restart apache2 |
Up to this point, our server is ready to serve WordPress.
Step 4: Downloading WordPress
We can now download WordPress and set up our site. The document root for our site will be in the /var/www/html directory. We will replace the default Apache welcome page. First, we need to download WordPress from their site. For security concerns and other changes, always download the latest version. Enter the following command to change into the writable temporary directory:
|
1 |
cd /tmp |
Download the WordPress compressed file using the following command:
|
1 |
curl -O https://wordpress.org/latest.tar.gz |
Next, enter the following command to extract files from the compressed tar file:
|
1 |
tar xzvf latest.tar.gz |
The files will go into the /tmp/wordpress directory. Let’s create a .htaccess file that WordPress will use. Enter the following command:
|
1 |
touch /tmp/wordpress/.htaccess |
WordPress configurations are saved inside the wp-config.php file. A new WordPress installation comes with a sample config file that we can copy to the wp-config.php file. Enter the following command to copy this file:
|
1 |
cp /tmp/wordpress/wp-config-sample.php /tmp/wordpress/wp-config.php |
WordPress usually delivers upgrades or security patches whenever a vulnerability is discovered. This is usually first handled in the upgrades directory. To prevent WordPress from running into permission issues, you can create the directory with the following command:
|
1 |
mkdir /tmp/wordpress/wp-content/upgrade |
Finally, the contents in the /tmp/wordpress directory need to be moved into the /var/www/html directory. First, remove any file that might be in that directory:

Since we are using the default Apache webroot, it probably has the Apache welcome page index.html file. Remove it by entering the following command:
|
1 |
sudo rm index.html |
Now, enter the following command to copy the extracted WordPress files from the /tmp directory. The dot at the end of the source directory ensures every content of the directory is copied:
|
1 |
sudo cp -a /tmp/wordpress/. /var/www/html |
If you change the directory into the /var/www/html directory and list contents, you should be able to see the WordPress files as in the screenshot below:

Step 5: Setting Up User Permissions and Database Credentials in the WordPress Directory
Before accessing the web front-end administration panel, you must adjust a few settings. Those include the directory ownership permissions, and database user credentials.
Adjust Directory Ownership and Permissions.
The ownership of the WordPress directory currently belongs to the sudo user. The ownership needs to be changed to the www-data user and group, which is what the Apache web server uses. Changing ownership to www-data allows WordPress to read and write files, hence properly serving the web pages and performing automatic updates when necessary. We can update the ownership using the chown command. Enter the following on your terminal:
|
1 |
sudo chown -R www-data:www-data /var/www/html |
All the subdirectories of the WordPress installation need the right permissions. You can change their permissions using the find command as shown. Remember the semicolon at the end to avoid running into errors:
|
1 2 |
sudo find /var/www/html/ -type d -exec chmod 750 {} \; sudo find /var/www/html/ -type f -exec chmod 640 {} \; |
WordPress can now work with the current changes. Some plugins may need tweaks, but you can easily find out about that on the individual plugin’s documentation page.
Update the WordPress Configuration File
The file we will be editing in this section is the wp-config.php, which contains the necessary configurations that run the WordPress site. First, let’s change the secret keys to improve the security of the installation. Instead of having to generate your own keys, WordPress offers a secret key generator utility that you can use to get some highly secure keys. You can get them using the following command:
|
1 |
curl -s https://api.wordpress.org/secret-key/1.1/salt/ |
Then, you will get something like the result in the screenshot below. Make sure to always generate new keys every time you install a WordPress site. Do not copy these ones or any other keys you find on the internet:
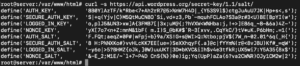
The output shown above contains the exact configuration lines that you can copy and paste in the wp-config.php file. Highlight the keys you received and copy them to your clipboard. Open the wp-config.php file in the nano editor using the following command:
|
1 |
sudo nano /var/www/html/wp-config.php |
Look through to find the section that contains the dummy keys. It may look something like this screenshot:
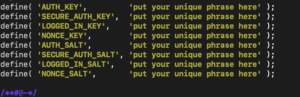
Delete these dummy strings and replace them with the ones you copied from the command line. Next, WordPress needs to communicate with the database that you had created in Step One of this tutorial. At the beginning of the config file, you should see the MySQL settings section. It will be something like this:
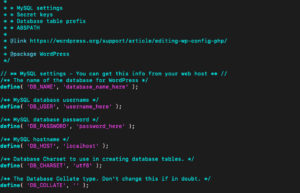
You need to update the database name, database user, and the associated password as you had created them in Step one. Lastly, you need to define the method that WordPress will use to write to the file system. Since the Apache server has the right permissions to access all the directories in the WordPress installation directory, we can set the file system access method to direct. This is also defined inside the wp-config.php file.
You can simply define the string below the database settings section:
|
1 |
define('FS_METHOD', 'direct'); |
Your file will now look like this:
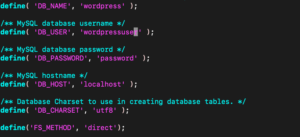
Save and close the wp-config.php file when you are ready.
Step 6: Finalize the Installation through the Web Frontend
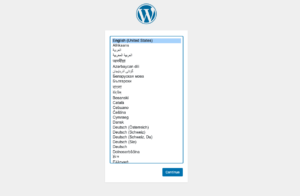
At this point, the server’s configuration is complete and you should be able to access your WordPress installation directly on the web through your domain name or server’s public IP address. You should see the WordPress initial setup page. Select your language and proceed:
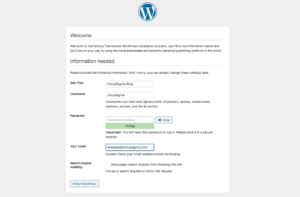
Next, you will be presented with the main setup page, where you set the site’s title, username, and password that you will be using to log in to the admin dashboard. Fill in the details appropriately. A strong password is already generated for you. You may optionally type in a strong password of your choice. Save and continue:
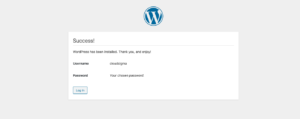
Currently, WordPress installs successfully, and the next page prompts you to login:
Once you log in, you will be directed to the WordPress administration dashboard:
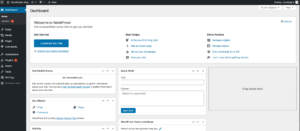
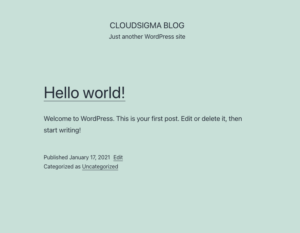
Your homepage, with the default WordPress blog post now looks like this:
Conclusion
In this tutorial, you successfully configured a LAMP stack and installed a WordPress site. This is a huge step because you can now host any WordPress site in just a few minutes. The next steps include looking at WordPress themes that may improve the appearance of your site, WordPress plugins to add functionalities or try out a bunch of other stuff you can do with WordPress.
Happy Computing!
- Removing Spaces in Python - March 24, 2023
- Is Kubernetes Right for Me? Choosing the Best Deployment Platform for your Business - March 10, 2023
- Cloud Provider of tomorrow - March 6, 2023
- SOLID: The First 5 Principles of Object-Oriented Design? - March 3, 2023
- Setting Up CSS and HTML for Your Website: A Tutorial - October 28, 2022