
Node.js is an open-source platform that allows programmers to build dynamic web pages and applications. It is used widely for server-side scripting and allows users to use JavaScript for both client and server-side scripts. In this tutorial, you will learn how to install Node.js on Ubuntu 18.04 and get started with it.
Prerequisites
First, you have to create a machine. You can do that easily on CloudSigma WebApp’s compute section:
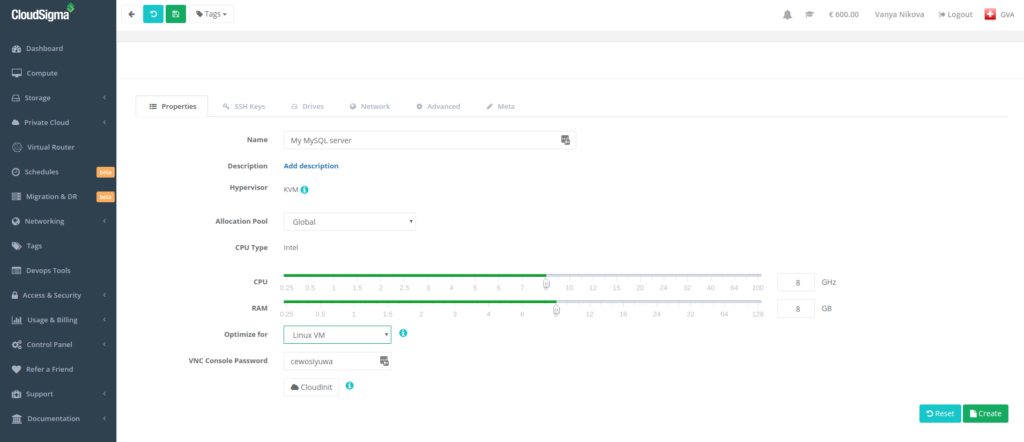
For the purposes of this tutorial, you can use the following resources:
CPU: 8 GHz
RAM: 8 GB
SSD: 50 GB
You can mount the disk with Ubuntu 18.04 LTS image available in CloudSigma’s library:
Ubuntu 18.04: Pre-installed 64bit with VirtIO drivers, superuser, Python 2.7.17, Pip 20.0.2 OpenSSL 1.1.1d, Cloud-init and latest updates until 2019-03-03.
After starting the machine, you can update all the existing repos and packages on the machine by running the following commands:
|
1 2 |
sudo apt update sudo apt upgrade |
Installing the Stable Version for Ubuntu
In this section, you will install Node.js on Ubuntu 18.04 using ‘apt’ command. Ubuntu has a stable version of Node.js in its repositories. The stable version provides a more consistent experience across multiple systems. To install the stable version from Ubuntu’s repositories, you can run the following command:
|
1 |
sudo apt install nodejs |
After the installation, you should also install ‘npm’. NPM – Node Package Manager. This is a package manager for the javascript programming languages. It would allow you to manage and install the node.js packages and the modules. To install NPM, go ahead and run the following command:
|
1 |
sudo apt install npm |
You can check the version of Node.js installed on your server using the following command:
|
1 |
nodejs -v |

You can also install it in another more robust way. You will learn how to do that in the following section.
Installing using PPA – Personal Package Archive
NodeSource maintains PPA – Personal Package Archive which allows you to get a more recent version of node.js. It will give you more freedom to choose the version of node.js you want to work on.
For this tutorial, I will use the commands for Node.js v14. First, you can install PPA using the following command:
|
1 2 |
curl -sL https://deb.nodesource.com/setup_14.x | sudo -E bash - sudo apt-get install -y nodejs |
To install any other version, just change the version number in the command. For example, if you wish to install v10, you can edit the version similar to this:
|
1 2 |
curl -sL https://deb.nodesource.com/setup_10.x | sudo -E bash - sudo apt-get install -y nodejs |
The above commands add PPA to the configuration and update the local package cache. The second command installs Node.js. To check the version, run the following command:
|
1 |
sudo nodejs -v |

You don’t need to install NPM separately as the above-installed package already contains it. NPM keeps track of updates using a configuration file in your home directory. To check if NPM has been installed, you can run the following command:
|
1 |
sudo npm -v |

Some NPM packages require build-essentials to compile code from source. You can install them using the following command:
|
1 |
sudo apt install build-essential -y |
Installing Using NVM – Node.js Version Manager
Another way to install Node.js is to use NVM – “Node.js Version Manager”. NVM works on the directory level instead of the system level which means you can have various versions installed in various directories without affecting the entire system.
NVM allows you to use the new versions while maintaining the old releases of Node.js. Node.js installed by apt and NPM are managed differently.
To install NVM, go to the Github page of the project and check the version you require. In this tutorial, I am using version vo.35
|
1 |
sudo curl -o- https://raw.githubusercontent.com/nvm-sh/nvm/v0.35.3/install.sh | bash |
The above command installs NVM in ~/.nvm. Moreover, it adds the required lines of script to ~/.bashrc
You can log out and log in, or source the file “~/.bashrc” to load the changes to the current session.
|
1 |
sudo source ~/.bashrc |
You can install the various versions of Node.js using NVM. To check the available versions of Node.js, run the following command:
|
1 |
sudo nvm ls-remote |
|
1 2 3 4 5 6 7 8 9 10 11 12 13 14 15 16 |
Output Snippet: v12.11.1 v12.12.0 v12.13.0 (LTS: Erbium) v12.13.1 (LTS: Erbium) v12.14.0 (LTS: Erbium) v12.14.1 (LTS: Erbium) v12.15.0 (LTS: Erbium) v12.16.0 (LTS: Erbium) v12.16.1 (LTS: Erbium) v12.16.2 (LTS: Erbium) v12.16.3 (LTS: Erbium) v12.17.0 (LTS: Erbium) v12.18.0 (LTS: Erbium) v12.18.1 (Latest LTS: Erbium) v13.0.0 |
You can install the desired version using the following command:
|
1 |
sudo nvm install 12.18.1 |

You can check the version using:
|
1 2 3 4 5 |
sudo node -v Output: root@demo:/home/cloudsigma# node -v v12.18.1 |
NVM will generally use the last installed version but you can also specify it using the ‘ncm use’ command:
|
1 |
sudo nvm use 12.18.1 |
You can manage multiple Nodejs versions. To see the versions installed, use the following command:
|
1 |
sudo nvm ls |
To make a version the default one, you can alias it. Whenever a new session is created, the default version of node.js will be used.
|
1 |
sudo nvm alias default 12.18.1 |
You can also reference it as per below:
|
1 |
sudo nvm use default |
Each version of Node.js keeps track of its packages. While installing packages through NPM, you can specify whether to install them for the particular version of Node.js or globally.
To install the package for the particular version in use, run this command:
|
1 |
sudo npm install express |
To install it globally, add the ‘-g’ flag,
|
1 |
npm install -g express |
After installing the package globally, you’ll be able to run commands but for your program to use it, you will have to link the package into your local sphere.
|
1 |
npm link express |
You can find more options available with NVM by executing this command:
|
1 |
nvm help |
Removing Node.js
You can either uninstall node.js by using ‘apt’ or by using NVM.
To remove the stable version you installed with ‘apt’, use this command:
|
1 |
sudo apt remove nodejs |
The above command uninstalls the node.js, but keeps the configuration files. If you want to uninstall node.js and remove the configuration files as well, use the command:
|
1 |
sudo apt purge nodejs |
Moreover, to remove the packages that were automatically installed while installing some of the removed packages, use the command:
|
1 |
sudo apt autoremove |
To uninstall the versions you installed using NVM, use this command:
|
1 |
nvm uninstall 12.18.1 |
If the version you want to uninstall is the current version, deactivate it first and then run the uninstall command:
|
1 2 |
nvm deactivate nvm uninstall 12.18.1 |
The above commands would remove all files associated with the version excluding the cached files.
Now that you’ve completed this tutorial, you know 3 different and easy ways of installing Node.js on Ubuntu 18.04 server.
Happy Computing!
- Removing Spaces in Python - March 24, 2023
- Is Kubernetes Right for Me? Choosing the Best Deployment Platform for your Business - March 10, 2023
- Cloud Provider of tomorrow - March 6, 2023
- SOLID: The First 5 Principles of Object-Oriented Design? - March 3, 2023
- Setting Up CSS and HTML for Your Website: A Tutorial - October 28, 2022