
MySQL is one of the most popular database management systems for websites and server applications. For webmasters, it is an essential tool to learn. MySQL is a relational database that uses SQL (Structured Query Language) for managing its data. MySQL is commonly installed as a part of the LEMP stack that contains Linux, Nginx, MySQL/MariaDB, and PHP/Perl/Python. You should have in mind that on CentOS, it is preferable to install MariaDB, a fork of MySQL that is also maintained by the original MySQL developers. MariaDB is treated as an alternative replacement for MySQL. In the following tutorial, we will walk you through installing MySQL on a CentOS 7 server. Let’s start!
Install MySQL
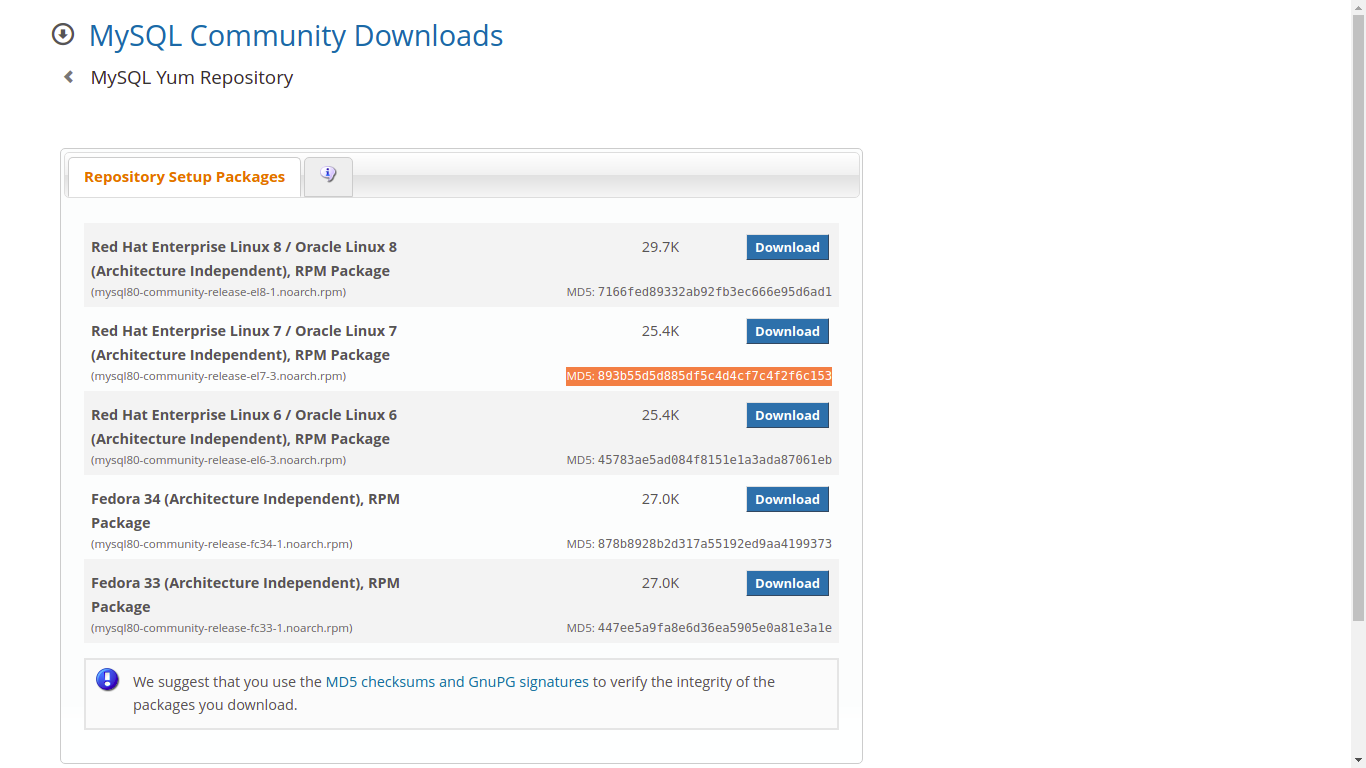
Installing any package on CentOS requires access to the root account or any other account that has sudo privilege. Assuming there is root access at the disposal, move along. First, the MySQL community repository for yum has to be installed. To grab the package, check out the official MySQL download page: https://dev.mysql.com/downloads/repo/yum/ The file can be downloaded from the browser. Alternatively, use wget to download it. If the file is updated to a new version, change the filename in the command:
|
1 |
wget https://dev.mysql.com/get/mysql80-community-release-el7-3.noarch.rpm |
Verify the file integrity. The official MySQL download page offers MD5 hex hash for all downloads:
|
1 |
md5sum mysql80-community-release-el7-3.noarch.rpm |

Assuming the MD5 hash matches with the official value, it is time to install the RPM package. Next, run the following command to install the package:
|
1 |
sudo rpm -ivh mysql80-community-release-el7-3.noarch.rpm |
The package would have added two new MySQL yum repos. Finally, the system is ready to install MySQL (MariaDB). Note that despite the package name, it will actually install MariaDB, the alternative to MySQL:
|
1 |
sudo yum install mysql-server |
Launch MySQL
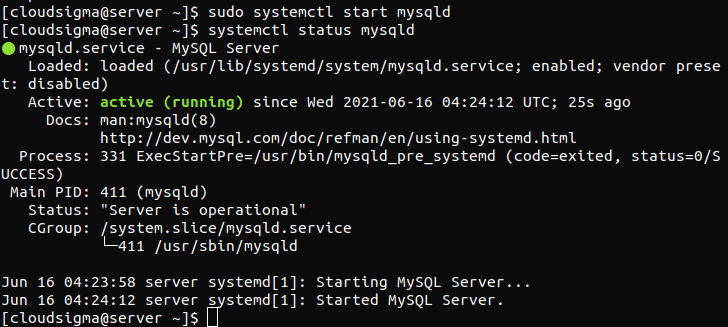
Once the installation is complete, it is time to start the server. Run the following command to start the MySQL service:
|
1 |
sudo systemctl start mysqld |
Make sure that the service started successfully. If it was successful, the output would look something like this:
|
1 |
systemctl status mysqld |
By default, MySQL is configured to start in the beginning of each system boot. If there is a need to disable this behavior, then run the following command. Note that if the MySQL service is disabled, it has to be manually started afterward to enjoy the service:
|
1 |
systemctl disable mysqld |
MySQL generates a temporary password during the installation process. It is located inside the mysqld.log file. Use grep to grab the temporary password. It will be necessary when it comes to configuring MySQL for the first time:
|
1 |
sudo grep 'temporary password' /var/log/mysqld.log |

Configure MySQL
When the service is up and running, the server is ready to be configured. For ease of use, MySQL comes with a script to automate some of the configurations. Now, run the security script. Here, we will need the temporary password grabbed at the previous stage:
|
1 |
mysql_secure_installation |
MySQL will ask for a new password. Make sure that the password is a strong one. Then, MySQL will ask for confirmation if this is the final password. After that, press “n” to decline the offer. When offered to remove the anonymous users, enter “y” and hit “Enter”. In the case of all the subsequent steps, answer “y” to confirm. Then, it will disable remote root login, remove the test database, and reload privilege tables.
Test MySQL
Now, MySQL has been successfully installed. To verify that it is functioning as intended, it is time to perform one final test. We will be using the mysqladmin tool. It is a client for running administrative commands.
In the following command, mysqladmin will prompt you to connect to the MySQL server as the root user. The “-p” flag is to signify the password prompt, and “version” tells you to return the version of the server:
|
1 |
mysqladmin -u root -p version |
If everything went fine, we will get the final output.
Useful MySQL commands
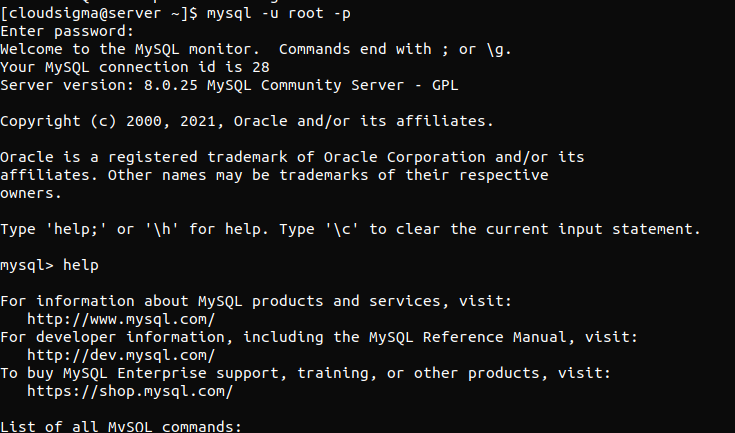
There are numerous commands that MySQL supports, each with its own use case. To get a list of all the MySQL commands, check the MySQL help. To do that, launch the MySQL console:
|
1 |
mysql -u root -p |
Run the help command in the MySQL console:
|
1 |
help |
Conclusion
With the help of our tutorial, installing MySQL on CentOS 7 is nothing difficult. It takes a while to install it for the first time. Once configured, it can work efficiently for all sorts of purposes.
Here are some additional resources from our blog that will help you get further acquainted with MySQL:
- How to setup MySQL on a server and MySQL basics
- MySQL User – Create and Grant Permissions
- SQLite vs MySQL vs. PostgreSQL: Relational Database Management Systems Compared
Happy computing!
- How To Enable, Create and Use the .htaccess File: A Tutorial - March 8, 2023
- An Overview of Queries in MySQL - October 28, 2022
- Introduction to Cookies: Understanding and Working with JavaScript Cookies - October 25, 2022
- An Overview of Data Types in Ruby - October 24, 2022
- The Architecture of Iptables and Netfilter - October 10, 2022