

Introduction
Kubernetes is an open-source tool that is crucial in container orchestration. Kubernetes works by orchestrating and managing clusters at scale across various cloud environments or even on-premise servers. A cluster is a set of hosts meant for running containerized applications and services. A cluster needs a minimum of two nodes to work – one master node and a worker node. Keeping scalability in mind, you have the option to expand the cluster with as many worker nodes as required.
A node in Kubernetes refers to a server. A master node is a server that manages the state of the cluster. Worker nodes are servers that run the workloads – these are typically containerized applications and services.
This guide will walk you through the steps of installing and deploying a Kubernetes cluster consisting of two nodes on Ubuntu 20.04. As mentioned, having two nodes is the most basic configuration when working with Kubernetes. You also have the option to add more worker nodes once you understand the fundamentals. We will further show you how to link the two servers to allow the master node to control the worker node.
To test our configuration, we will deploy a Docker container running the Nginx webserver to the cluster. This is a typical real-life application of Kubernetes. You will learn more about some defining components of Kubernetes such as kubectl and kubeadm as we go along. It is also advisable to first get acquainted with our tutorial on getting to know Kubernetes tool-kit basics to familiarize yourself with the basics of the Kubernetes platform.
Now, let’s start!
Prerequisites
You will need to provision two servers, running on Ubuntu 20.04. For best performance, the minimum system requirements for Kubernetes are 2GB of RAM and 2 CPUs. You may follow steps 1 to 4 of this step-by-step tutorial to help you set up your Ubuntu server on CloudSigma. One server will be the master node, the other will be the worker node. We have aptly named our two servers as kubernetes-master and kubernetes-worker. This makes it easier to follow along with the tutorial. However, you are free to choose the hostnames you prefer.
-
Ensure you add a user with sudo privileges on both nodes that we will use to run the commands as outlined in the tutorial above. Follow this tutorial on configuring the Linux sudoers file for instructions.
-
Network connectivity – the servers in the cluster should be able to communicate. When you deploy your VMs from CloudSigma, they will be connected to the internet with a public IP by default. If you are working from a local network, you may have to edit your /etc/hosts file in each server and link them appropriately.
-
You will need to install and enable Docker on each of the nodes. Kubernetes relies on a container runtime to run containers in pods. While there are other container platforms to choose from, we will be using Docker in this tutorial. Docker will provide the runtime environment needed by Ubuntu. You may follow steps 1, 2, and 3 of our tutorial on installing and operating Docker.
Step 1: Install Kubernetes
In this step, we will be installing Kubernetes. Just like you did with Docker in the prerequisites, you must run the commands in both nodes to install Kubernetes. Use ssh to login into both nodes and proceed. You will start by installing the apt-transport-https package which enables working with http and https in Ubuntu’s repositories. Also, install curl as it will be necessary for the next steps. Execute the following command:
|
1 |
sudo apt install apt-transport-https curl |
Then, add the Kubernetes signing key to both nodes by executing the command:
|
1 |
curl -s https://packages.cloud.google.com/apt/doc/apt-key.gpg | sudo apt-key add |
Next, we add the Kubernetes repository as a package source on both nodes using the following command:
|
1 2 |
echo "deb https://apt.kubernetes.io/ kubernetes-xenial main" >> ~/kubernetes.list sudo mv ~/kubernetes.list /etc/apt/sources.list.d |
After that, update the nodes:
|
1 |
sudo apt update |
- Install Kubernetes tools
Once the update completes, we will install Kubernetes. This involves installing the various tools that make up Kubernetes: kubeadm, kubelet, kubectl, and kubernetes-cni. These tools are installed on both nodes. We define each tool below:
-
kubelet – an agent that runs on each node and handles communication with the master node to initiate workloads in the container runtime. Enter the following command to install kubelet:
|
1 |
sudo apt install kubelet |
-
kubeadm – part of the Kubernetes project and helps initialize a Kubernetes cluster. Enter the following command to install the kubeadm:
|
1 |
sudo apt install kubeadm |
-
kubectl – the Kubernetes command-line tool that allows you to run commands inside the Kubernetes clusters. Execute the following command to install kubectl:
|
1 |
sudo apt install kubectl |
-
kubernetes-cni – enables networking within the containers ensuring containers can communicate and exchange data. Execute the following command to install:
|
1 |
sudo apt-get install -y kubernetes-cni |
Optionally, you can install all four in a single command:
|
1 |
sudo apt-get install -y kubelet kubeadm kubectl kubernetes-cni |
Step 2: Disabling Swap Memory
Kubernetes fails to function in a system that is using swap memory. Hence, it must be disabled in the master node and all worker nodes. Execute the following command to disable swap memory:
|
1 |
sudo swapoff -a |
This command disables swap memory until the system is rebooted. We have to ensure that it remains off even after reboots. This has to be done on the master and all worker nodes. We can do this by editing the fstab file and commenting out the /swapfile line with a #. Open the file with the nano text editor by entering the following command:
|
1 |
sudo nano /etc/fstab |
Inside the file, comment out the swapfile line as shown in the screenshot below:
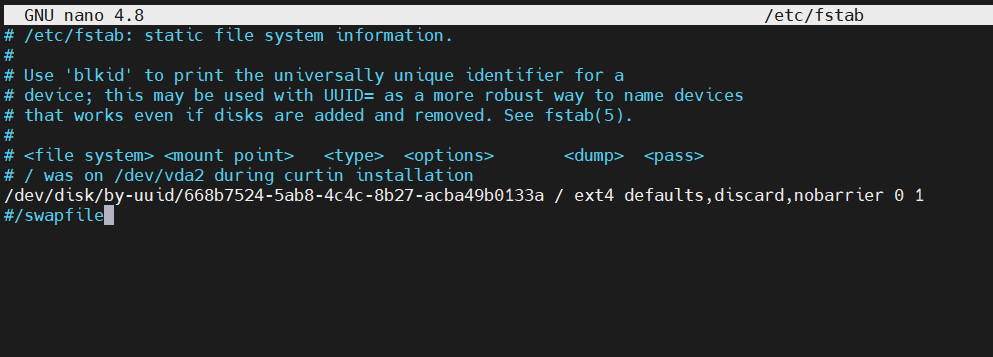
If you do not see the swapfile line, just ignore it. Save and close the file when you are done editing. Follow the same process for both nodes. Now, swap memory settings will remain off, even after your server reboots.
Step 3: Setting Unique Hostnames
Your nodes must have unique hostnames for easier identification. If you are deploying a cluster with many nodes, you can set it to identify names for your worker nodes such as node-1, node-2, etc. As we had mentioned earlier, we have named our nodes as kubernetes-master and kubernetes-worker. We have set them at the time of creating the server. However, you can adjust or set yours if you had not already done so from the command line. To adjust the hostname on the master node, run the following command:
|
1 |
sudo hostnamectl set-hostname kubernetes-master |
On the worker node, run the following command:
|
1 |
sudo hostnamectl set-hostname kubernetes-worker |
You may close the current terminal session and ssh back into the server to see the changes.
Step 4: Letting Iptables See Bridged Traffic
For the master and worker nodes to correctly see bridged traffic, you should ensure net.bridge.bridge-nf-call-iptables is set to 1 in your config. First, ensure the br_netfilter module is loaded. You can confirm this by issuing the command:
|
1 |
lsmod | grep br_netfilter |
Optionally, you can explicitly load it with the command:
|
1 |
sudo modprobe br_netfilter |
Now, you can run this command to set the value to 1:
|
1 |
sudo sysctl net.bridge.bridge-nf-call-iptables=1 |
Step 5: Changing Docker Cgroup Driver
By default, Docker installs with “cgroupfs” as the cgroup driver. Kubernetes recommends that Docker should run with “systemd” as the driver. If you skip this step and try to initialize the kubeadm in the next step, you will get the following warning in your terminal:
|
1 2 |
[preflight] Running pre-flight checks [WARNING IsDockerSystemdCheck]: detected "cgroupfs" as the Docker cgroup driver. The recommended driver is "systemd". Please follow the guide at https://kubernetes.io/docs/setup/cri/ |
On both master and worker nodes, update the cgroupdriver with the following commands:
|
1 2 3 4 5 6 7 8 9 |
sudo mkdir /etc/docker cat <<EOF | sudo tee /etc/docker/daemon.json { "exec-opts": ["native.cgroupdriver=systemd"], "log-driver": "json-file", "log-opts": { "max-size": "100m" }, "storage-driver": "overlay2" } EOF |
Then, execute the following commands to restart and enable Docker on system boot-up:
|
1 2 3 |
sudo systemctl enable docker sudo systemctl daemon-reload sudo systemctl restart docker |
Once that is set, we can proceed to the fun stuff, deploying the Kubernetes cluster!
Step 6: Initializing the Kubernetes Master Node
The first step in deploying a Kubernetes cluster is to fire up the master node. While on the terminal of your master node, execute the following command to initialize the kubernetes-master:
|
1 |
sudo kubeadm init --pod-network-cidr=10.244.0.0/16 |
If you execute the above command and your system doesn’t match the expected requirements, such as minimum RAM or CPU as explained in the Prerequisites section, you will get a warning and the cluster will not start:

The screenshot below shows that the initialization was successful. We have also added a flag to specify the pod network with the IP 10.244.0.0, It’s the default IP that the kube-flannel uses. We will discuss more on the pod network in the next step.
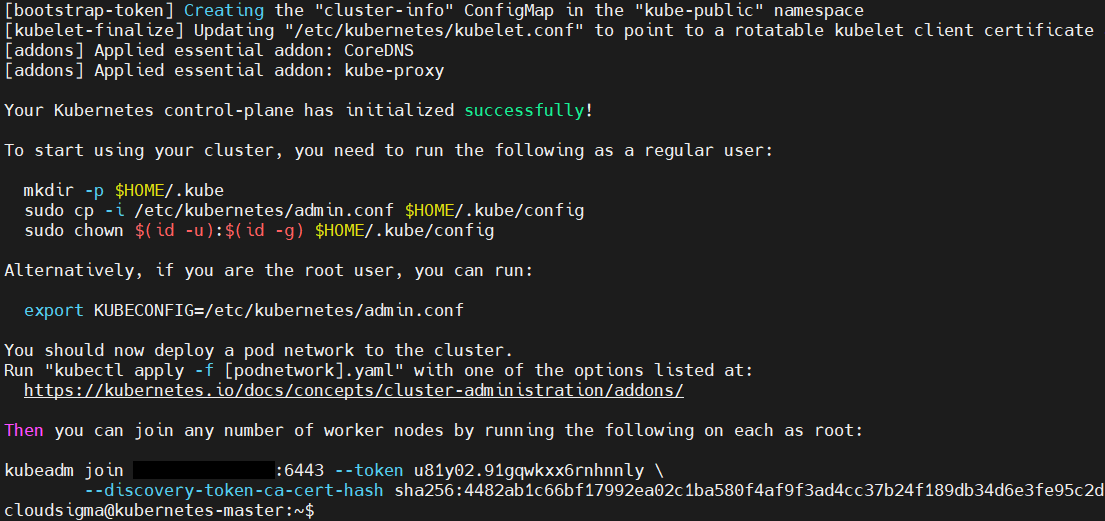
In the output, you can see the kubeadm join command (we’ve hidden our IP address) and a unique token that you will run on the worker node and all other worker nodes that you want to join onto this cluster. Next, copy-paste this command as you will use it later in the worker node.
In the output, Kubernetes also displays some additional commands that you should run as a regular user on the master node before you start to use the cluster. Let’s run these commands:
|
1 2 3 |
mkdir -p $HOME/.kube sudo cp -i /etc/kubernetes/admin.conf $HOME/.kube/config sudo chown $(id -u):$(id -g) $HOME/.kube/config |
We have now initialized the master node. However, we also have to set up the pod network on the master node before we join the worker nodes.
Step 7: Deploying a Pod Network
A pod network facilitates communication between servers and it’s necessary for the proper functioning of the Kubernetes cluster. You can read more about Kubernetes Cluster Networking from the official docs. We will be using the Flannel pod network for this tutorial. Flannel is a simple overlay network that satisfies the Kubernetes requirements.
Before we deploy the pod network, we need to check on the firewall status. If you have enabled the firewall after following step 5 of the tutorial on setting up your Ubuntu server, you must first add a firewall rule to create exceptions for port 6443 (the default port for Kubernetes). Run the following ufw commands on both master and worker nodes:
|
1 2 |
sudo ufw allow 6443 sudo ufw allow 6443/tcp |
After that, you can run the following two commands to deploy the pod network on the master node:
|
1 2 |
kubectl apply -f https://raw.githubusercontent.com/coreos/flannel/master/Documentation/kube-flannel.yml kubectl apply -f https://raw.githubusercontent.com/coreos/flannel/master/Documentation/k8s-manifests/kube-flannel-rbac.yml |
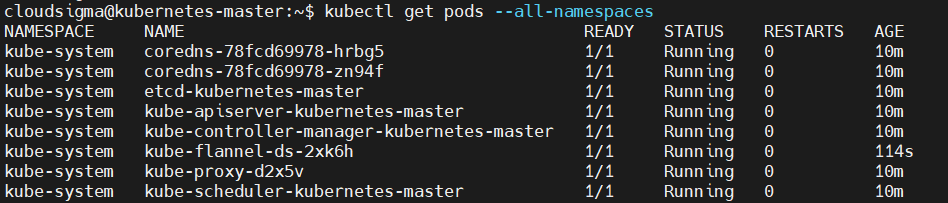
This may take a couple of seconds to a minute depending on your environment to load up the flannel network. Run the following command to confirm that everything is fired up:
|
1 |
kubectl get pods --all-namespaces |
The output of the command should show all services status as running if everything was successful:
You can also view the health of the components using the get component status command:
|
1 |
kubectl get componentstatus |

This command has a short form cs:
|
1 |
kubectl get cs |

If you see the unhealthy status, modify the following files and delete the line at (spec->containers->command) containing this phrase - --port=0 :
|
1 |
sudo nano /etc/kubernetes/manifests/kube-scheduler.yaml |
Do the same for this file:
|
1 |
sudo nano /etc/kubernetes/manifests/kube-controller-manager.yaml |
Finally, restart the Kubernetes service:
|
1 |
sudo systemctl restart kubelet.service |
Step 8: Joining Worker Nodes to the Kubernetes Cluster
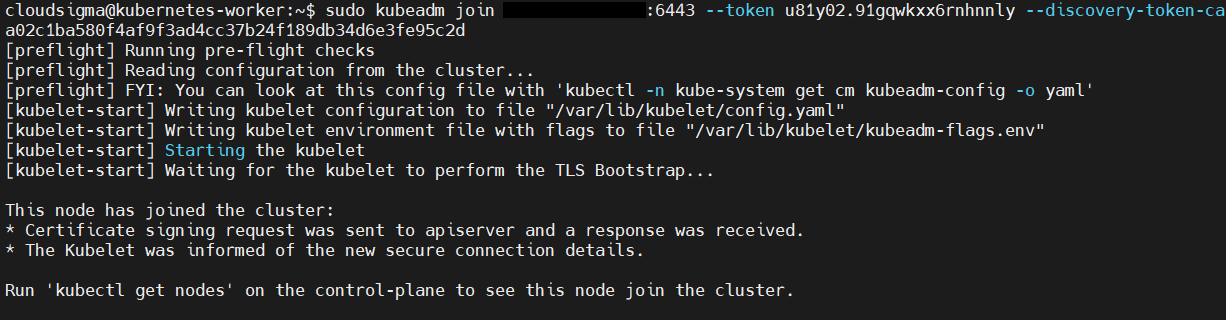
With the kubernetes-master node up and the pod network ready, we can join our worker nodes to the cluster. In this tutorial, we only have one worker node, so we will be working with that. If you have more worker nodes, you can always follow the same steps as we will explain below to join the cluster.
First, log into your worker node on a separate terminal session. You will use your kubeadm join command that was shown in your terminal when we initialized the master node in Step 6. Execute the command:
|
1 |
sudo kubeadm join 127.0.0.188:6443 --token u81y02.91gqwkxx6rnhnnly --discovery-token-ca-cert-hash sha256:4482ab1c66bf17992ea02c1ba580f4af9f3ad4cc37b24f189db34d6e3fe95c2d |
You should see similar output like the screenshot below when it completes joining the cluster:
Once the joining process completes, switch the master node terminal and execute the following command to confirm that your worker node has joined the cluster:
|
1 |
kubectl get nodes |
In the screenshot from the output of the command above, we can see that the worker node has joined the cluster:

Step 9: Deploying an Application to the Kubernetes Cluster
At this point, you have successfully set up a Kubernetes cluster. Let’s make the cluster usable by deploying a service to it. Nginx is a popular web server boasting incredible speeds even with thousands of connections. We will deploy the Nginx webserver to the cluster to prove that you can use this setup in a real-life application.
Execute the following command on the master node to create a Kubernetes deployment for Nginx:
|
1 |
kubectl create deployment nginx --image=nginx |
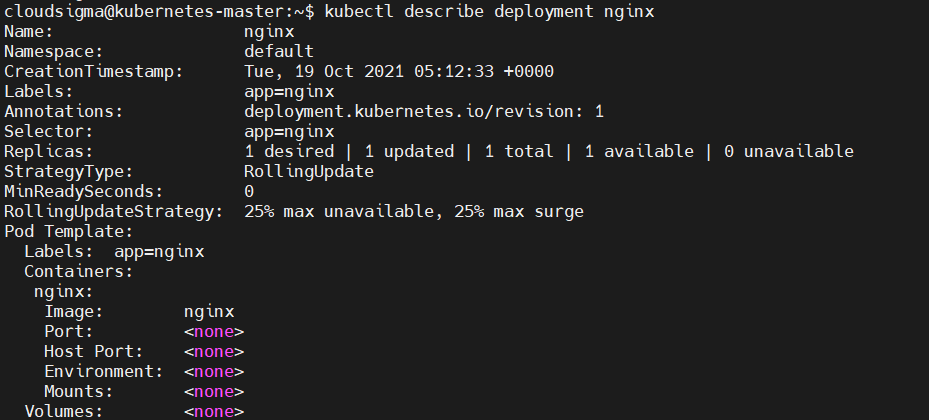
You can view the created deployment by using the describe deployment command:
|
1 |
kubectl describe deployment nginx |
To make the nginx service accessible via the internet, run the following command:
|
1 |
kubectl create service nodeport nginx --tcp=80:80 |

The command above will create a public-facing service for the Nginx deployment. This being a nodeport deployment, Kubernetes assigns the service a port in the range of 32000+.
You can get the current services by issuing the command:
|
1 |
kubectl get svc |

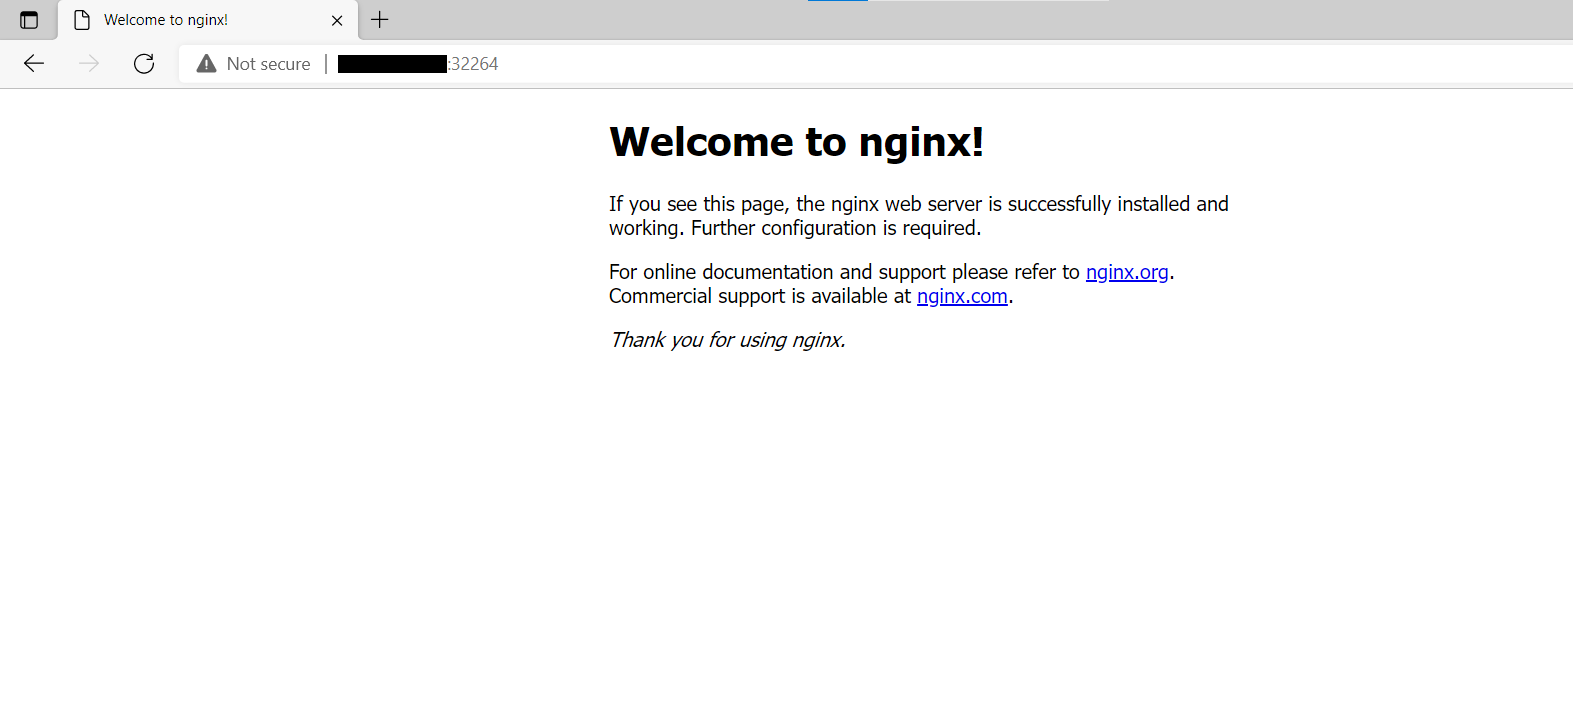
You can see that our assigned port is 32264. Take note of the port displayed in your terminal to use in the next step.
To verify that the Nginx service deployment is successful, issue a curl call to the worker node from the master. Replace your worker node IP and the port you got from the above command:
|
1 |
curl your-kubernetes-worker-ip:32264 |
You should see the output of the default Nginx index.html:

Optionally, you can visit the worker node IP address and port combination in your browser and view the default Nginx index page:
You can delete a deployment by specifying the name of the deployment. For example, this command will delete our deployment:
|
1 |
kubectl delete deployment nginx |
We have now successfully tested our cluster!
Conclusion
In this tutorial, you have learned how to install a Kubernetes cluster on Ubuntu 20.04. You set up a cluster consisting of a master and worker node. You were able to install the Kubernetes toolset, created a pod network, and joined the worker node to the master node. We also tested our concept by doing a basic deployment of an Nginx webserver to the cluster. This should work as a foundation to working with Kubernetes clusters on Ubuntu.
While we only used one worker node, you can extend your cluster with as many nodes as you wish. If you would like to get deeper into DevOps with automation tools like Ansible, we have a tutorial that delves into provisioning Kubernetes cluster deployments with Ansible and Kubeadm, check it out. If you want to learn how to deploy a PHP application on a Kubernetes cluster check this tutorial.
Happy Computing!
- How to Deploy WordPress with Persistent Volume on Kubernetes Cluster - March 17, 2023
- Deploying Applications on Kubernetes Using Argo CD and GitOps - October 26, 2022
- Using Node.js Modules with npm and package.json: A Tutorial - October 6, 2022
- Using Ansible to Install and Configure WordPress with LAMP on Ubuntu - September 23, 2022
- Creating Views in the Django Web Application Framework - September 22, 2022