
Git is the most popular version control system in the field of software development. It’s open-source and actively maintained since 2005 by Linus Torvalds, the famous creator of Linux. Today, a staggering number of software projects (including commercial ones) use Git for version management.
Git follows a distributed architecture, making it a perfect example of a DVCS (Distributed Version Control System). Using Git, we can manage both a local and a remote repo simultaneously. In this guide, we will demonstrate how to configure an automatic deployment of a Git project with a VPS.
Prerequisites
In this guide, there will be one local repo and a remote repo on the VPS. The local repo will be pushing changes to the remote repo. From the remote repo, we can push the changes to the beta or live branch. To achieve this, there are a couple of prerequisites you need to take care of first.
- A local machine and a remote server, both using Ubuntu as the operating system. This guide showcases how to configure and set up Ubuntu servers.
- Both machines are configured with Git.
To establish a secure connection to the VPS, we will be using SSH. Thankfully, Git also supports SSH as a protocol to connect to remote repos. This guide explores configuring SSH to connect to remote servers on Ubuntu.
Configuring the VPS
On our remote server, we’ll have the following configuration:
- Live directory: /var/www/dummy-domain.com
- Server repo: /var/repo/site.git
From the local machine, Git will push the updates to the VPS repo. From the VPS repo, we’ll configure a script that Git will use to automatically push it to the live directory. It’s also possible to configure a repo for beta releases.
-
Creating the Repositories
Connect to the VPS and create the repo locations:
|
1 2 3 |
cd /var sudo mkdir -pv repo && cd repo sudo mkdir -pv site.git && cd site.git |

Next, initiate the Git repo:
|
1 |
sudo git init --bare |

Here, the flag --bare describes that there will be no source files, only the version control components.
-
Hooks
Next, we’ll configure the hooks for the repo. Every Git repo contains a folder named hooks. It contains sample files that serve as a template for hooks and various custom actions.
According to Git’s official documentation, there are three types of hooks:
- pre-receive: It’s executed as soon as the server receives a push request.
- post-receive: It’s executed when a push request is completed.
- update: Similar to pre-receive. However, it executes once per branch.
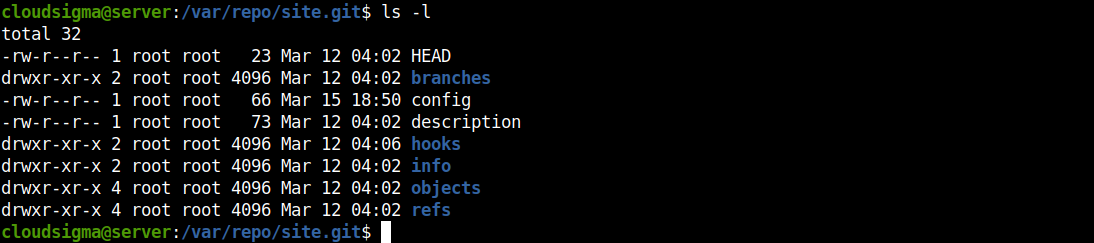
From the location of the repo, run the ls command:
|
1 |
ls -l |
Change the current directory to hooks:
|
1 |
cd hooks/ |

Now, create the post-receive script:
|
1 |
sudo nano post-receive |
Inside the script, enter the following code. Make sure to change the directory locations accordingly:
|
1 2 |
#!/bin/sh git --work-tree=/var/www/dummy-domain.com --git-dir=/var/repo/site.git checkout -f |

Save the file and close the editor. Set the file as an executable:
|
1 |
sudo chmod +x post-receive |
![]()
Now, every time a push is completed, Git will look into the post-receive script and put the files in place accordingly.
Configuring the Local Machine
The remote machine is ready to accept incoming Git project updates. Next, we will configure the local repo to use the VPS as the remote Git server.
Let’s make a sample Git project directory:
![]()


Now, initiate the repo:
|
1 |
sudo git init |

We have to declare the remote path of the repo. Here, we’re going to refer to the remote location as the live branch. Then, run the following command:
|
1 |
sudo git remote add live ssh://<remote_username>@<remote_ip_address>/var/repo/site.git |

Let’s test it out. We added a shell script to the project directory:

Next, add the file to the project and perform a commit:
|
1 2 |
sudo git add . sudo git commit -m "random commit" |

In the next command, we’ll push the project to the live server:
|
1 |
sudo git push live master |

Git will connect to the VPS using SSH. If the SSH connection was configured to use a password, Git will ask for the authentication password.
Beta Repository
What if the project isn’t to be deployed at one step? Maybe it requires further testing within a beta directory. Using the method described so far, we can create another branch in the VPS, referred to as the beta branch.
-
Configuring the Beta Branch on VPS
First, we need to create the directories for the VPS. Connect to the VPS and create a directory under /var/www:
|
1 2 |
cd /var/www sudo mkdir beta |
Now, we need a Git repo that will act as the beta branch:
|
1 2 |
cd /var/repo sudo mkdir -pv beta.git && cd beta.git |
Initiate the repo:
|
1 |
sudo git init --bare |
Just like before, implement a post-receive script:
|
1 2 |
cd hooks sudo nano post-receive |

After that, enter the following code:
|
1 2 |
#!/bin/sh git --work-tree=/var/www/beta --git-dir=/var/repo/beta.git checkout -f |

Save the file and close the editor. Mark post-receive as an executable file:
|
1 |
sudo chmod +x post-receive |
-
Adding the Beta Repo on the Local Machine
We’re now ready to add the beta repo to our local repo. From within the local project directory, run the following Git command:
|
1 |
sudo git remote add beta ssh://<username>@<remote_ip_address>/var/repo/beta.git |
Voila! The local repo is now configured with the beta remote repository. Try pushing changes:
|
1 2 3 |
sudo git add . sudo git commit -m "beta version" sudo git push beta master |

-
Moving from Beta to Live in VPS
Let’s say all the changes are accumulated to the beta repo. How do you push the changes to the live repo? It’s very simple. Within the beta repo on VPS, we add the local live repo. Then, we simply push the beta release to the live repo.
Connect to the VPS, and run the following commands:
|
1 2 |
cd /var/repo/beta.git sudo git remote add live ../site.git |
Then, you can push the beta release to live:
|
1 |
sudo git push live master |

Final Thoughts
This guide successfully demonstrates how to configure and use a VPS as a remote repository for your Git project. The VPS can automatically deploy the latest codes and files without any complex process. It can also act as the center for collaboration among multiple development teams.
With the help of Git, you can establish a simple mechanism for automatic deployment. For proper project management, however, it’s recommended to use something like GitLab. The following guide showcases installing and deploying GitLab on a VPS that manages multiple projects. You can also check out how to set up GitLab Continuous Integration (CI) pipelines on Ubuntu 20.04.
Happy Computing!
- How To Enable, Create and Use the .htaccess File: A Tutorial - March 8, 2023
- An Overview of Queries in MySQL - October 28, 2022
- Introduction to Cookies: Understanding and Working with JavaScript Cookies - October 25, 2022
- An Overview of Data Types in Ruby - October 24, 2022
- The Architecture of Iptables and Netfilter - October 10, 2022