

In this second installment of the two-part tutorial on configuring Linux services to start automatically after a reboot or system crash, we will discuss the init system in detail. You can refer to Part 1 of the series: How to Configure a Linux Service to Auto-Start After a Reboot or System Crash: Practical Examples here.
The current tutorial will be heavy on theory. Therefore, you should use it as a reference to gain a deeper understanding of how the init system works in Linux. In the first installment of this tutorial, we shared some code snippets and startup scripts that the init system reads when starting up. We also used MySQL as an example to learn how to enable and disable a Linux service to auto-start after a crash or reboot. As you learned in the first installment of this two-part tutorial, there are three init systems used in different distributions of Linux: System V, Upstart, and Systemd. You can refer to the first part of this tutorial to understand the distribution and version configured to use a particular init system.
In this tutorial, we will explain the code we used in the first part of the tutorial. We will elaborate on the commands and the configuration files that the init system uses. Let’s start!
Prerequisites
In the conclusion of the first part of this two-part tutorial, we mentioned that you should keep the three test servers running. If you had deleted them, you may go back and recreate them. This will help you follow along with the tutorial. The three test servers that you should have are:
- Ubuntu 9.04 and earlier, or Debian 6 x64 (we will use it to demonstrate System V init system)
- Ubuntu 14.04 x64 (we will use it to demonstrate Upstart). Here’s a tutorial on how to easily set up your Ubuntu server.
- CentOS 7 x64 (we will use it to demonstrate Systemd).
You should have a user with sudo privileges on each of the servers that you will use to run the commands. This tutorial on configuring the Linux sudoers file can guide you.
Note: The commands in the tutorial will interfere with system services. Hence, you should not apply them on a live production server.
Runlevels
A runlevel is an operational level that describes the current state of a Linux system in relation to what services are available. The concept originates in System V init. When the Linux system boots up it initializes the kernel, enters one runlevel, and runs the startup script associated with that runlevel. You can execute only one runlevel at startup.
Other examples of runlevels include the shutdown state, the restart mode, a single-user mode, etc. Each level determines what services to run in that state. Some services can run on more than one level while others cannot.
There are seven runlevels: from 0 to 6. Below is a definition of the seven runlevels:
- Runlevel 0: System shutdown
- Runlevel 1: Single-user and rescue mode
- Runlevels 2, 3, 4: Multi-user and text mode with networking enabled
- Runlevel 5: Multi-user, network-enabled, and graphical mode
- Runlevel 6: System reboot
Runlevels are not necessarily executed sequentially. Runlevels 2, 3, and 4 vary depending on the Linux distribution you are running. You can implement runlevel 4 in some distributions and not others. When you enabled a service to auto-start, as explained in part one, you actually added it to a runlevel. In System V, the OS starts with a particular runlevel, and during the startup, it tries to start all the services associated with that runlevel. Runlevels are targets in Systemd, which we will discuss in the Systemd section.
Init and PID 1
The init system is the very first process that runs when a Linux System boots up and the Kernel loads into memory. It does various tasks including determining how a user process or system service will load, in what order, and whether it should start automatically. In every Linux distribution, every process is identified by a process ID (PID) and init has a PID of 1. It’s the parent of all other processes that successively start as the system boots up.
History of init
The init system found in the recent Linux distributions is an improvement to the original. The earliest versions of Linux distros used System V init, which was similarly used in Unix systems. As Linux evolved, the Upstart init daemon was implemented – it was created by Ubuntu. Now, (at the time of writing this tutorial, 2021) we have Systemd init daemon – that was first implemented by Fedora. As Linux systems continue to evolve, there may be a newer init system. For this tutorial, we will be discussing these three: System V, Upstart, and Systemd.
Recent Linux versions come with Systemd init system by default. However, they have kept the other older init systems for backward compatibility. There are different implementations of System V that you can use in other variants of Linux. For example, FreeBSD, a variant of UNIX, uses BSD init. Older versions of Debian use SysVinit. Both come from System V.
The way each version of the init daemon manages services is different. The improvements added into each version were geared towards a robust service management tool that would handle everything a Linux system needs from services, devices, ports, and other resources. There was a need for a powerful system that could load resources in parallel, and that could elegantly recover from a system crash.
System V Init Sequence
System V utilizes an inittab file to hold initialization instructions. Upstart keeps the inittab file for backward compatibility. Here is the System V startup flow:
- The init system comes from the binary file /sbin/init.
- Once the init system loads into memory it reads its first file at /etc/inittab.
- One of the entries in this file determines the runlevel the machine should boot into. For instance, if the value for the runlevel is specified as 5, Linux will boot in multi-user, graphical mode with networking enabled (common in distributions designed for desktop use). The runlevel specified here is known as the default runlevel because it is what will always be used.
- Then, the init system looks further into the /etc/inittab file and reads what init scripts it needs to run for that runlevel.
By finding what scripts to run for a given runlevel, the init system will be finding what services it needs to startup. These init scripts are where you usually configure startup behavior for individual services, the same way we configure the MySQL service in the first part of this tutorial.
System V Init Scripts structure
In this section, we will look at init scripts in detail. System V configuration files or init scripts are what controls services. Init scripts initialize a service, hence the name init script.
Each service has its own init script. For example, the MySQL init script controls the MySQL server. Application vendors provide the init scripts for their particular application, while native Linux services come with the Operating System installation. When you create a custom application, you may also create your own custom init scripts for it.
To start a service like the MySQL server, its binary program is first loaded into memory. Depending on its configuration, the program may keep executing in the background to keep accepting client connections. The service’s init script handles the job of starting, stopping, or reloading the binary application. Init scripts in System V are shell scripts. Another name for them is rc (run command) scripts.
System V Directory Structure
The parent directory for init scripts is the /etc directory. The /etc/init.d directory is the actual directory for the init shell scripts. The scripts are symlinked to the rc directories.
There are several rc directories within the /etc directory, each with a number in its name. The numbers represent different runlevels. If you list the contents of the directory, you will see names like /etc/rc0.d, /etc/rc1.d, /etc/rc2.d, etc.
If you view the contents of each of the rc directories, you will see files that start with K or S in their file name, followed by two digits. These files contain symbolic links pointing back to the actual init shell scripts of the actual program. The letters K and S are abbreviations: K means Kill or Stop, while S stands for Start. The two digits in the file names represent the order of execution. If you see a file named K05script_name, it will execute before a file named K09script_name.
Startup
Progressing with the startup sequence, let’s see how the init scripts are called.
The S and K scripts are not called directly by the init system. Rather, they are called by another script: the /etc/init.d/rc script. The /etc/inittab file instructs the init daemon what runlevel the system should boot in by default. Depending on the runlevel specified, a line in the /etc/inittab file calls the /etc/init.d/rc script, passing the default runlevel as a parameter. Using this parameter, the script will call the files under the corresponding /etc/rcN.d directory, where N denotes the runlevel. For example, if the server boots with runlevel 5, corresponding files under the /etc/rc5.d directory will be called.
Inside the rc directory, all K scripts are run numerically with an argument of stop, while all S scripts are run similarly with an argument of start. Corresponding actual init shell scripts for the program that the files under /etc/rcN.d symlinks to will be called with the stop and start parameters respectively.
In simple terms, what happens whenever a Linux system enters or switches to a certain runlevel is that certain scripts will be run to stop some services, while others will be run to start other services. This process ensures that any process not supposed to run in a given Linux state is stopped, and any process that should run is started automatically.
System V Automatically Starting
When you enable a service to auto-start at boot time, you are directly modifying the init behavior. For example, if you configure a service to auto-start at runlevel 2, the init process creates the appropriate symbolic links in the /etc/rc2.d directory. To help you understand, we will explain this with an example.
System V Example
To give you a practical example, we will use the MySQL service configuration from part 1. Thus, log into the Debian 6 VPS with your sudo/root user using ssh (or putty if you are on Windows), and proceed with the following steps.
Step 1: Open and examine the inittab file
First, enter the following command to view the contents of the inittab file on the terminal:
|
1 |
cat /etc/inittab | grep initdefault |
The contents of the file should be something like this:
|
1 |
id:2:initdefault: |
The number 2 denotes the runlevel the system starts with. In this case, runlevel 2 is the default, hence this Debian system will start in runlevel 2 as multi-user, text mode. You can run the following command to confirm:
|
1 |
cat /etc/inittab | grep Runlevel |
It will show the output similar to:
|
1 2 3 4 |
# Runlevel 0 is halt. # Runlevel 1 is single-user. # Runlevels 2-5 are multi-user. # Runlevel 6 is reboot. |
Step 2: Examining the rc directories
Next, to list the rc directories, run the following command:
|
1 |
ls -ld /etc/rc*.d |
Here is a screenshot of the output:
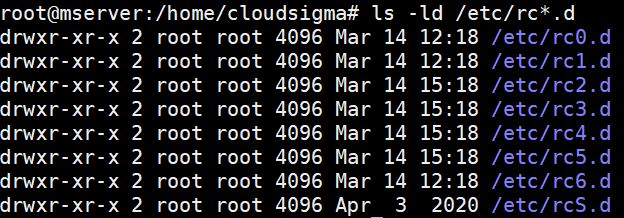
As we saw in the inittab file earlier, the system is configured to boot in runlevel 2, hence the scripts under /etc/rc2.d will be executed at system startup. You can list the contents of this directory by using the command:
|
1 |
ls -l /etc/rc2.d |
As you can see from the output, the files are just symbolic links pointing to the actual script files under /etc/init.d. Here is a snippet of the output:
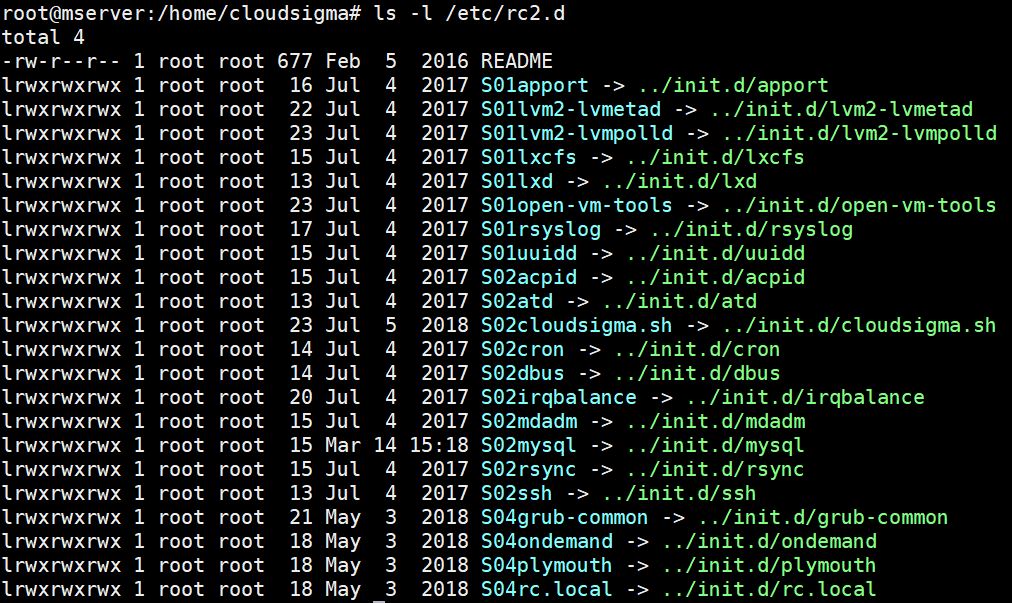
There are no K scripts in this directory, only S (start) scripts. The scripts will start the services linked here, like rsync. You can also notice the mysql service listed which we discuss in the next subtopic.
Step 3: Examining the Init Script
When a service that is compliant with System V is installed, it creates a shell script under the /etc/init.d directory. You can check the availability of the MySQL shell script by entering the following command:
|
1 |
ls -l /etc/init.d/my* |
It shows the below output:

The file is quite large. You may enter the following command to view its contents:
|
1 |
cat /etc/init.d/mysql | less |
Step 4: Using chkconfig or sysv-rc-conf
Chkconfig is a command you can use in RHEL-based distributions like CentOS to enable or disable System V compatible services. You can also use it to list installed services and their respective runlevels. Here is the command for that (works on CentOS):
|
1 |
chkconfig --list | grep service_name |
In Debian distributions, such a utility does not exist natively. The update-rc.d in Debian systems only installs and removes services from runlevels. A custom tool is available that you can use to bring the chkconfig functionality to Debian systems. Enter the following command to install it:
|
1 |
sudo apt-get install sysv-rc-conf –y |
Once it installs, you may run the following command to view the runlevel behaviors for various services:
|
1 |
sudo sysv-rc-conf |
The output of this command is formatted into a table that shows the service name on the left and the runlevel the service runs under:
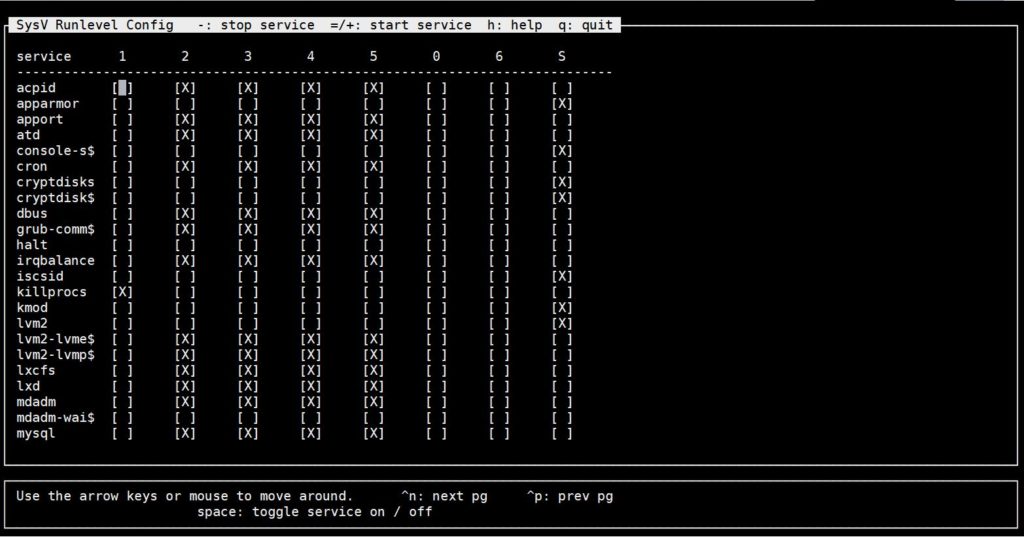
The X indicates the runlevel the service will run under. This tool allows you to disable or enable a service for a runlevel using arrow keys and the space bar. To exit the tool, press Q.
Step 5: Test MySQL Startup Behavior during System Boot
From the screenshot above, you can see the mysql service is enabled on runlevels 2,3,4,5. You can disable the MySQL using the following command:
|
1 |
sudo update-rc.d mysql disable |
The output looks like this. Notice the service has stopped for all runlevels:

Run the command below to see the contents of the directory:
|
1 |
ls -l /etc/rc2.d |
See the mysql line in the output below:
|
1 |
lrwxrwxrwx 1 root root 15 Dec 11 05:28 K01mysql -> ../init.d/mysql |
The output shows that the symlink has changed to K, meaning Kill (stop). Hence, MySQL will not autostart by default at runlevel 2. Whenever you enable or disable a service in System V, this is what happens. As long as there is an S (start) script under the default runlevel directory for a service, init daemon will start that service during system boot.
To enable the service again, enter the following command:
|
1 |
sudo update-rc.d mysql enable |
Step 6: Test MySQL Start-up Behavior after a System Crash
In this section, we will discuss how System V handles service crashes. You can use this knowledge to configure the behavior of your custom services after a crash.
In the first part of this tutorial, we had made a change to the /etc/inittab file to enable MySQL to start automatically after a crash. We added the following line to enable this behavior:
|
1 |
ms:2345:respawn:/bin/sh /usr/bin/mysqld_safe |
We can check this behavior by doing a few tests. First, reboot your VPS by entering the following command:
|
1 |
sudo reboot |
After the reboot, check which process IDs mysql_safe and mysqld are running with, enter the following command to get the process IDs:
|
1 |
ps -ef | grep mysql |
The output we got was:
|
1 2 |
hackins 1836 1 0 07:30 ? 00:00:00 /bin/sh /usr/bin/mysqld_safe mysql 186338 907 0 07:30 ? 00:00:00 /usr/sbin/mysqld --basedir=/usr --datadir=/var/lib/mysql --user=mysql --pid-file=/var/run/mysqld/mysqld.pid --socket=/var/run/mysqld/mysqld.sock --port=3306 |
Take note of the process IDs. In our case, it was 1836 and 186338. Now, simulate a crash by killing the process with the -9 switch by entering the following command. Remember to substitute with your process IDs:
|
1 2 |
sudo kill -9 1836 sudo kill -9 186338 |
After a few minutes, check the status of MySQL by running the following command:
|
1 |
sudo service mysql status |
The output indicates that MySQL is running, meaning it was respawned after the simulated crash. If you run the ps -ef | grep mysql command again, you will find that both mysqld_safe and mysqld processes are running, although with new IDs.
You may try killing the processes multiple times and it will respawn after a few minutes. This behavior is possible by the line we added to the /etc/inittab file. This is how you configure services to automatically restart after a crash in System V. To see the syntax again, have a look at Part 1 of this tutorial.
Some custom services may have bugs and fail to respawn after multiple retries. The init daemon will try to respawn a service, but if it fails more than ten times within two minutes, the Linux system disables the service for up to 5 minutes. It helps keep the system stable and ensure system resources are not wasted on crashing services. It is a good idea to check your system logs to identify problems with your custom applications that need to be fixed.
Upstart Introduction
System V init system has been crucial to Linux distributions for a long time. However, as it’s the case with technology, it keeps advancing. The Linux ecosystem grew tremendously thanks to the support from the open-source community. System V loads jobs and services in a serialized manner which brings complexity and consumes time. Additionally, the introduction of modern pluggable storage media which System V had not been designed for drove the need for a different init system.
The developers at Ubuntu started working on another initialization system. This init system was designed to handle faster loading of the OS, ensure graceful clean-up of crashed services, keep dependency between system services predictable, and account for pluggable storage media. The Upstart daemon was born.
Upstart init has several advantages over System V init in the following ways:
- Upstart does not load services serially like System V, hence cutting down on a system’s boot time.
- It is designed to handle crashed services better with graceful cleanup and service respawn.
- Upstart uses a flexible event system to customize the handling of services in various states.
- The init avoids the complex shell scripts for loading and managing services like in System V. Upstart uses simple configuration files that are easy to understand and modify.
- Upstart was built with backward compatibility in mind. The /etc/init.d/rc script still runs to manage native System V services.
- It avoids keeping redundant symbolic links, all pointing to the same script.
Upstart Events
Upstart is event-based, allowing multiple events to be associated with the same service. This event-based architecture ensures flexible service management. Each event can call a shell script specific to the event.
Upstart events include:
- Starting
- Started
- Stopping
- Stopped
In between an event, a service can be in various states including but not limited to:
- Waiting
- Pre-start
- Starting
- Post-start
- Running
- Pre-stop
- Stopping
- Post-stop
Upstart init can be configured to take actions for each of these states, hence its flexible design.
Upstart Init Startup Sequence
The Upstart init runs the /etc/init.d/rc script at startup, just like System V. This script runs any System V init scripts normally to ensure backward compatibility.
Upstart config files are located in the /etc/init directory so it looks there by default and executes the shell commands found in the configuration files under this directory.
Upstart Configuration Files
The Upstart init uses service configuration files to control services, unlike bash scripts used in System V. The naming standard for these service configuration files is service_name.conf.
The files contain plain text content divided into various sections called stanzas. Each stanza describes a different state of a service and its behavior. Different stanzas control different events of a service. For example, waiting, pre-start, start, pre-stop, stopping, etc.
A stanza contains shell commands, making it possible to initiate several actions for each event for each service. In addition, each service config file specifies the following two things:
- Which runlevels the service should start and stop on.
- Whether the service should respawn if it crashes.
Upstart Directory Structure
The Upstart service configuration files are located under the /etc/init directory. Do not confuse this with /etc/init.d.
Upstart Example
In this example, we will see how Upstart handles a service during system boot and in the event of a crash. We will be going into more details explaining the practical examples shown in the first part of this tutorial.
Step 1: Log into Ubuntu 14.0.4 server
First, for testing Upstart, we will use the second VPS, the one running Ubuntu 14.0.4. That’s because this Linux distribution implements Upstart natively. Use ssh or putty if you are on Windows. You must log in with a user with root or sudo privileges. I have a user called hackins, so this is how I would log in:
|
1 |
ssh hackins@my_server_ip |
Replace with your root/sudo user and server’s public IP address. Then, press enter, and provide a password or passphrase.
Step 2: Examine the init and rc directory
Upstart configuration files are stored in the /etc/init directory. It is the directory you will use when creating new service configuration files.
To list configuration file names in the /etc/init directory, execute the following command:
|
1 |
sudo ls -l /etc/init/ | less |
As you will see from the output of the above command, many services are running under Upstart. Press Q to exit less.
If you run the following to list the service configuration files for System V in the rc directory, you will only see a few:
|
1 |
sudo ls -l /etc/rc3.d/* | less |
Step 3: Examine an Upstart file
In the first installment of this tutorial, we had used a mysql.conf file to learn about server configuration. To add on our knowledge, let’s use a different configuration. The cron config file is a good candidate. Enter the following command to open the file:
|
1 |
sudo nano /etc/init/cron.conf |
You should get an output similar to the screenshot below:
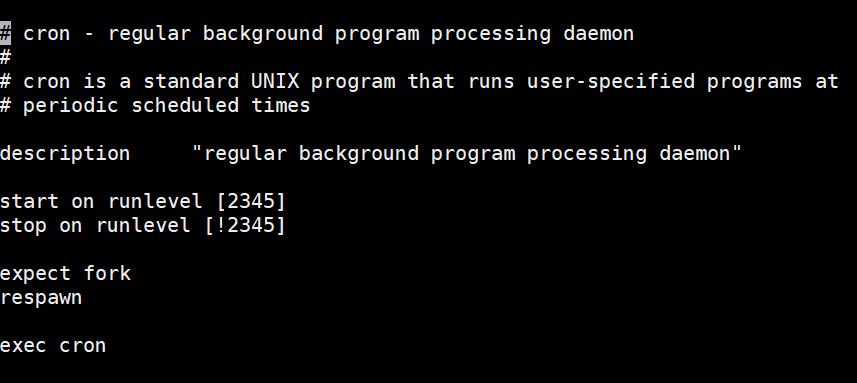
The script is pretty straightforward. Take note of the following important fields: start on, stop on, fork, and respawn. Let’s define what these directives are doing:
- start on instructs Ubuntu to start the cron daemon when the system enters runlevels 2,3,4 or 5. It will not run on the other runlevels not specified here, i.e. 0,1, or 6.
- stop on instructs Ubuntu to stop a running daemon. However, in this case, there is an exclamation mark (!) which is a negation sign. The script should not be stopped on the runlevels after the exclamation mark: 2,3,4,5.
- fork directive instructs Upstart to detach the process from the console and keep it running in the background.
- respawn directive instructs the system to start cron automatically if it crashes for any reason.
Press Ctrl X to exit the editor without typing anything.
Other upstart configuration files follow the same structure, with stanzas for start, stop and respawn. Some configuration files may have additional script blocks for pre-start, pre-stop, post-start, and more. These code blocks tell the system what to execute when a process is in any of the states defined.
Step 4: Test MySQL Service Startup Behavior after the System Boots up
MySQL is by default set to auto-start after the system boots up. We will try to disable it and see the behavior. In Upstart, a service can be disabled by creating a file called service_name.override under the /etc/init/ directory. The content of the file is just one word: manual.
Let’s see how we can use this command to disable the MySQL service. Enter the following command to open the file with nano editor:
|
1 |
sudo nano /etc/init/mysql.override |
In the opened file add the following line:
|
1 |
Manual |
Save changes by pressing Ctrl + O, then enter. Exit the editor by pressing Ctrl + X. Run the following command to reboot the server:
|
1 |
sudo reboot |
Wait a few minutes then log back in. Once logged back in, test the status of the MySQL service by entering the following command:
|
1 |
sudo initctl status mysql |
The output will indicate that the service is not running:
|
1 |
mysql stop/waiting |
This indicates that MySQL did not start automatically after system boot. Next, open the MySQL configuration file and check if the start directive has changed:
|
1 |
sudo cat /etc/init/mysql.conf | grep start\ on |
The output will indicate that nothing was changed:
|
1 |
start on runlevel [2345] |
This means that if your service is not auto-starting, and you only check the configuration file of the service (service_name.conf), you may not find the error. You should also check the existence of the service_name.override file in the directory.
Enter the following command to delete the override file and re-enable the MySQL service. Then, reboot the server:
|
1 2 |
sudo rm -f /etc/init/mysql.override sudo reboot |
Once the server has booted up, test the status of the MySQL service again:
|
1 |
sudo initctl status mysql |
It should show that the MySQL service started automatically.
Step 5: Test the MySQL Service Startup Behavior after a System Crash
By default, the MySQL service restarts automatically if it crashes. To stop this behavior, we will edit the mysql.conf file. Enter the following command to open the file with nano editor:
|
1 |
sudo nano /etc/init/mysql.conf |
Find the respawn directive lines and comment them out as shown below with #:
|
1 2 |
# respawn # respawn limit 2 5 |
Execute the following commands to restart the service:
|
1 2 |
sudo initctl stop mysql sudo initctl start mysql |
We used the above commands to stop and start the service because using the initctl restart or initctl reload would not work here. When you run the command to start MySQL service, the output will display a PID for MySQL like:
|
1 |
mysql start/running, process 1439 |
Our PID was 1439. Next, note down what you got when you ran the command, we will use it in the next step. To simulate a crash, kill the MySQL process using the following command, remember to replace your PID as explained above:
|
1 |
sudo kill -9 1439 |
To check if MySQL restarted after the crash, wait a few minutes then enter the following command:
|
1 |
sudo initctl status mysql |
The output will indicate that MySQL is stopped:
|
1 |
mysql stop/waiting |
Try to check the status a few more times to see if there is any change. You will notice that MySQL stays stopped. This is because the service configuration file does not have the respawn directives (the ones we commented out). Check out part 1 of this tutorial for more explanation on the respawn directive.
Why did we show you how to disable auto-restart for services after system boot or crash? This is mainly for troubleshooting purposes. If for example, your service comes up and keeps crashing, you may want to disable it so you can troubleshoot, and also keep your system stable. You can also stop some old service configurations from restarting automatically if you happen to upgrade to a new Linux distribution that comes natively with systemd discussed in the next section.
Systemd Introduction
Systemd is the latest init system, found in the most recent Linux distributions. It includes many components that make up a modern Linux system.
Systemd manages not only the services but also the whole Linux system. In this section, we will be focusing on how systemd controls the behavior of services after a system boot or crash.
Systemd is backward-compatible with System V init scripts and commands. Hence, if you have any System V configured services, they will also run under Systemd. Most Upstart and System V administrative commands have been altered to work with Systemd. Systemd renames itself to init at boot time. An /sbin/init file exists that symlinks to /bin/systemd.
Systemd Configuration Files: Unit Files
Systemd configuration consists of unit files. Each unit file represents a system resource. While the other two init systems (i.e. System V and Upstart) were responsible for managing services of a Linux system, Systemd not only manages the service daemons, but also other types of system resources such as device operating system paths, sockets, mount points, etc. Unit files store information about the resource.
Each unit file represents a particular system resource with a naming style of service_name.unit_type. This means you will find files like home.mount, dbus.service, sshd.socket, etc. Unit files are simple text files with a declarative syntax that’s easy to understand and modify.
Directory Structure
The main location of native unit files is the /lib/systemd/system/ directory. Unit files you create or those custom created by system administrators, and other modified native unit files are stored in the /etc/systemd/system directory.
If a unit file with the same name exists in both /lib/systemd/system/ and /etc/systemd/system directories, systemd will use the one under the /etc directory.
When you enable a service to start at boot time or any other target/runlevel, a symbolic link is created for that service unit file under the appropriate directories in /etc/systemd/system. Unit files in the /etc/systemd/system directory are just symbolic links to the files with a similar name in the /lib/systemd/system directory.
Systemd Init Sequence: Target Units
Target units are unique types of unit files usually suffixed by .target. Target units differ from other types of unit files because they don’t represent one particular resource. Instead, they represent the state of the whole system at a given time.
To achieve this, target units group and launch multiple unit files that are part of a particular state. While Systemd targets and System V runlevels can be loosely compared, they are not the same. A target unit file has a name instead of a number. For instance, you will find something like multi-user.target instead of runlevel 3 or reboot.target instead of runlevel 6. A Linux system may boot with multi-user.target. In this case, it is basically bringing the server to runlevel 2, 3, or 4, which starts the system in multi-user text mode with networking enabled.
The difference lies in how it brings the server to that level. System V brings up services sequentially. On the other hand, as a system boots up, systemd checks if other services or resources exist and determines their order of loading.
Another difference between systemd target units and System V runlevels is that a Linux distribution using System V will exist in only one runlevel. If you modify the runlevel it will simply switch to and exist in that new runlevel. On the other hand, target unit files can be inclusive. Furthermore, activating a target unit ensures that other target units are loaded as part of it. For instance, if you boot up a Linux system with a graphical user interface, it will have the graphical.target activated. This in turn automatically ensures multi-user.target is loaded and activated as well.
Here is a table comparing runlevels and targets.
| Runlevel (System V) | Target Units (systemd) |
| runlevel 0 | poweroff.target |
| runlevel 1 | rescue.target |
| runlevel 2,3,4 | multi-user.target |
| runlevel 5 | graphical.target |
| runlevel 6 | reboot.target |
Systemd default.target
In systemd, default.target is the equivalent of the default runlevel in System V. We saw that the default runlevel in System V was defined in the inittab file. In systemd, we have default.target file. The default target file is stored in the /etc/systemd/system directory. It symlinks to one of the target unit files under /lib/systemd/system. Changing the default target simply means recreating a symbolic link and modifying the system’s runlevel.
In System V, the inittab specified which directory Linux will find the init scripts. This could be any of the rc directories as explained earlier. On the other hand, systemd default target determines the resource units to load at boot time. All defined units are loaded. However, not all are loaded in parallel, and not all are loaded sequentially. The loading of the resource unit depends on the other resources it wants or requires.
Systemd Dependencies: Wants and Requires
In this section, we will discuss how Systemd handles dependencies. We saw that with Upstart, parallel loading of services is possible when using configuration files. We also discussed how System V uses runlevels to determine which service to auto-start or to wait until another service or resource comes up. Similarly, Systemd services can be configured to load in one or more targets, or wait until another service or resource comes up.
In Systemd, a unit file that requires another unit will not start until the required unit loads and becomes active. If the required unit fails to load while the first unit is active, the first unit will stop.
This behavior ensures system stability. A service that requires a particular resource (for example, a port) to be available and active can thus be made to wait until the resource is available (i.e. the port is opened).
In contrast, a unit that wants another unit does not impose such restrictions. It won’t stop if the wanted unit stops while the calling unit is still active. For example, some non-essential services in the graphical-target mode.
Systemd Example
Let’s see how we can configure the behavior of a service under systemd.
Step 1: Log into your VPS instance
We will be using MySQL as a real-life service and CentOS 7 as the server. To go through the steps practically and understand the concepts, log into your CentOS 7 VPS or create one on CloudSigma. A VPS running CentOS 7, Debian 7 or 8, or Ubuntu 15 distribution or newer is appropriate for this section as they all come with systemd. Log in using the ssh command or if you are on Windows, use PuTTY:
|
1 |
ssh hackins@your_server_ip |
Step 2: Examine the default.target File and Dependencies
Systemd’s startup sequence follows a long chain of dependencies which we will discuss in detail under this section.
- default.target
The default.target file controls the services that start during a normal boot up. You can list the default target unit file using the following command:
|
1 |
sudo ls -l /etc/systemd/system/default.target |
The output shows something like the screenshot below:
![]()
The screenshot shows that the default target symlinks to the multi-user.target file in the /lib/systemd/system/ directory. This means, by default, the system will boot under multi-user.target, equivalent to runlevel 3.
- multi-user.target.wants
To see all the services that the multi-user.target file wants, enter the following command:
|
1 |
sudo ls -l /etc/systemd/system/multi-user.target.wants/*.service |
The output contains a lot of lines, here is a snippet:
|
1 2 3 4 5 6 7 8 |
lrwxrwxrwx. 1 root root 38 Dec 25 10:32 /etc/systemd/system/multi-user.target.wants/mysqld.service -> /usr/lib/systemd/system/mysqld.service lrwxrwxrwx. 1 root root 36 Dec 16 19:10 /etc/systemd/system/multi-user.target.wants/ntpd.service -> /usr/lib/systemd/system/ntpd.service lrwxrwxrwx. 1 root root 39 Dec 16 19:08 /etc/systemd/system/multi-user.target.wants/postfix.service -> /usr/lib/systemd/system/postfix.service lrwxrwxrwx. 1 root root 46 Dec 16 19:08 /etc/systemd/system/multi-user.target.wants/rhel-configure.service -> /usr/lib/systemd/system/rhel-configure.service lrwxrwxrwx. 1 root root 39 Dec 16 19:08 /etc/systemd/system/multi-user.target.wants/rsyslog.service -> /usr/lib/systemd/system/rsyslog.service lrwxrwxrwx. 1 root root 36 Dec 16 19:08 /etc/systemd/system/multi-user.target.wants/sshd.service -> /usr/lib/systemd/system/sshd.service lrwxrwxrwx. 1 root root 37 Dec 16 19:08 /etc/systemd/system/multi-user.target.wants/tuned.service -> /usr/lib/systemd/system/tuned.service lrwxrwxrwx. 1 root root 40 Dec 16 19:14 /etc/systemd/system/multi-user.target.wants/yum-cron.service -> /usr/lib/systemd/system/yum-cron.service |
As the output shows, they are symbolic links pointing to the actual unit files in the /lib/systemd/system/ directory. We have highlighted mysqld.service to point out to you that it is also a part of multi-user.target. If you would like to confirm if a certain service is configured for startup, you can modify the command for that file. For example, we can filter outputs to find mysql or cron daemon using the following commands:
|
1 |
sudo systemctl show --property "Wants" multi-user.target | fmt -10 | grep mysql |
The output will show:
|
1 |
mysqld.service |
To filter the result for the cron daemon, enter the following command:
|
1 |
sudo systemctl show --property "Wants" multi-user.target | fmt -10 | grep cron |
The output will show:
|
1 |
crond.service |
Apart from the multi-user.target, other different types of targets exist, i.e. system-update.target or basic.target.
Enter the following command to see what targets the multi-user target depends on:
|
1 |
sudo systemctl show --property "Requires" multi-user.target | fmt -10 |
The output shows:
|
1 |
Requires=basic.target |
This means, basic-target must load first for the system to start in multi-user.target mode.
- basic-target
Enter the following command to see what other targets the basic.target wants:
|
1 |
sudo systemctl show --property "Requires" basic.target | fmt -10 |
The output will show:
|
1 |
Requires=sysinit.target |
- sysinit.target
You can run the following command to see if there are any required targets for sysinit.target. The syntax of the command is the same. You can keep modifying it to see which target units are required by another target unit as you go along. Here is the command:
|
1 |
sudo systemctl show --property "Requires" sysinit.target | fmt -10 |
The output will show that there are no required units for sysinit.target. We can check if there are other services and targets wanted by sysinit.target using the following command:
|
1 |
sudo systemctl show --property "Wants" sysinit.target | fmt -10 |
The output shows a long list of services and targets wanted by sysinit.target. Part of the output you can see below:
|
1 2 3 4 5 6 7 8 9 10 11 12 13 14 15 16 17 18 19 20 21 22 |
Wants=systemd-tmpfiles-setup-dev.service systemd-binfmt.service systemd-journald.service rhel-loadmodules.service dev-hugepages.mount systemd-modules-load.service rhel-autorelabel-mark.service plymouth-read-write.service sys-fs-fuse-connections.mount systemd-machine-id-commit.service systemd-random-seed.service systemd-udevd.service systemd-sysctl.service plymouth-start.service rhel-autorelabel.service proc-sys-fs-binfmt_misc.automount local-fs.target rhel-import-state.service sys-kernel-config.mount dev-mqueue.mount kmod-static-nodes.service systemd-update-utmp.service |
During system initialization with system4, the system does not stay in one target only. Instead, it loads services in a dependent fashion as it moves from target to another.
Step 3: Examine a Unit File
Let’s see how a unit file looks like. We had used the MySQL service unit file in the first part of this tutorial, and we will be using that again. However, we can also look at another service unit file – the sshd unit file. Enter the following command to open the sshd configuration file:
|
1 |
sudo nano /etc/systemd/system/multi-user.target.wants/sshd.service |
Below is a screenshot showing the lines in the file:
As you can see the code blocks outlined in the file make it easy to understand and modify whenever necessary. Below are some important directives to understand:
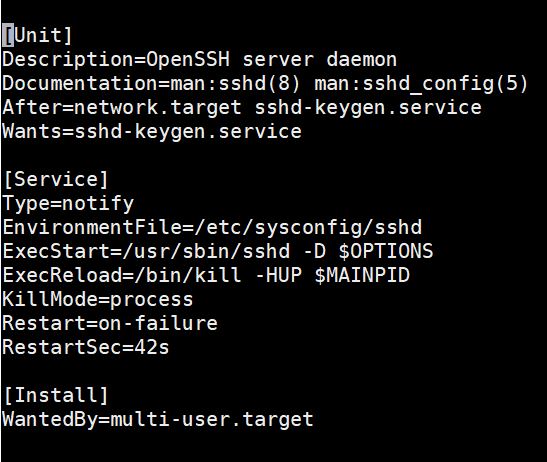
- After – the After clause tells the system to only load the service after the specified targets and services have loaded. In this case, SSHD service will load after the network target and the keygen service have loaded.
- Wants – the Wants clause shows what targets want this service. In this case the ssh-keygen.service wants the sshd.service. However, if sshd fails or crashes, it won’t shut down the ssh-keygen.service.
Press Ctrl + X to close the editor.
Step 4: Test MySQL Service Startup Behavior at System Boot
In this section, we will show you how you can change and test the behavior of MySQL service at system boot time. In the previous section, we saw that the mysqld.service is wanted by multi-user.target. Hence, it will auto-start at boot up.
You can disable the service by running the following command:
|
1 |
sudo systemctl disable mysqld.service |
Running the command shows that the mysql symlink is removed from the /etc/systemd/system/multi-user.target.wants/ directory. In order to test this, run the following command to test if MySQL is still wanted by multi-user.target:
|
1 |
sudo systemctl show --property "Wants" multi-user.target | fmt -10 | grep mysql |
The command returns nothing. If you try to reboot the server and check the MySQL status, it will not be running, meaning it did not auto-start at boot time.
Now re-enable the service using the command:
|
1 |
sudo systemctl enable mysqld.service |
The output will show a symlink. If you reboot your server, MySQL should auto-start automatically. Enabling a Systemd service creates a symbolic link in the default target’s wants directory. Disabling a Systemd service removes the symbolic link from the wants directory.
Step 5: Test MySQL Service Startup Behavior after a Service Crash
By default, the MySQL service will auto-start in case it crashes. We can disable this behavior in the Systemd configuration file for MySQL. First, let’s have a look at the file. Enter the following command to open the file:
|
1 |
sudo nano /etc/systemd/system/multi-user.target.wants/mysqld.service |
The screenshot below shows the output:
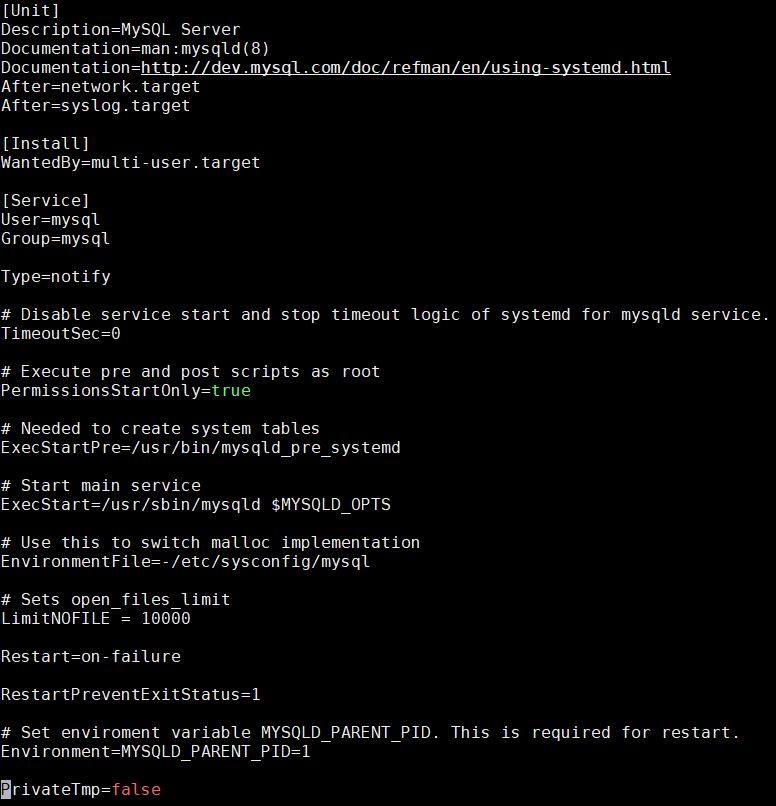
The value of the Restart directive is set to on-failure. This means that the MySQL service will restart after unclean exit codes, timeout, or unclean signals. Below is a table showing some of the restart parameters from the man page.
| Restart settings/Exit causes | no | always | on-success | on-failure | on-abnormal | on-abort | on-watchdog |
| lean exit code or signal | X | X | |||||
| Unclean exit code | X | X | |||||
| Unclean signal | X | X | X | X | |||
| Timeout | X | X | X | ||||
| Watchdog | X | X | X | X |
The two important directives in a Systemd unit file are Restart and RestartSec. They control the crash behavior of the service. Restart specifies when the service should restart, and RestartSec specifies how long it should wait before restarting after a crash. To disable the restart behavior, comment out the Restart directive by adding a # at the beginning of the line as shown:
|
1 |
# Restart=always |
Now, reload the system daemon, then reload the mysqld service using the following commands:
|
1 2 |
sudo systemctl daemon-reload sudo systemctl restart mysqld.service |
Next, run the following command to find the Main PID of the MySQL service:
|
1 |
sudo systemctl status mysqld.service |
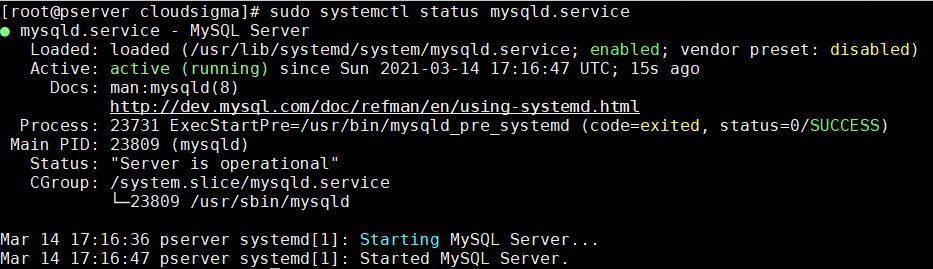
The Main PID for our test was 23809. Note down yours to use in the next command. Using the kill -9 command, simulate a crash by killing the process. Also, remember to replace with the process number you got in your test:
|
1 |
sudo kill -9 23809 |
If you run the command that checks the MySQL status, you will find that it is not active, and has failed to restart:
|
1 |
sudo systemctl status mysqld.service |
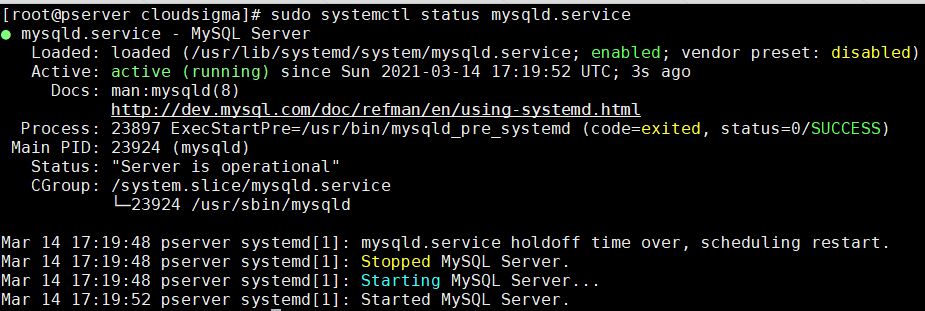
It will remain in the failed state as long as the Restart directive is commented out in the mysqld.service configuration file. This emulates a crash where a service stops and does not come back up.
To re-enable the service, you can edit the mysqld.service configuration file, uncomment the Restart directive, then save and close. As you did earlier, reload the daemon and restart the service. It takes the service back to its initial configuration, and now it can auto-start after a crash. Finally, that is all for configuring a service to auto-start after a crash. If you want to configure services to auto-start after a crash, you simply need to add the Restart directive, (and if you wish, you can also add the RestartSec directive), under the [Service] section of the service unit file.
Conclusion
In this tutorial, we have discussed how Linux handles services during startup or after a crash. To understand the Linux System initialization process, we discussed the three init systems that Linux uses: System V, Upstart, and Systemd. We discussed their evolution and how each init process works in relation to automatically starting a service after a system reboot or crash.
Since both the init daemons and Linux distributions have been evolving over time, remember to check the version of the Linux distribution you are running so that you know which init daemon your system supports natively.
Linux native applications and most third-party applications already auto-start after a system boot or crash, so you won’t need to do anything. The knowledge in this tutorial is crucial when you are configuring the startup and respawn behavior of your own custom services, or when troubleshooting constantly crashing services.
Happy Computing!
- How To Create a Kubernetes Cluster Using Kubeadm on Ubuntu 18.04 - June 24, 2021
- Nginx Server and Location Block Selection Algorithms: Overview - May 14, 2021
- Configuring an Iptables Firewall: Basic Rules and Commands - April 5, 2021
- How to Configure a Linux Service to Auto-Start After a Reboot or System Crash: Part 2 (Theoretical Explanations) - March 25, 2021
- How to Configure a Linux Service to Auto-Start After a Reboot or System Crash: Part 1 (Practical Examples) - March 24, 2021