

Introduction
In computing, things don’t always go as planned. Oftentimes unexpected system crashes prompt system admins to initiate reboots and restart of individual services. Figuring out and restarting every service your application needs to run after a system crash or reboot can be tedious. In this first installment of the two-part tutorial, we will show you how to configure services to automatically start after a system crash or server reboot with practical examples. The second part will cover theoretical information about what we achieved in part one.
We will use the MySQL database service for practical examples. However, the same principles apply to other processes that make up a complete server such as Nginx, Apache, Redis, or other applications. You can check out our tutorials on how to install MySQL, Nginx, and Apache.
In Linux distributions, there are three major initialization (init) systems, depending on the distribution you are running. Some distributions may come with two or more init systems as outlined below:
- System V – an older init system found in older distributions like:
- Ubuntu 9.04 and earlier
- CentOS 5 and earlier
- Debian 6 and earlier
- Upstart – used in former distributions such as:
- CentOS 6
- Ubuntu 9.10 to Ubuntu 14.10 and Ubuntu 14.04
- Systemd – used in the most recent distributions such as:
- CentOS 7
- Debian 7 and 8.
- Ubuntu 15.04 and newer
Background
It’s common for operating systems, and especially Linux and Unix systems to have processes and services running in the background. Such services may have shipped with the operating system software. Some may have come with the user applications that you install.
Operating System services include:
- sshd – It is the daemon allowing remote connections.
- cupsd – It is the daemon controlling printing.
Installed application services include:
- httpd/apache2 – A service that comes with Apache2 web server.
- nginx – A service that comes with Nginx web server.
To ensure that our web applications, databases, mail servers, etc. are accessible, such services must run continuously. If you are a system admin or a curious app developer, you want to ensure that such services run continuously, and in the unfortunate event of a system crash, they start automatically after the system reboots. And that is exactly what we will be learning in this hands-on tutorial.
While setting alerts and continuously monitoring your Linux distribution is crucial, some Linux services can self-heal if well configured, thanks to the init systems that manage services.
In Linux distributions, there are mode operations that implement system initialization called runlevels. For a service to auto-start, it must be added to a runlevel. Every Linux and Unix like system has four common runlevels as listed below:
- 0 – Runlevel 0 indicates system shutdown.
- 1 – Runlevel 1 indicates single-user, rescue mode.
- 2, 3, 4 – These runlevels indicate states where the system has booted in multi-user, network-enabled, text mode.
- 5 – Runlevel 5 indicates multi-user network-enabled, graphical mode.
- 6 – Runlevel 6 indicates system reboot.
In this tutorial, you will learn how to configure a Linux service to automatically start when the system reboots using the three different init modes explained earlier: System V, Upstart, and Systemd.
Prerequisites
This hands-on tutorial expects you to have a Linux VPS that you can use to follow along. You may take advantage of the free trial period at Cloudsigma and fire up some servers to try out the commands. You can follow along with our step-by-step tutorial on how to set up your Ubuntu servers.
The servers you create in this tutorial are purely for following up with the hands-on practicals and you should not be trying out the commands on a production server since a lot of services will be disrupted.
Some of the distributions that you will need:
- Ubuntu 9.04 and earlier, or Debian 6 x64 (will be used to demonstrate System V init system)
- Ubuntu 14.04 x64 (will be used to demonstrate Upstart)
- CentOS 7 x64 (will be used to demonstrate systemd).
Ensure you have set up a non-root user with sudo privileges. You can take a look at our tutorial on configuring the sudoers file here.
Using System V
This is the oldest init system which was used in earlier Linux distributions such as:
- Debian 6 and earlier
- CentOS 5 and earlier
- Ubuntu 9.04 and earlier
Most installable server applications such as MySQL and Nginx come with init scripts saved in the /etc/init.d directory by default. These scripts enable them to start after a reboot. However, they may not be configured to start automatically after a system crash.
Auto-start Checklist for System V
The first step is to check for the availability of a functional Bash init script at /etc/init.d/service directory. To enable the service, in Debian or Ubuntu distributions, use the update-rc.d command, in a CentOS system, use chkconfig. Replace with your actual service name:
|
1 |
sudo update-rc.d service enable |
The above command creates a symlink in /etc/rc2.d directory that looks like the output below. Do not create it yourself as it is auto-generated:
|
1 |
lrwxrwxrwx 1 root root 20 Dec 10 07:09 S02mysql -> ../init.d/service |
At the bottom of the file /etc/inittab add a respawn line as shown in the generic example below. Remember to replace it with the actual path to your application’s startup script:
|
1 |
id:2345:respawn:/bin/sh /path/to/your-application/startup |
Enter the following commands to stop and start the service:
|
1 2 |
sudo service service-name stop sudo service service-name start |
Next, reboot the server:
|
1 |
sudo reboot |
How to Test the Changes?
After rebooting the server, verify that the service is up by searching for the process number using the command:
|
1 |
ps -ef | grep service-name |
Kill the process using the command:
|
1 |
sudo kill -9 process_number |
After five minutes, verify that the service is up and running.
Practical System V Configuration with a Real Service
In the following steps, we will try out a real server application such as MySQL. You should have access to a Debian 6 virtual machine. With an account that has sudo privileges, connect to it using SSH or putty if you are on a Windows desktop.
Step 1: Install MySQL
Enter the following command to install MySQL:
|
1 |
sudo apt-get install mysql-server -y |
When the installation begins, you will be prompted for a root password. Then, enter a password of your choice and confirm it. Wait for the installation to complete, then enter the following command to start securing MySQL:
|
1 |
mysql_secure_installation |
You will be prompted for the root password that you entered earlier. Press N to maintain it. Next, press Y to accept the proceeding prompts for removing anonymous users, disable remote root login, and remove the test database. Finally, accept to reload the privileges table for the changes to reflect automatically.
This completes the MySQL installation. You can check if the service is running by entering the following command:
|
1 |
service mysql status |
Step 2: Configure MySQL to Auto-start after Reboot
MySQL is by default configured to start after a system reboot. You can find the symlink to the MySQL initialization script in the /etc/rc2.d directory. These symlinks are not created manually. You can use the update-rc.d command to enable and disable services.
Enter the following command to list the contents of the directory:
|
1 |
ls -l /etc/rc2.d |
Check if you can notice the symlink to MySQL init script:
|
1 |
lrwxrwxrwx 1 root root 15 Dec 2 10:42 S01mysql -> ../init.d/mysql |
The S is important, because as long as you can see an S script under the default runlevel directory for the service, the init system will start the service when the server boots. To verify that MySQL will auto-start after reboot, enter the following command to reboot the system:
|
1 |
sudo reboot |
Your ssh connection terminates during a reboot. Wait a minute or two and connect back. Run the following command to check if the service is running:
|
1 |
service mysql status |
The output will indicate that the service is running. This means it started automatically after the reboot. For services that are not configured to start automatically, you will have to configure them yourself.
We can disable the MySQL service and reboot the system to test if it auto-starts. In Debian and Ubuntu systems, you can use the update-rc.d command to add or remove services from the init system. Enter the following command to disable the MySQL service:
|
1 |
sudo update-rc.d mysql disable |
Reboot the system and connect back using ssh. Try to connect to MySQL using the following command:
|
1 |
mysql -u root -p |
You will get the MySQL error like:
|
1 |
ERROR 2002 (HY000): Can't connect to local MySQL server |
Then, enter the following command to re-enable the service:
|
1 |
sudo update-rc.d mysql enable |
If you are on a CentOS distribution, the command will be:
|
1 |
sudo chkconfig mysql enable |
Since MySQL was not initially starting, you have to start it. Enter the following command:
|
1 |
sudo service mysql start |
Step 3: Configure a Service (MySQL) to Auto-start after a System Crash
System V will not start a process automatically after a crash. We can simulate a system crash by finding the MySQL process ID and killing it. Enter the following command to find the MySQL process ID:
|
1 |
ps -ef | grep mysql |
From the output, find the MySQL processes. The main processes running MySQL are mysqld_safe and mysqld. Note their process IDs (these are numerals) and use the following commands to kill them:
|
1 2 |
sudo kill -9 mysqldsafe_number sudo kill -9 mysqld_number |
Check the MySQL service status using the command:
|
1 |
sudo service mysql status |
The output will indicate that MySQL has stopped. We can manually restart it using the service start command. However, we want an automatic process. To achieve this automatic behavior, we need to edit the /etc/inittab file. This is the first file that System V init reads when booting up. The /etc/inittab file contains instructions on how a process should behave if it crashes. If configured properly, it restarts the system again when there is a crash. For our case, we want to ensure that MySQL is one of those services.
The /etc/inittab file is extremely crucial to a Linux distribution. It determines whether your system will reboot or not. If you make a mistake in the commands, the system might not start up when you reboot. As we had indicated, we hope you are only trying out these commands in a test server environment and not a production environment.
First, make a copy of the file before you begin editing:
|
1 |
sudo cp /etc/inittab /etc/inittab.original |
Next, open the file using nano:
|
1 |
sudo nano /etc/inittab |
Scroll to the end of the file and add the following code snippet:
|
1 |
ms:2345:respawn:/bin/sh /usr/bin/mysqld_safe |
The above command restarts the mysql_safe process after a system crash. It has four fields separated by full colons as explained below:
- ms: Specifies an id for the process.
- 2345: Specifies the runlevels the command applies to. In this case: runlevels 2, 3, 4, 5.
- respawn: Specifies the action. In this case, we are respawning or restarting the process.
- /bin/sh /usr/bin/mysqld_safe: The last part defines the process – the command that is executed to restart the process.
Now press Ctrl + O and Enter to save the file. Then, press Ctrl + X to close the editor. Enter the following command to start the service:
|
1 |
sudo service mysql start |
Reboot the server, then run the commands explained earlier to find the process number. Next, kill the processes, starting with the command ps -ef | grep mysql. Wait for a few minutes and enter the following command to check for the status of MySQL:
|
1 |
sudo service mysql status |
The output should indicate that the MySQL service is up and running, meaning it was able to restart after a crash. You can follow the same process for other services on your server.
Auto-starting Services with Upstart
Upstart is another init system that was initially introduced in Ubuntu 6 and later became the default in Ubuntu 9.10. RHEL 6 and its derivatives, and Google’s Chrome OS also use the Upstart init system. For the steps in this section, you should have a server running any of the following distributions:
- Ubuntu 9.10 to Ubuntu 14.10, and the LTS version of Ubuntu, i.e. Ubuntu 14.04.
- CentOS 6
Let’s see how you can configure the Upstart files to auto-start your server services in case of reboots or system crashes. Upstart uses configuration files stored under the /etc/init directory to control services in a Linux distribution. Most recent versions of server applications such as MySQL and Nginx install their own init scripts in the /etc/init directory. Thus, they will start after reboot and after a crash of the system without you having to do anything.
Auto-start Checklist for Upstart
Here are some reference configurations to check to ensure your service is configured to start automatically.
- Ensure the service has an init script at the directory /etc/init/service_name.conf – service_name being the actual name of your particular service. You should check for the following two lines in the /etc/init/service_name.conf file:
- A line containing something like start on runlevel [2345]. It indicates that the service will be started on system reboot.
- A line containing something like respawn. It indicates that the service will be respawn/restarted after a system crash.
- Ensure there is no service override file in the directory: /etc/init/service_name.override. Unless you or another system admin created it earlier.
- Enter the following commands to stop and start the service:
|
1 2 |
sudo initctl stop service_name sudo initctl start service_name |
- Reboot the system, and connect back after a few minutes. Now, run some tests to see if things are working
- After reboot, verify that the service is up and running. Enter the following command to search for the process number, replace service_name with the actual name of the service you are testing:
|
1 |
ps -ef | grep service_name |
- Once you have the process number, enter the following command to kill the process:
|
1 |
sudo kill -9 process_number |
- Wait for a few seconds, and again verify that the process is up and running.
Practical Upstart Configuration with a Real Service
In the next section, we will try to demonstrate how you can use Upstart with an actual service. We will be running the tests on an Ubuntu 14.04 virtual machine server with MySQL as the service. Connect to your Ubuntu 14.04 test server using ssh or putty if you are on Windows. As the norm, you should be using a non-root user with sudo privileges. Once you are logged in, we can begin the steps:
Step 1: Install MySQL
Always remember to update your packages before installing any new software:
|
1 |
sudo apt-get update |
Now, enter the following command to install the MySQL server:
|
1 |
sudo apt-get install mysql-server –y |
Create a root password when prompted. Wait for the installation to complete and run the following command to start securing your MySQL installation:
|
1 |
mysql_secure_installation |
Follow along with the prompts, as you had done in the earlier section. Then, flush privileges for the changes to take effect immediately.
Step 2: Configuring a Service (MySQL) to Auto-start after a System Reboot
MySQL is set to start automatically after a reboot. We are only looking at its configuration files to learn how we can configure our custom applications to also start automatically after a reboot. MySQL service was started automatically after the installation. However, let’s confirm that it is running by entering the following command:
|
1 |
sudo initctl status mysql |
You should see output indicating that MySQL service is running, something like:
|
1 |
mysql start/running, process 2553 |
Reboot your server and log back in. Again, enter the following command to test that it is running:
|
1 |
sudo initctl status mysql |
The output will indicate that MySQL is running, meaning it was automatically started after the reboot. In this case, nothing needs to be changed. However, this behavior may not be the same for other applications. You may be wondering how the Upstart init system knows that it should auto-start MySQL after reboot. MySQL installs its Upstart startup configuration file at the location /etc/init/mysql.conf. Upstart files are not shell scripts, but text files with script blocks for pre-start and post-start events. The blocks instruct the Upstart system on what to execute when the MySQLd process is starting or when it has already started.
Enter the following command to open the file in the editor with nano:
|
1 |
sudo nano /etc/init/mysql.conf |
The output of the file may look like this:
|
1 2 3 4 5 6 7 8 |
description "MySQL Server" author "Mario Limonciello <superm1@ubuntu.com>" start on runlevel [2345] stop on starting rc RUNLEVEL=[016] respawn respawn limit 2 5 |
As seen, the start block instructs MySQL to start on runlevels 2,3,4,5, and not 0,1,6. If you are defining an Upstart configuration for your application, you will define it in this section. The respawn block instructs Upstart on what to do after a crash. We will discuss that in the next section, so keep the file open in the nano editor.
Step 3: Configuring a Service (MySQL) to Auto-start After Crash
The respawn directive in the /etc/init/mysql.conf file instructs Upstart to restart the MySQL service after a crash.
The respawn limit directive instructs Upstart on how many times it should attempt to restart the crashed MySQL service in an interval specified in seconds. The first argument, (2) indicates the number of tries. The second argument, (5) indicates the interval in seconds. If after a crash, Upstart fails to respawn the MySQL service within the threshold, it will remain stopped. This behavior is designed to protect the system from affecting its stability in the case that it keeps trying to restart continuously crashing services. You may now close the editor without making any changes.
Let’s test if MySQL will come back up automatically after a crash. Enter the following command to check the status and get the process number of the MySQL service:
|
1 |
sudo initctl status mysql |
The output should be something like this. Take note of the process number as we will use it later:
|
1 |
mysql start/running, process 738 |
Next, enter the following command to kill the process. This emulates a crash. Replace with the process number you got in the previous command:
|
1 |
sudo kill -9 7738 |
Again check the status of MySQL by entering the following command:
|
1 |
sudo initctl status mysql |
It should be running again, but probably with a different process number:
|
1 |
mysql start/running, process 1428 |
This happens because of the respawn directive in the /etc/init/mysql.conf file. It ensures that in case of any system breakdown, MySQL will start automatically. Hence, your application that depends on a MySQL database will continue functioning as expected.
Auto-starting Services with Systemd
Systemd is an initialization system found in most recent Linux distributions. It’s likely what you will use when you spin up a new VPS. It was first introduced in Fedora. It comes with RHEL 7 and its derivatives like CentOS 7. From Ubuntu 15.04, you will find Systemd natively. Systemd is backward compatible with the System V initialization scripts and commands. Hence, any System V service should work under Systemd. Most commands used in System V and Upstart have been modified to work with Systemd.
With Systemd, most server applications such as MySQL and Nginx will start automatically after a reboot or shutdown, without you having to change anything. For your custom apps, you must create your own init scripts to automatically restart services.
For more in-depth information about Systemd, check out our tutorial on how to manage Systemd services and units with Systemctl.
Auto-start Checklist for Systemd
Here are some reference configurations to check to ensure your service is configured to start automatically with Systemd.
- The service must have a functional Systemd init script located at /etc/systemd/system/multi-user.target.wants/serviceName.service. ServiceName is the actual name of the service you are configuring.
- The command for enabling the service is:
|
1 |
sudo systemctl enable serviceName.service |
- The command creates a symlink in the /etc/systemd/system/multi-user.target.wants/ directory that may look similar to:
|
1 |
lrwxrwxrwx 1 root root 11 Dec 1 04:43 /etc/systemd/system/multi-user.target.wants/serviceName.service -> /usr/lib/systemd/system/serviceName.service |
- With that symlink in place, you will have enabled automatic restart after booting.
- To activate the changes, reload the system daemon and then reload the service using the following commands:
|
1 2 3 |
sudo systemctl daemon-reload sudo systemctl restart serviceName.service |
- To test if your configurations will start the service after a reboot, you can reboot the system:
|
1 |
sudo reboot |
- When the system reboots, search for the process number using the command:
|
1 |
ps -ef | grep serviceName |
- Note the process number and kill it using the command:
|
1 |
sudo kill -9 process_number |
- Wait for a few seconds and search for the service again to verify that it is backed up.
Practical Systemd Configuration with a Real Service
In this section, we will try to configure MySQL service on an Ubuntu 20.04 virtual machine.
Step 1: Connect to your Virtual Private Server (Ubuntu 20.04 or CentOS 7 x64)
Log onto your VPS or create one from the Cloudsigma panel and connect using ssh or putty if you are on Windows. We are using Ubuntu 20.04 server for this section of the tutorial. The same commands can apply to CentOS 7. Be sure to use a non-root user with sudo privileges.
Step 2: Install MySQL (the service we are configuring)
First, update your system:
|
1 |
sudo apt update |
Then, you can install the MySQL server using the command:
|
1 |
sudo apt install mysql-server –y |
Next, run the following command to start securing MySQL:
|
1 |
sudo mysql_secure_installation |
The script asks you if you would like to set up the VALIDATE PASSWORD component or press any letter to proceed without enabling the component. Follow this link to learn more about the MySQL validate password component.
Press 1 to enable it and then choose medium level by pressing 1. Enter a strong password: a combination of uppercase, lowercase, special characters, and numerals. Confirm the password and confirm the prompt that asks you if you would like to use the password you entered as the root password. For the rest of the other prompts, press y to accept them as you did in the previous sections. Finally, flush the privileges for MySQL to reload the changes.
Step 3: Configure MySQL to Auto-start After Reboot
MySQL is configured to start after a reboot, so there’s no change for you to make. However, we can use the MySQL configuration files to learn how to configure our custom files.
First, check whether the MySQL service was configured to start at boot time. Enter the following command (note that in Centos the MySQL service is called mysqld):
|
1 |
sudo systemctl is-enabled mysql.service |
Here is the output:

Next reboot the VPS by entering the following command:
|
1 |
sudo reboot |
Connect back using ssh and enter the following command to check the status of MySQL service:
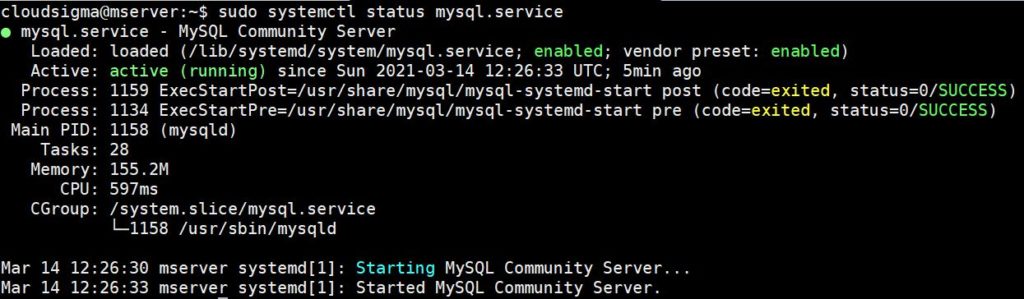
|
1 |
sudo systemctl status mysql.service |
You should get output similar to the one in the screenshot below:
To disable the MySQL service, enter the following command:
|
1 |
sudo systemctl disable mysql.service |
The output indicates symlinks to the MySQL service have been removed from Systemd:

You can test if the service is enabled with Systemd init system by entering the following command:
|
1 |
sudo systemctl is-enabled mysql.service |
The output will show it’s disabled. If you reboot your system, MySQL will not start at boot time:
![]()
Enable the service by entering the following command:
|
1 |
sudo systemctl enable mysql.service |
The output shows the symlink to the MySQL service created in Systemd init:

When you reboot, the MySQL service will start automatically.
Step 4: Configure MySQL to Auto-start After Crash
MySQL is configured to restart automatically after a crash. Let’s look at how this configuration is implemented in Systemd. Systemd uses unit files for configuration. Enter the following command to open the mysql.service configuration file in nano:
|
1 |
sudo nano /etc/systemd/system/multi-user.target.wants/mysql.service |
The output looks like this:
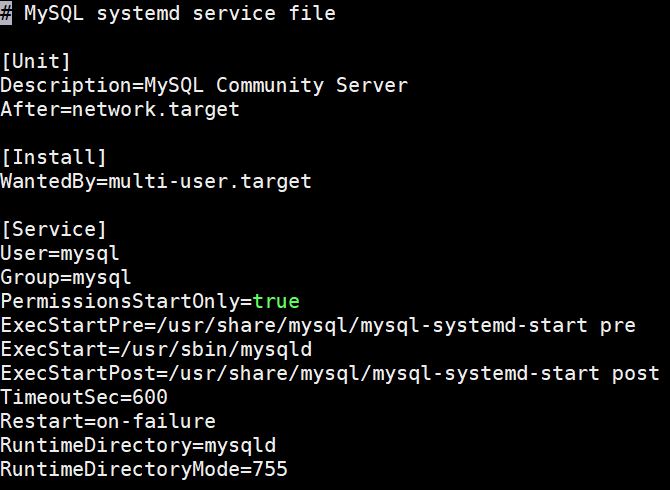
Our concern is the Restart directive. As defined, MySQL will restart if there is a failure. The Restart directive defines what should happen in Systemd just like the Respawn directive in Upstart.
Not all services will have this directive. To enable a service to restart after a crash, you can always add the Restart directive under the [Service] block of the service configuration unit file. If the [Service] header does not exist, then add it. Now, exit the editor by pressing Ctrl + X.
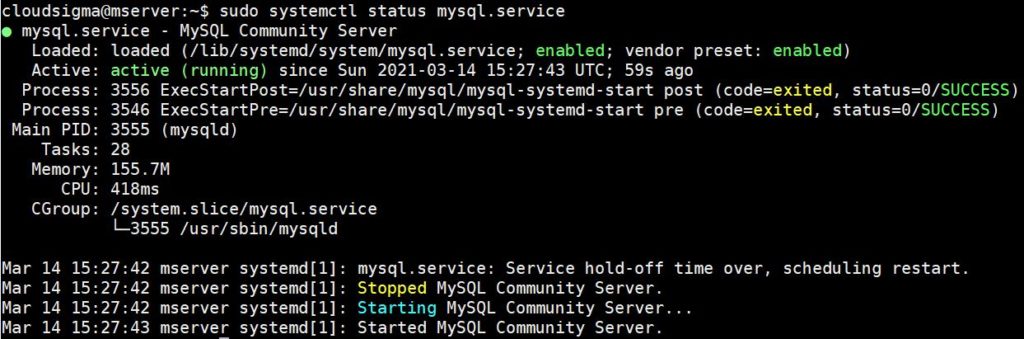
To emulate a crash, find the MySQL process ID by entering the following command:
|
1 |
sudo systemctl status mysql.service |
The status check command displays a process ID, in our case it’s 3555:
Enter the following command to kill the process. Replace it with the process ID you got on your server:
|
1 |
sudo kill -9 3555 |
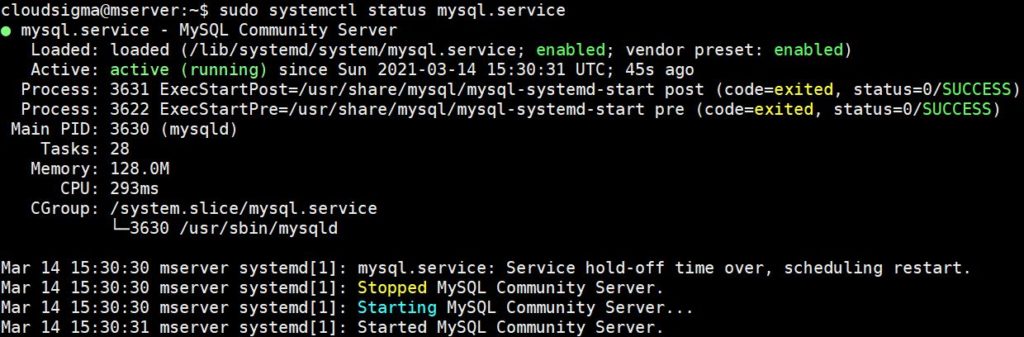
Enter the following command to check the status:
|
1 |
sudo systemctl status mysql.service |
The output shows MySQL is running, but with a new process ID. This means it was auto-restarted after the crash:
Conclusion
In this tutorial, we have introduced you to the three initialization systems in Linux distributions: System V, Upstart, and Systemd. We have learned how to use any of the init systems to configure your continuous running services to auto-start after a reboot or system crash. This should serve as a starting point for you when you need to configure your services. Part one of this series was majorly a hands-on practical tutorial. The second part is more theoretical and features more details on what we have been doing in part one. Do not delete your test servers yet as you will use them in part two also.
Happy Computing!
- How To Create a Kubernetes Cluster Using Kubeadm on Ubuntu 18.04 - June 24, 2021
- Nginx Server and Location Block Selection Algorithms: Overview - May 14, 2021
- Configuring an Iptables Firewall: Basic Rules and Commands - April 5, 2021
- How to Configure a Linux Service to Auto-Start After a Reboot or System Crash: Part 2 (Theoretical Explanations) - March 25, 2021
- How to Configure a Linux Service to Auto-Start After a Reboot or System Crash: Part 1 (Practical Examples) - March 24, 2021