
Port forwarding also referred to as port mapping, is a method for allowing remote devices to connect to a specific service within your private local-area network (LAN). As the name suggests, the process involves forwarding requests for a specific port to another port or network. It modifies the destination of the packet in-flight and is considered a type of network address translation (NAT) operation.
Enabling port forwarding allows those devices or hosts not connected with the internal network to access each other, which is otherwise restricted when disabled. You can leverage the benefits of port forwarding to block target websites, upgrade security, and add a detour around the NAT firewall at your convenience.
In this tutorial, we will walk you through the steps of forwarding ports with iptables in Linux.
Prerequisites
To follow along with this tutorial, you will need:
- Ubuntu installed on your system.
- Two Ubuntu 20.04 hosts in the same data center with private networking enabled.
- Non-root user account set up with sudo privileges in each machine.
Host Details
First, we need to know the details of the interfaces and addresses of the working servers. Let’s check the network interfaces of our system:
|
1 |
ip -4 addr show scope global |
You’ll see the output:
|
1 2 3 4 5 6 7 8 9 |
Sample Output 2: eth0: <BROADCAST,MULTICAST,UP,LOWER_UP> mtu 1500 qdisc pfifo_fast state UP group default qlen 1000 inet 198.51.100.45/18 brd 45.55.191.255 scope global eth0 valid_lft forever preferred_lft forever 3: eth1: <BROADCAST,MULTICAST,UP,LOWER_UP> mtu 1500 qdisc pfifo_fast state UP group default qlen 1000 inet 192.168.1.5/16 brd 10.132.255.255 scope global eth1 valid_lft forever preferred_lft forever |
Here, the highlighted output shows two interfaces, the first one eth0 assigned to the address 192.51.100.45, and the second eth1 assigned to the address 192.168.1.5. Out of these two interfaces, one is public and the other is private. We will run a command to distinguish between the two, and figure out the public interface, the one connected to your default gateway. To distinguish, type:
|
1 |
ip route show | grep default= |
You’ll see the output:
|
1 2 3 |
Output: ip route show | grep default |
Dummy Data for the Tutorial
We will use dummy addresses and interface assignments throughout this tutorial. You are free to use these data or replace them, at your convenience.
Web server network details:
-
Public IP Address: 203.0.113.2
-
Private IP Address: 192.0.2.2
-
Public Interface: eth0
-
Private Interface: eth1
Firewall network details:
-
Public IP Address: 203.0.113.15
-
Private IP Address: 192.0.2.15
-
Public Interface: eth0
-
Private Interface: eth1
Web Server Set-Up
Let’s make a start with our web server host. First, log in with your sudo user.
Install Nginx
First, we will install Nginx on our web server host and lock it down so that it only listens to its private interface. It will enable our web server to only be available if we have set up port forwarding in a correct manner.
Next, update the local package cache and use apt to download and install Nginx:
|
1 |
sudo apt-get update |
|
1 |
sudo apt-get install nginx |
Add Restrictrictions
Once we’ve installed Nginx on our web server host, we’ll lock it to ensure it accepts inputs from private interfaces and nowhere else. Also, it will ensure that our web servers will be active only if the port forwarding setup is correct.
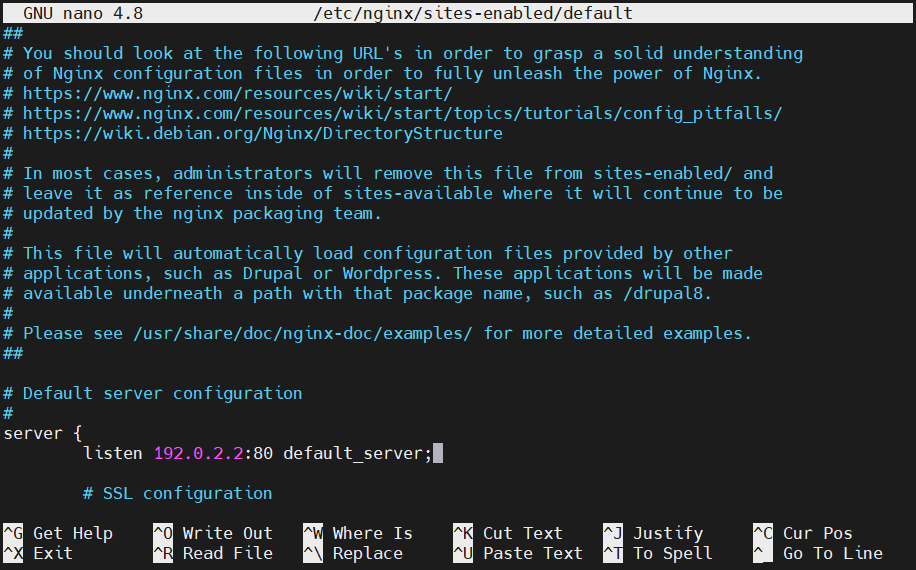
To add restrictions, open up the default server block configuration file /etc/nginx/sites-enabled/default on any text editor of your choice (here we’re using nano text editor), and type:
|
1 |
sudo nano /etc/nginx/sites-enabled/default |
In the output, you’ll see the listen directive appearing twice:
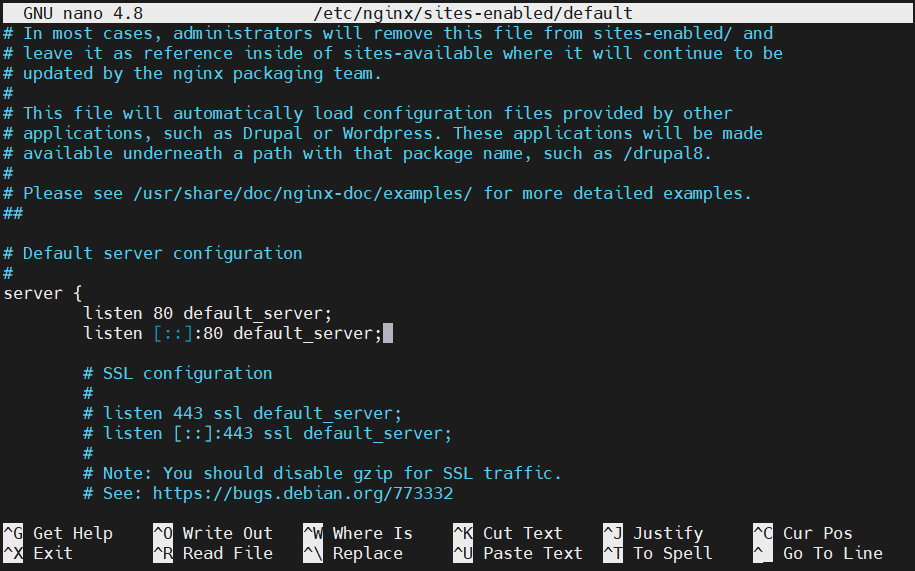
In this tutorial, we’re using the first directive to demonstrate IPv4 forwarding. The second one, which is configured for IPv6, can be removed. Add your web server’s private IP address with a colon just ahead of the 80 to inform Nginx to take inputs only from the private interface. Next, edit the directive:
Once done, save and close the file. Before heading forward, make sure there are no syntax errors. Let’s test the file:
|
1 |
sudo nginx -t |

If you see no error displayed, you’re good to restart Nginx and enable the new configuration:
|
1 |
sudo service nginx restart |
Verification of the Network Restriction
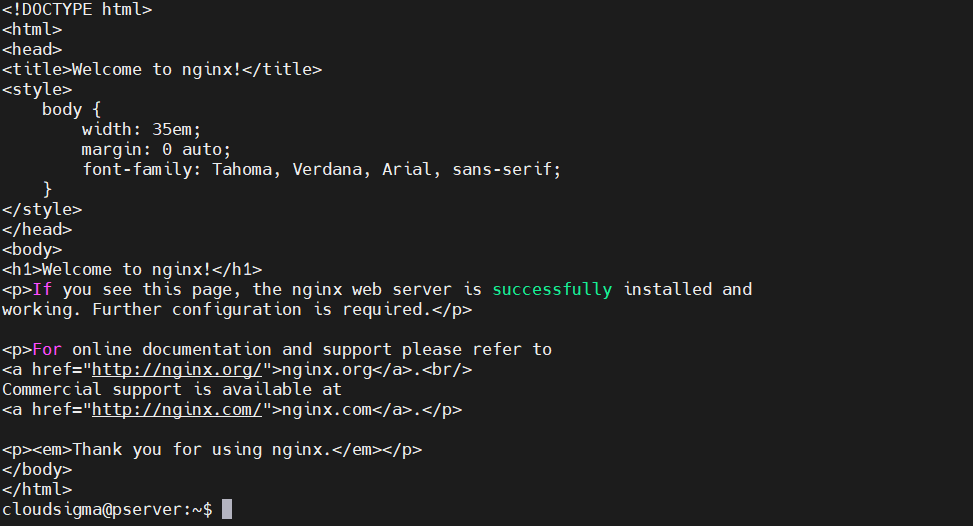
Let’s verify the level of access we have to our web server. Try to access the webserver using the private interface using the curl command:
|
1 |
curl --connect-timeout 5 192.0.2.2 |
You’ll see the output:
If we attempt to use the public interface, we will not be able to connect:
|
1 |
curl --connect-timeout 5 203.0.113.2 |
|
1 |
curl: (7) Failed to connect to 203.0.113.2 port 80: Connection refused |
This is exactly what we expected.
Configure the Firewall to Forward Port 80
Let’s progress our work with implementing port forwarding on our firewall machine.
Enable Forwarding in the Kernel
By default, most systems have port forwarding turned OFF. We’ll make changes to turn ON port forwarding by making a few edits. Also, there is an option to turn ON port forwarding permanently using the sudo privileges as shown in the upcoming steps.
To turn ON traffic forwarding at the kernel level, type:
|
1 |
echo 1 | sudo tee /proc/sys/net/ipv4/ip_forward |
To turn ON port forwarding permanently, edit the /etc/sysctl.conf file. Open the file with sudo privileges, and type:
|
1 |
sudo nano /etc/sysctl.conf |
Inside, find and uncomment the line that looks like this:
|
1 |
net.ipv4.ip_forward=1 |
Once done, save and close the file. Then, use the sysctl commands to apply changes in the settings to make it more effective:
|
1 |
sudo sysctl -p |
|
1 |
sudo sysctl --system |
Basic Firewall Setup
First, go over the guide on how to set up a basic firewall on your machine. Upon completion, you will have:
- Installed iptables-persistent
- Saved the default rule set into /etc/iptables/rules.v4
- Comprehensive knowledge of adding and modifying rules using the iptables command
Also, you can check out how to list and delete iptables Firewall rules.
Adding the Forwarding Rules
We’ll configure our firewall to ensure that traffic flowing into our public interface ( eth0 ) on port 80 gets forwarded to our private interface ( eth1). By default, our basic firewall has a FORWARD chain set to DROP traffic. Adding firewall rules will allow forward connections to our web server. For adding security, we will lock the firewall rules to permit forward requests.
In the FORWARD chain, we will accept new connections destined for port 80 coming from our public interface and heading to our private interface. We’ll identify the new connections with the help of the conntrack extension and represent them by a TCP SYN packet:
|
1 |
sudo iptables -A FORWARD -i eth0 -o eth1 -p tcp --syn --dport 80 -m conntrack --ctstate NEW -j ACCEPT |
You need to allow any subsequent traffic in both directions resulting from the incoming connection. Type the commands below to allow ESTABLISHED and RELATED traffic between our public and private interfaces:
|
1 |
iptables -A FORWARD -i eth0 -o eth1 -m conntrack --ctstate ESTABLISHED,RELATED -j ACCEPT |
|
1 |
iptables -A FORWARD -i eth1 -o eth0 -m conntrack --ctstate ESTABLISHED,RELATED -j ACCEPT |
Let’s verify if our policy on the FORWARD chain is set to DROP:
|
1 |
sudo iptables -P FORWARD DROP |
Until now, we’ve added a few rules that allow traffic between our public and private interfaces to proceed through our firewall. However, iptables is not yet informed to direct the traffic because firewall rules configuration is yet to be done. In the next steps, we will add the NAT rules and adjust the permanent rule set to direct traffic.
Adding the NAT Rules to Direct Packets
We’ll perform two separate operations in order for iptables to correctly alter the packets, and streamline communication with the clients and the webserver.
DNAT is the first operation that commences the PREROUTING chain of the nat table. The operation alters the packet’s destination address and enables it to be correctly routed as it passes between networks. However, the clients on the public network will be connecting to our firewall server and will have no information about our private network topology. To pass information with the private network, change the destination address of each packet to allow it to correctly reach our destination web server.
It is crucial to note that we’re focusing on configuring port forwarding. Performing NAT on every packing hitting the firewall is not a part of our tutorial. We will match packets at port 80 to our web server’s private IP address:
|
1 |
sudo iptables -t nat -A PREROUTING -i eth0 -p tcp --dport 80 -j DNAT --to-destination 192.0.2.2 |
The packet will get routed correctly to our web server containing the client’s original address as the source address. Despite attempts made by the server to send the reply directly to that address, there will be no possibility to establish a legitimate TCP connection.
To configure proper routing, we’ll modify the packet’s source address. Let’s edit the source address to our firewall server’s private IP address. After modification, the reply will be sent back to the firewall, which will forward back to the client.
To enable this functionality, add a rule to the POSTROUTING chain of the nat table evaluated right before packets are sent out on the network. Then, match the packets destined for our web server by IP address and port:
|
1 |
sudo iptables -t nat -A POSTROUTING -o eth1 -p tcp --dport 80 -d 192.0.2.2 -j SNAT --to-source 192.0.2.15 |
Once this rule is in place, our web server should be accessible by pointing our web browser at our firewall machine’s public address:
|
1 |
curl 203.0.113.15 |
You’ll see the output:
Our port forwarding setup is complete.
Adjust the Permanent Rule Set
After completing the port forwarding setup, we’ll save this to our permanent rule set. If you want to keep the comments in the current rule set, use the iptables-persistent service to save your rules:
|
1 |
sudo service iptables-persistent save |
You can also open it up and edit manually to keep the comments in your file:
|
1 |
sudo nano /etc/iptables/rules.v4 |
Next, configure the filter table and the nat table to add the FORWARD chain rules and ROUTING rules respectively. Adjusting the nat table will allow us to add PREROUTING and POSTROUTING rules as shown in the example below:
|
1 2 3 4 5 6 7 8 9 10 11 12 13 14 15 16 17 18 19 20 21 22 23 24 25 26 27 28 29 30 31 32 33 34 35 36 37 38 39 40 41 42 43 44 45 46 47 48 49 50 51 52 53 54 55 56 57 58 59 60 61 62 63 64 65 66 67 68 69 70 71 72 73 74 75 76 77 78 79 80 81 82 83 84 85 86 87 88 89 90 91 92 93 94 95 96 97 98 99 100 101 102 103 104 105 106 107 108 109 110 111 112 113 114 115 116 117 118 119 120 121 122 123 124 125 126 127 128 129 130 131 132 133 134 135 136 137 138 139 140 141 142 143 144 145 146 147 148 149 150 151 152 153 154 155 156 157 158 159 160 161 162 163 164 165 166 167 168 169 170 171 172 173 174 175 176 177 178 179 |
/etc/iptables/rules.v4 *filter # Allow all outgoing, but drop incoming and forwarding packets by default :INPUT DROP [0:0] :FORWARD DROP [0:0] :OUTPUT ACCEPT [0:0] # Custom per-protocol chains :UDP - [0:0] :TCP - [0:0] :ICMP - [0:0] # Acceptable UDP traffic # Acceptable TCP traffic -A TCP -p tcp --dport 22 -j ACCEPT # Acceptable ICMP traffic # Boilerplate acceptance policy -A INPUT -m conntrack --ctstate ESTABLISHED,RELATED -j ACCEPT -A INPUT -i lo -j ACCEPT # Drop invalid packets -A INPUT -m conntrack --ctstate INVALID -j DROP # Pass traffic to protocol-specific chains ## Only allow new connections (established and related should already be handled) ## For TCP, additionally only allow new SYN packets since that is the only valid ## method for establishing a new TCP connection -A INPUT -p udp -m conntrack --ctstate NEW -j UDP -A INPUT -p tcp --syn -m conntrack --ctstate NEW -j TCP -A INPUT -p icmp -m conntrack --ctstate NEW -j ICMP # Reject anything that's fallen through to this point ## Try to be protocol-specific w/ rejection message -A INPUT -p udp -j REJECT --reject-with icmp-port-unreachable -A INPUT -p tcp -j REJECT --reject-with tcp-reset -A INPUT -j REJECT --reject-with icmp-proto-unreachable # Rules to forward port 80 to our web server # Web server network details: # * Public IP Address: 203.0.113.2 # * Private IP Address: 192.0.2.2 # * Public Interface: eth0 # * Private Interface: eth1 # # Firewall network details: # # * Public IP Address: 203.0.113.15 # * Private IP Address: 192.0.2.15 # * Public Interface: eth0 # * Private Interface: eth1 -A FORWARD -i eth0 -o eth1 -p tcp --syn --dport 80 -m conntrack --ctstate NEW -j ACCEPT -A FORWARD -i eth0 -o eth1 -m conntrack --ctstate ESTABLISHED,RELATED -j ACCEPT -A FORWARD -i eth1 -o eth0 -m conntrack --ctstate ESTABLISHED,RELATED -j ACCEPT # End of Forward filtering rules # Commit the changes COMMIT *raw :PREROUTING ACCEPT [0:0] :OUTPUT ACCEPT [0:0] COMMIT *nat :PREROUTING ACCEPT [0:0] :INPUT ACCEPT [0:0] :OUTPUT ACCEPT [0:0] :POSTROUTING ACCEPT [0:0] # Rules to translate requests for port 80 of the public interface # so that we can forward correctly to the web server using the # private interface. # Web server network details: # * Public IP Address: 203.0.113.2 # * Private IP Address: 192.0.2.2 # * Public Interface: eth0 # * Private Interface: eth1 # # Firewall network details: # # * Public IP Address: 203.0.113.15 # * Private IP Address: 192.0.2.15 # * Public Interface: eth0 # * Private Interface: eth1 -A PREROUTING -i eth0 -p tcp --dport 80 -j DNAT --to-destination 192.0.2.2 -A POSTROUTING -d 192.0.2.2 -o eth1 -p tcp --dport 80 -j SNAT --to-source 192.0.2.15 # End of NAT translations for web server traffic COMMIT *security :INPUT ACCEPT [0:0] :FORWARD ACCEPT [0:0] :OUTPUT ACCEPT [0:0] COMMIT *mangle :PREROUTING ACCEPT [0:0] :INPUT ACCEPT [0:0] :FORWARD ACCEPT [0:0] :OUTPUT ACCEPT [0:0] :POSTROUTING ACCEPT [0:0] COMMIT |
After adding the above values, save and close the file. Next, type the below command to test the syntax of your rules:
|
1 |
sudo iptables-restore -t < /etc/iptables/rules.v4 |
If you see no errors, load the rule set:
|
1 |
sudo service iptables-persistent reload |
Let’s verify that our web server is still accessible through your firewall’s public IP address:
|
1 |
curl 203.0.113.15 |
Conclusion
By the end of this tutorial, you must be comfortable with forwarding ports on a Linux server with iptables. You can leverage port forwarding capabilities to disguise your private network’s topology whilst streamlining service traffic to flow freely through your gateway firewall machine.
As the process relies explicitly on your network safety and the ports used, it is safe. There may be a possibility of risk involved if you don’t have a security firewall or VPN security on your network. Therefore, it is advisable to configure the firewall as discussed in this tutorial. We hope this guide helps you stay safe on the internet when using your private network.
To further explore more firewall solutions you can implement on your system, check these resources from our blog:
- Configuring a Firewall with UFW on Ubuntu 18.04
- Setting Up a Firewall with FirewallD on CentOS 7
- The Basics of UFW: Learning the Essential Firewall Commands
Happy Computing!
- How to Deploy WordPress with Persistent Volume on Kubernetes Cluster - March 17, 2023
- Deploying Applications on Kubernetes Using Argo CD and GitOps - October 26, 2022
- Using Node.js Modules with npm and package.json: A Tutorial - October 6, 2022
- Using Ansible to Install and Configure WordPress with LAMP on Ubuntu - September 23, 2022
- Creating Views in the Django Web Application Framework - September 22, 2022