
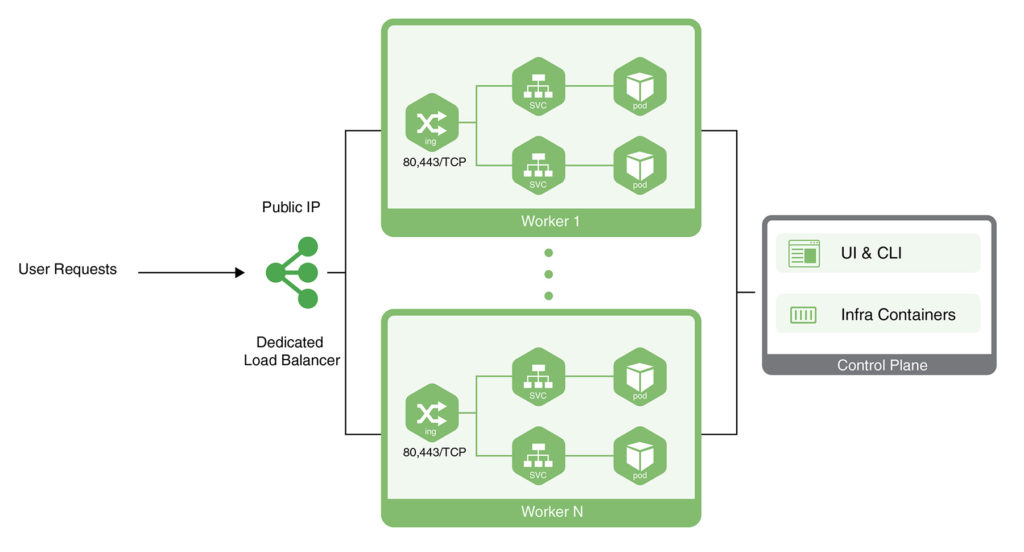
CloudSigma PaaS allows users to expose their applications using a public IP address. This address needs to be attached to a node from the Kubernetes cluster environment. There are two ways to achieve this in the CloudSigma PaaS environment:
- One way is to attach the public IP to a dedicated load balancer.

- Another way is to attach the public IP to a Worker node from Kubernetes.
In this tutorial, we will guide you on how to get Kubernetes application access using either of these approaches.
Setting a Dedicated Load Balancer for Kubernetes Application Access
First, we shall learn how to set up a dedicated load balancer for application access:
- Head over to the CloudSigma Marketplace to locate and install the Kubernetes cluster. Then, deploy your application. As an example, we will be deploying the Jakarta EE Cargo Tracker.
- Next to your Kubernetes cluster, find and click on Change Environment Topology. In the window that opens on your screen, add a Dedicated Load Balancer node. Then, attach a public IP address to it like this:
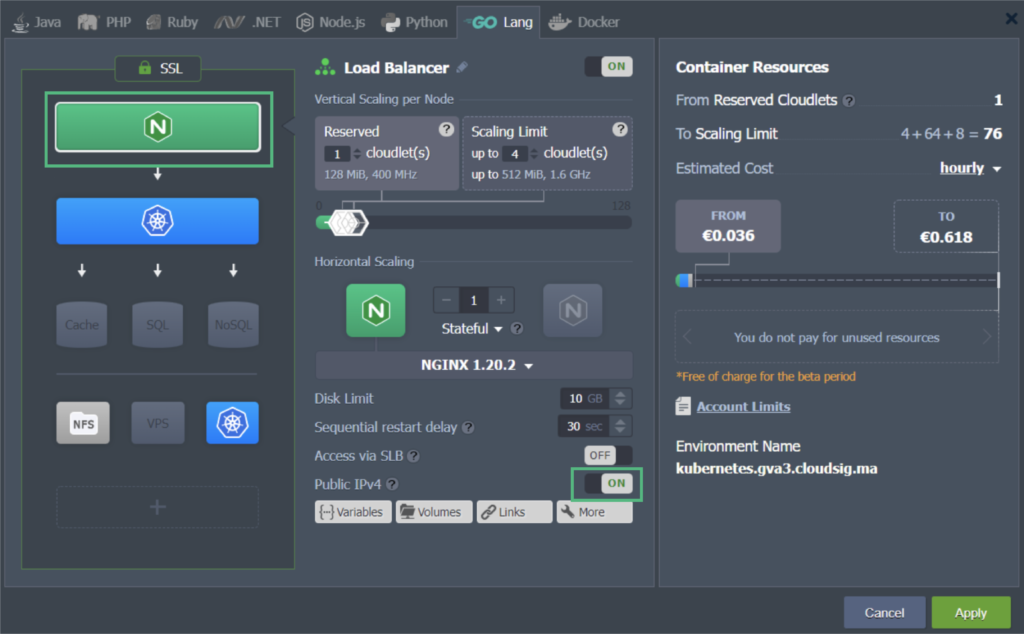
In our example, we have used the NGINX load balancer node. There are multiple other load balancers available including HAProxy, LS Web ADC, and Varnish. You can choose whichever one you prefer to use.
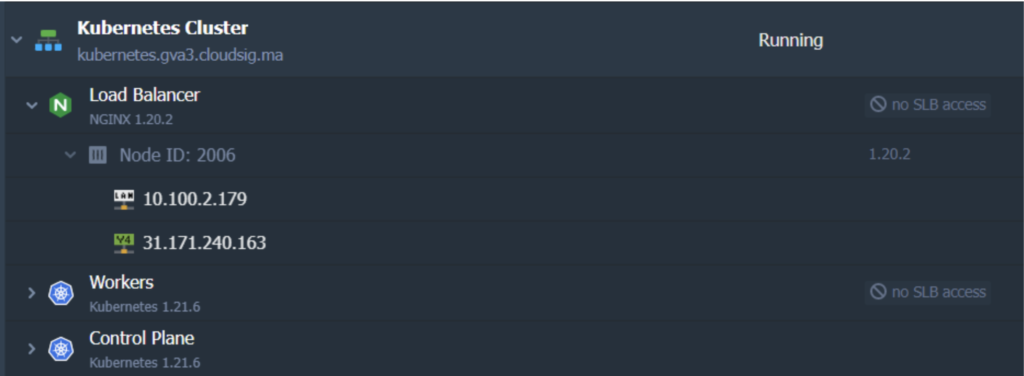
When you are done modifying the topology, the applied changes will look like this:
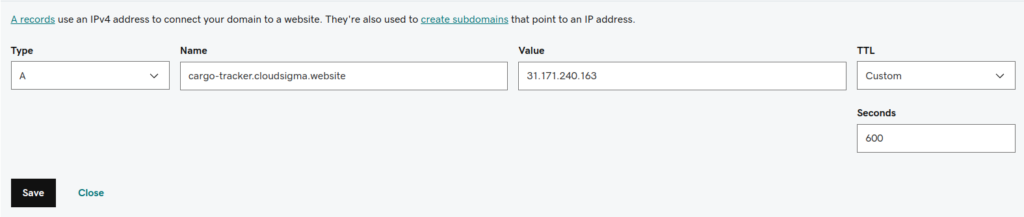
3. The next step is to create an A record for a custom domain. You will be using the same public IP address that you used in the previous steps. In this example, we will be using cargo-tracker.cloudsigma.website:
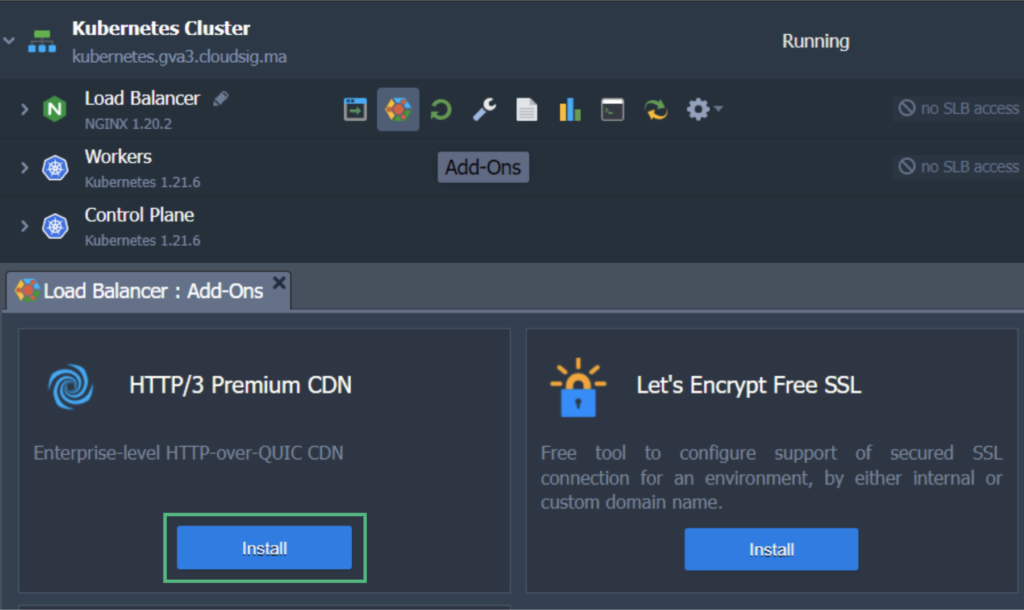
4. Now we can attach our custom domain to the K8s cluster. To do this, we will send a request to issue a trusted Let’s Encrypt SSL certificate:
- Hover over the Load Balancer and click on Add-Ons.
- Find and Install Let’s Encrypt Free SSL:
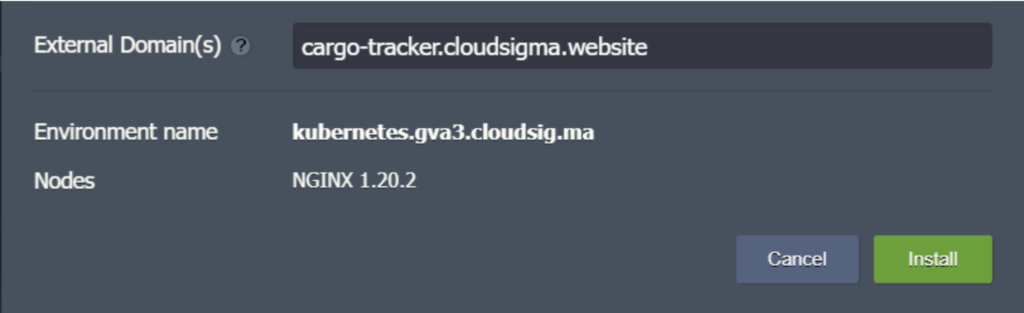
- In configuration, enter your custom domain name and then, click Install. In our case, the domain name is as follows:
Finally, we have now made our application that we can access using the custom domain https://cargo-tracker.cloudsigma.website. We have also encrypted the traffic on our application with a valid and trusted Let’s Encrypt SSL certificate.
Gaining Application Access Using the Kubernetes Worker Node Public IP Address
Next, we will be looking at the alternative approach you can take to make the application available outside the Kubernetes cluster. Essentially, we will learn how to attach a public IP address to a worker node in the Kubernetes cluster in order to make the app directly accessible:

Let’s continue with the same example we showed you previously. We will be using the same cluster that we deployed our Cargo Tracker application on. Here’s how to proceed:
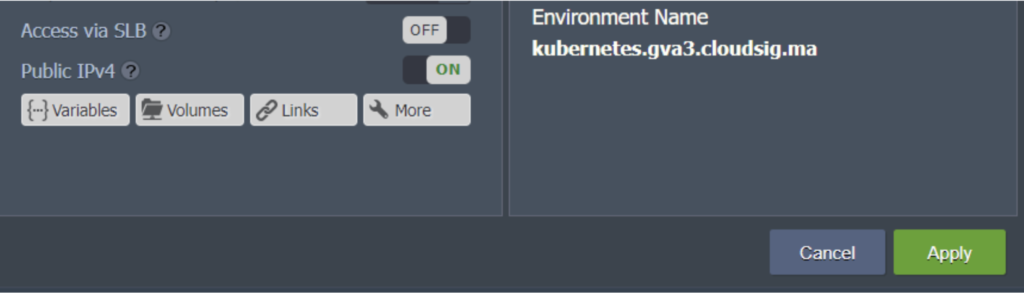
1. Click on Change Environment Topology. Add the public IP address to the worker node:
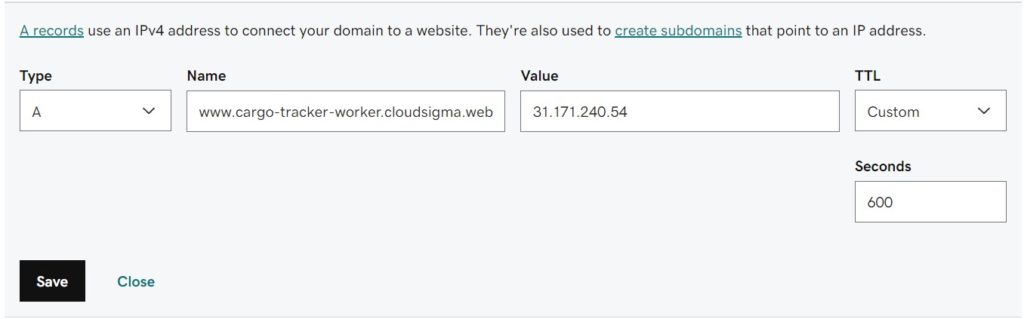
2. Next, create an A record for your custom domain and map it to the IP you just added. Make sure that you use a domain name that is different from the one used in the previous chapter. For example, we will use the following domain name: cargo-tracker-worker.cloudsigma.website:
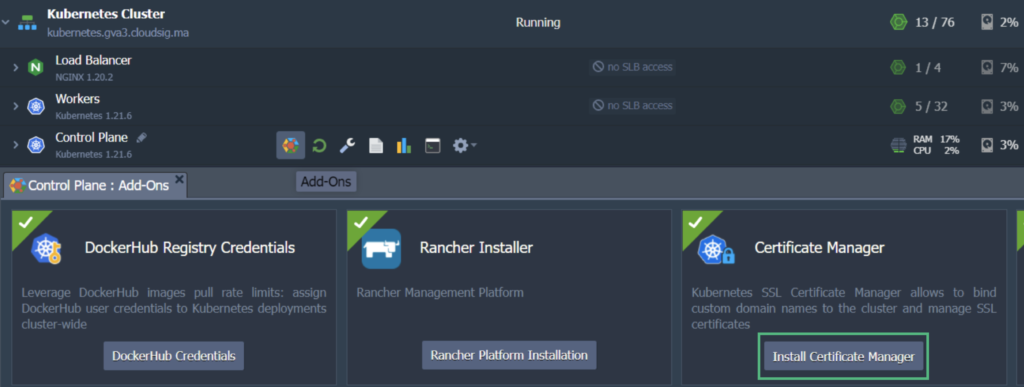
3. Hover over the Control Plane or Master node and click on Add-Ons. Locate and install Certificate Manager. This should install a cert-manager controller along with an NGINX ingress controller with LoadBalancer service type. The latter contains the IP address that is associated with your worker node. It will be serving the “nginx-cert” ingress class resources:
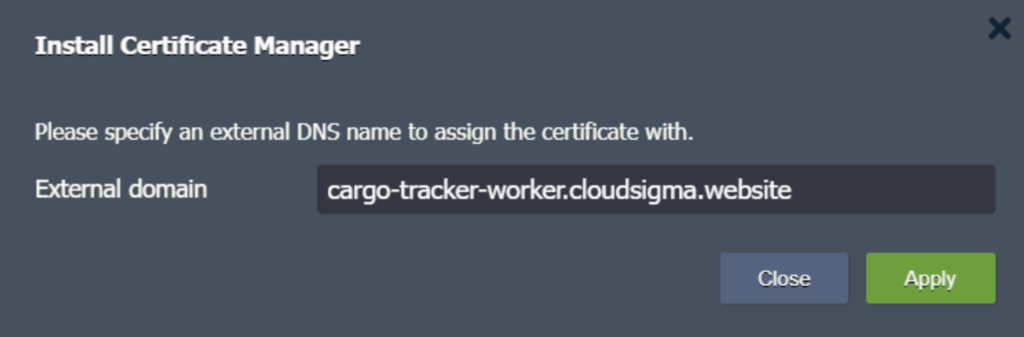
4. In the given field, enter your preferred domain name and click on Apply:
5. At the time of installation, the add-on also installs a test application called helloworld-cert. You can simply delete the resources it uses with these commands:
|
1 2 3 4 5 |
$ kubectl delete deploy hello-cert-manager $ kubectl delete svc hello-cert-manager $ kubectl delete ing helloworld-cert |
These commands should be entered and executed using SSH (SFTP) or the Web SSH Gate of the Control Plane or Master Node. Hover over the node and click on the Web SSH option beside it to access the gate.
The other option is for you to hover over the Control Plane or Master Node and clicking on Config. From here, go to the SFTP/SSH Gate and follow the given instructions.
6. In order to terminate application SSL traffic and handle routing to the cargo-tracker service, we need to create an ingress resource called cargo-tracker-worker. Let’s say we are using cargo-tracker-worker-ingress.yaml. You can use an editor such as vi to create a file and then paste the following code:
|
1 |
vi cargo-tracker-worker-ingress.yaml |
After that, proceed as follows:
|
1 2 3 4 5 6 7 8 9 10 11 12 13 14 15 16 17 18 19 20 21 22 23 24 25 26 27 28 29 |
apiVersion: networking.k8s.io/v1 kind: Ingress metadata: name: cargo-tracker-worker namespace: default annotations: kubernetes.io/ingress.class: nginx-cert cert-manager.io/cluster-issuer: "letsencrypt-prod" kubernetes.io/tls-acme: "true" nginx.ingress.kubernetes.io/affinity: "cookie" nginx.ingress.kubernetes.io/affinity-mode: "persistent" nginx.ingress.kubernetes.io/session-cookie-expires: "172800" nginx.ingress.kubernetes.io/session-cookie-max-age: "172800" spec: tls: - hosts: - cargo-tracker-worker.cloudsigma.website secretName: external-domain-tls rules: - host: cargo-tracker-worker.cloudsigma.website http: paths: - path: / pathType: ImplementationSpecific backend: service: name: cargo-tracker port: number: 80 |
|
1 |
$ kubectl apply -f cargo-tracker-worker-ingress.yaml |
7. When you make this ingress, Certificate Manager will automatically issue a Let’s Encrypt SSL certificate for your new domain name. Give the system a minute or two before you check if your app is available on the new custom domain name, which is https://cargo-tracker-worker.cloudsigma.website in our case.
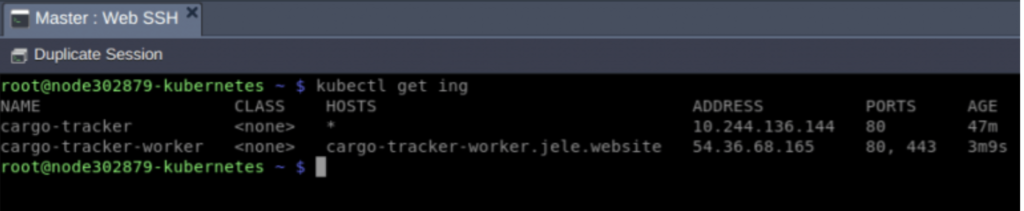
And voila! By following these steps, you have exposed your application using two different approaches. As a result, you will see two ingresses. For us, they are:
- cargo-tracker
This ingress serves application traffic that comes through the public IP of your dedicated load balancer.
- cargo-tracker-worker
This ingress is set to serve the application traffic that flows in directly from the IP that is attached to the K8s worker node.
This is how they will appear:
Based on which kind of implementation you go for, you will only need one ingress in production. CloudSigma PaaS gives its users access to a number of tools to perform load balancing as needed by their applications. Feel free to read and learn more about load balancing on the platform. We also have detailed guides about the basics of load balancing with the likes of NGINX and HAProxy among other available tools.
You can give CloudSigma’s PaaS a try with our 7-day free trial or contact us if you want us to provide you with more details and a platform demo.
- 5 Tips to Achieve Optimal Cloud Computing Cost Efficiency - October 31, 2022
- CloudSigma Empowers Blockchain Infrastructure Provider with a Green, Reliable, and Cost-Efficient Cloud Platform - October 27, 2022
- Whitech Launches New Egypt Cloud Computing Offering, Powered by HPE and CloudSigma - October 17, 2022
- Key Aspects of Protecting your Data in the Cloud - September 20, 2022
- How to Configure MongoDB Replication and Automated Failover - September 19, 2022