
Introduction
Kubernetes has become a standard for deploying large applications. It helps developers gain significant advantages and offers features that are not available in traditional server hosting. Kubernetes allows horizontal scaling without the hassle of infrastructure. Furthermore, it reduces the cost of acquiring and maintaining the infrastructure as the application grows.
However, managing applications on Kubernetes can also be complex and demands advanced skills. Deploying applications using the Kubernetes and Continuous Integration and Continuous Deployment process (CI/CD) helps in overcoming this complex process by providing abstraction. GitOps is one of the tools that can help in achieving abstraction.
In this tutorial, we will demonstrate how to use Argo CD to continuously integrate and deploy applications on Kubernetes. Whenever any change is pushed to the repository, it is deployed on the target cluster. Argo CD also provides version controls, configurations, and application environments by integrating with the whole of the software development life cycle. If you are having package managers for Kubernetes such as Helm, or if you have your repository hosted on BitBucket or GitLab, Argo CD can seamlessly integrate with all of these platforms as well.
Prerequisites
To complete this tutorial, you must have:
-
SSH keys on your machine. If you dont have a pair of SSH keys running on Linux/MacOS/BSD, you can create one following our tutorial SSH Overview – SSH Servers, Clients, and Keys.
-
You will also need a Kubernetes cluster running. In addition, you should have kubectl running on your machine. If you do not have a Kubernetes cluster, you can follow How To Create a Kubernetes Cluster Using Kubeadm on Ubuntu 18.04.
-
You should have a basic understanding of Kubernetes concepts. If you want to familiarize yourself with Kubernetes further, you can follow Getting to know the basics of the Kubernetes tool.
Step 1 – Install Argo CD
Before we can install Argo CD, we need to have a Kubernetes environment running with kubectl. You can test this by running the command below:
|
1 |
kubectl get nodes |

You should see at least one Kubernetes node running in the Ready status. If there is no node available you should recheck your Kubernetes installation. Next, we will create a separate namepsace for our Kubernetes installation. Let’s call it argocd. We will keep the Argo CD related service in this namespace:
|
1 |
kubectl create namespace argocd |
After that, install the Argo CD scripts in the above newly created namespace by running the command below:
|
1 |
kubectl apply -n argocd -f https://raw.githubusercontent.com/argoproj/argo-cd/stable/manifests/install.yaml |

To check the status of the Kubernetes pods, run the below command:
|
1 |
watch kubectl get pods -n argocd |
You will get a result like below:

Here you have successfully concluded the installation of Argo CD. To exit the watch interface, you can press Ctrl + C. To access the services in this Kubernetes cluster, we will need to forward the ports. We will show you how to do that in in the next step.
Step 2 – Forward Ports to Access Argo CD
Kubernetes can deploy your application to any port of its choice. Hence, it is necessary to forward the ports of the Kubernetes application to access them from the local machine. Argo CD exposes a service called argocd-server which uses port 443. Port 443 is the default port for the HTTPS and HTTP services. You can forward the Kubernetes ports to a port of your choice. In our example below, we have forwarded the port to 8080. To forward ports, run the below command in the terminal:
|
1 |
kubectl port-forward svc/argocd-server -n argocd 8080:443 |
Once you forward the port, it will be blocked so that the other services cannot access it. To have uninterrupted access, it is always recommended to run the above mentioned command in a new terminal. Once you finish, you can press Ctrl+C to quit the port forwarding process.
After you have forwarded the port, you can navigate to the Argo CD by navigating to localhost:8080. You will be prompted for the credentials which you can get from the command line in the next step.
Step 3 – Manage Argo CD from the Command Line
We have to install the Argo CD command line for managing the Argo CD installation. The recommended way to install Argo CD is to use a package manager such as Homebrew. Homebrew is a popular package manager tool for installation on macOS and Linux. You can install Homebrew using the command below:
|
1 |
/bin/bash -c "$(curl -fsSL https://raw.githubusercontent.com/Homebrew/install/HEAD/install.sh)" |
You should have brew installed on your machine. A password prompt might come for login. You can run it by run the command below:
|
1 |
brew install argocd |
You will get the argocd command after the above installation. We will need to retrieve the admin password using the kubectl command. It was automatically generated during the installation. Below is the command to acquire it:
|
1 |
kubectl -n argocd get secret argocd-initial-admin-secret -o jsonpath="{.data.password}" | base64 -d; echo |
Now that you have installed Argo CD, you can login using the command argocd login below:
|
1 |
argocd login localhost:8080 |
You will need to login for deploying the application when using the command line:

You might receive a security warning. If so, press y to proceed forward. Many users may wish to change the password once logged in. If so, run the command argocd account update-password to change the password. We now have a fully functional Argo CD configuration.
Finally, we will be deploying an application on the Kubernetes cluster using the installed Argo CD.
Step 4 – Utilize Multiple Clusters
Before you continue with the setup of your application, it is necessary to know the target machine where you want to deploy it. For many of the scenarios, Argo CD and the deployed application can run on the same cluster. This is the default behavior of Argo CD but this is not the limitation. If you want to deploy the application on other target machines, first run the kubectl config in your machine:
|
1 |
kubectl config get-contexts -o name |
Suppose you get two clusters: test-deploy-cluster and test-target-cluster. Now if the test-deploy-cluster is where your Argo CD is and you want to deploy on test-target-cluster, then run the below command:
|
1 |
argocd cluster add target-k8s |
The above command will add additional cluster’s details on Argo CD. It will also allow to deploy services on the Argo CD target cluster.
Step 5 – Deploy an Example Application
It’s finally time to deploy applications on the Kubernetes cluster. We will use the example appllications that are provided by Argo CD. We will also utilize the helm-guestbook that is built using Helm charts.
To install the application, we will use the argo app create command. We will specify the Git repository, helm-guestbook , and the passing your default destination and namespace:
|
1 |
argocd app create helm-guestbook --repo https://github.com/argoproj/argocd-example-apps.git --path helm-guestbook --dest-server https://kubernetes.default.svc --dest-namespace default |
You can check the status of the newly created app by running the argocd app get:
|
1 |
argocd app get helm-guestbook |
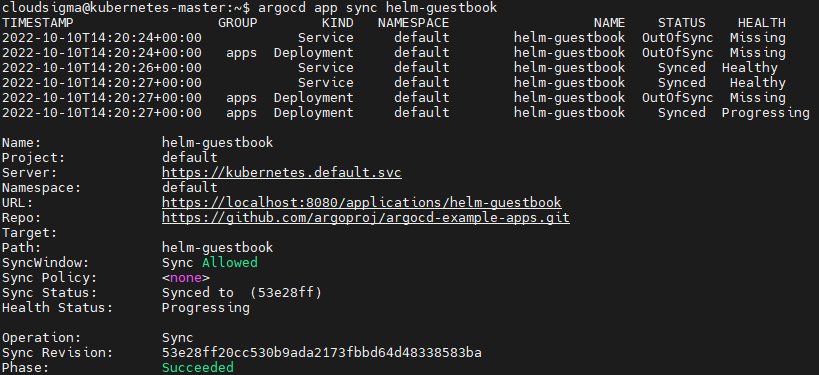
Don’t be surprised if you see OutOfSync status. Until now we have downloaded the Helm chart and created an entry point to it for Argo CD. However, on the Kubernetes part, there is no resource allocated to it. To sync this application run the below command:
|
1 |
argocd app sync helm-guestbook |
When working with GitOps, it is always needed to sync the application with the upstream. Hence, whenever change occurs in the repository, Argo CD deploys the application.
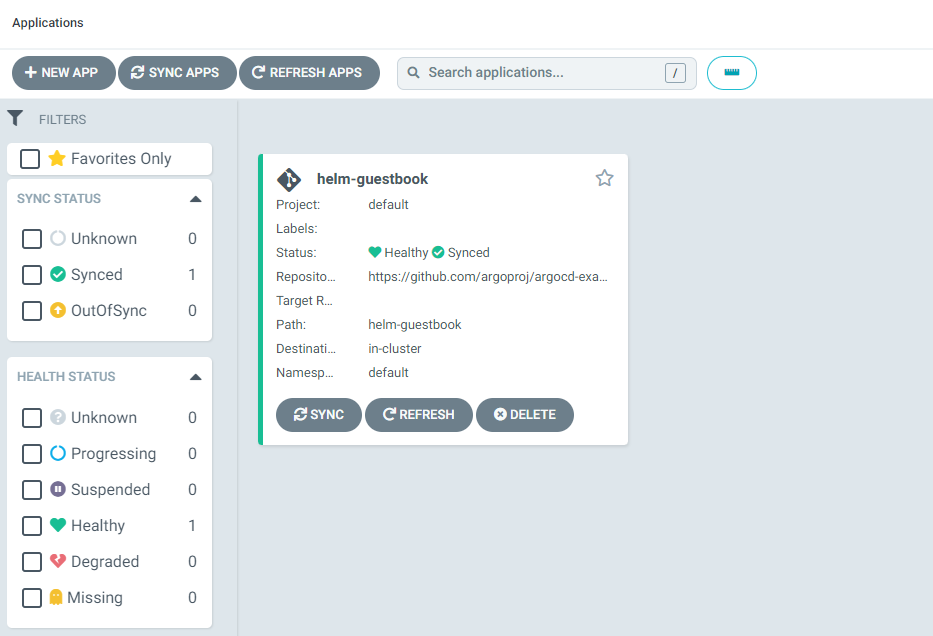
We have deployed the application using the Argo CD command line. You can achieve the same result using the Argo CD web interface. The web interface is very helpful if you wish to check the status and running of the application. To open the web interface, open localhost:8080:
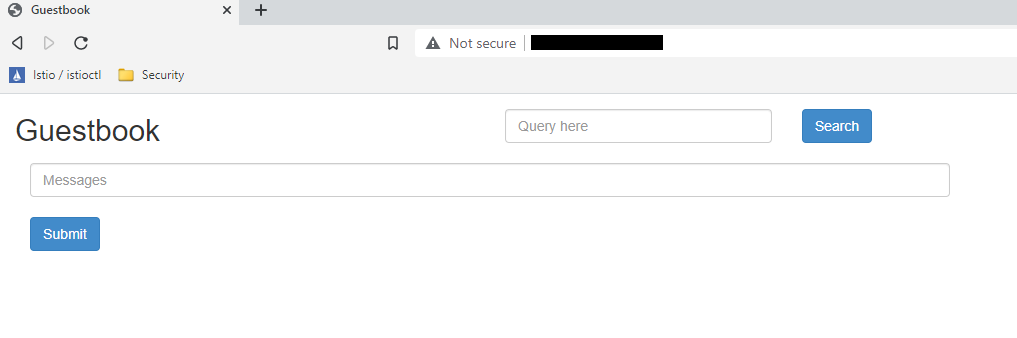
To verify the installation, we will open the application in the browser. Our helm-guestbook runs on port 80. If you have any other application using port 80, you can forward the port so that other applications are not interrupted:
|
1 |
kubectl port-forward svc/helm-guestbook 9090:80 |
Finally, open the url localhost:9090 on your web browser to see your application running:
Now if a developer pushes any code to the Github remote repository, ArgoCD will capture it and reflect it. Your ArgoCD dpeloyments would be accordingly updated providing continuous availability.
Conclusion
In this tutorial, we showed you how to install and deploy applications on Kubernetes using Argo CD. It is important to make sure that your deployments on Kubernetes are maintainable. GitOps could help you a lot in this regard.
Kubernetes is now the standard of deployments on the cloud. Cloudsigma has some great tutorials on Kubernetes that you can check out next:
- Kubernetes DNS Service: A Beginner’s Guide
- Setting Up WordPress With MySQL On Kubernetes With Helm
- Installing Jenkins on Kubernetes
- Exploring CloudSigma PaaS: How to Access Kubernetes Application via Public IP
Happy Computing!
- How to Deploy WordPress with Persistent Volume on Kubernetes Cluster - March 17, 2023
- Deploying Applications on Kubernetes Using Argo CD and GitOps - October 26, 2022
- Using Node.js Modules with npm and package.json: A Tutorial - October 6, 2022
- Using Ansible to Install and Configure WordPress with LAMP on Ubuntu - September 23, 2022
- Creating Views in the Django Web Application Framework - September 22, 2022