
Django is a well-known web framework for the rapid development of secure and maintainable websites and web apps. Built using Python, Django simplifies web development, allowing more time and focus on writing apps without reinventing the wheel every single time. Django is a free and open-source project with robust official documentation, great community support, and plenty of free and paid-for support.
In this guide, we’ll dive into creating Django models. In Django, a model is the key source of info about your data. Models describe the fields and behavior of the data to be stored. Django uses the model to generate the database tables using ORM (Object Relational Mapping), also referred to as models.
Prerequisites
We’re working on a Unix-based operating system, preferably an Ubuntu 20.04 cloud server as the system we’ve tested on. If you want to set up Django on a similar environment, please refer to our tutorial, “How To Install Django and Set Up a Development Environment on Ubuntu 20.04.”
Step 1. Python Development Environment
Django is built on Python. So, we need a robust Python development environment with all the necessary tools to work with Python apps. We’ve already discussed it in a dedicated guide. Here, we’ll have a short demonstration.
First, fire up a terminal and run the following commands:
|
1 2 |
$ sudo apt update && sudo apt upgrade -y $ sudo apt install python3 python-is-python3 |
Next, install pip – the Python package manager:
|
1 |
$ sudo apt install python3-pip |
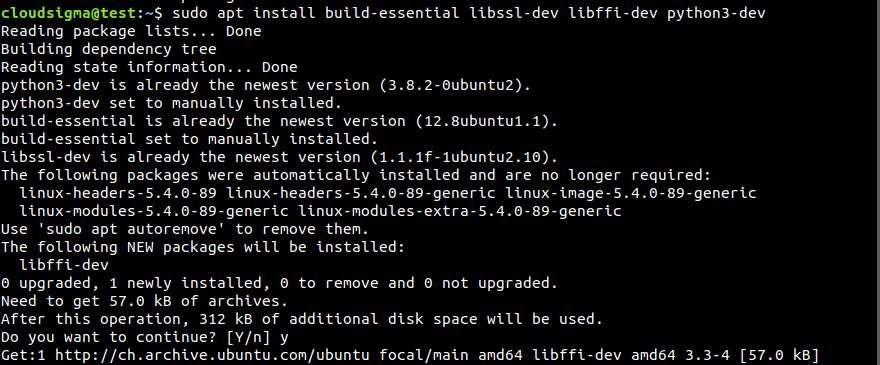
Then, install some additional development packages:
|
1 |
$ sudo apt install build-essential libssl-dev libffi-dev python3-dev |
To establish a virtual environment, we also need the Python venv module:
|
1 |
$ sudo apt install python3-venv |
Step 2. Installing MySQL Server
MySQL is a popular relational database management system. It’s open-source, stable, and rich in features. We’ll use MySQL as the database server for our Django app. Install MySQL using APT:
|
1 |
$ sudo apt install mysql-server |
Next, verify the installation:
|
1 |
$ systemctl status mysql |

It’s just a barebone setup of MySQL with default options. Check out the more in-depth guide on MySQL installation and configuration.
Step 3. Setting Up the Django App
We’re now ready to create our Django app. If you’re interested in a further in-depth demonstration of Django, please refer to our tutorial, “Installing the Django Web Framework on Ubuntu 20.04.”
Next, create a dedicated directory for the app. The directory name should reflect the project name:
|
1 |
$ mkdir -pv <project_dir> |
Within the project directory, create a Python virtual environment using the venv module:
|
1 |
$ python3 -m venv <virtual_env_name> |
Activate the virtual environment:
|
1 |
$ . sample_app_env/bin/activate |

Install Django using pip:
|
1 |
$ pip install django |
Next, create a new Django project using the django-admin command:
|
1 |
$ django-admin startproject sample_app |

Step 4. Configuring the Django App
The Django app contains all the default configurations. For our goal, we need to make some adjustments.
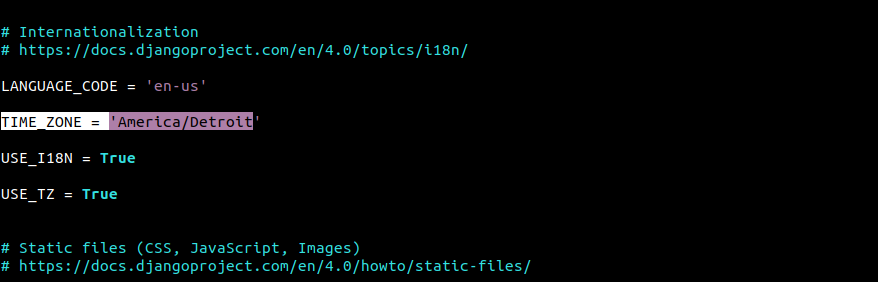
Start by editing the configuration file settings.py:
|
1 |
$ nano sample_app/sample_app/sample_app/settings.py |
Then, change the time zone:
|
1 |
$ TIME_ZONE = '<time_zone>' |
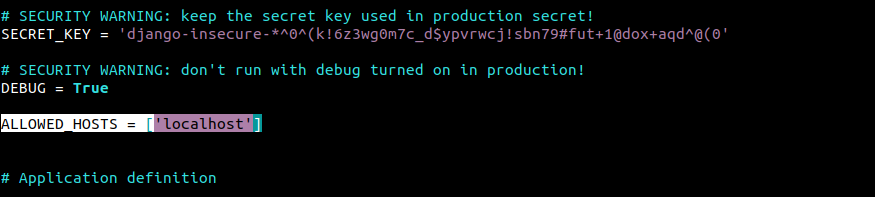
Add the machines that are allowed to access the Django app server:
|
1 |
$ ALLOWED_HOSTS = ['<allowed_host_ip_or_domain_name >'] |
After that, apply the changes:
|
1 |
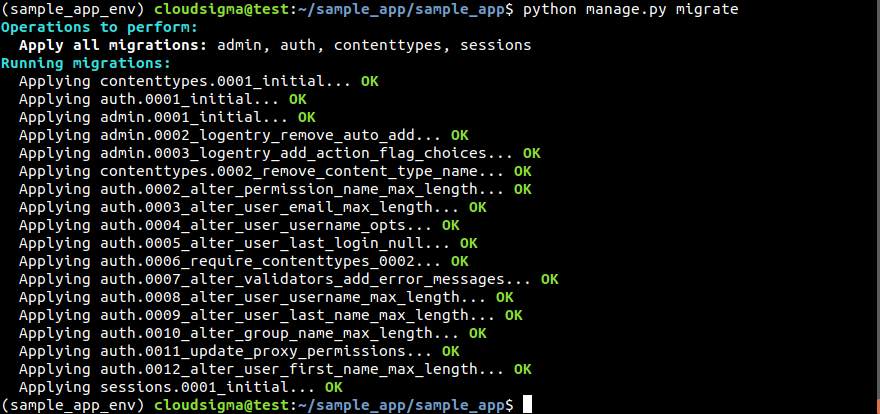
$ python manage.py migrate |
Finally, create a superuser for our Django web app:
|
1 |
$ python manage.py createsuperuser |

Step 5. Connecting Django App to MySQL
To connect to MySQL, we need an additional Python connector library that’s compatible with Django. We’ll be using mysqlclient.
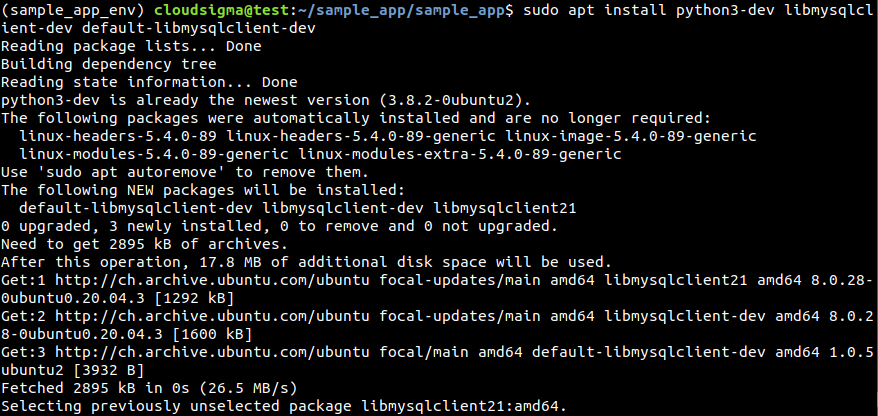
First, ensure that we have the necessary packages installed:
|
1 |
$ sudo apt install python3-dev libmysqlclient-dev default-libmysqlclient-dev |
Next, install mysqlclient:
|
1 |
$ pip install mysqlclient |
- Creating a Dedicated Database
For our app, we need to create a dedicated database and database user. Launch the MySQL shell as root:
|
1 |
$ sudo mysql -u root |
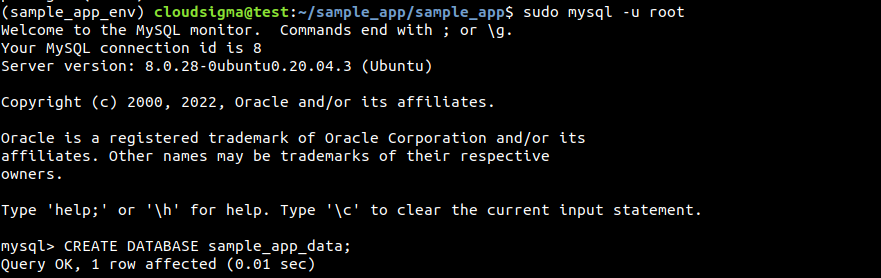 Create a dedicated database for our Django app:
|
1 |
$ CREATE DATABASE <dedicated_database>; |
Then, create a dedicated database user for the Django app:
|
1 |
$ CREATE USER '<username>'@'%' IDENTIFIED WITH mysql_native_password BY '<user_password>'; |
Finally, grant the dedicated user full permission on the dedicated database:
|
1 |
$ GRANT ALL ON <database>.* TO '<username'@'%'; |

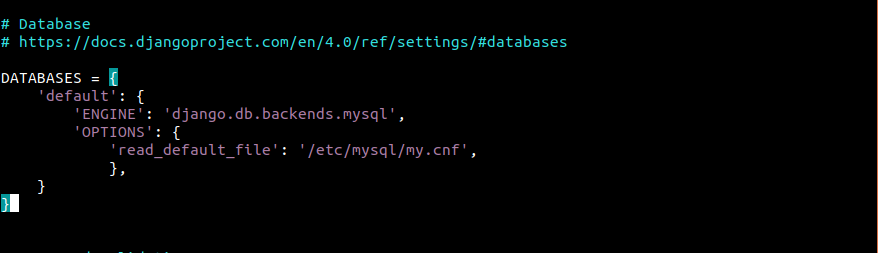
- Changing Django Configuration to use MySQL
Now, we need to tweak some Django configurations so that it can use MySQL as the database server. Open up settings.py in a text editor:
|
1 |
$ nano settings.py |
Scroll down to the DATABASES section and paste the following code:
|
1 2 3 4 5 6 7 8 |
DATABASES = { 'default': { 'ENGINE': 'django.db.backends.mysql', 'OPTIONS': { 'read_default_file': '/etc/mysql/my.cnf', }, } } |
Next, edit the MySQL configuration file so that it contains the necessary database credentials:
|
1 |
$ sudo nano /etc/mysql/my.cnf |
Add the following block at the end of the file:
|
1 2 3 4 5 |
[client] database = <dedicated_database> user = <dedicated_user> password = <user_password> default-character-set = utf8 |
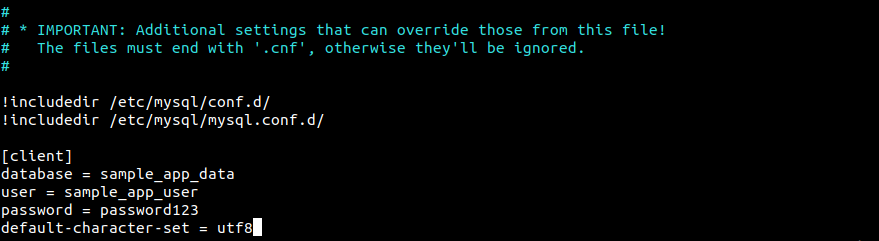
Restart MySQL to take the changes into effect:
|
1 2 |
$ sudo systemctl daemon-reload $ sudo systemctl restart mysql |
Step 6. Creating a Django Model
We’re now ready to create a new model within our Django project. Activate the virtual environment:
|
1 2 3 |
$ cd sample_app/ $ . sample_app_env/bin/activate $ cd sample_app/ |
At this location, tell Django to create a new app:
|
1 |
$ python manage.py startapp <new_app> |
After creating, the file tree should look something like this. Here, the file models.py will contain the codes for our custom Django model:

Check the current content of the file:
|
1 |
$ cat models.py |

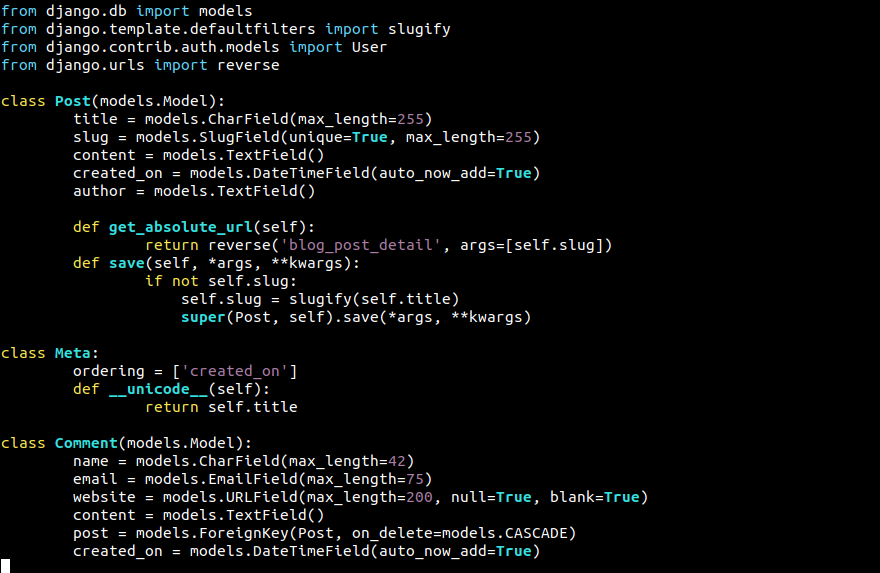
For demonstration, we’re going to create a model for blog posts named Post. It will contain the following fields:
title: Blog post title.slug: Stores and generates valid URLs for web pages.content: The blog post text.created_on: Date of the creation of the post.author: The user who created the post.
Open up the file models.py in a text editor:
|
1 |
$ nano models.py |
Let’s import some necessary APIs for our model. By default, it imports the models API. We’ll also be needing the slugify API for generating slugs, User for authentication, and reverse for a better and flexible URL creation:
|
1 2 3 4 |
from django.db import models from django.template.defaultfilters import slugify from django.contrib.auth.models import User from django.urls import reverse |
Next, add the class method called Post. It will contain the necessary database fields like title, slug, content, created_on, and author:
|
1 2 3 4 5 6 |
class Post(models.Model): title = models.CharField(max_length=255) slug = models.SlugField(unique=True, max_length=255) content = models.TextField() created_on = models.DateTimeField(auto_now_add=True) author = models.TextField() |
We need the functionality for URL generation and saving the post. It’s important as it generates unique links matching to unique posts:
|
1 2 3 4 5 6 7 |
def get_absolute_url(self): return reverse('blog_post_detail', args=[self.slug]) def save(self, *args, **kwargs): if not self.slug: self.slug = slugify(self.title) super(Post, self).save(*args, **kwargs) |
The next section will tell the model on ordering the post and displaying it on the web page. We’ll encode the logic using an inner class, Meta. It will contain additional model logic that doesn’t concern the database field definition:
|
1 2 3 4 5 |
class Meta: ordering = ['created_on'] def __unicode__(self): return self.title |
Finally, we’ll have the feature of Comment model in this file. It requires adding another class Comment using models.Model as its signature. It will contain the following database fields:
- name: Commenter’s name.
- email: Commenter’s email address.
- text: Content of the comment itself.
- post: The post that comment was made on.
- created_on: Time of the comment creation.
The code will look something like this:
|
1 2 3 4 5 6 7 |
class Comment(models.Model): name = models.CharField(max_length=42) email = models.EmailField(max_length=75) website = models.URLField(max_length=200, null=True, blank=True) content = models.TextField() post = models.ForeignKey(Post, on_delete=models.CASCADE) created_on = models.DateTimeField(auto_now_add=True) |
At this point, our models.py file will have a look like this:
Finally, save the file and close the editor.
Step 7. Updating Django Settings
The model is created. However, we need to tweak some configuration files to put the model in action. Inside settings.py, we need to add our model under INSTALLED_APPS.
Open settings.py in a text editor:
|
1 |
$ nano settings.py |
Register the new module under the section INSTALLED_APPS:

Save the file and close the editor.
Step 8. Migrating Changes
Now that we’ve added all the desired models, the next step is applying these changes. Django will apply these schemas to our MySQL database.
The following command will generate all the migration files necessary. The output will show the locations of all those files within the project directory:
|
1 |
$ python manage.py makemigrations |

The following command will list all the existing migrations:
|
1 |
$ python manage.py showmigrations |
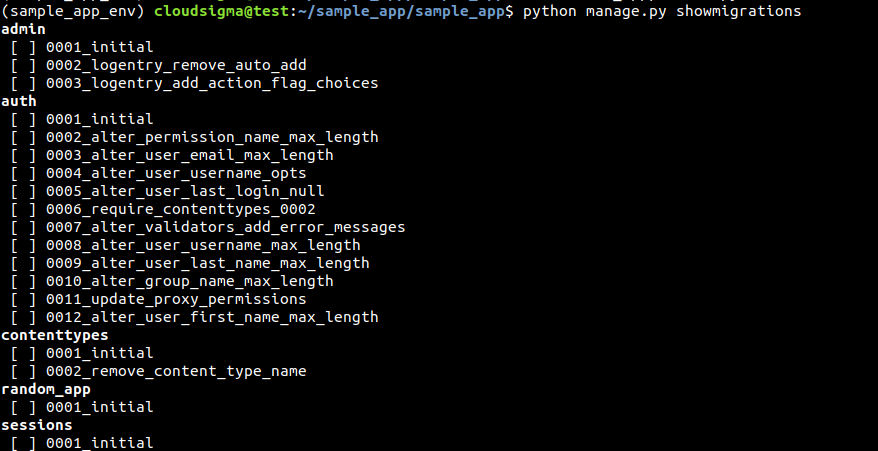
Note that all the migrations are marked except for 0001_initial that was created as a part of the models Post and Comment.
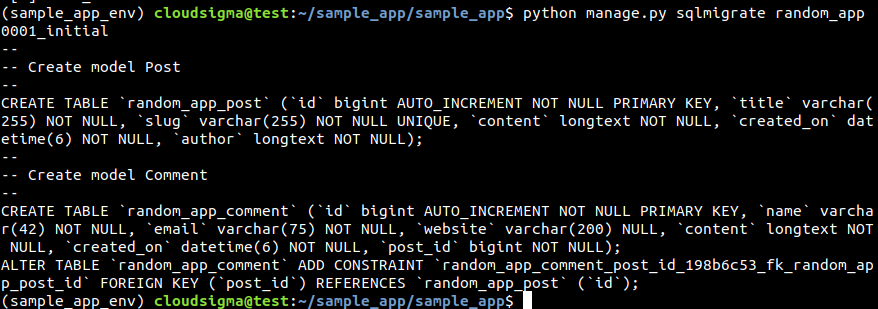
The following command will show what SQL query will Django execute to make the migrations:
|
1 |
$ python manage.py sqlmigrate random_app 0001_initial |
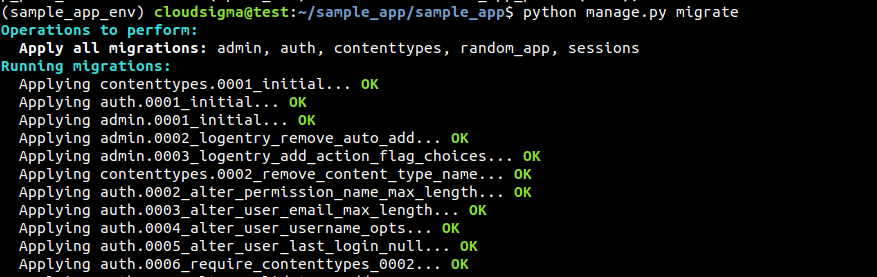
All we need now is to apply the migrations. These migrations will write the changes into the database:
|
1 |
$ python manage.py migrate |
Step 9. Verifying Changes
To verify the changes, let’s have a look at our MySQL database. Start the MySQL shell as the Django user:
|
1 |
$ mysql sample_app_data -u sample_app_user |
Next, change the current active database to the Django app database:
|
1 |
$ USE <django_dedicated_database>; |
List all the tables from the database:
|
1 |
$ SHOW TABLES; |
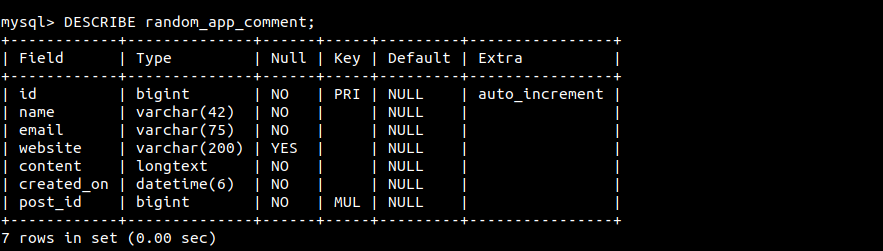
Lastly, to see the content of any of the tables, use the DESCRIBE query:
|
1 2 |
$ DESCRIBE random_app_comment; $ DESCRIBE random_app_post; |
Django Limitations with MySQL
When using MySQL as the database server for your Django app, there are a few things to keep in mind:
- There’s not much support for transactions around schema-altering processes. Meaning, if a migration fails, it requires manually unpicking all the changes before trying another migration. There’s no way to roll back to an earlier point when the failed migration didn’t take place.
- For most of the schema-altering processes, MySQL completely rewrites tables. In certain situations, it can be really time-consuming. At worst, the time complexity will be proportional to the number of rows to be added or columns to be removed. According to the official Django documentation, it could take one minute per million rows.
- MySQL enforces a character limit for the name lengths of columns, tables, and indices. There’s also a limit on the total size of all columns and index covers. Django can go higher than the limit. Some backends other than MySQL can handle the higher limit of Django.
That’s why it’s strongly recommended to weigh your options and choose the appropriate one.
Final Thoughts
This guide successfully demonstrates how to add modules to an existing Django app. We used MySQL as the backend for the app. It also showcases some key Django concepts like models, how migration works, and how Django translates models into MySQL database tables.
Happy Computing!
- How To Enable, Create and Use the .htaccess File: A Tutorial - March 8, 2023
- An Overview of Queries in MySQL - October 28, 2022
- Introduction to Cookies: Understanding and Working with JavaScript Cookies - October 25, 2022
- An Overview of Data Types in Ruby - October 24, 2022
- The Architecture of Iptables and Netfilter - October 10, 2022