
Django is a high-level open-source Python web framework that can help you build your Python application quickly. It encourages rapid development and clean, pragmatic design by following the model–template–views architectural pattern. Out of the box, the framework comes with the necessary modern application components such as user authentication, caching framework, object-relational mapper, URL Dispatcher, template system, and customizable administrative interface.
Gunicorn ‘Green Unicorn’ is a Python WSGI HTTP Server for UNIX systems. Gunicorn server is compatible with various web frameworks, offers great performance, and is light on server resources. Docker is an open-source container platform that has been around for a while, making application development fast, efficient and predictable.
In this tutorial, you will gain skills in developing and deploying scalable containerized Django web apps. We will be using a Django Polls app created by following the getting started with Django introductory guides. At the time of writing the tutorial, we based it on Django 3.2 supported by Python 3.6 or later. We will deploy the app as a container with Docker and serve it with the Gunicorn server. Of course, before deploying the Django app in a container, you will have to do some modifications to the project code to handle things like logging to standard output streams and working with the environment variables. Static files such as CSS and JavaScript images can be offloaded to object storage services to allow easy management of the files from one location in a multi-container environment.
We will show you how to implement these modifications based on the well-outlined twelve-factor methodology for building scalable web applications. Once you complete the modifications, you will build a Docker image of the application and deploy the containerized app with Docker. We recommend that you follow along with the steps outlined in the tutorial to gain a full understanding of the tutorial.
Prerequisites
This being a hands-on tutorial we encourage you to have the setup below to help you follow along:
-
An Ubuntu 20.04 server. You may follow steps 1 to 4 of this step-by-step tutorial to help you set up your Ubuntu server on CloudSigma.
-
Ensure you add a user with sudo privileges on both nodes that we will use to run the commands as outlined in the tutorial above.
-
Install Docker on the server. You may follow steps 1, 2, and 3 of our tutorial on installing and operating Docker. Remember to add the sudo user created above to the Docker group.
-
A compatible object storage space. Django supports several storage services as listed on the django-storages docs. You may choose one that you prefer and follow the docs to set it up. For this tutorial, we will be using MinIO which is an S3-compatible cloud storage service.
-
An SQL database instance. Django supports several SQL databases that you are free to choose. For this tutorial, we will be using PostgreSQL. The PostgreSQL database will not be deployed inside a container. We will set up a separate Ubuntu server to host the PostgreSQL instance to ensure we achieve our multi-container setup as well as data persistence. You may create another Ubuntu 20.04 instance and follow this tutorial to Set up a PostgreSQL database instance on Ubuntu. Remember to add a role in the PostgreSQL database for your sudo user as explained in Steps 2 and 3. This role will allow you to connect to the Database from the other servers hosting your containers.
As per these prerequisites, you should have two Ubuntu server instances. One instance will be running your Docker container, and the other instance will be running the PostgreSQL instance. Let’s start!
Step 1: Configuring the PostgreSQL Database Instance
In this section, we will modify Postgres configurations on the Ubuntu server running the Postgres instance. This will allow connections from an external IP address. Once it connects, we can create a database and a user role, specific to the Django Polls app we are deploying.
First, if you had set up your environment as per the Prerequisites, you should have a role in your PostgreSQL database for your sudo user. Next, we need to set a password for this role. While on the server running PostgreSQL, log into the Postgres terminal with the following command:
|
1 |
sudo -u postgres psql |
Once on the Postgres terminal, issue the \password command to alter the password of a user. The syntax for the \passwordcommand is \password <username>. For our case, the command:
|
1 |
\password cloudsigma |
Enter the password and confirm it. Save this password somewhere safe as you will use it to authenticate from the other Ubuntu server later on. After that, type exit and hit Enter to exit the Postgres terminal.
If you had enabled firewall (ufw) on the PostgreSQL server instance, you will need to allow traffic to the Postgres default port 5432. You may restrict the traffic to only originate from a specific IP address of your other Ubuntu server that will run the Docker container. Execute the following command to add the ufw rule, replacing your IP address where highlighted:
|
1 |
sudo ufw allow from ubuntu_server_ip_address to any port 5432 |
This will ensure that only your server can connect to the PostgreSQL instance. While that allows traffic through the firewall, you also need to modify the PostgreSQL configuration files to allow connection from the remote IP address. By default, the configuration only allows connection from localhost. The configuration files for PostgreSQL are found at the /etc/postgresql/12/main directory. 12, in this case, is the version of PostgreSQL we installed for this tutorial. You may have installed a different version. Thus, you may change it into the directory /etc/postgresql/ and list contents to find the version number of the PostgreSQL you installed.
Use nano to modify the configuration file:
|
1 |
sudo nano /etc/postgresql/12/main/postgresql.conf |
Find this line below, and uncomment it, set it to allow connections from all IPs:
|
1 |
listen_addresses = '*' |
Save and close the file. Then, you have to edit the pg_hba.conf file too, it’s in the same directory as the postgresql.conf. The pg_hba.conf allows you to define from which computers you can connect to the PostgreSQL instance as well as the method of authentication. Open the file with nano:
|
1 |
sudo nano /etc/postgresql/12/main/pg_hba.conf |
Please read the comments in this file to understand the keywords. The section we are looking for is this:
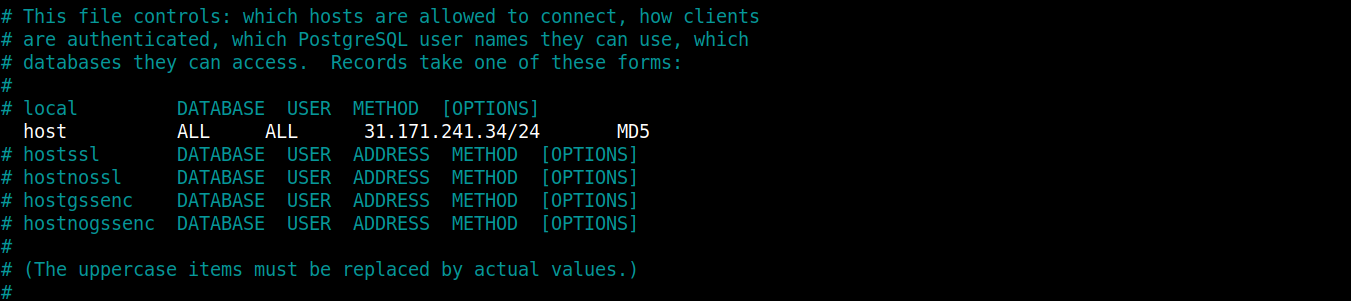
Our focus will be on the second line, you want it to look like the line below after uncommenting:
|
1 |
host all all your_ubuntu_server_ip/24 md5 |
Please replace the highlighted part with your Ubuntu server IP address to allow it to connect to the PostgreSQL instance. Save the file once you are ready. Restart the PostgreSQL database for the changes to take effect:
|
1 |
sudo service postgresql restart |
Our other Ubuntu server with the specified IP address should be able to connect to the Postgres Instance.
Step 2: Connecting to the PostgreSQL Server Instance and Creating a Database and User
In this step, we will try to ensure that the Ubuntu instance serving our Docker container can connect to the other server running the PostgreSQL instance. Log into the Ubuntu instance that has Docker and install the postgresql-client package inside the Ubuntu host machine (not inside the container yet).
As a norm, first update the apt package and then install the package with the following commands:
|
1 |
sudo apt update |
|
1 |
sudo apt install postgresql-client |
The package installed above will help you in creating a database and a user for your application. Next, we need to connect to the PostgreSQL instance by issuing connection parameters to the Postgresql client.
The connection parameters follow this syntax:
|
1 |
psql -U username -h host -p port -d database --set=sslmode=require |
In this command, the username is the user/role you added to your PostgreSQL database. host is the IP address of the Ubuntu instance running your PostgreSQL database. port is the default port on which Postgres listens for incoming connections, i.e. 5432. In the place of the database, we will use the default database called postgres that comes with the PostgreSQL installation. Replace your values in the highlighted parts appropriately and hit Enter. When prompted, enter the password you had set. This logs you into the Postgres prompt where you can manage the database.
You have successfully connected to the PostgreSQL instance. You can now create a database for the Django polls app. Let’s call it django_polls:
|
1 |
CREATE DATABASE django_polls; |
Ensure your statement ends with a semicolon to avoid running into errors. Then, switch into the django_polls database with the command:
|
1 |
\c django_polls; |
Next, create a database user specific to this project. Let’s name the user django_user:
|
1 |
CREATE USER django_user WITH PASSWORD 'password'; |
Choose a secure password for your user. Once done, we need to modify the connection parameters for the user we just created. This helps speed up database operations by ensuring the correct values are not queried and set each time a connection is established.
Set the default encoding that Django expects as UTF-8:
|
1 |
ALTER ROLE django_user SET client_encoding TO 'utf8'; |
Next, set the default transaction isolation scheme to “ read committed”, which blocks reads from uncommitted transactions:
|
1 |
ALTER ROLE django_user SET default_transaction_isolation TO 'read committed'; |
Set your time zone. To keep the tutorial universal, we will use the UTC:
|
1 |
ALTER ROLE django_user SET timezone TO 'UTC'; |
Lastly, grant administrative privileges of the database to the new user:
|
1 |
GRANT ALL PRIVILEGES ON DATABASE django_polls TO django_user; |
Exit the PostgreSQL prompt when you are ready:
|
1 |
\q |
That is all for this step. Once you properly configure your Django app, it should be able to manage your database.
Step 3: Pulling the App from a Git Repo and Defining Dependencies
In this step, we will clone the Django-polls app repository. This repo contains the code for Django’s writing your first Django app tutorial.
Log into the Ubuntu server running Docker, create a directory called django_project and navigate into it:
|
1 2 |
mkdir django_project cd django_project |
Then, clone the repo into the directory with the following command:
|
1 |
git clone https://github.com/jaymoh/django-polls.git |
Navigate into the directory and list the contents:
|
1 |
cd django-polls |
List the contents of the directory:
|
1 |
ls |

Notice the following items:
-
manage.py: this file is the entry to the command-line utility that Django provides to manage your app.
-
mysite: a directory with the Django project scope and code settings.
-
polls: a directory containing the polls application code.
-
templates: contains custom template files for the admin pages.
To learn more about how we actually created the project, please have a look at the Writing your first Django app from the official docs. Inside the django-polls directory, we want to have our Python dependencies defined in a text file. We’ll call it requirements.txt. Open the file with your preferred editor:
|
1 |
nano requirements.txt |
Paste the following lines inside the file file to declare dependencies:
|
1 2 3 4 5 6 7 8 9 10 11 12 13 14 15 |
Django==3.2.9 gunicorn==20.1.0 docutils==0.18.1 sqlparse==0.4.2 jmespath==0.10.0 psycopg2==2.9.2 python-dateutil==2.8.2 pytz==2021.3 six==1.16.0 urllib3==1.26.7 django-storages==1.12.2 minio==7.1.6 django-minio-backend==3.3.2 django-dotenv==1.4.2 boto3==1.21.38 |
In this file, we have defined Python dependencies with their exact versions that should be installed when you build the app. Some of them include Django, django-storages for interacting with object storage buckets, the psycopg2 adapter for PostgreSQL, gunicorn WSGI server, and other additional dependencies. Save and close the file when you finish.
Step 4: Configuring Environment Variables for a Django App
The twelve-factor app methodology recommends that you should extract hard-coded configurations from your application’s codebase. In doing so, you get the freedom to change the behavior of the application at runtime by modifying environment variables without touching the codebase. Docker works with this setup, so we will be modifying the settings file to work with environment variables. Kubernetes also works with this configuration setup. We will be sharing another tutorial on deploying with Kubernetes on the CloudSigma blog.
The settings.py is the main settings file for a Django project. It is a Python module that uses native data structures to configure the application. For our application, the file is at the location django-polls/mysite/settings.py. Most of its values are hard-coded. This will require you to modify the configuration file in the codebase if you change the application behavior. We want to change that. Luckily, Python offers the getenv function in the os module. We can use it to configure Django to read configuration parameters from local environment variables instead.
Let’s continue by modifying the django-polls/mysite/settings.py file to replace the hard-coded values of the variables. We may want to update at runtime with a call to os.getenv. This function reads the value set in the provided environment variable name. Optionally, you may provide a second parameter which is a default value that will be used if the environment variable is not set.
Here is an example:
|
1 |
SECRET_KEY = os.getenv('DJANGO_SECRET_KEY') |
In the line above, we tell Django to retrieve the secret key from the environment variable. We do not provide a fallback value as we will provide the key externally. If it does not exist, the application should fail to launch. While providing the secret key externally, we also want to ensure all our containerized copies of the app are using the same key across the various servers. This avoids potential problems that arise when the various copies of the app use different keys.
Here is another example with a default option:
|
1 |
DEBUG = os.getenv('DEBUG', False) |
In this line, we define an environment variable DEBUG that should be read. However, if it is not set, we have provided a second parameter that will be passed to the DEBUG settings variable. DEBUG is set to False to ensure that sensitive information is not passed to the frontend in case there’s a problem with the application. However, if we are in development mode, we want it set to True to allow us to see the error information to make it easier for us to fix errors.
Now that you know the importance of the environment variables, open the django_project/django-polls/settings.py in your editor. First, import the os module by adding this line at the top of the settings.py file:
|
1 |
import os |
Then, find these variables and update them as follows:
|
1 2 3 |
SECRET_KEY = os.getenv('DJANGO_SECRET_KEY') DEBUG = os.getenv('DEBUG', False) ALLOWED_HOSTS = os.getenv('DJANGO_ALLOWED_HOSTS', '127.0.0.1').split(',') |
In the ALLOWED_HOSTS setting, we specify that it should get the value from the DJANGO_ALLOWED_HOSTS environment variable, and split it into a Python list using comma ( ,) as a separator. If the variable is missing, ALLOWED_HOSTS is set to 127.0.0.1.
Next, scroll through the file and find the DATABASES section, configure it to also read from environment variables:
|
1 2 3 4 5 6 7 8 9 10 11 12 13 14 15 |
DATABASES = { 'default': { 'ENGINE': 'django.db.backends.{}'.format( os.getenv('DB_ENGINE', 'sqlite3') ), 'NAME': os.getenv('DB_DATABASE', 'django_polls'), 'USER': os.getenv('DB_USERNAME', 'your_db_username'), 'PASSWORD': os.getenv('DB_PASSWORD', 'your_secure_default_password'), 'HOST': os.getenv('DB_HOST', '127.0.0.1'), 'PORT': os.getenv('DB_PORT', 5432), 'OPTIONS': json.loads( os.getenv('DB_OPTIONS', '{}') ), } } |
Notice we have added the json.loads module. You should also add an import of the module at the top of the settings.py file:
|
1 |
import json |
The json.loads function deserializes a JSON object passed into the DATABASES['default']['OPTIONS'] from the DB_OPTIONS environment variable. Specifying this option allows us to pass in an arbitrary data structure to define the database configuration. A database engine includes a set of valid options applicable to it. The JSON option gives us the flexibility to encode a JSON object with the appropriate parameters for the database engine we are using at the time.
The DATABASES['default']['NAME'] specifies the database name in the relational database management system we have set up. In the case of using an SQLite database, you should specify the path to the database file.
Note that Python offers several methods to read external environment variables. We have only used one of them. You are free to research and use other methods. In this step, you have learned how to work with external environment variables. This gives you the flexibility to change the variables and alter the behavior of the app running in containers. In the next step, you will learn how to work with object storage services.
Step 5: Working with External Object Storage Services
A major advantage of containerizing your application is to make it portable for easy deployment of several copies of the app when traffic increases. Hence, giving room for scaling. However, this brings the issue of maintaining versions of static files and assets across various containers. Thanks to improvements in cloud technology, you can offload these shared static elements to external storage. Then, you can make the files accessible over a network to all of your running containers. Instead of trying to synchronize the files across the various running containers, you have one central place to manage them.
The concept we are trying to explain above is the use of cloud object storage services, or Simple Storage Services (S3). Django has a package called django-storages that allows you to work with remote storage backends. Django-storages work with most S3-compatible object storage services such as FTP, SFTP, Amazon’s AWS S3, Google Cloud Storage, Dropbox, and Azure Storage, among others. In this tutorial, we will be using MinIO. Feel free to use any other S3-compatible object storage services. MinIO offers high-performance, S3-compatible object storage. With MinIO, you can build S3-compatible data infrastructure on any cloud.
We will show you how to set up a MinIO storage service on the CloudSigma platform. Please follow these steps:
-
Start by creating an Account on CloudSigma. If you face any issues while creating the MinIO storage please connect with CloudSigma’s free 24/7 live chat support, and they will assist you.
-
Add your Billing Info.
-
Next, request your publicly accessible bucket from here: https://blog.cloudsigma.com/xxxx. You will need to contact Live Chat support to get your account access credentials.
-
Once your MinIO object storage environment has been created, you will be provided with access credentials and other instructions to access it. The credentials should include your MINI_ACCESS_KEY, MINIO_SECRET_KEY, and MINIO_URL. You will use these keys in the instructions below.
Let’s make some more changes to the mysite/settings.py file that we have been modifying in the previous step. In the file, add the storages app to Django’s list of INSTALLED_APPS:
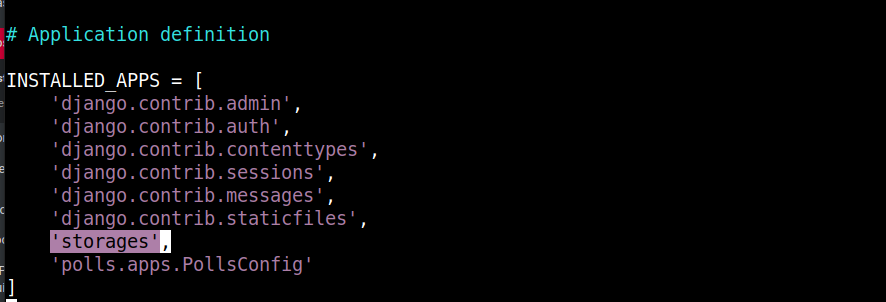
The storages app is installed via django-storages as defined in the requirements.txt. Scroll to the bottom of the file and replace the STATIC_URL variable with the following code snippet:
|
1 2 3 4 5 6 7 8 9 10 11 12 13 14 15 |
# Static files (CSS, JavaScript, Images) # https://docs.djangoproject.com/en/3.2/howto/static-files/ DEFAULT_FILE_STORAGE = os.getenv('STATIC_DEFAULT_FILE_STORAGE', 'storages.backends.s3boto3.S3Boto3Storage') AWS_S3_ENDPOINT_URL = os.getenv('MINIO_URL') AWS_ACCESS_KEY_ID = os.getenv('MINIO_ACCESS_KEY') AWS_SECRET_ACCESS_KEY = os.getenv('MINIO_SECRET_KEY') AWS_STORAGE_BUCKET_NAME = os.getenv('STATIC_MINIO_BUCKET_NAME') AWS_S3_OBJECT_PARAMETERS = { 'CacheControl': 'max-age=86400', } AWS_LOCATION = 'static' AWS_DEFAULT_ACL = 'public-read' STATICFILES_STORAGE = 'storages.backends.s3boto3.S3Boto3Storage' STATIC_URL = '{}/{}/'.format(AWS_S3_ENDPOINT_URL, AWS_LOCATION) STATIC_ROOT = "static/" |
Notice that some of the configuration variables are hard-coded:
-
STATICFILES_STORAGE: defines the storage backend that Django will use to handle static files. In our guide, we are using MinIO storage, but you can use any S3 compatible backend as explained in the Django Storages docs.
-
AWS_S3_OBJECT_PARAMETERS: defines the cache-control headers.
-
AWS_LOCATION: we use this to set a directory within the storage bucket where all static files will be stored. You are free to choose a different name.
-
AWS_DEFAULT_ACL: sets the access control list (ACL) for static files. Setting the value to ‘ public-Read’ will make the files accessible to all public users.
-
STATIC_URL: Django uses the base URL set in this variable to generate URLs for static files. The base URL in this case is derived from combining the endpoint URL and the static files subdirectory.
-
STATIC_ROOT: defines where to collect static files locally before copying them to remote object storage.
We also have some externally defined environment variables to maintain flexibility and portability:
-
AWS_STORAGE_BUCKET_NAME: defines the name of the storage bucket to which Django will upload the assets.
-
AWS_S3_ENDPOINT_URL: defines the endpoint URL used to access the object storage service. This will be the URL mapped to the server hosting your MinIO service.
Save and close the file when you are done editing.
Once you have those settings in place and have installed the declared Python dependencies, you can run the Django command manage.py collectstatic anytime to assemble your project’s static files and upload them to the remote object storage backend:
|
1 |
python manage.py collectstatic |
However, we haven’t set up the env file with configurations yet, so it will likely fail.
When you run the command, it takes a moment to copy your assets to MinIO Cloud Storage depending on their size and your internet speed.
That’s all for this step. Let’s see how we can handle pushing Django logs to the Docker Engine so that you can view them using the docker logs command in the next step.
Step 6: Setting up Logging in a Django App
While in Debug mode, when the DEBUG option is set to True, Django logs information to standard output and standard error. The log information usually shows up from the terminal on which you launched the development HTTP server.
While in production, you are likely using a different HTTP server, and the DEBUG option is set to False. Django will use a different logging method in this case. Django sends logs of priority ERROR or CRITICAL to an administrative email account that you define. This works great for many situations.
In containerized and Kubernetes setups, logging to standard output and standard error is highly recommended. Log messages are collected in a single directory on the Node’s filesystem and are easily accessible using kubectl and docker commands. With a centralized logging point on the Node’s filesystem, the operations team can easily run processes on each node to watch and forward logs. Hence, we must configure our application to write logs to this standard setup.
You will be happy to learn that Django leverages the highly customizable logging module from the Python standard library. This allows you to define a dictionary that passes through logging.config.dictConfig to define the desired outputs and formatting. Here is a nice article on Django Logging, The Right Way that can help you master techniques on Django logging.
Open up the django-polls/mysite/settings.py file in your editor. Add an import for the Python logging.config library at the top of the file:
|
1 |
import logging.config |
So far, with all the imports we have added, your imports section in settings.py should look like this:

The logging.config library takes in a dictionary of new logging configuration through the dictConfig function to override Django’s default logging behavior.
Scroll to the bottom of the file and add the following logging configuration code snippet:
|
1 2 3 4 5 6 7 8 9 10 11 12 13 14 15 16 17 18 19 20 21 22 23 24 25 26 27 28 |
# Logging Configuration # Disable prev config LOGGING_CONFIG = None # Get loglevel from env LOGLEVEL = os.getenv('DJANGO_LOGLEVEL', 'info').upper() logging.config.dictConfig({ 'version': 1, 'disable_existing_loggers': False, 'formatters': { 'console': { 'format': '%(asctime)s %(levelname)s [%(name)s:%(lineno)s] %(module)s %(process)d %(thread)d %(message)s', }, }, 'handlers': { 'console': { 'class': 'logging.StreamHandler', 'formatter': 'console', }, }, 'loggers': { '': { 'level': LOGLEVEL, 'handlers': ['console',], }, }, }) |
LOGGING_CONFIG is set to None to disable/clear default logging configurations that Django defines. LOGLEVEL is set by the DJANGO_LOGLEVEL environment variable. However, if it does not exist, then we want it set to ‘ info’.
The logging.config module we imported at the top provides a function dictConfig that is used to set a new configuration dictionary. The dictionary defines text formatting using the formatters key. The output is set with the handlers key, and finally, the loggers key defines which message should go to which handler.
Once you have those settings defined, Docker will expose the logs through the docker logs command. Similarly, in another tutorial we will be doing for Kubernetes, you can view the logs with the kubectl logs command. Let’s now begin the containerization process in the next step.
Step 7: Defining the Application Dockerfile
In this step, we define the configuration to spin up the container image that will run the Django app served by the Guincorn WSGI server. We will define the runtime environment for building a container image, install the application and its dependencies, and perform some final configurations.
-
The parent image for a Django app
Deciding the foundation image on which to base your container is the very first decision that you will make when dealing with containerized deployments. Of course, you have the option to build your container images from SCRATCH, i.e. an empty filesystem, or base it off an existing container image. Since we do not want to reinvent the wheel, we will be building our image from a base image. There are many open-source container images available from Docker’s official container image repository. Unless you are building your image from scratch, it’s highly recommended that you use an image from Docker’s official hub. That’s because Docker verifies the images to follow best practices, and ensures regular updates and security patches are in place.
As Django is a Python framework, we will take advantage of an image with a standard Python environment that has tools and libraries we need already installed. From the official page for Python images on Docker hub, you can find a Python-based image for various versions of Python.
From our various Docker-based tutorials, you will notice we use images based on Alpine Linux. Alpine Linux offers a robust but slim operating system environment for running containerized applications. While its filesystem is small, it’s extensible and comes with a complete package management system with the possibility to add functionalities.
When choosing a base image on the Docker hub, you may notice multiple tags available for each image. For the sake of Python, we have 3-alpine, which points to the latest Python 3 version image of the latest Alpine version. This means that in case your project works with an older image version, it may break when the maintainers of the Docker image make an update. To avoid such scenarios in the future, it’s always recommended to choose the most specific tags for the image you want to use.
In this tutorial, we will use the 3.8.12-alpine3.15 image as the base image for our Django application. This specific tag will be specified in the Dockerfile using the FROM instruction. The Dockerfile will be in the main project directory: django_project.
Start by navigating out of the Django-polls directory back into the django_project directory:
|
1 |
cd .. |
Once in the directory, use your favorite editor to open a file called Dockerfile :
|
1 |
nano Dockerfile |
Next, paste in the following line to set the base of your image:
|
1 |
FROM python:3.8.12-alpine3.15 |
The FROM keyword defines the starting point of a custom Docker image. With that defined, we can continue to add instructions to set up the applications. These instructions will install the necessary dependencies, copy the application files, and set up the runtime environment.
Add the following code snippet inside the Dockerfile:
|
1 2 3 4 5 6 7 8 9 10 11 12 13 14 15 16 17 18 19 20 21 22 |
ADD django-polls/requirements.txt /app/requirements.txt RUN set -ex \ && apk add --no-cache --virtual .build-deps postgresql-dev build-base \ && python -m venv /env \ && /env/bin/pip install --upgrade pip \ && /env/bin/pip install --no-cache-dir -r /app/requirements.txt \ && runDeps="$(scanelf --needed --nobanner --recursive /env \ | awk '{ gsub(/,/, "\nso:", $2); print "so:" $2 }' \ | sort -u \ | xargs -r apk info --installed \ | sort -u)" \ && apk add --virtual rundeps $runDeps \ && apk del .build-deps ADD django-polls /app WORKDIR /app ENV VIRTUAL_ENV /env ENV PATH /env/bin:$PATH EXPOSE 8000 |
In this code snippet, we tell Docker to copy the requirements.txt file to /app/requirements.txt to ensure the application’s dependencies are available on the filesystem of the image. The requirements include all the Python packages required to run the application. The dependencies are copied first so that Docker can cache the image layer. That’s because Docker caches every step in the Dockerfile. The first build of the image is usually longer. Docker will download the dependencies, and it will then cache them. If the requirements.txt file does not change, Docker will build from the cache, hence making subsequent builds faster.
The next step has the RUN instruction that executes a list of Linux commands, chained with the Linux && operator. The commands are doing the following:
-
Use Alpine’s apk package manager tool to install PostgreSQL development files and basic build dependencies.
-
Create a Python virtual environment.
-
Install the Python dependencies as defined in the requirements.txt file using pip.
-
Compile the necessary runtime packages by analyzing the requirements of the installed Python packages.
-
Remove any build dependencies that are no longer necessary.
The reason behind chaining the commands in the RUN step is to reduce image layers. Docker creates a new image layer on top of the existing filesystem every time it encounters ADD, COPY, or RUN instruction in the Dockerfile. Compressing commands where applicable will minimize the number of image layers created.
Items added to image layers cannot be removed in a subsequent layer. You have to declare instructions to delete unwanted items before you move to the next instruction. This is necessary to reduce the image size. You should notice we added the apk del command at the end of the RUN command. That was done to remove the build dependencies after we had used them to build the app’s packages.
Next, we have another ADD instruction which we use to copy the application code to the /app directory. Then, we will use the WORKDIR instruction to set the working directory of the image to the /app directory, which now has the code of the application.
Next, we have the ENV instructions which we use to set two environment variables that the image will make available to the running containers. First, we set the VIRTUAL_ENV variable to /env. Second, we set the PATH variable to include the /env/bin directory. In these two lines, we are sourcing the /env/bin/activate script, which is how we activate a virtual environment in a Linux environment. You can read more on working with virtual environments in Python on other operating systems. The last instruction is the EXPOSE command which sets the port 8000 on which the container will listen at runtime.
By now, your Dockerfile is almost complete, apart from the default command that will run when you start the containers. Let’s define it in the next section.
-
Understanding the Default Docker Image Command
When starting up a Docker container, you may provide a command to execute. However, if you do not provide a command, the Docker image’s default command will determine what will happen when the container starts. We use the ENTRYPOINT or CMD instructions individually or together to define a default command within the Dockerfile.
If you choose to define both ENTRYPOINT and CMD, in the ENTRYPOINT instruction, you define the executable that will be run by the container. In the CMD instruction, define the default argument list for the executable command. You can override the default argument list by appending alternative arguments on the command line when launching the container in the format:
|
1 |
docker run <image> <arguments> |
This format prevents developers from easily overriding the ENTRYPOINT command. The ENTRYPOINT command is defined to call a script that will set up the environment and perform different actions based on the argument list provided.
You can use the ENTRYPOINT instruction alone to configure the container’s executable. However, this format does not allow defining a default argument list. You can provide arguments when you run the container with the docker run command.
If you choose to go with CMD alone, Docker interprets it as the default command and argument list, which you can override at runtime. You can find more information on the official Dockerfile reference docs.
Let’s see how we can apply the information you’ve learned about default commands to our container example. We want to serve the application by default using the gunicorn server. While the argument list passed to the gunicorn server does not have to be configurable at runtime, we want the flexibility of running other commands for purposes such as debugging or managing configurations (initializing the database, collecting static assets, etc). As you can see, it’s in our best interest to use the CMD to define a default command which will allow us to override it whenever necessary.
Here are some syntaxes you can use to define the CMD command:
- CMD ["command", "argument 1", "argument 2", . . . ,"argument n"]: The exec format (recommended format), takes a command and a list of arguments. It executes the command directly with no shell processing.
- CMD command "argument 1" "argument 2" . . . "argument n": The shell format defines a command and list of arguments. It passes the list of commands to the shell for processing. You may find this useful if you want to substitute environment variables in a command, however, it’s not entirely predictable.
- CMD ["argument 1", "argument 2", . . . ,"argument n"]: The argument list format, it only defines the default argument list and is used together with an ENTRYPOINT instruction.
We will be using the exec format to define our final instruction in the Dockerfile. Add the following line at the end of your Dockerfile:
|
1 |
CMD ["gunicorn", "--bind", ":8000", "--workers", "3", "mysite.wsgi:application"] |
You may now save and close the Dockerfile.
When you spin up containers using this image they will execute gunicorn bound to localhost port 8000 with 3 workers, and call the application function in the wsgi.py file found in the mysite directory. You may choose to provide a different command to override the default command at runtime and execute a different process instead of gunicorn. You may want to learn more about Gunicorn workers.
Your Dockerfile is now ready and you can use docker build to build the app image. You can use docker run to spin up the container on your local development machine.
-
Building the Docker Image
The docker build command will look for a Dockerfile in the current directory by default to find its build instructions. It also sends the build “context” to the Docker daemon. A build context is a set of files that should be available during the build process. By default, the current directory in which you are running the docker build command is set as the build context.
While in the same directory that contains your Dockerfile, run the command docker build. Provide an image and tag with the -t flag, and set the current directory as build context using the ( .) dot at the end of the command:
|
1 |
docker build -t django-polls:v1 . |
In this command, we have named the image django-polls and the tag v1. Notice the dot at the end of the command, we use it to denote the current directory as the build context.
When the docker build completes, you should see something similar to the following output:

Your Docker image is now ready. If we had not offset some of the configurations into external environmental variables, you could easily run your container with the docker run command. However, since we have not configured the external environment variables we set up in the settings.py file, the run will fail. Let’s finalize that in the next step.
Step 8: Setting the Runtime Environment and Testing the App
We are nearing the end of this tutorial. In this step, we will be configuring the environment variables in the env file. With the env file variables in place, we can create the database schema, generate and upload the static files to the external object storage service, and finally test the app.
Docker comes with several methods you can use to provide environment variables to the container. In our case, we want to provide a list of environment variables through a file. Hence, we will use the --env-file method.
Using your preferred editor, create a file called env in the django_project directory:
|
1 |
nano env |
Paste in the following list of variables:
|
1 2 3 4 5 6 7 8 9 10 11 12 13 14 15 16 17 18 |
DJANGO_SECRET_KEY=your_secret_key DEBUG= DJANGO_LOGLEVEL=info DJANGO_ALLOWED_HOSTS=your_server_IP_address DB_ENGINE=postgresql_psycopg2 DB_DATABASE=polls_db DB_USERNAME=hackins DB_PASSWORD=your_database_password DB_HOST=your_database_host DB_PORT=your_database_port STATIC_DEFAULT_FILE_STORAGE=storages.backends.s3boto3.S3Boto3Storage STATIC_MINIO_BUCKET_NAME=test-bucket MINIO_ACCESS_KEY=your_minio_access_key MINIO_SECRET_KEY=your_minio_secret_key MINIO_URL=your_minio_url:your_minio_port |
The variables in the list are the ones you defined in the previous steps:
-
DJANGO_SECRET_KEY: Generate a unique, unpredictable value as explained in the Django docs. You may use this command to generate a random string and set it to the variable:
|
1 |
python -c 'from django.core.management.utils import get_random_secret_key; print(get_random_secret_key())' |
-
DEBUG: We have set this value to True, but for a production deployment, remember to set it to False by leaving it blank.
-
DJANGO_LOGLEVEL: we have set this to info, feel free to adjust it to your desired level.
-
DJANGO_ALLOWED_HOSTS: set this value to the IP address of the Ubuntu server running your Docker containers. Optionally, set it to *, wildcard matching all hosts if in development mode.
-
DB_DATABASE: if you used a different database name, set it here appropriately.
-
DB_USERNAME: set this to the username you chose for your database.
-
DB_PASSWORD: set this to the password you chose for your database.
-
DB_HOST: set this to the host running your database instance as you had set up in Step One.
-
DB_PORT: set this to the port of your database.
-
STATIC_MINIO_BUCKET_NAME: set this to the bucket name you created in your MinIO Cloud Storage account.
Save and close the file when you finish editing.
Environment configurations are now ready. We need to run the container passing in arguments to override the default CMD command and create the database schema using the manage.py makemigrations and manage.py migrate commands.
Here is the command:
|
1 |
docker run --env-file env django-polls:v1 sh -c "python manage.py makemigrations && python manage.py migrate" |
In this command, we are running the django-polls:v1 container image, using the –env-file flag to pass in the environment variable file. We also override the default CMD command with sh -c "python manage.py makemigrations && python manage.py migrate" When this command is run to start the container, it will create the database schema as defined in the application code.
If successful, you should see an output similar to the one below:
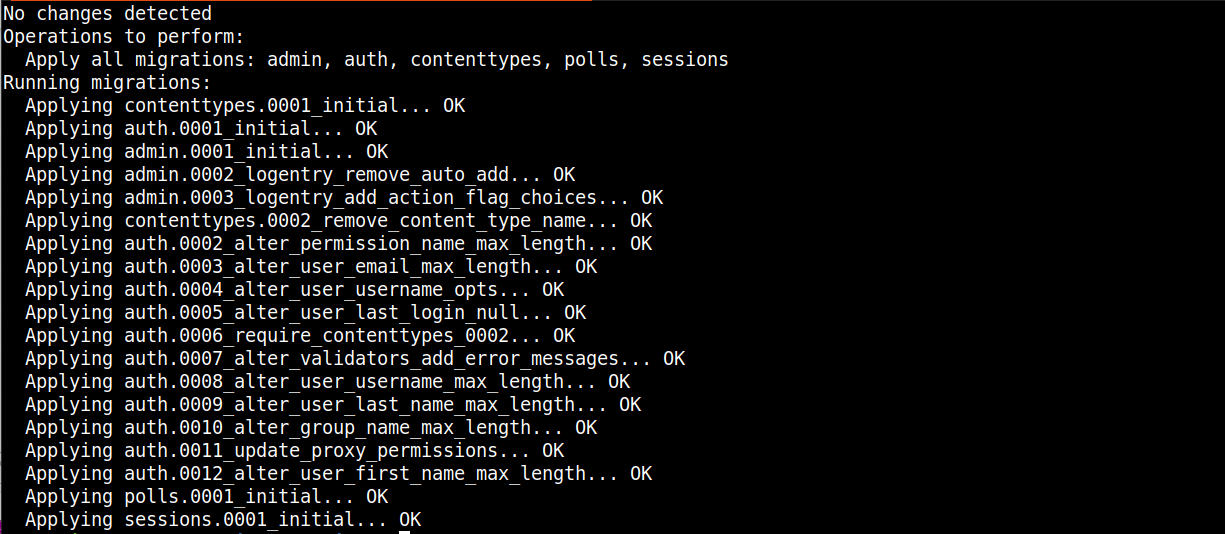
The output indicates that the database schema has been created successfully.
The next step is to create an administrative user for the Django app. We will spin up the container and start an interactive shell inside with the following command:
|
1 |
docker run -i -t --env-file env django-polls:v1 sh |
The command starts up the container with a shell prompt that you can use to interact with the Python shell. Let’s create a user:
|
1 |
python manage.py createsuperuser |
Follow the prompts to provide a username, email address, password, retype the password, and hit enter to create the user. Exit the shell and kill the container by hitting CTRL+D.
Next, we need to run the container again, overriding the default command with collectstatic Django command to generate the static files for the app and upload them to your MinIO cloud Storage service:
|
1 |
docker run --env-file env django-polls:v1 sh -c "python manage.py collectstatic --noinput" |
When it completes, you should see a similar output as below, indicating that your container successfully connected to MinIO storage service and uploaded the static files:
![]()
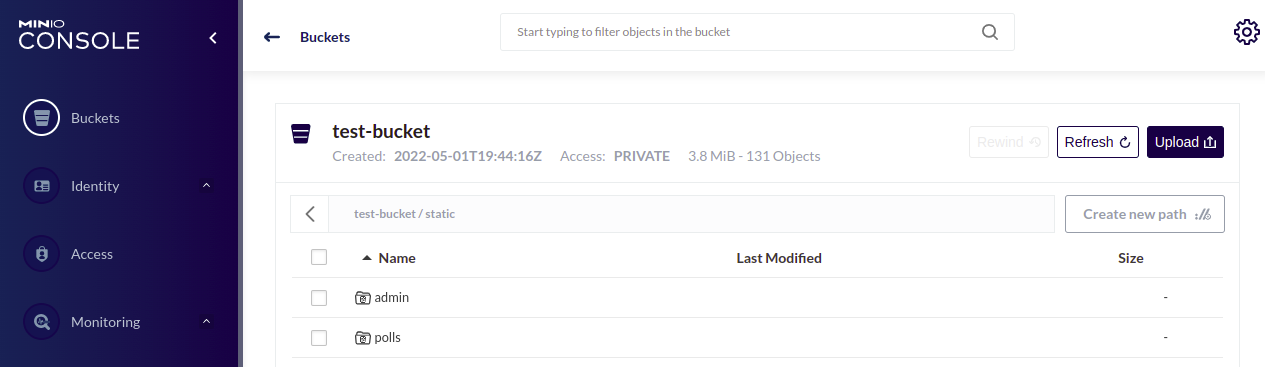
Our storage bucket now looks like this, with the directories that Django created:
Finally, we can now run the app with command:
|
1 |
docker run --env-file env -p 80:8000 django-polls:v1 |
Here is the output:

When you execute the above command, it runs the default CMD command in your image and exposes port 8000 as defined. Now, Ubuntu on port 80 gets mapped to the 8000 port of the django-polls:v1 container.
We can now test the application in the browser. Go to your server’s public IP address in the browser: http://your_server_public_ip.
Expect to find a 404 Page Not Found Error, since as per the Django Tutorial, we did not define a route for / path:
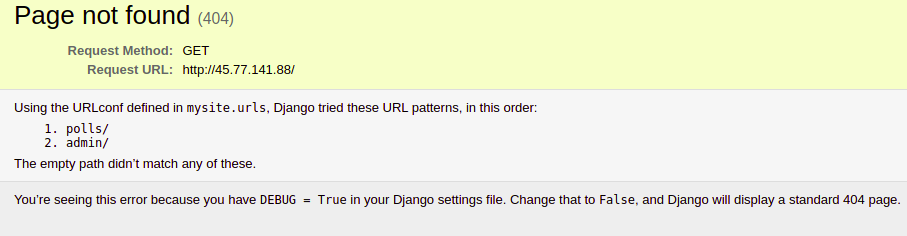
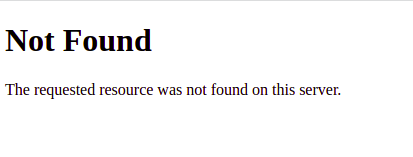
We have the DEBUG variable set to True, that’s why we see this error page with a lot of crucial information. Let’s unset the DEBUG variable. First, you will need to stop the running container with CTRL+C.Then, open the env file:
|
1 |
nano env |
Next, find the DEBUG variable and unset it, or leave it blank. We leave it blank because the getenv function interprets False as a string, hence returning true:
|
1 |
DEBUG= |
Save the file and run the container again with the command:
|
1 |
docker run --env-file env -p 80:8000 django-polls:v1 |
If you visit this http://your_server_public_ip in your browser, you should see the default 404 page:
You have seen how you can manipulate the runtime behavior of your Django app using env variables, without modifying the source code.
Navigate to http://your_server_public_ip/polls to see the Polls home page:

We have no polls since we have just deployed the app.
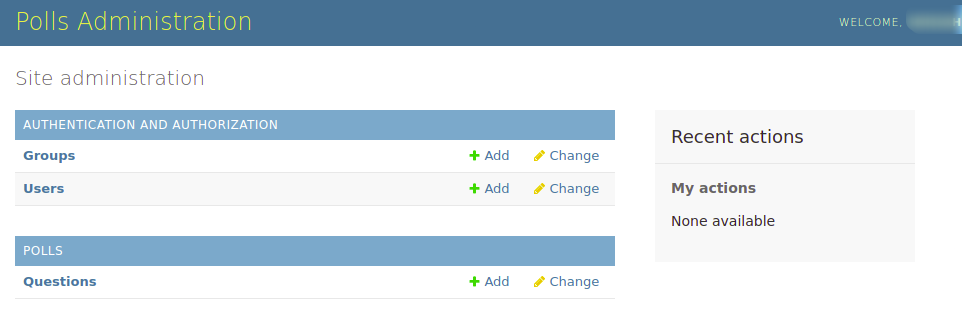
Navigate to the admin interface: http://your_server_public_ip/admin to view the admin authentication window:
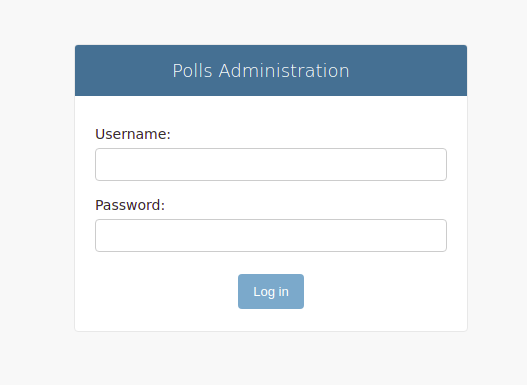
Provide the credentials you had set with the createsuperuser command to log in. You should now be on the Administrative page interface:
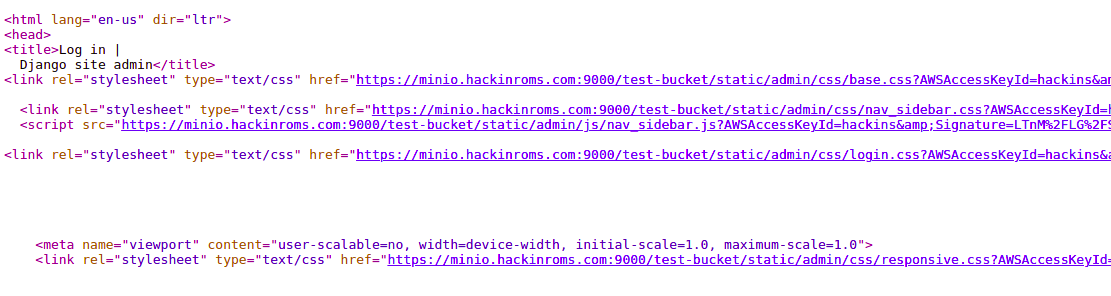
Note that all static files are served from the external storage service we had set up. You can Right Click in your browser window and select View Page Source:
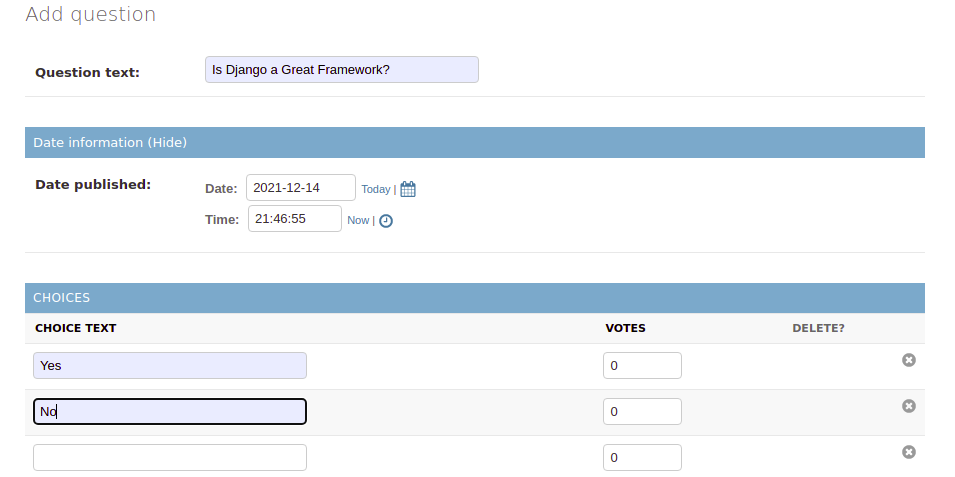
You can add some questions and choices and test the overall performance of the app:
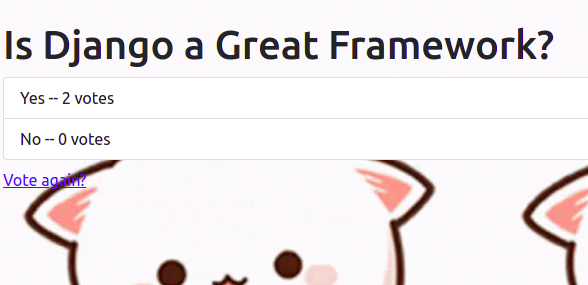
Go back to the Polls index http://your_server_public_ip/polls and try to vote on the question:
After you have tested and confirmed everything is working as expected, you can kill the container.
Conclusion
You have successfully configured a Django web app to work well in a container-based environment. This involved adapting the app to work with external environment variables, setting the app to use a cloud storage service for the static files, and creating a Dockerfile for the container image. You can view changes we have made to Dockerize the app on django-polls-docker branch of the django-polls GitHub repository.
From here, the possibilities are limited only by your imagination. You can set up Nginx reverse proxy to sit between clients and the Guinicorn server. You can also add Certbot to obtain TLS certificates to secure your Nginx server. We recommend adding an HTTP proxy to buffer slow clients and protect your Gunicorn server from denial of service attacks.
While we defined 3 workers in the startup command of Dockerfile, you can set your preferred number depending on the resources available on your server. You can find more information on official Gunicorn design docs. If you wish, you can push the Docker image you built to Dockerhub and try to deploy it on several environments that have Docker installed. If you would like to learn more, keep checking our Тutorials blog as we will be doing a follow-up tutorial to make the Django app secure with Nginx and Let’s Encrypt.
Finally, here are more resources that will help you utilize Docker:
- How to Host a Docker Image Repository and Build Docker Images with GitLab Self-Managed Instance on Ubuntu 20.04
- Working with Docker Data Volumes on Ubuntu 20.04
- Build and Deploy a Flask Application with Docker on Ubuntu 20.04
- How to Deploy WordPress with Docker Containers on Ubuntu 20.04
Happy Computing!
- How To Set Up GitHub Continuous Integration Pipelines With Self-Hosted Runners on Ubuntu 22.04. - March 20, 2023
- Managing CSV in Node.js using Node-CSV - March 15, 2023
- Containerize A Python App using Docker - March 7, 2023
- Using GitLab for Managing Projects - September 15, 2022
- Creating Drag and Drop Elements with Pure, Vanilla JavaScript - August 4, 2022