
Introduction
Docker is an open-source container platform. It is a lightweight, virtualized, portable, software-defined standardized environment that allows the software to run in isolation from other software running on the physical host machine. Docker offers a lightweight alternative to virtual machines. At the same time, it provides portability, performance, agility, and scalability of applications. For a comprehensive guide about the Docker ecosystem, take a look at our detailed overview of containerization with Docker.
Flask is an open-source minimal web framework built with Python. Some of the great features of Flask are that it is lightweight, flexible, and highly structured. In addition, it does not require any specific tools or plug-ins to run.
Combining Flask and Docker gives you a lightweight, flexible, and scalable application. You can deploy it across many servers and infrastructures, thanks to the portable nature of Dockerized containers. The focus of this tutorial is to show you how to deploy a Flask application with Docker. We will also demonstrate how to make sure that the future updates of your application take effect.
Prerequisites
This is going to be a hands-on tutorial, and you should create an environment that will enable you to follow along:
- You should have an installation of Ubuntu 20.04 as your initial operating environment. You also need to create a non-root user with sudo privileges.
- In addition, you need to install Docker. We have a tutorial on how to install and operate Docker on Ubuntu. Follow steps 1, 2, 3, and 4. This should work for any Ubuntu distribution.
- Finally, you need to have Nginx installed. Follow our tutorial on installing Nginx on Ubuntu.
Now, let’s start!
Step 1: Prepare the Flask Application
We will start by creating a directory that will hold our Flask application. You may select a directory name of your choice. However, for this tutorial, we will name it flask_demo. We will save the project files inside the /var/www directory, which is usually the directory Ubuntu allows access to the public internet by default. First, execute the following commands to create the directory and navigate into it:
|
1 2 3 |
sudo mkdir /var/www/flask_demo cd /var/www/flask_demo |
Inside this root directory of our project, we will create the base folder structure of a Flask application. Next, execute the following command to create the base structure, adding the -p flag to create all parent folders along the way:
|
1 |
sudo mkdir -p app/static app/templates |
The app folder holds all files related to a Flask app including views and blueprints. Views contain the code you write to respond to requests hitting your application. Blueprints help in making application components and support common patterns in Flask applications.
The aptly named static folder holds static assets such as images, CSS, and JavaScript files. The templates directory holds all the HTML templates for the project.
Now we can start writing the files needed to initialize a Flask application. Start by creating a file named __init__.py inside the app directory to tell the Python interpreter that the app directory should be treated as a package. Execute the following command on your terminal to open the file with nano editor:
|
1 |
sudo nano app/__init__.py |
We use packages in Python to group modules into logical namespaces or hierarchies. Modularization allows breaking down code into individual and manageable blocks that perform definite functions.
After that, inside the __init__.py file open in your editor, add the following code snippet to start the Flask instance, and import the logic from the views.py that you will create in the next steps:
|
1 2 3 4 5 |
from flask import Flask app = Flask(__name__) from app import views |
When you are done, press Ctrl + O and ENTER to save the file, then close it with Ctrl + X. Next, let’s create the views.py inside the app directory. The views.py file will contain most of the application logic:
|
1 |
sudo nano app/views.py |
Inside the file, add the following code snippet. This code will display a simple string to show your app is running when users visit your website:
|
1 2 3 4 5 |
from app import app @app.route('/') def home(): return "Our Flask application is running!" |
In this file, we start by importing the Flask app instance. Then, we need to add a line to define the route: @app.route(/). The @app.route(/) line is referred to as a decorator in Flask. You can use decorators for injecting additional functionalities into one or more functions. In this case, we are passing a call to the route / onto the home function. When a user visits this route, they will see the text: "Our Flask application is running!".
Next, you will create the uwsgi.ini file to hold the uWSGI configurations for the application. uWSGI is a deployment option for Nginx that serves as a protocol and an application server. Run the following command to create the file in the root directory of the project with nano editor:
|
1 |
sudo nano uwsgi.ini |
Inside the opened file, add the following code snippet:
|
1 2 3 4 |
[uwsgi] module = main callable = app master = true |
This file contains some directives. We define their purpose below:
- module – defines the module from which the Flask application will be served. We have set the module as main, referencing the main.py file in the root directory. We will create this file in the next step.
- callable – directs uWSGI to use the app instance exported from the application.
- master – ensures the application keeps running to minimize downtime during reloading of the entire application.
Save and close the file when you are done.
Now you can create the main.py file to determine the entry point to your application. uWSGI will read this file to know how to interact with the application. Run the following command to create the main.py file with nano inside the root directory of your project:
|
1 |
sudo nano main.py |
Inside the file, add the following line that will import the Flask instance that was created in the application package:
|
1 |
from app import app |
The final thing you will do in this step is to define the dependencies necessary for the application to run. We will define these dependencies inside a file called dependencies.txt. When Docker builds your application’s image, it will execute a pip (package manager) command to install the dependencies. Open the file in the root directory with the following command:
|
1 |
sudo nano dependencies.txt |
Up to this point in our project, we only want one dependency: Flask. Hence, we can add the following line to reference the right version of Flask we want for our project:
|
1 |
Flask==2.0.1 |
We are settling with Flask version 2.0.1 as the dependency. It is the latest version at the time of writing this tutorial. You can find out more about the various versions from the Flask Changes page. That completes the Flask application set up. Now let’s prepare Docker configurations for deployment.
Step 2: Configure Docker
To set up a Docker deployment, we will create two files, Dockerfile and start.sh. The Dockerfile contains declarative lines that make up a Docker image. The start.sh is a basic shell script to build the image and start the container from the Dockerfile. While inside the root directory of the project, execute the following command to create the Dockerfile:
|
1 |
sudo nano Dockerfile |
This file holds the necessary configurations for a Docker image. Next, add the following code snippet to specify the dependencies and how to build the image:
|
1 2 3 4 5 6 7 8 9 10 11 |
FROM tiangolo/uwsgi-nginx-flask:python3.6-alpine3.7 RUN apk --update add bash nano git ENV STATIC_URL /static ENV STATIC_PATH /var/www/app/static COPY ./dependencies.txt /var/www/dependencies.txt RUN pip install -r /var/www/dependencies.txt |
The first line in a Dockerfile defines the base image from which we are building our image. In this case, we will be building based on the tiangolo/uwsgi-nginx-flask, available from DockerHub. We chose this particular image because it supports many Python versions.
We also specify that we want to update the image. Then, we need to add the bash command processo , the nano text editor, and the git client for pulling and pushing source code from version control repositories such as GitHub, Bitbucket, or Gitlab. The lines with ENV specify environment variables to be used in the container.
The COPY command copies the dependencies into the container. The RUN command invokes the pip package manager to parse the dependencies.txt file and install the dependencies. Save and close the file when you are done editing.
Next, you will create the start.sh script. This script will include Docker commands to build and run the image. While you can execute these commands progressively on the terminal, we thought it’s cleaner to add them to a shell script and just invoke it from the terminal with one command.
Before we can define the contents of this file, we must first establish a free port that other services are not using. We will be using port 45644. However, you can choose a different port. Execute the following line to check if the port is free:
|
1 |
sudo nc localhost 45644 < /dev/null; echo $? |
Depending on the port you chose, if the output of the above command is 1, then it’s free. Otherwise, you may have to choose another port and try the command again:

Since we have established a free port, we can now create the file with nano inside the project’s root directory by running the following command:
|
1 |
sudo nano start.sh |
Inside this file, add the following code snippet:
|
1 2 3 4 5 6 7 |
#!/bin/bash app_name="docker-flask-demo" docker build -t ${app_name} . docker run -d -p 45644:80 --name=${app_name} -v $PWD:/app ${app_name} |
The first line, referred to as shebang, specifies that this is a bash file and should be executed as commands. The second line declares a variable called app_name. We use this variable to set the image and container names. The third line instructs Docker to build the image based on the Dockerfile definition in the current directory. The image will be called docker-flask-demo as per the variable.
The last line creates a container called docker-flask-demo as per the variable we defined. The -d flag keeps the container running in the background in a detached state after the command has finished executing. The -p flag binds a port on the server to a particular port on the container. In this case, we are mounting port 45644 on the host machine to port 80 that Docker will expose in the container.
We use the -v flag to specify a Docker volume to mount on the container. The $PWD variable is a default Linux variable that holds the path to the current directory you are in at a particular time:

In our case, we are mounting the entire project directory to the /var/www directory of the container. The Docker configuration is now ready. You can build the image and start up the container based on the built image by executing the following command:
|
1 |
sudo bash start.sh |
Wait for the script to finish running, then execute the following Docker command to list all running containers:
|
1 |
sudo docker ps |
The output will display running containers:

You should see our container with the name docker-flask-demo in the list of running containers. Find your server’s public IP and access it in your browser at the specified port: http://your-server-public-ip:45644.
You should see a similar output:
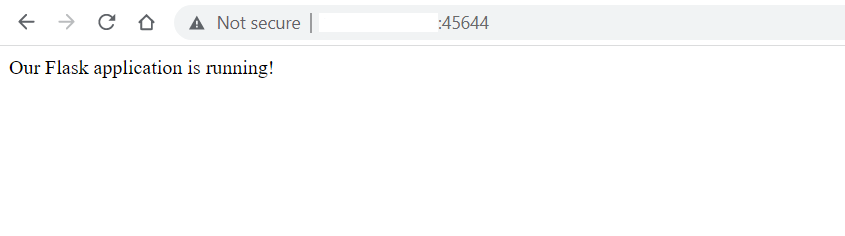
If you see the above in your browser, then you have successfully deployed a Flask application. Next, we will be modifying files and serving content to users via templates.
Step 3: Serve Content via Template Files
In Flask, Templates are used to display static and dynamic content to website visitors. We will show you how to create an HTML template and serve it to your users when they visit a certain route. For example, this can be a Home page or an About page.
Execute the following command on your terminal to create an index.html file in the app/templates directory:
|
1 |
sudo nano app/templates/index.html |
Then, add the following code snippet to the file:
|
1 2 3 4 5 6 7 8 9 10 11 12 |
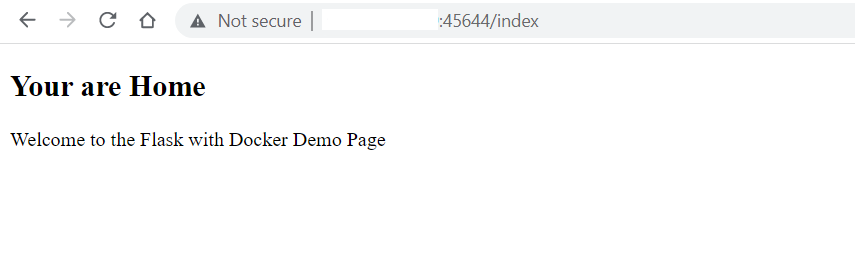
<!DOCTYPE html> <html lang="en"> <head> <meta charset="UTF-8"> <title>Flask Demo</title> </head> <body> <h2>Your are Home</h2> <p>Welcome to the Flask with Docker Demo Page</p> </body> </html> |
Save and close the file when you are done. Also, create another page, let’s call it the About page, with the following command:
|
1 |
sudo nano app/templates/about.html |
Add the following code snippet to the file:
|
1 2 3 4 5 6 7 8 9 10 11 12 13 |
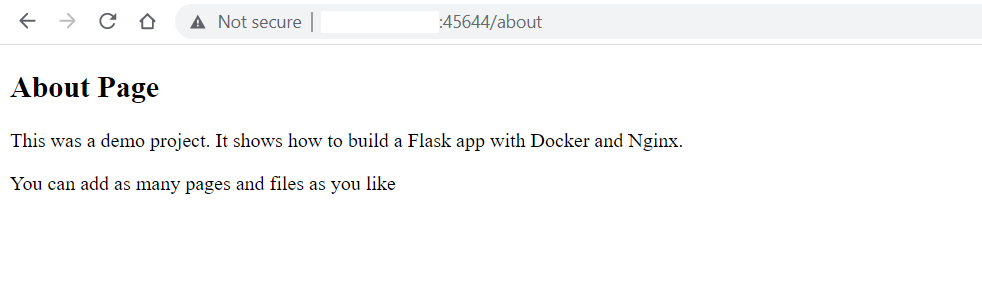
<!DOCTYPE html> <html lang="en"> <head> <meta charset="UTF-8"> <title>About Flask Demo</title> </head> <body> <h2>About Page</h2> <p>This was a demo project. It shows how to build a Flask app with Docker and Nginx.</p> <p>You can add as many pages and files as you like</p> </body> </html> |
Save and close the file when you are done. Next, modify the app/views.py file to reference the templates as well as the routes for the actual pages:
|
1 |
sudo nano app/views.py |
Modify the file so that it looks like this:
|
1 2 3 4 5 6 7 8 9 10 11 12 13 14 |
from flask import render_template from app import app @app.route('/') def home(): return "Our Flask application is running!" @app.route('/index') def index(): return render_template('index.html') @app.route('/about') def about(): return render_template('about.html') |
Save and close the file when you are done. The changes you have made will not take effect until you stop and restart the container. Run the following Docker commands to stop and start the container. Take note of the container name as we defined earlier:
|
1 |
sudo docker stop docker-flask-demo && sudo docker start docker-flask-demo |
Once the container is up and running, visit the Home page and About page to see some of the new content:
|
1 |
Home page: http://your-server-public-ip:45644/index |
|
1 |
About page: http://your-server-public-ip:45644/about |
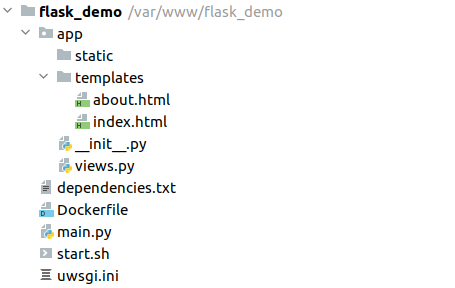
So far, you have created a Flask application that can serve content to your website visitors. Here is the file structure for the project:
You have probably noticed that we had to restart the Docker container for it to pick new changes. In the next step, we will automate this to ensure less downtime.
Step 4: Configure Application Files Updates to Reload Automatically
Every other day we make changes to an application, to improve the logic, user interfaces or add some dependencies. For such changes to take effect, it may require you to restart the Docker container. Fortunately, uWSGI has a feature called touch-reload for reloading a Python script without restarting the container.
Out of the box, Python has an auto-reloading feature that watches the entire file system for changes and refreshes the application when a change happens. While auto-reloading is good for minimizing downtimes, it can be resource-intensive. Hence, not recommended for production environments.
Let’s see how you can use touch-reload to watch for changes to a particular file and reload the application when there are changes. Modify the uwsgi.ini file with nano editor:
|
1 |
sudo nano uwsgi.ini |
Add the highlighted line so that it looks like this:
|
1 2 3 4 5 |
[uwsgi] module = main callable = app master = true touch-reload = /app/uwsgi.ini |
Save and close the file when you are done. The added line has specified a file that will be modified to trigger the reloading of the application. However, for this condition to be activated for future modifications, you must first restart the container:
|
1 |
sudo docker stop docker-flask-demo && sudo docker start docker-flask-demo |
You can now modify the app/views.py file to demonstrate how auto-reloading works:
|
1 |
sudo nano app/views.py |
Change the string returned by the home function as highlighted:
|
1 2 3 4 5 6 7 8 9 10 11 12 13 14 |
from flask import render_template from app import app @app.route('/') def home(): return "<h3>Some changes to Our Flask application to auto reload!</h3>" @app.route('/index') def index(): return render_template('index.html') @app.route('/about') def about(): return render_template('about.html') |
Save and close the file once done.
Open your application’s home page in the browser: http://your-server-public-ip:45644.
You will not see any changes yet. This is because the touch-reload condition detects a change to the uwsgi.ini file. You can use touch to activate the condition, hence reloading the entire application with the following command:
|
1 |
sudo touch uwsgi.ini |
Now, if you reload the home page, you will find the new changes displayed:
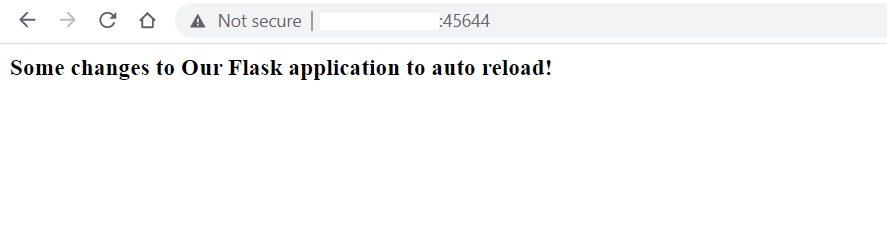
In the future, if you make any future changes, you only need to run the command sudo touch uwsgi.ini and the entire application will reload with less downtime. That brings us to the end of this tutorial.
Conclusion
In this tutorial, you implemented and deployed a Flask application with Docker images and containers. To minimize downtime by avoiding the need to restart the container, you configured touch-reload to listen to changes to a particular file and automatically reload the entire application. You finally tested all these in the browser to ensure that it works.
Docker ensures faster deployments and allows for easy scaling of applications. If you would like to learn more about the various Docker commands, please have a look at this tutorial on how to install and use Docker on Ubuntu.
For more resources on Docker on our blog, you can check out the following:
- Containerization Technology: Types and Uses of Different Containers on CloudSigma’s PaaS Platform
- How To Share Data Between a Docker Container and a Host
- Installing and Setting up Docker on CentOS 7
- Deploying Laravel, Nginx, and MySQL with Docker Compose
- Clean Up Docker Resources – Images, Containers, and Volumes
Happy Computing!
- How to Deploy WordPress with Persistent Volume on Kubernetes Cluster - March 17, 2023
- Deploying Applications on Kubernetes Using Argo CD and GitOps - October 26, 2022
- Using Node.js Modules with npm and package.json: A Tutorial - October 6, 2022
- Using Ansible to Install and Configure WordPress with LAMP on Ubuntu - September 23, 2022
- Creating Views in the Django Web Application Framework - September 22, 2022